
This recording has not been published on YouTube yet. The written guide is available below.
Written guide
What you will learn
This Appmint Customer Portal course gives a customer access to their own records and verifies changes on both sides. We will configure the portal, follow a controlled invoice and request, then check another customer cannot retrieve them.
1. Configure the portal on the intended site
Portal layout and sections belong to a site. An empty section selection means show every section, not hide everything.
Steps
Open Studio Manager Home → Active Site, use Choose a site and select the intended website. Find the inline My Account panel, labelled what a signed-in customer sees. Under Layout page choose a page from that site or retain Built-in default layout. The same controls are also embedded in Site Config → My Account; this is not a separate Client Portal modal. For a selected page use the adjacent Edit button to open Build Studio, preserving its account components and bindings. Select the exact required Sections: for this rehearsal Orders, Payments, Tickets, Messages, Profile and Addresses, adding other actual needs deliberately. Save, reopen and compare the selection. Open the customer-facing account entry and inspect its navigation.
Check the result: The intended site presents the chosen portal layout and sections.
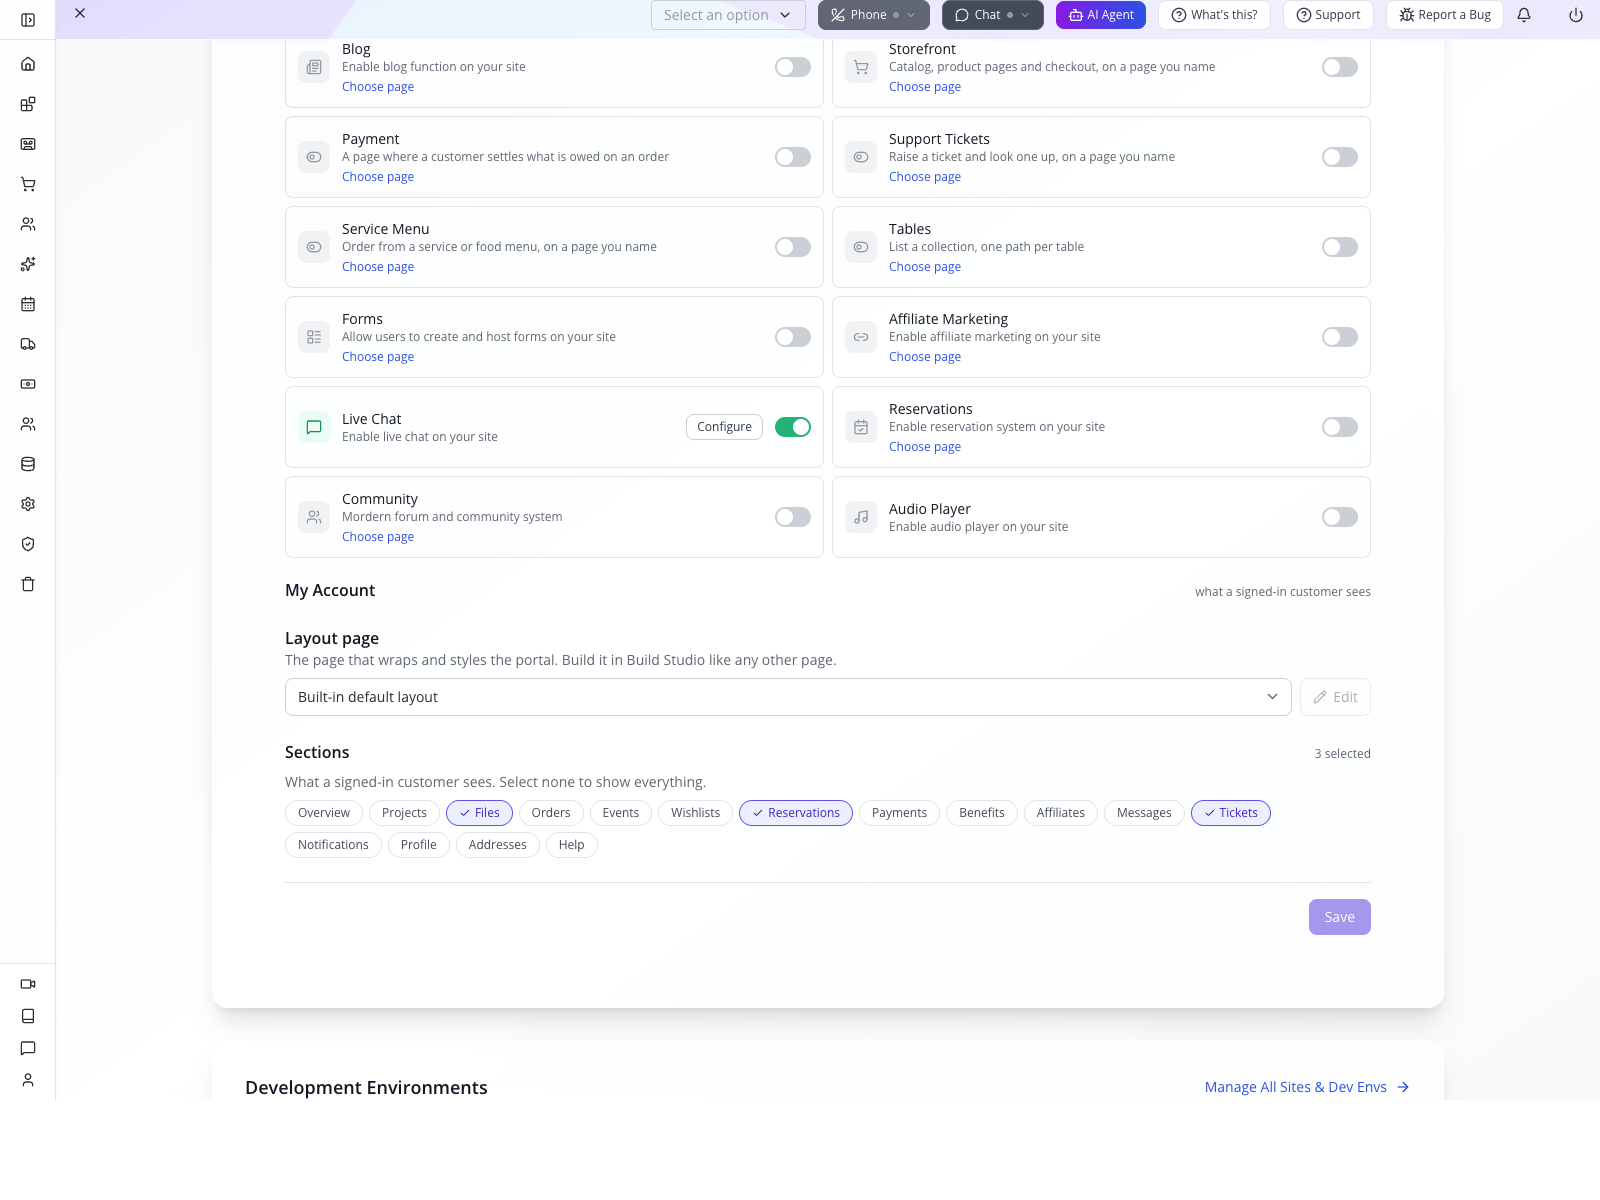
Historical local capture, visually checked: My Account appears directly below Site Features. Layout page uses Built-in default layout; Files, Reservations and Tickets are selected. Use these controls to choose your own sections, then Save. The capture illustrates the control location, not the different example selection in this chapter.
2. Prepare a customer-owned invoice and payment page
Online payment needs both a payment feature page and a provider connection. An invoice checkbox does not create those dependencies.
Steps
Create/select the controlled customer and a catalogue product. Open Storefront → Invoices → New Invoice, select that customer and add the catalogue item. Set the dates, line quantity, Enable Online Payment, Delivery Method and Customer Notes. Save once and reopen the saved row. In the active site’s Site Features → Payment choose its intended page and turn on the separate Enable Payment switch. If no page exists create and save the payment page in Build Studio first, then select it. Verify the payment gateway configuration through its dedicated setup before using a payment link. Return to the invoice and inspect the now-available link.
Check the result: The saved invoice has a customer and a configured payment destination.

Historical local capture, visually checked: Payment shows Page: /pay, but its switch is still off. Selecting the page alone does not enable payments. Turn on the separate switch, save/reload as required by the current control, then verify the customer payment destination. The unrelated SMS notice is not evidence about payment setup.
3. Inspect the live customer document
The staff record and customer document must describe the same invoice. Updating one field is an opportunity to verify that connection.
Steps
Sign into the actual site as customer A and open the relevant document/payment destination. Compare invoice reference, line items, total and Customer Notes. Keep that view open while staff update a controlled note or line through the invoice editor and save. Observe the customer result and use its supported refresh behavior where necessary; do not claim live push unless it occurs. Execute only a sandbox or authorized controlled payment and inspect both customer confirmation and staff transaction state.
Check the result: The customer sees the correct saved document version and any payment has a real matching result.
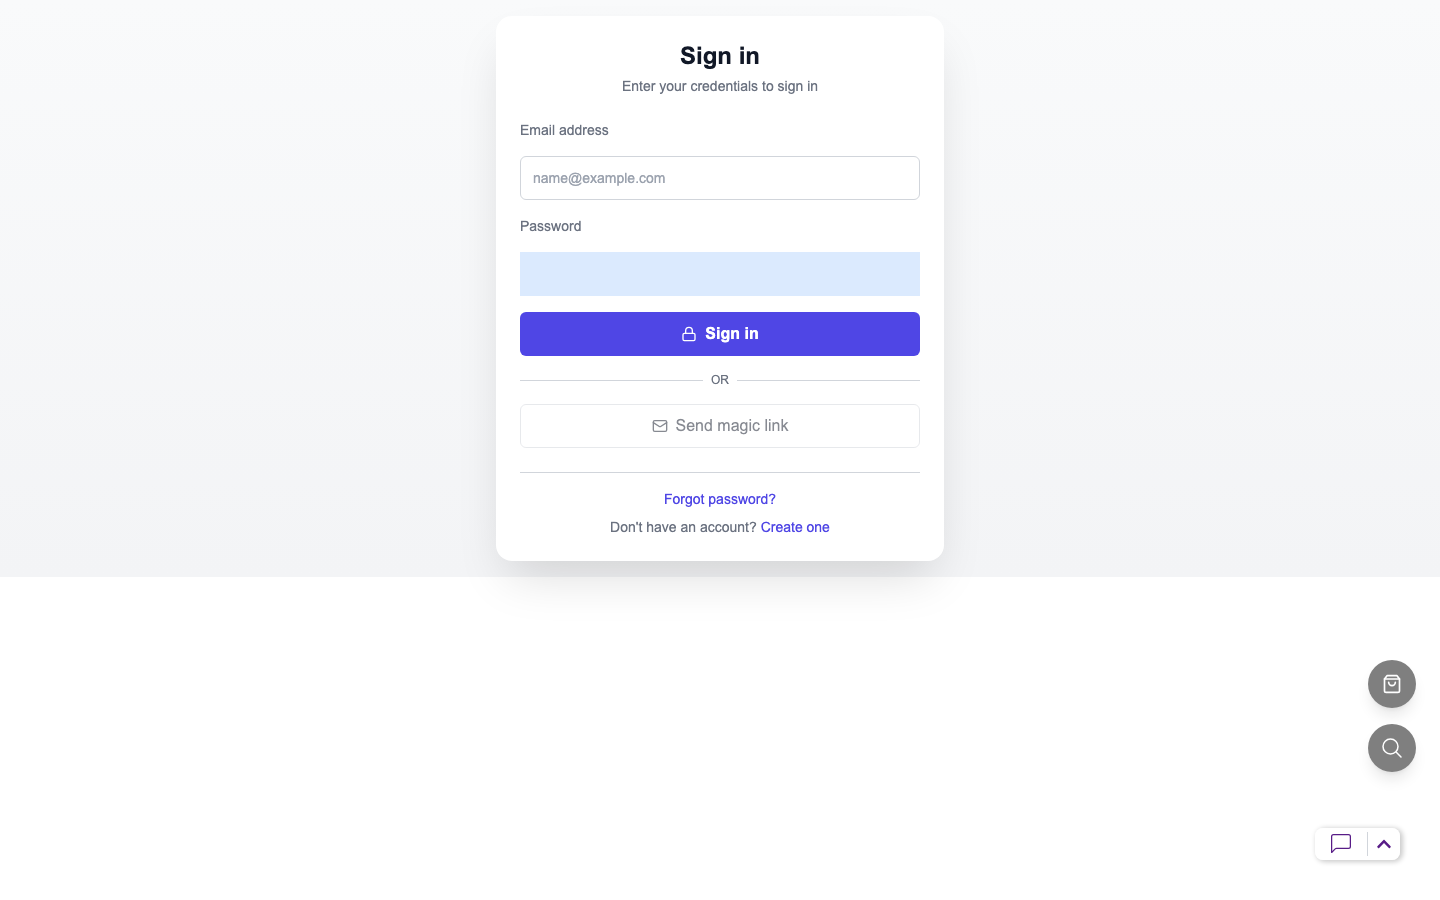
Historical local customer view, visually checked: enter the controlled customer identity here. This is a website customer session, not Studio Manager staff access. Sign in and Send magic link are separate actions; delivery still needs a controlled inbox test.
4. Submit a request and verify it for staff
A portal section must lead to an actual customer action. A navigation label alone does not prove request submission.
Steps
As customer A, open My Account → Tickets → Create New Ticket. Choose the intended ticket type in its dropdown; the selected type supplies the form, so its fields can vary. If No ticket types available appears, stop and have staff check the type configuration or failed type fetch; do not treat an empty menu as a submitted request. Fill the type's required fields with a unique subject/reference, submit once and retain the returned ticket ID. If you instead use a configured customer form, verify its own destination record; a form response is not automatically a support ticket. In Studio Manager open CRM → Tickets and search for that returned reference. Compare its customer and entered content before replying. Use the ticket conversation reply action, then reopen the same ticket as the customer to check the received reply. Staff seeing its own reply is not recipient proof. Return to the customer view and verify the response. Repeat for a reservation or form only when its corresponding section and backend are configured; compare the resulting staff record. Check notification delivery independently from the saved request.
Check the result: The submitted request and response are visible to the intended identities.
5. Check isolation and shared-account access
Shared accounts use explicit membership. Sharing a password is not a valid way to test customer collaboration.
Steps
Sign out of A and sign in as unrelated customer B. Verify A’s order, invoice and ticket are absent and their direct destinations refuse unauthorized access where applicable. Use the Shared Accounts procedure in the CRM course to create the intended shared account and inspect its members. Add only the intended member, then sign in with that member’s own identity to inspect shared records. Account creation, invitation acceptance and explicit membership are distinct states. Remove the membership and repeat the access check. Keep ordinary personal records outside the shared relationship unless the module actually assigns them to it.
Check the result: Customer isolation and intended shared access are independently verified.
6. Verify profile changes and recover layout mistakes
Self-service should survive a refresh and remain usable on a small screen.
Steps
As the controlled customer change a Profile or Address field, save and reopen it. Compare the staff-side customer record where that field is expected to synchronize. Test navigation and return from a document on a narrow screen. If a custom layout breaks, inspect its account bindings and compare the built-in layout without deleting customer records. For an empty section check site, customer ownership and available records before changing permissions or recreating content.
Check the result: The portal supports the verified customer tasks and preserves their saved results.
Troubleshooting and recovery
A successful configuration save does not prove the customer workflow. Reopen the exact record, inspect the actual consumer and preserve any error. Check stored state before repeating a create, purchase, message or refund. Keep organization, site, customer and record identifiers aligned across screens. Correct the failing dependency and repeat that verification without disguising an unsupported action.
Your next check
Follow the record through both sides of the workflow. When the intended person can complete the task and the saved result agrees, the setup has evidence behind it.
Limitations and checks
Current inline My Account panel, its Home/Site Config call sites and prior detailed invoice/customer-self-service manuscript used. No new customer signup, payment, request or shared-membership test performed. Exact Tickets/reservation submission fields depend on their configured collection; do not invent standard labels. Live invoice push is deliberately not promised without observation. Shared-account boundary needs fresh proof.
Appmint Customer Portal: configure My Account — supporting guide
Overview
Appmint Client Portal gives customers a place to see their own activity. We will choose the site’s account layout and sections, then verify the result as two different customers. Hiding a section is presentation; it is not a substitute for access control.
1. Choose the site and layout
Why this matters
Client Portal settings belong to the active site. The layout can be a page designed in Build Studio or the built-in layout.
Follow these steps
In Studio Manager Home, under Active Site choose the intended site. Scroll to the inline My Account panel, labelled what a signed-in customer sees, beside the Site Features controls. These settings are not opened through a Client Portal button or modal. Inspect Layout page. Choose the existing account page intended for this site, or retain the built-in layout. The page list is filtered to the active site. Use the adjacent Edit button to open Build Studio only for an actual selected page; the built-in layout is not a page you can open there. Save and reopen to verify the site and chosen layout.
Check the result: The same site retains the intended portal layout.
An alternative route is Site Config → My Account, which embeds the same controls. Select the intended active site before using either route. When no pages exist, the panel explains that a page must be created before a custom layout can be selected; the section controls still remain relevant.
Historical local capture, visually checked: My Account appears directly below Site Features. Layout page uses Built-in default layout; Files, Reservations and Tickets are selected. Use these controls to choose your own sections, then Save. The capture illustrates the control location, not the different example selection in this chapter.
Confirm which site you are changing
The saved values are the active site's myAccount.layout and myAccount.features. Changing this panel is site configuration, not an individual customer's preferences. Verify the active site again when returning from Build Studio. The built-in layout cannot be opened using Edit because it is not a page record; create or choose a real account-layout page first if a custom design is required.
2. Choose the sections customers need
Why this matters
The section selector has a counterintuitive default: selecting none shows everything. To show only a few sections, select those sections explicitly.
Follow these steps
In Sections select the desired choices from Overview, Projects, Files, Orders, Shared Accounts, Events, Wishlists, Reservations, Payments, Benefits, Affiliates, Messages, Tickets, Forms, Notifications, Profile, Addresses and Help. For a focused shop account select its required sections explicitly rather than clearing everything. Save, reopen and compare the selected list. Open the site’s actual customer account entry while signed in as the controlled customer and compare the navigation.
Check the result: The saved section selection and actual customer navigation match.
3. Verify customer-specific records
Why this matters
The portal should show the current customer’s records. An administrator’s all-records view does not establish that boundary.
Follow these steps
Prepare a recognizable order, reservation or ticket owned by customer A through its actual module workflow. Sign into the site as A, open the corresponding portal section and inspect that record. Open its detail and compare the relevant status/reference with administration. Sign out and sign in as controlled customer B. Verify A’s record is absent and cannot be retrieved by reusing its direct address where applicable. Keep Shared Accounts separate: verify an explicitly shared relationship through its own module before expecting additional people’s records.
Check the result: The intended record is visible to its owner and unavailable to an unrelated identity.
Historical local customer view, visually checked: enter the controlled customer identity here. This is a website customer session, not Studio Manager staff access. Sign in and Send magic link are separate actions; delivery still needs a controlled inbox test.
4. Customize and retest the layout
Why this matters
A layout edit can break navigation or data binding even when the site setting still saves correctly.
Follow these steps
Return to the chosen layout page in Build Studio. Change one heading or arrangement while preserving its account components and data bindings. Save and use the site’s normal preview/publishing workflow. Reopen the portal as the customer on desktop and a narrow screen. Check section navigation, detail return, loading/error states and the sign-out/sign-in boundary. Revert the controlled layout change if the portal stops rendering and compare the built-in option without erasing customer data.
Check the result: The personalized layout still supports the verified customer workflow.
5. Advanced sections and recovery
Why this matters
Enabling a menu item does not create the underlying project, benefit, invoice or support workflow. Each section needs actual records and capabilities behind it.
Follow these steps
For each additional section selected, create or identify a controlled record in that module, then inspect its customer result. Test Profile and Addresses as separate forms by changing a controlled value and reopening it. For the customer profile API, current self-service updates accept only firstName, lastName and phone, as a flat object; email, permissions and full record envelopes are not supported profile edits. A phone change clears its verification flag. Do not infer that showing a Profile section grants every account-administration action. For Messages, Tickets or Forms use the module’s actual customer submit action and verify the resulting staff-side record. When a section is empty first check customer ownership, site scope and record availability; when it errors preserve the error and inspect that module’s request. Do not label an empty section as a completed workflow.
Check the result: Each enabled section has either a demonstrated customer task or an explicitly recorded limitation.
Troubleshooting and recovery
Keep the exact record and operation visible when reading an error. Inspect persisted state before retrying a write; a timeout does not prove nothing happened. Correct the specific cause and verify the resulting record and consumer independently. An enabled feature, successful configuration save or administrative status is not proof of an external delivery, access boundary or money movement. Preserve unsupported behavior rather than simulating success.
Next steps
You can now use the module’s records and controls in context, and check the result at the point where it matters. Return to the relevant chapter for the advanced path and its verification.
Limitations and checks
Current client-portal-drawer, site-action-buttons and site-config-form source inspected. Despite the component filename, these controls render inline on Home’s Active Site card and under Site Config → My Account. The panel edits layout and features and preserves preset; no presets exist yet. Do not teach a preset picker from the broader SDK schema. Full customer rendering, access boundaries and each section’s submit actions require live proof; this is configuration plus a concrete verification script, not a claim those tests ran.