
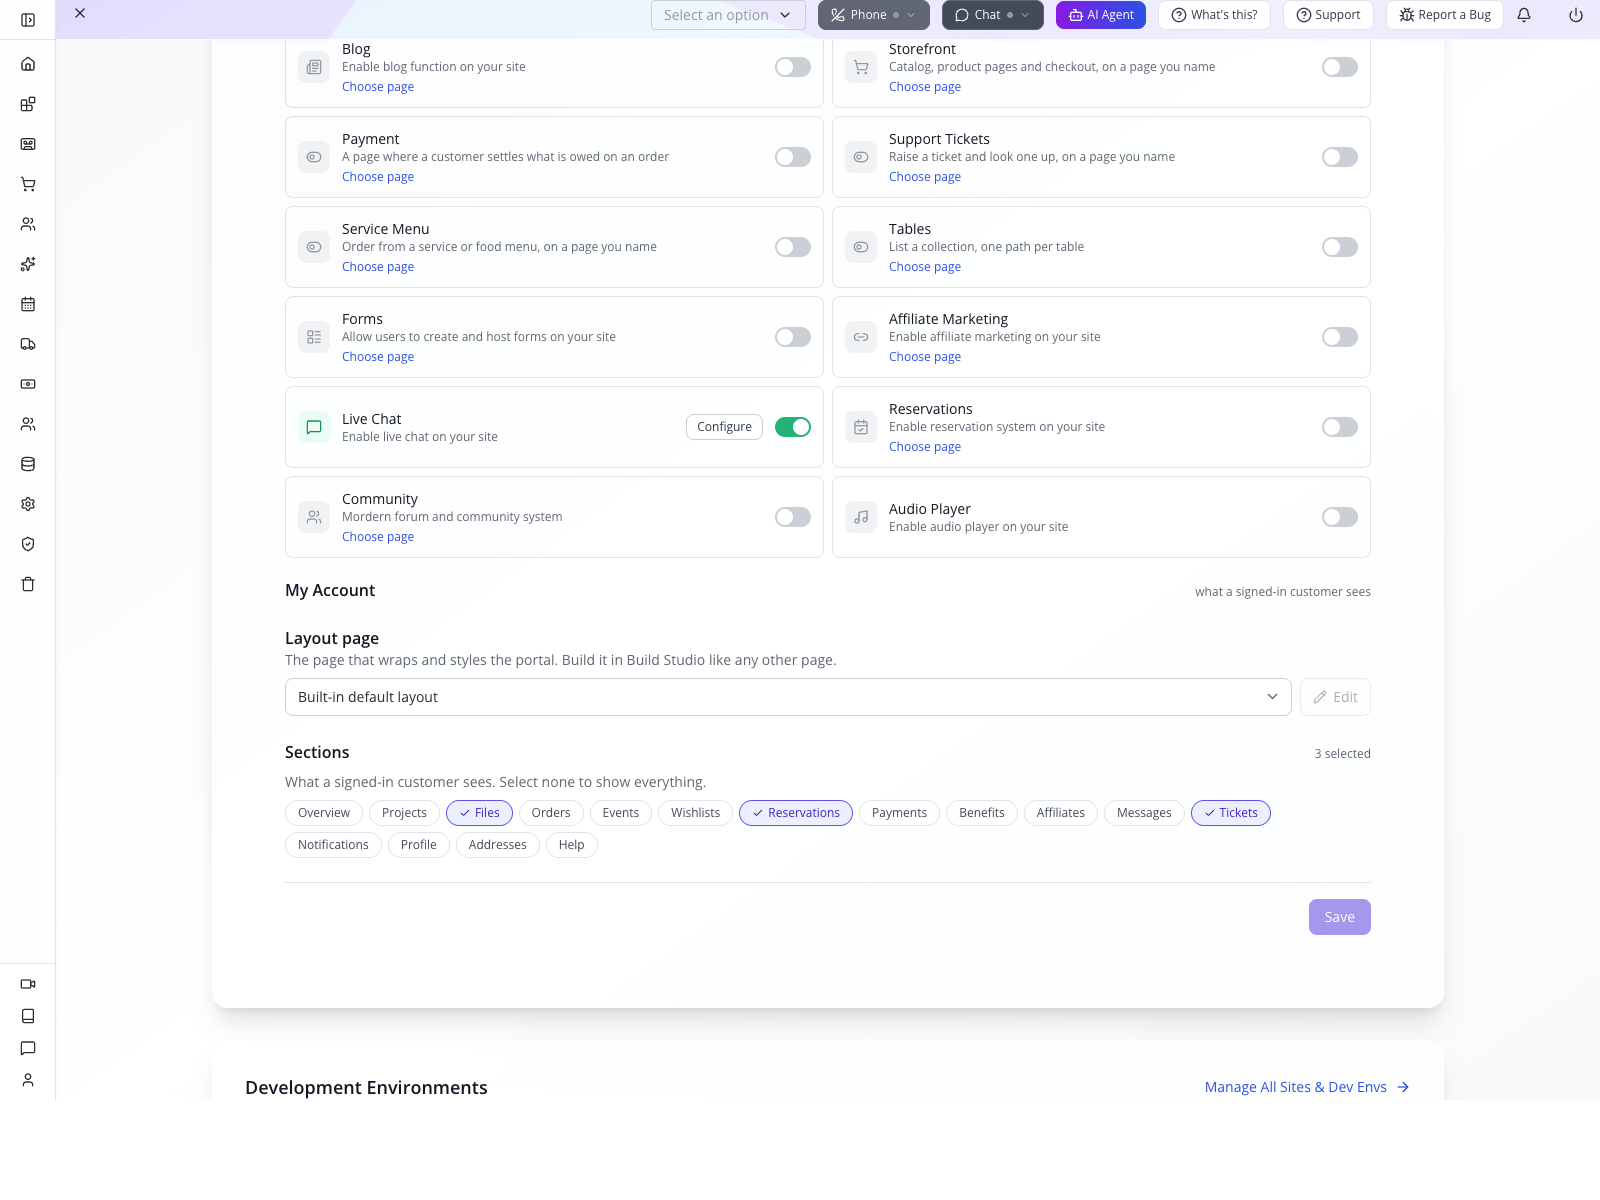
 1 — Three sections selected. 2 — The built-in layout stays in place while you establish the client workflow.
Who: business owners setting up customer self-service, with a developer joining for custom layouts and data checks. Time: 30 minutes for configuration; allow another session for customer acceptance testing. Level: beginner setup, advanced testing afterwards. Product: Appmint Studio Manager and your public website. Checked: local Studio0.6.2 and AppEngine r10, 21 September 2026. Example: Cedar & Form, clients Maya Bennett and Daniel Reyes.
Course status: complete locally. Settings, saved configuration, public login, reservation readback, private customer upload and reload, customer ticket create/reload, second-customer isolation, owner DAM file readback, owner reply, sign-out redirect, and desktop/mobile chat/sidebar behavior were exercised against the local applications. Evidence is linked from the repair reports in tutorials-plan/application-fixes/.
What you will have at the end
You will have a saved client portal menu, a clear customer sign-in entry and a precise way to check the portal against your business records. The first configuration uses Files, Reservations and Tickets. You will know why selecting every available section can expose an unfinished workflow, and how to distinguish a customer account from a Studio staff account.
The useful outcome is a client who can find the right appointment, share the right file and raise a request that staff can actually act on. Enabling menu items is the first step toward that outcome, not the whole setup.
What you need
- Your live site from Build a business website.
- The customer records and bookings from Turn an enquiry into a tracked lead and a booked consultation.
- An email inbox you control for the customer sign-in test. The fictional addresses printed in the course are record examples, not mailboxes you can use to receive a magic link.
- Two separate private browser sessions for the later customer access checks.
- A small, non-sensitive test file. Start with a plain text document called
cedar-form-maya-room-brief.txtcontaining “Living room: retain the sofa, improve storage, use warm lighting. Tutorial example.”
The existing bookings are Maya’s consultation on 21 September 2026, 10:00–10:30, and Daniel’s at 11:00–11:30, both America/Chicago. Use future dates for a fresh rehearsal and write down the corresponding references. Daniel already has a record; he should not be treated as an empty account.
The story
Maya has booked an initial consultation. She needs to check the time and send a short room brief. Daniel has booked the following appointment. Cedar & Form wants each client to see their own material without giving either person access to Studio Manager.
A portal has two distinct responsibilities: help clients find the right section, and return only the records they are allowed to use. A tidy menu solves the first. Customer authentication and record ownership govern the second.
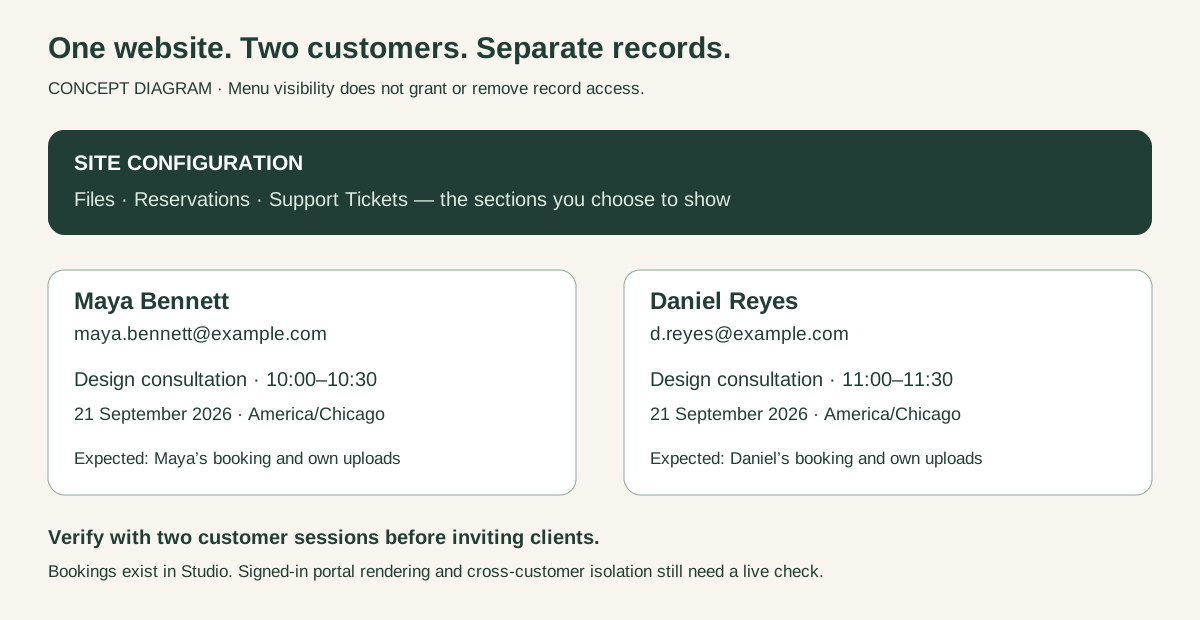 This is an explanatory graphic, not a screenshot or a completed access test.
Part 1 — Configure the client’s menu
1. Select the website you mean to configure
In Studio Manager, open App Root and find Active Site. Read the site name before changing anything: portal settings belong to that website. If the card says Nothing is loaded, select Choose a site, then select your existing website. The local rehearsal used cedsite, created in the website course. If another site is active, select Change Site first.
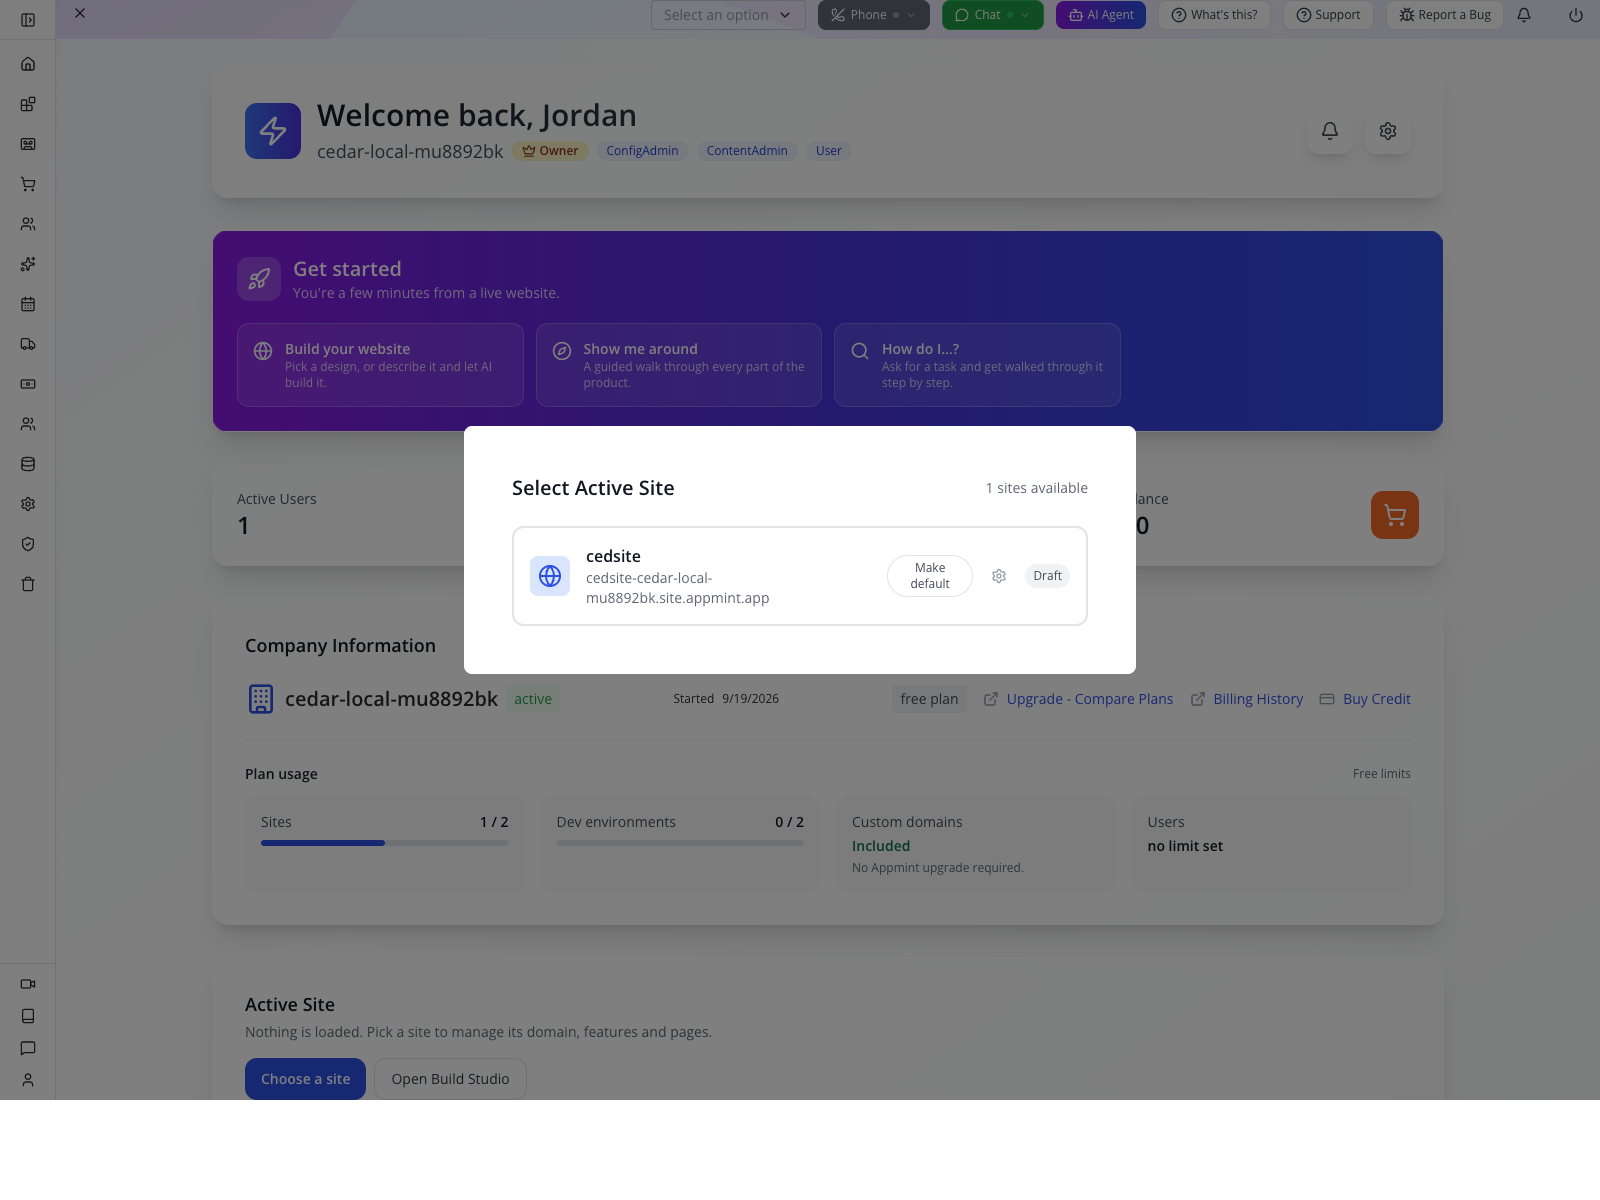
On the current interface, scroll down through the Active Site card to My Account — what a signed-in customer sees. The controls are directly on the page. The older0.6.1 screenshots used a separate Client Portal drawer; do not look for that drawer when your screen has this inline section.
2. Keep the built-in layout first
Under Layout page, leave Built-in default layout selected. The other options are saved pages belonging to the selected website. A custom page wraps and styles the account area; selecting a marketing page does not build a new client application or change record ownership.
Start with the built-in layout so you can verify bookings, files and support before changing their presentation.
3. Choose the sections that serve the first customer tasks
Under Sections, select Files, Reservations and Tickets. A selected pill has an indigo outline and a check mark. Deselect other sections if they were already enabled. Confirm 3 selected.
| Section | What the customer needs to do | What you must verify |
|---|---|---|
| Files | Share a room brief | Upload, reload, staff retrieval and customer ownership |
| Reservations | Find the consultation | Correct customer, appointment time and status |
| Tickets | Ask for help | A usable ticket type/form, successful submission and staff response |
Watch the empty selection: the helper says Select none to show everything. Removing all checks means All shown, not a hidden portal. Keep an explicit selection for a focused menu.
Try it: select Profile briefly. The count changes to4. Select it again to remove it and return to3 before saving. This rehearsal changed only the draft selection; Profile was not saved as a fourth section.
4. Save and prove the settings persisted
Select Save once and wait for Saving… to finish. Reload Studio. If Active Site is empty after reload, choose the same site again; an unloaded site card is not evidence that your portal settings were lost.
Scroll back to My Account. Confirm the built-in layout, 3 selected, and check marks on Files, Reservations and Tickets. The unchanged Save button is disabled; you do not need to edit something merely to enable it.
Check yourself: does hiding Orders stop a customer typing an Orders address? No. This setting chooses the navigation menu. The server must separately enforce access to each customer's records; that is why the later two-customer checks matter.
Part 2 — Explain customer access correctly
1. Open the account entry on the public website
Use View public site to get your website’s actual address. In a private window, open that address with /account at the end. For a branded site, this might be https://your-domain.example/account; use your real website domain, not Studio Manager’s domain.
A signed-out visitor is redirected to /login. The captured screen contains Email address, Password, Sign in, Send magic link, Forgot password? and Create one.
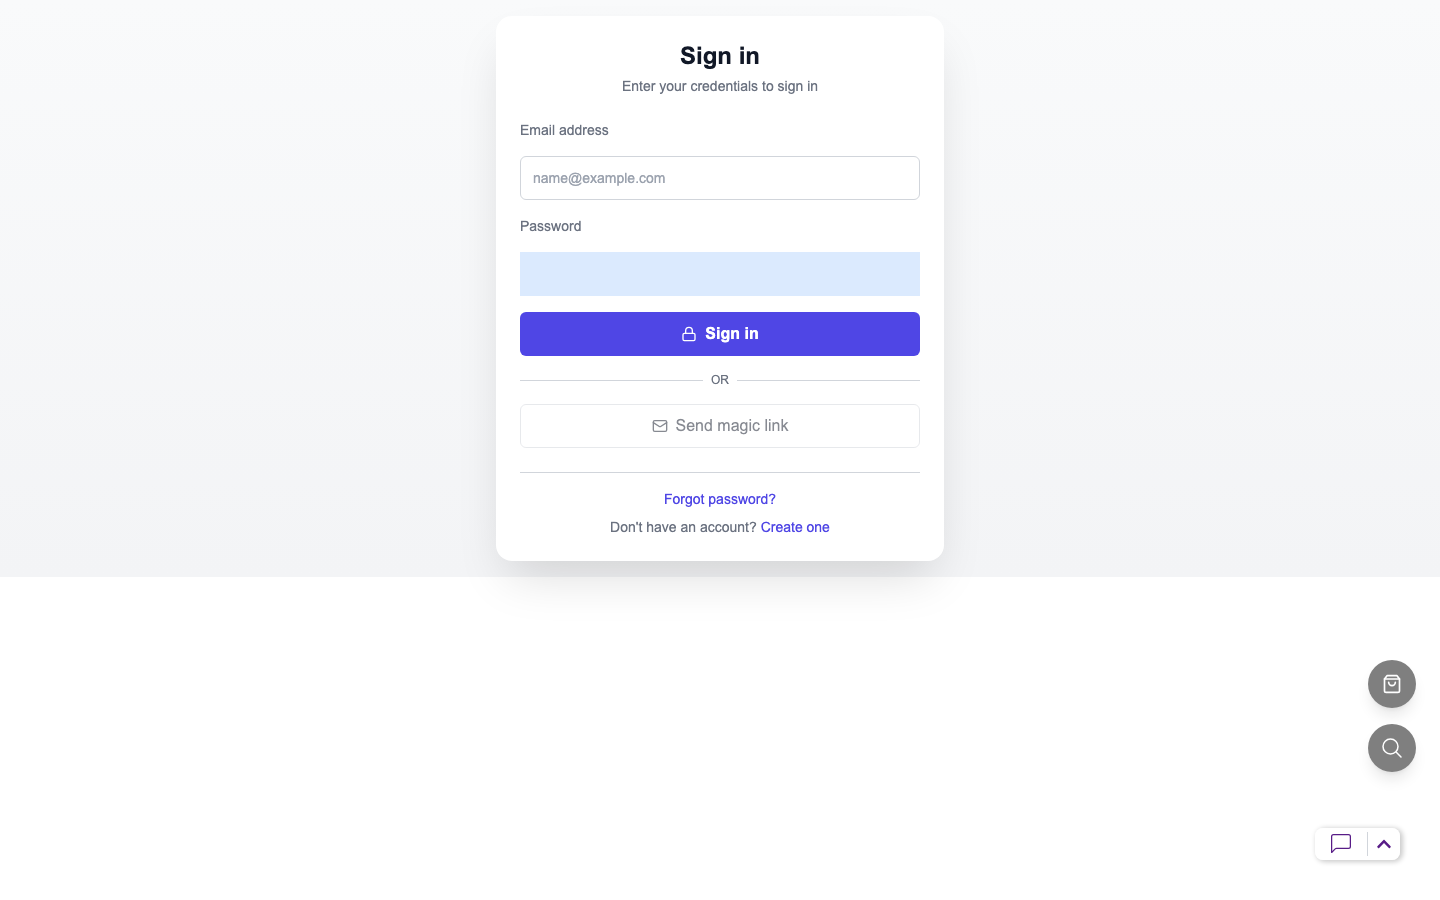
This is customer access to the website. Staff invitations and Studio permissions belong in Roles, groups and permissions. Do not invite clients to Studio just to let them check a booking.
2. Check whether the customer already exists
In your staff window, open CRM → Customers & Benefits. The Contacts tab shows the customers created by the booking and chat exercises. Find the customer by email, not only the displayed name.
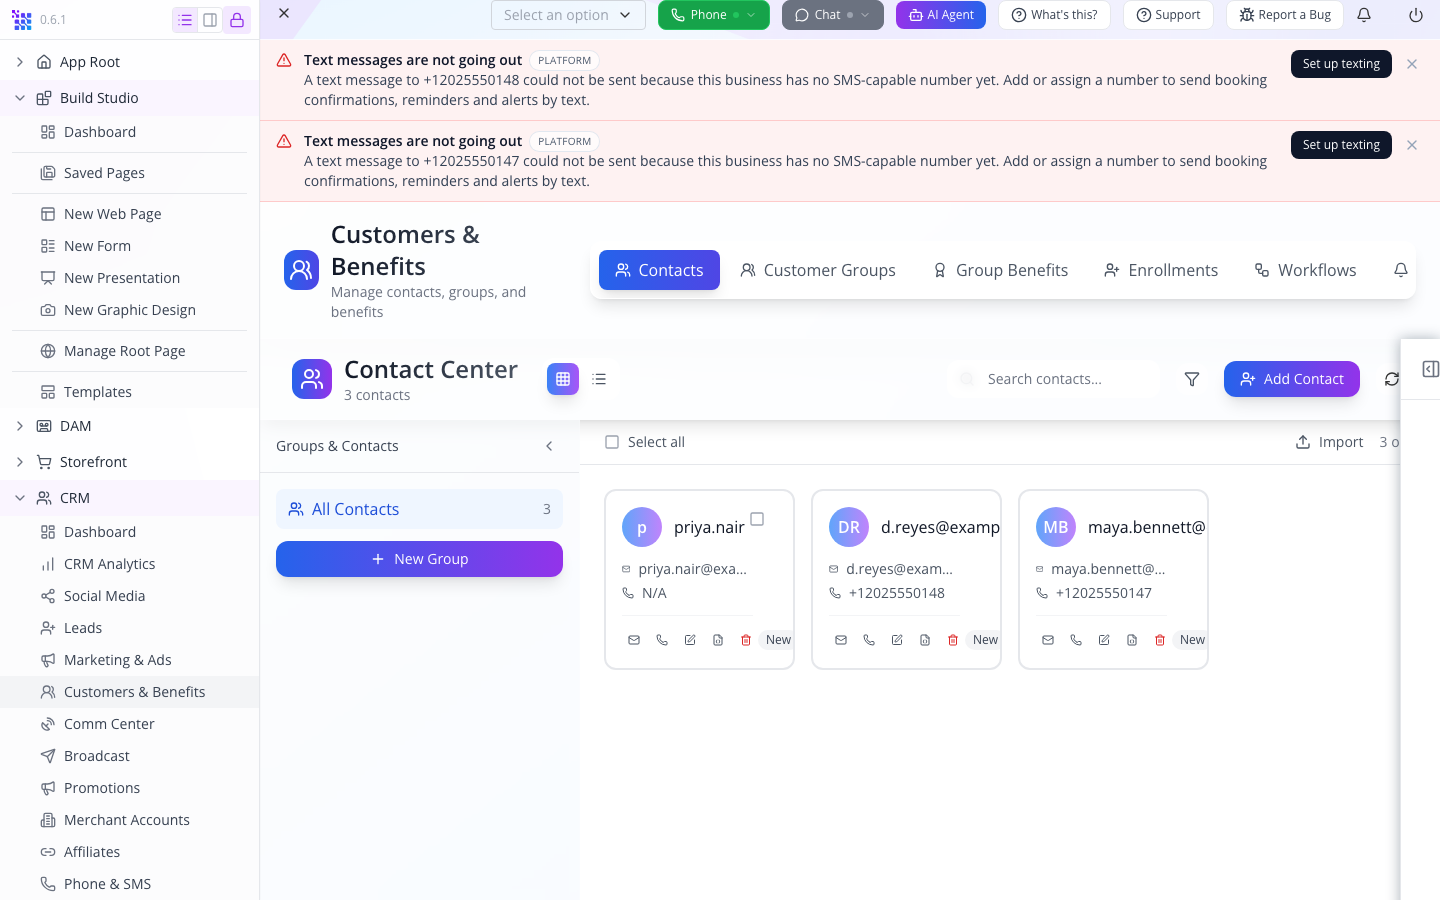
Maya’s booking created a customer record using [email protected]. That does not mean Maya selected a password at booking time. Account identity and an established sign-in method are separate things.
Use the same email for booking and customer access. Creating another account with a slightly different address makes matching records harder; it does not repair the original account.
3. Understand the new-customer form
On the website’s login screen, select Create one. The registration form says Create an account and contains:
| Field or action | What the customer does |
|---|---|
| Full name | Enters the name the business should use |
| Email address | Enters their accessible email address |
| Send magic link | Requests the registration/sign-in email |
| Sign in | Returns an existing customer to login |
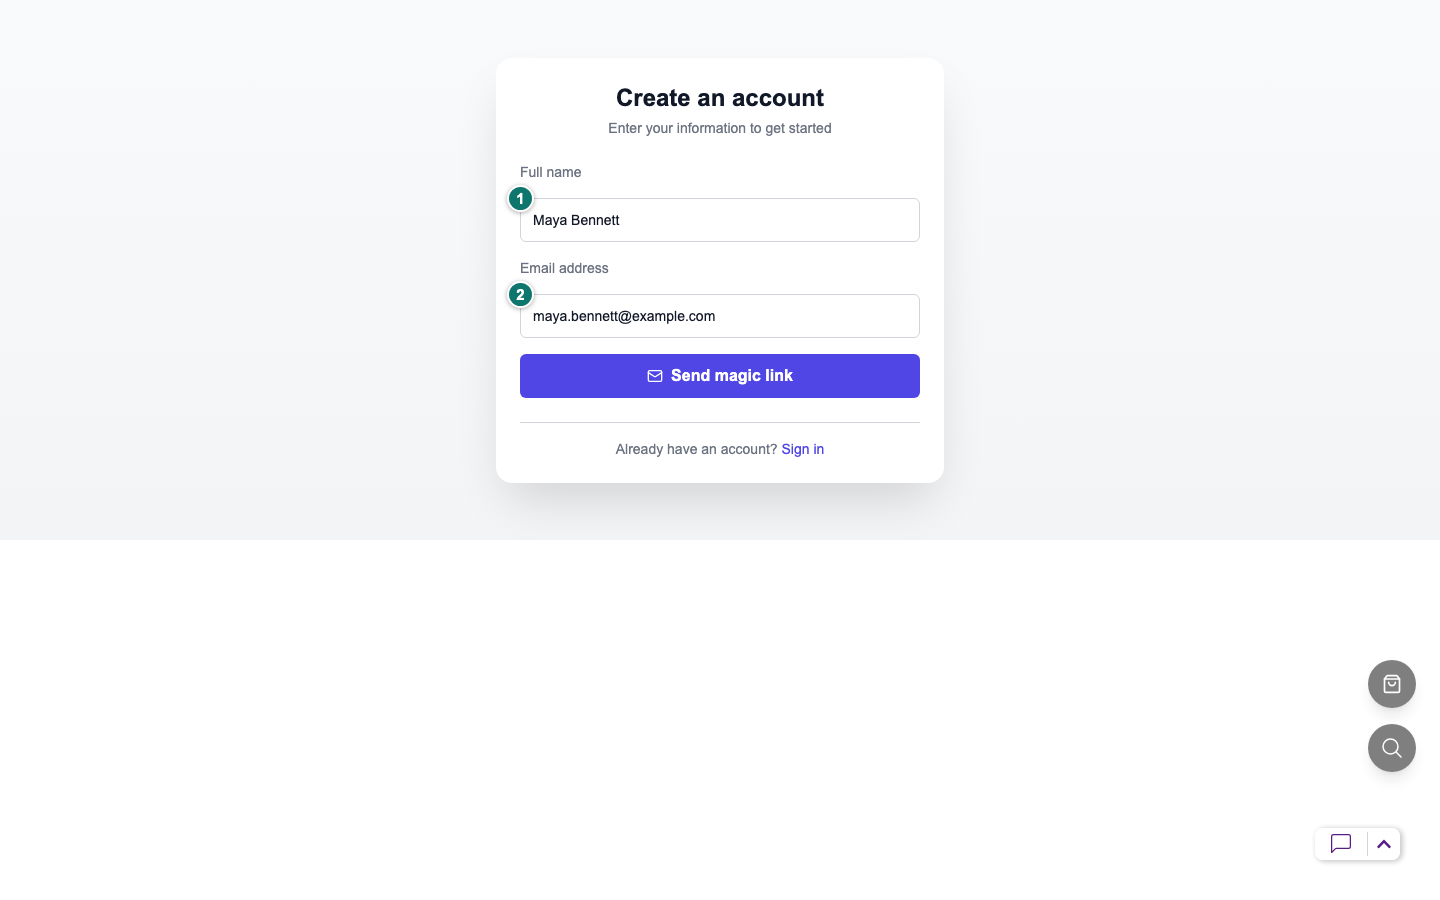
The current form does not ask a new customer to choose or confirm a password. Instructions that say “set a password here” would send them looking for a field that is not present.
For a genuinely new customer, use an address they can access and complete the link from that inbox. Keep the message and its link private. This course's controlled Maya and Daniel links were delivered through the local SMTP catcher and both sessions reached the portal.
4. Handle the existing-booking customer
Submitting Maya’s existing booking email through Create one displayed:
An account with this email already exists. Please login instead.
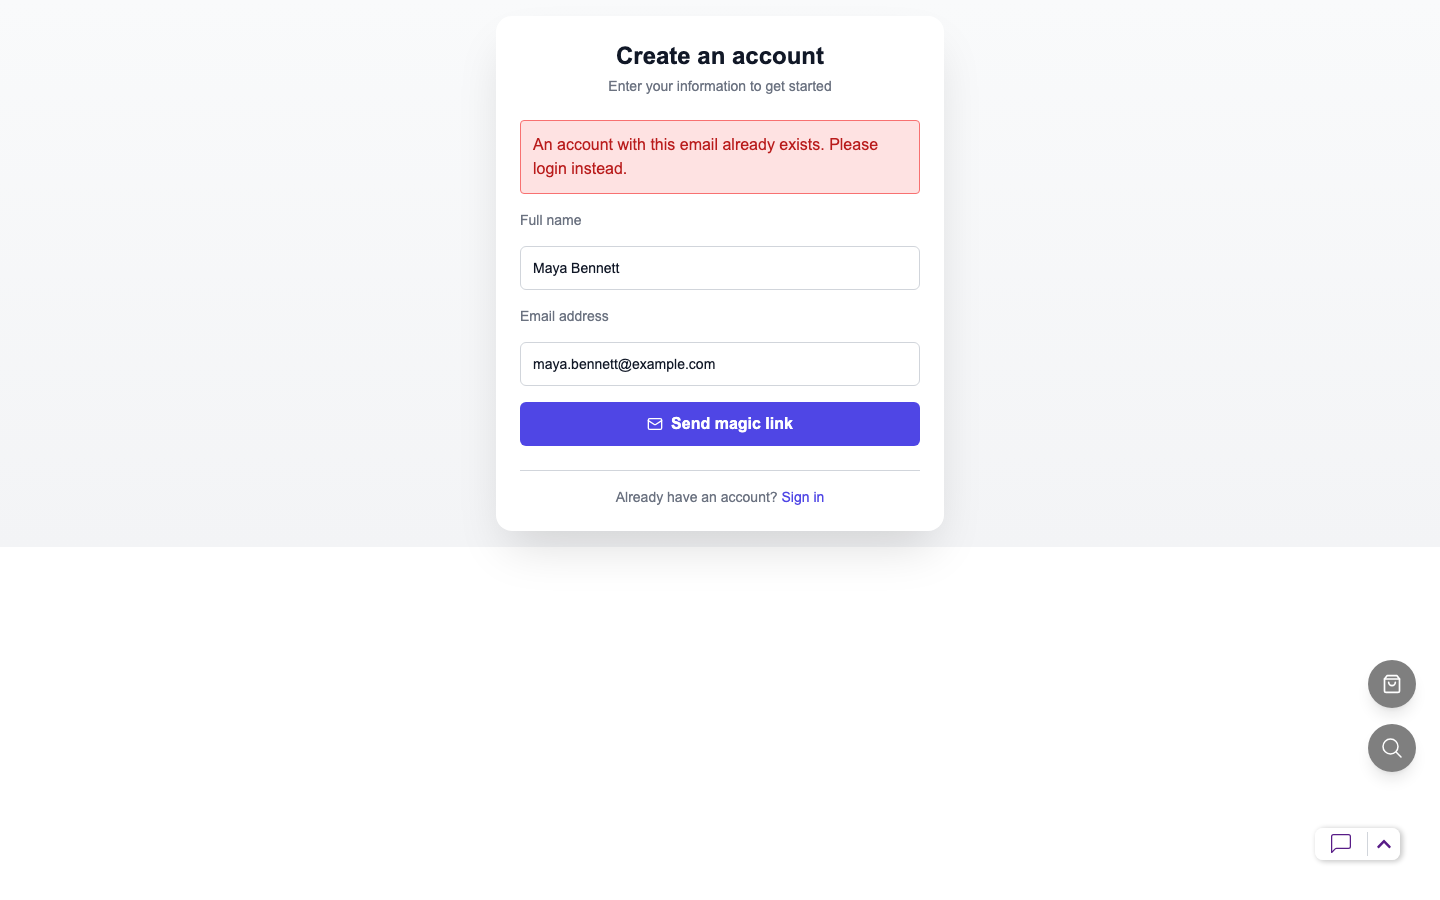
Return to Sign in. A customer who already has a working password can use Email address, Password, then Sign in. A customer without one should use the existing-account Send magic link route with their accessible email address.
Do not ask the customer to invent another email, register again or use a staff password. If a requested sign-in email does not arrive, staff should investigate delivery for that address before claiming account creation failed.
5. Know what the staff security panel does
From Customers & Benefits, open the customer record and expand Security & Login. It includes Reset Customer Password, a Reset Password action, account lockout details and a two-step verification status panel.
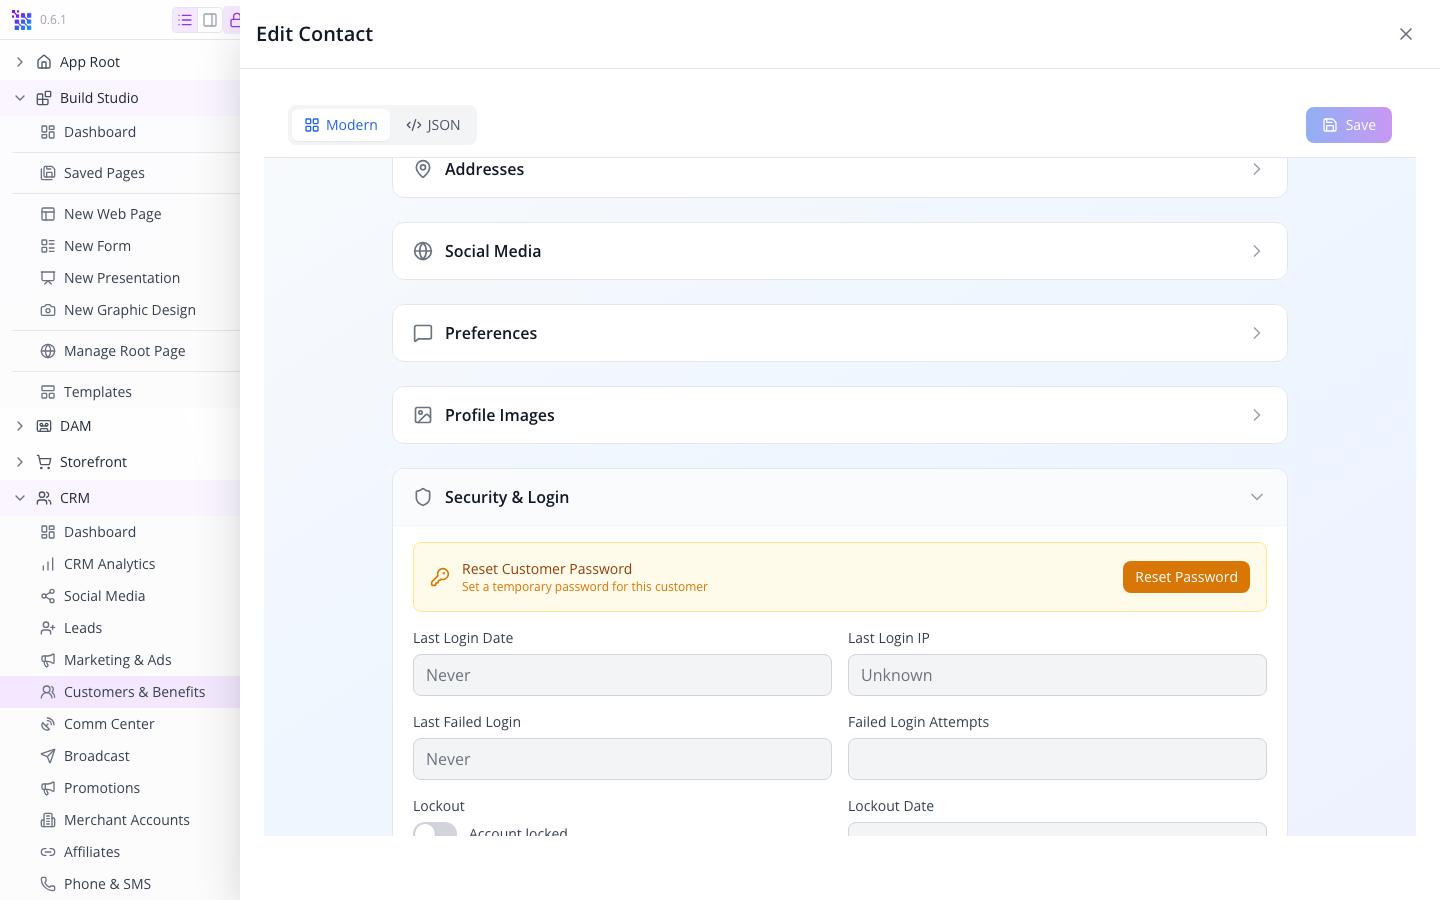
This is an account-recovery area. It is not a routine portal-setup step, and it does not verify that a customer received an email. The reset action was inspected but not executed in this walkthrough. Keep customer identity checks and your support process in place before changing someone’s access.
Try it: compare the email on a customer record with the email on their reservation. Correct a typo through the appropriate business process before asking them to sign in again.
Check yourself: why did registration say Maya already exists? Booking had already created her customer identity. The registration form was trying to create that identity again.
Part 3 — Rehearse the customer tasks before rollout
The instructions in this part follow the current customer components in source and were rehearsed with controlled Maya and Daniel accounts. Repeat with inboxes your team controls before inviting customers.
Read an appointment without changing it
After customer sign-in, open Reservations. Clear Search reservations... and choose All Reservations before deciding that a record is missing. A search or status filter can hide an otherwise available booking.
Open Maya’s reservation and compare it with the staff record:
| Detail | Maya’s expected record | Daniel’s expected record |
|---|---|---|
| Service | Design consultation | Design consultation |
| Date | 21 September 2026 | 21 September 2026 |
| Time | 10:00–10:30 | 11:00–11:30 |
| Timezone | America/Chicago | America/Chicago |
| Staff status at the end of the CRM exercise | Confirmed | New |
Compare the actual appointment time, not just its creation date or a familiar customer name. The repaired component displays Portal design consultation, 21 September 2026, 10:00–10:30, and America/Chicago for Maya; evidence is in the portal repair report.
The current source includes Cancel Reservation and Reschedule buttons without action handlers in this account component. Use the business’s confirmed staff-assisted change process until those customer controls are exercised successfully. Do not tell a client an appointment moved because a button was visible.
Upload one harmless file, then find it again
Open Files, select Upload Files, then Browse Files. Choose the small room-brief text file prepared earlier. Read the selected filename before starting the upload. The modal lists selected files and shows progress while sending.
After upload, find the filename in the list. Reload the page and find it again using Search files.... If the interface reports Upload failed, retain the error and use a working file-sharing method your business has approved; do not repeatedly upload the same file and create uncertainty about which copy arrived.
Client file storage and staff access are separate checks. A client-visible file is not automatically attached to a ticket or placed on a project. Establish exactly where your team retrieves it before instructing clients to use this as the only delivery route.
Raise a request that staff can recognise
The drawer’s Tickets selection maps to Support Tickets in the customer navigation. Ticket creation uses configured ticket types and their forms. The exact form fields depend on that configuration; there is no guaranteed universal “one title and one message” form.
For the rehearsal, use the request title Kitchen lighting question and a description such as:
Before our consultation, I would like to discuss warmer lighting over the kitchen worktop. Can you advise which measurements or photographs to prepare? Tutorial example.
Keep the customer email consistent with Maya’s account. After submitting a configured form, record the generated ticket reference and reload the customer’s list. In the staff window, open CRM → Tickets, search for the same reference and compare the customer and description.
If no ticket type or usable form is available, complete that configuration first. The customer-conversation course demonstrates a working staff-created ticket as a fallback. Label it as manual; do not represent it as a ticket submitted by the client.
The owner read Maya's ticket in CRM, replied with the room-brief confirmation, and the API returned a persisted message. The portal course checks the saved ticket and staff handoff; email delivery remains subject to the organisation's configured provider.
Try it: have a colleague follow one task without seeing Studio. Ask them to find the appointment time or upload the test brief, then explain how they know it worked.
Check yourself: is a success message enough to launch a self-service task? Reload and read back the result, then check the receiving side where relevant. The customer and staff views must agree on the same record.
Part 4 — Test the boundary between clients
The live signed-out test opened /account/reservations, /account/tickets, /account/files, /account/profile and /account/projects. All five returned the customer Sign in page.
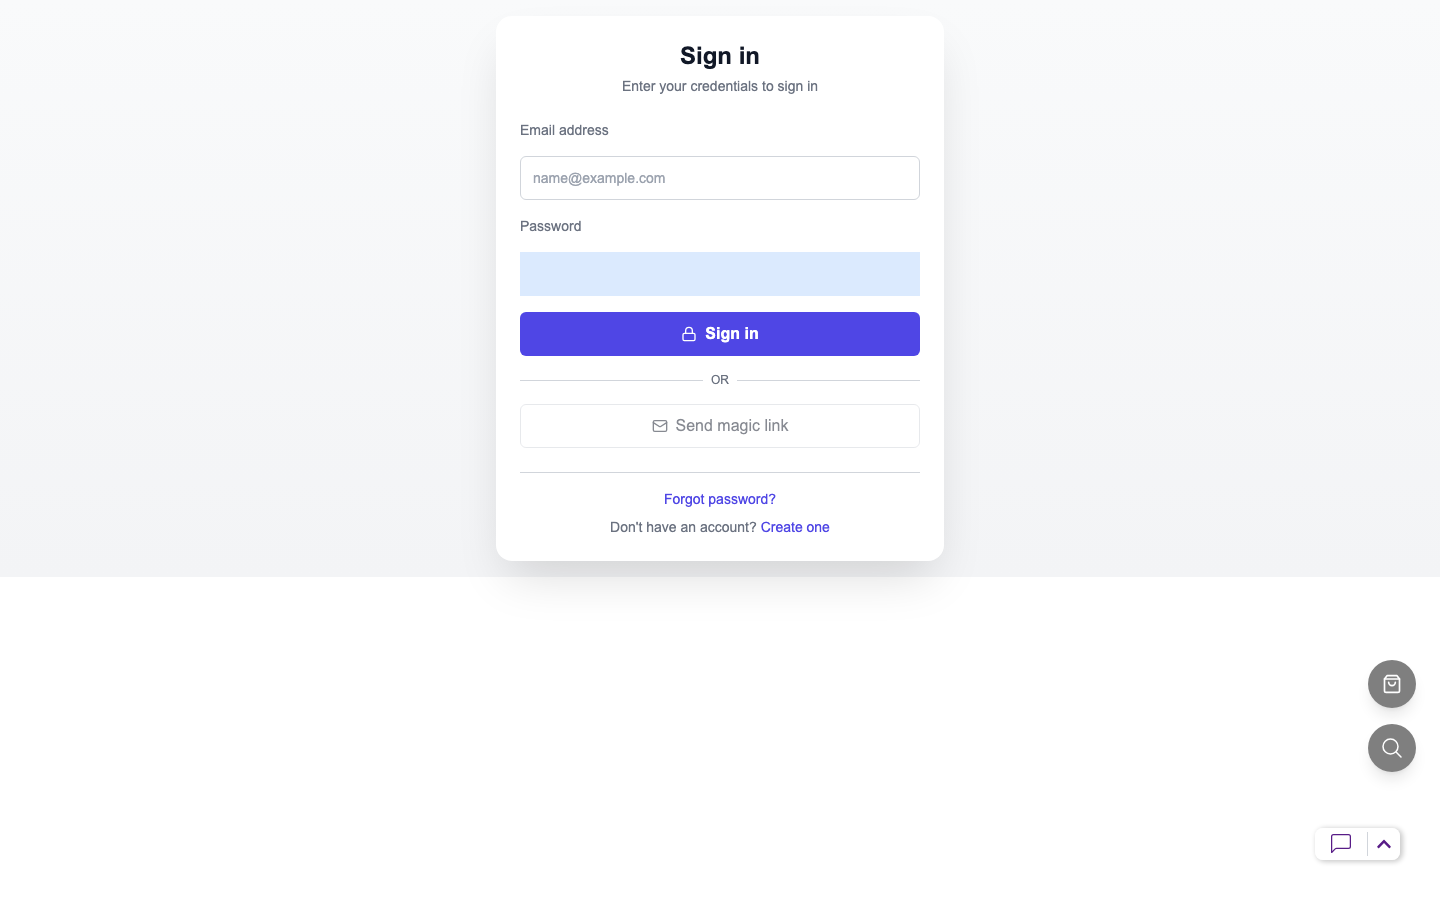
That establishes the anonymous entry behaviour. It does not establish what Daniel can access once signed in.
For the two-customer rehearsal, use two separate browser profiles, or two different browsers. Two private windows in the same browser may share a private session, so they are not sufficient isolation. Sign Maya into one profile and Daniel into the other. Check each profile’s displayed customer name/email before opening a copied record address; keep the staff Studio session in a third profile. If either customer session shows the other identity, stop, sign out and re-establish separate sessions before testing access. Compare each customer’s own booking against the table above. Upload different harmless filenames so accidental sharing is easy to recognise. Where a record has a direct address, try Maya’s address in Daniel’s session. If the interface uses an in-page panel rather than a unique address, have the developer check the corresponding authenticated record request; copying /account/tickets alone tests the section, not a particular ticket.
A suitable result gives Daniel his own material and refuses or omits Maya’s private record. Record both sessions and the exact outcome. Do not describe an expected refusal as an observed one.
Use Sign Out when finished and reopen /account. It should return to sign-in. Also check that the browser does not leave a sensitive file open in another tab after signing out.
Part 5 — Add branding and advanced views
Custom layout. Build a separate portal wrapper page with your header, footer and restrained styling. Choose it in Client Portal → Layout page, save and test the actual account pages at desktop and phone widths. Preserve the account content and navigation; a decorative homepage should not cover the forms a client needs. The custom wrapper was not selected in this rehearsal.
Project dashboard. The settings drawer offers Projects, but the inspected default navigation currently comments out its Projects entry. Selecting that pill alone is not enough to deliver a project tracker. Use the operations dashboard course for the data model and Vibe Studio for a custom client application. Bind records to the signed-in customer rather than hard-coding Maya’s record ID.
Messages, Profile and Help. The inspected Messages component uses an empty mock thread and local-state sending; Profile save is unfinished; Help contact actions are placeholders. Keep those incomplete actions out of your initial service promise. Use the tested website chat and a confirmed support channel while those components are completed and rechecked.
Do not repair a missing record by broadly changing its owner in raw JSON. First establish the correct customer and record relationship. A typo fix and a transfer of ownership are different business actions.
If something goes wrong
| Symptom | First check and next action |
|---|---|
| Every section is shown | Reopen Client Portal. An empty selection means All shown; select the intended sections explicitly. |
| Save is disabled | Nothing has changed. Inspect the saved selection rather than toggling randomly. |
| Different site was configured | Check Active Site and use Change Site before editing its portal. |
| Registration has no password field | This form uses Full name, Email address and Send magic link. Do not follow older password-signup instructions. |
| Existing email is rejected by Create one | Return to Sign in; the booking or earlier interaction may already have created the customer. |
| Sign-in email is missing | Confirm the exact customer address and delivery configuration. A request screen does not establish mailbox delivery. |
| Booking list is empty | Clear filters, compare customer identity and check whether account data failed to load. Avoid creating a duplicate customer. |
| Appointment shows an unexpected date | Compare with the staff reservation’s actual start/end and timezone; do not rely on creation date. |
| Projects selected but no Projects link | The current default navigation omits it in source. Use a tested custom implementation when needed. |
| Customer upload is not on a staff ticket | Files and ticket attachments are separate. Establish the staff retrieval path explicitly. |
| A hidden section still has a reachable URL | Menu settings are not access permissions. Check customer ownership on the server. |
What happened behind the scenes
Developer notes and source locations
The site stores the selected layout and feature keys under data.myAccount. Empty features means all navigation entries are considered visible. The account layout loads the site settings, customer account data and any chosen wrapper. The dynamic account route chooses a component by slug; menu visibility is not a route permission check.
Customer data combines several service calls. The inspected getAllClientData uses Promise.all, so a failure in one participating module can affect account loading more broadly. File operations use a client-account/<customerId>/ namespace. Each record type still needs its own ownership and response test; a wishlist ownership check does not certify tickets, files or reservations.
Source relative to the projects directory:
websitemint/packages/ui/src/components/welcome-screens/buttons/client-portal-drawer.tsxwebsitemint/packages/ui/src/components/crm/contacts/customer-form.tsxbase-app/src/app/(auth)/register/register-content.tsx,login/login-content.tsxandactions.tsbase-app/src/app/account/layout.tsxand[slug]/page.tsxbase-app/src/components/my-account/links.ts,Reservations.tsx,Files.tsx,Messages.tsx,Profile.tsx,HelpCenter.tsxbase-app/src/components/my-account/tickets/tickets-list.tsxappengine/src/client-account/client-account.controller.tsandclient-account.service.ts
The API now includes PUT /client-data/profile, but the inspected portal Profile component does not call a save endpoint. Backend availability alone does not establish the website button’s behaviour.
Where next
Continue with staff roles and permissions to give colleagues the access needed to handle client work. For a custom frontend using customer records, follow Build a connected web or mobile client.
Evidence: saved portal configuration, controlled customer sign-in, reservation readback, private file upload and owner DAM readback, ticket create/reload, Daniel isolation, owner reply, sign-out redirect, and desktop/mobile chat/sidebar checks are recorded in portal reservation/display evidence, portal files, portal ticket ownership, and chat CSS isolation. The custom wrapper remains an advanced extension outside this course.