
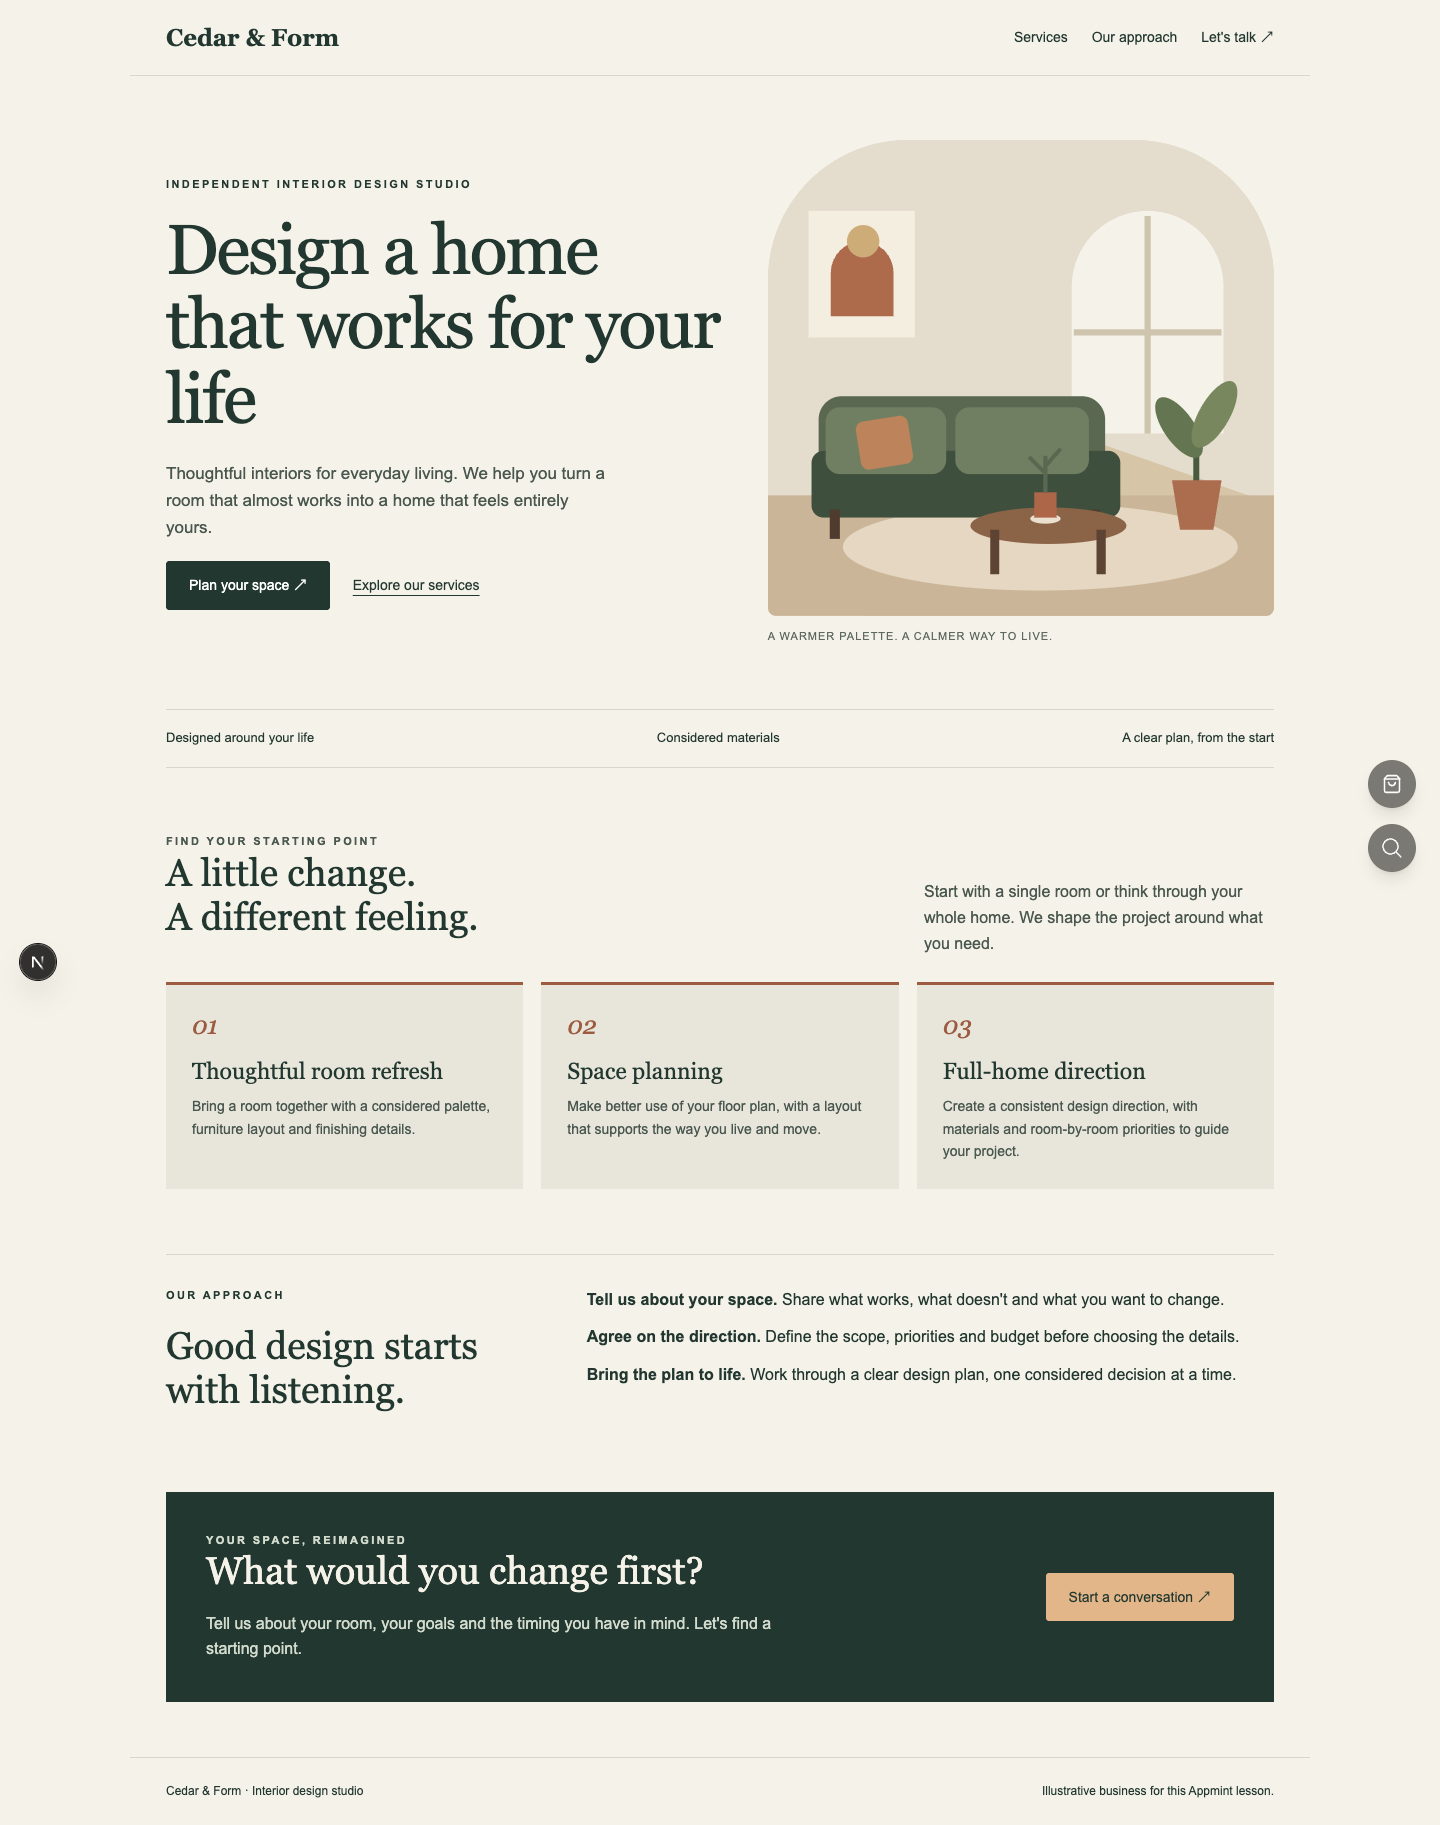
Cedar & Form now has a front door: a clear promise, a visual identity, services a visitor can understand, and a way to start a conversation. In this course you build that homepage, add a Services page, connect the navigation and check the result outside the editor.
For: business owners, content teams and developers learning Build Studio. Allow: 60–90 minutes, with an optional domain session. Product: Appmint Studio Manager → Build Studio. Build: local Studio Manager 0.6.2, rehearsed 19 September 2026. Example: Jordan Morgan's Cedar & Form business; organisation cedar-local-mu8892bk, site cedsite. Use your own account and supplied site address; those identifiers belong to the illustrated training business.
What you will have at the end
- A homepage with a headline you edited visually and a contact link pointing to your business.
- A matching Services page with working outward and return navigation.
- Saved pages you can reopen, a chosen homepage, and page search-description fields.
- A visitor check at desktop and phone widths, plus a practical domain-connection handoff.
The contact button in this exercise opens an email program. A website form, CRM lead and reservation are separate capabilities, introduced in the enquiry course. Keeping that distinction clear helps you choose the right next step for your business.
What you need
Complete Appmint signup and first setup. You should be able to open Studio Manager and find your Active Site on App Root's Home screen.
Download these two lesson files and open them in a plain-text editor:
| File | Purpose |
|---|---|
| Cedar & Form homepage starter | A complete layout with a room illustration, services, process and contact section |
| Matching Services page | A second complete page with navigation back to the homepage |
You will copy the file's HTML text, not the formatted text displayed when a browser opens it. No coding is needed for the visual headline change. The small link edits later teach the relationship between a visible button and its destination.
Choose the real email address your visitors should contact. The lesson uses [email protected], a fictional example that cannot receive your enquiries. Appmint and its apps are free; this exercise has no upgrade step.
The story
A homeowner has two minutes between meetings. They want to know whether Cedar & Form handles a single room, what happens after they enquire, and how to contact the studio. A page full of features would make them work too hard. Our page answers those questions in order: promise, services, process, invitation.
The room illustration is embedded in the starter. You do not need an image account or a separate upload to reproduce this design. Later, replace it with work you have permission to show, keeping the same purpose: help the visitor picture the result.
The route
flowchart LR
    A[Make the homepage yours] --> B[Save and reopen]
    B --> C[Add Services and link both pages]
    C --> D[Choose the homepage]
    D --> E[Check as a visitor]
    E --> F[Connect your domain when ready]
Part 1 — Make the first page yours
1. Open a new page in the right site
In Studio Manager's left sidebar, expand Build Studio using its chevron, then choose New Web Page. Read the site selector in the top toolbar before you add content. Our example says cedsite; yours should show the site created for your company.
The page selector initially contains a generated new_page… name. This is a new page, not an already saved business page.
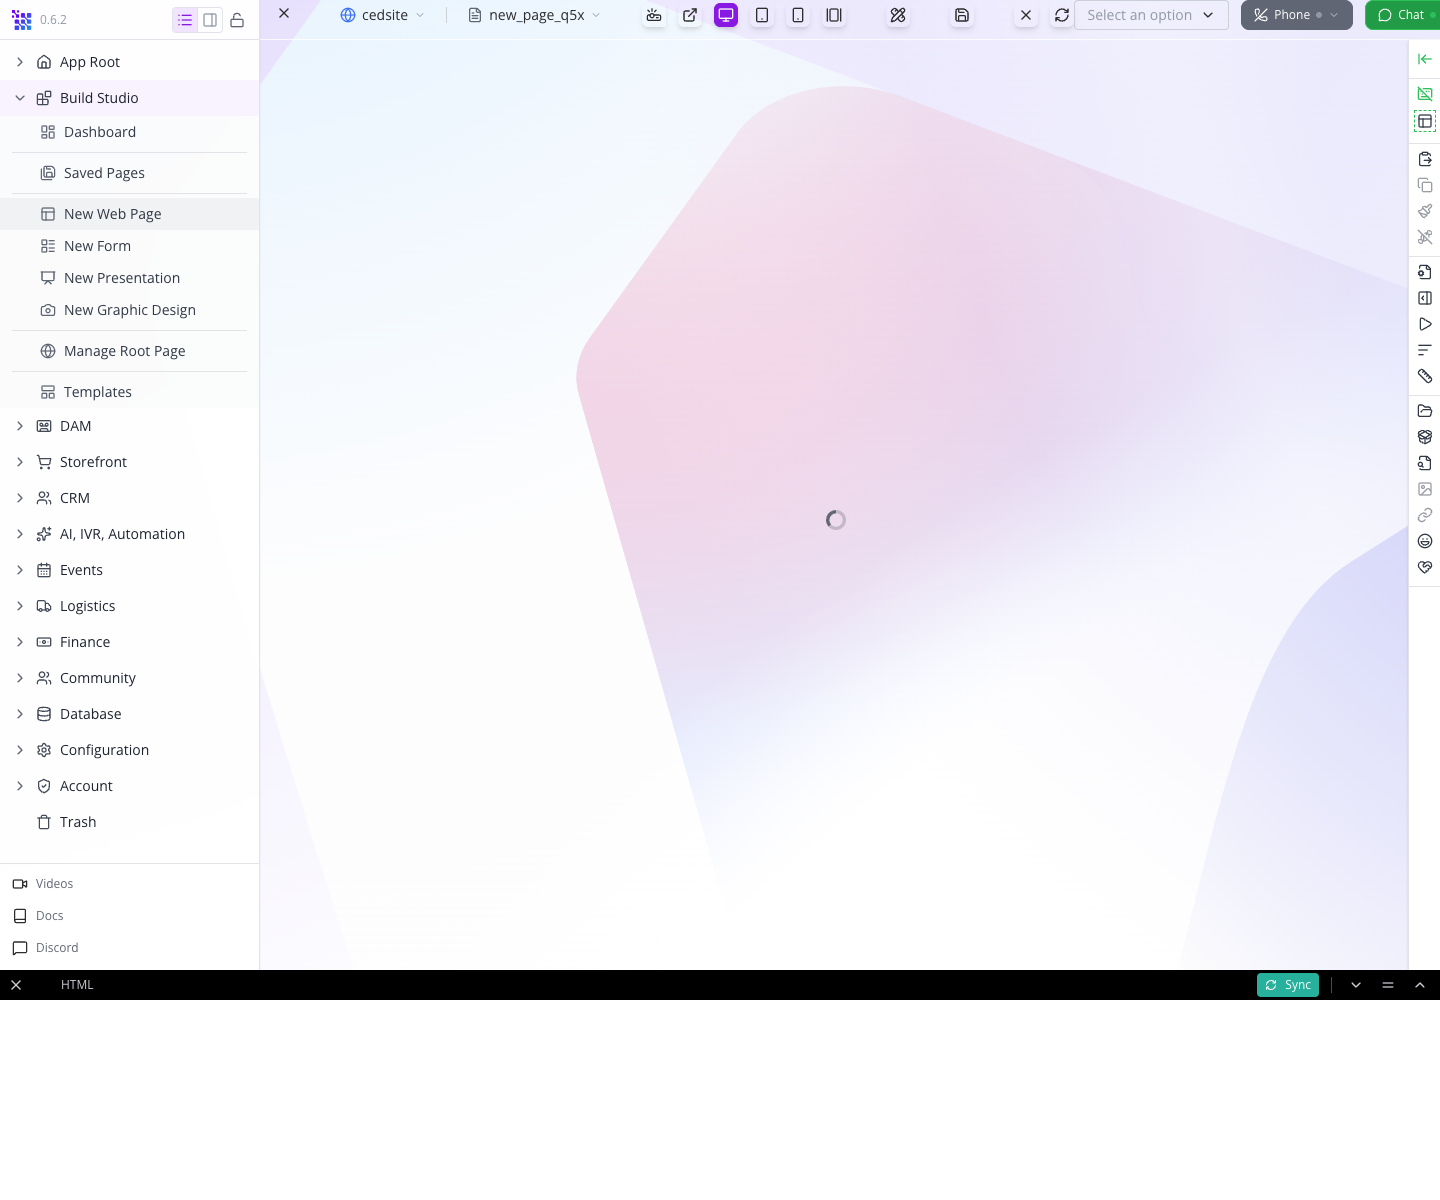
Think of the site as the whole website and the page as one address within it. You will create two pages in the same site, not two separate sites.
2. Load the homepage starter
Choose HTML at the bottom of the editor. Click inside the code editor, select all with Cmd+A on Mac or Ctrl+A on Windows, and replace the current contents with the entire homepage starter. Include its opening <!doctype html> and closing </html>.
Press the HTML panel's Save button. Its tooltip is Save HTML document to canvas. The page appears on the canvas, and the application reports Page applied to canvas.

Watch for: replacing the whole HTML document replaces the page's content. Use this step on the new page. If you see an extra
>at the bottom, inspect the text after</html>, remove the extra character and apply the document again.
3. Understand the editing surface before changing it
Close the HTML panel with the small X at the left of its header. Clicking HTML again is not the close action.
Click the large headline once. Its outline and floating toolbar show which element you selected. The page tree lists the same structure: a section contains text, links and the illustration; a heading is one child within that section.
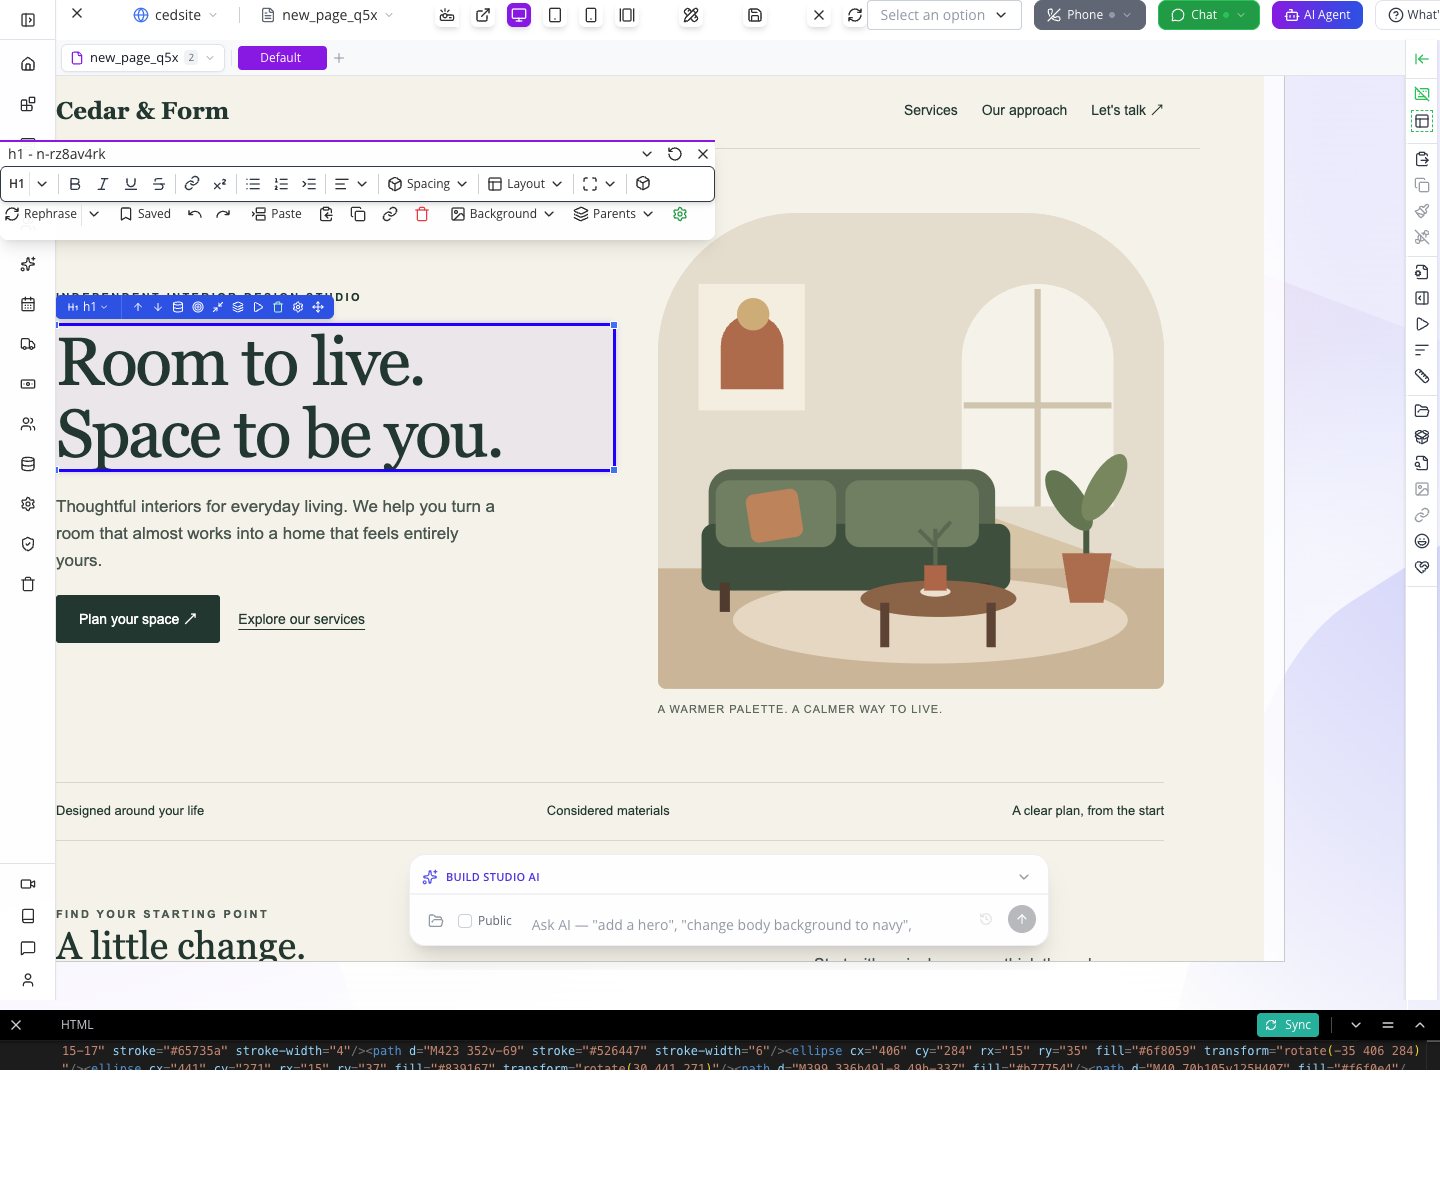
| Area | What you use it for |
|---|---|
| Site and page selectors | Confirm what you are editing |
| Canvas | Select and change visible content |
| Floating element toolbar | Work on the selected heading, link or container |
| Page tree | Find a parent section or a nested element |
| HTML panel | Inspect or replace the document's markup |
| Top toolbar | Change preview width, save the page record and close the page |
If the tree expands into many path, rect and ellipse entries, you have expanded the illustration's SVG shapes. Collapse that branch to return to the useful page sections. Select a parent section when you mean the whole block; select its heading when you mean only the words.
4. Edit the main promise on the canvas
Double-click the headline and replace its text with:
Design a home that works for your life
Press Tab to leave text editing. The new headline should remain visible on the canvas.
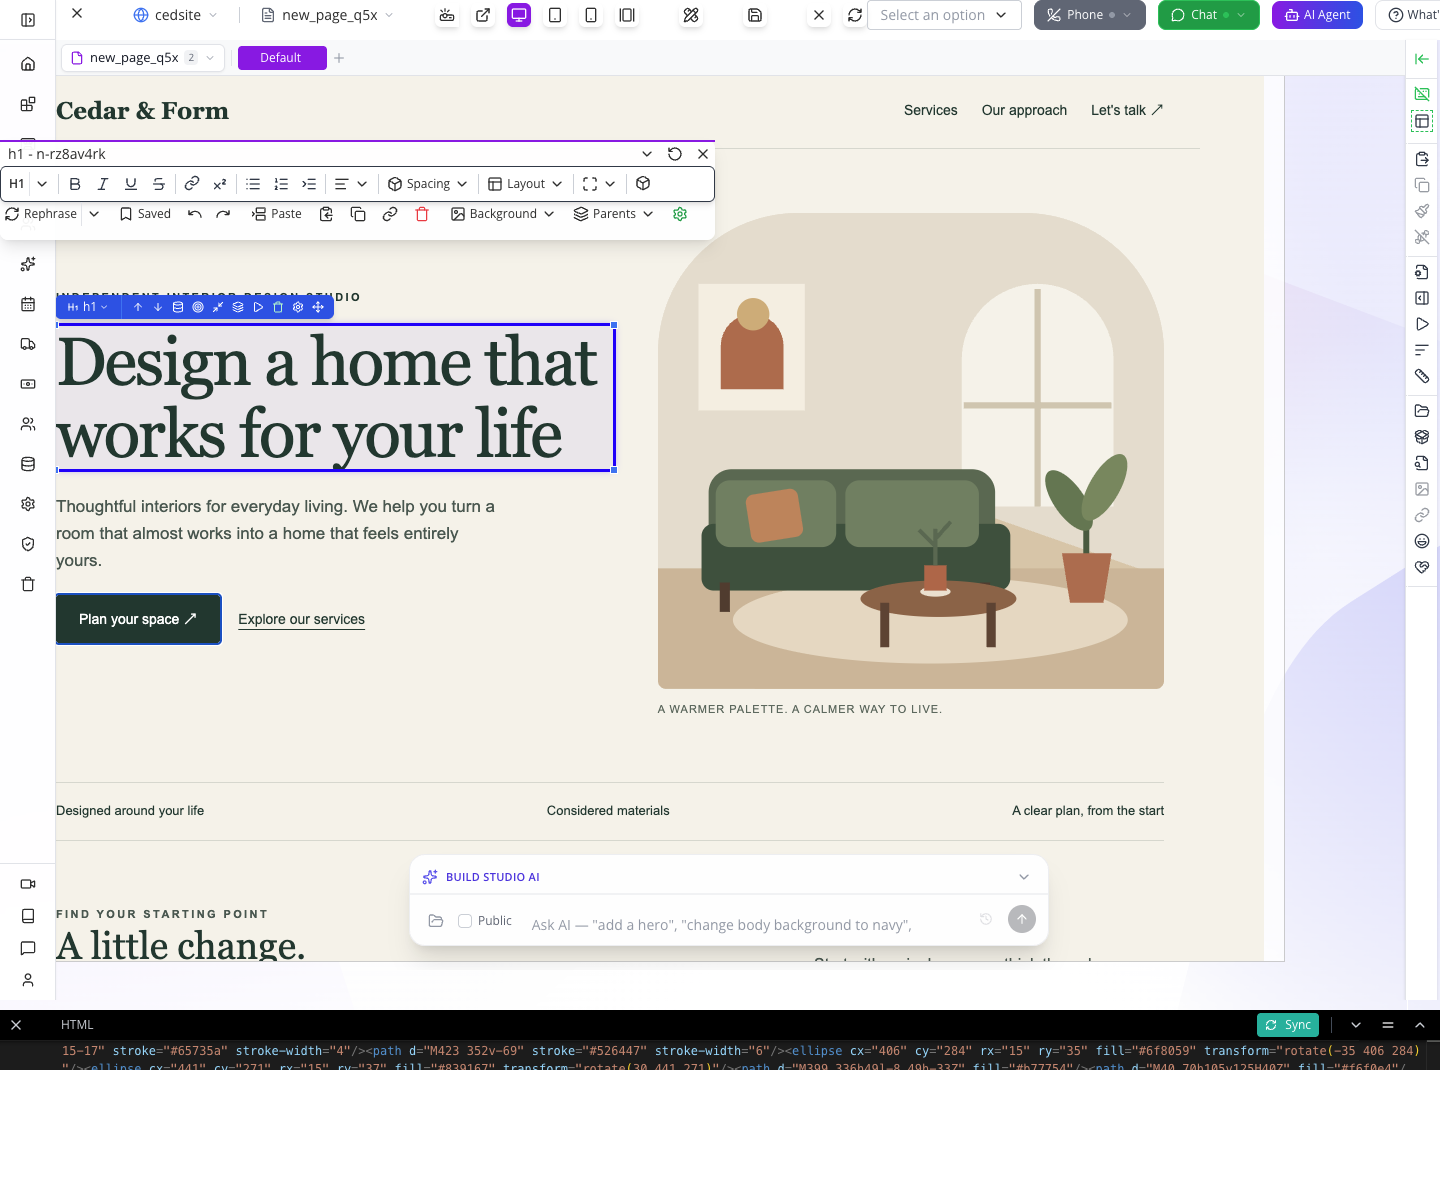
This headline says what the visitor gains. For your own business, try a similarly concrete promise: “Fresh lunch, ready when your team is” or “Book a repair without losing your afternoon.” Avoid using a slogan that tells a first-time visitor nothing about the service.
5. Give the contact link the correct destination
Reopen HTML and press Sync, whose tooltip is Sync from canvas. This brings your visual headline edit into the code editor before you change a link.
Find [email protected] and replace it with your business's enquiry address. Keep mailto: in front of the address and preserve any ?subject= text after it. For the fictional business the link becomes:
mailto:[email protected]?subject=My%20interior%20design%20projectPress the HTML panel's Save, then close that panel. Your edited headline should still be present.
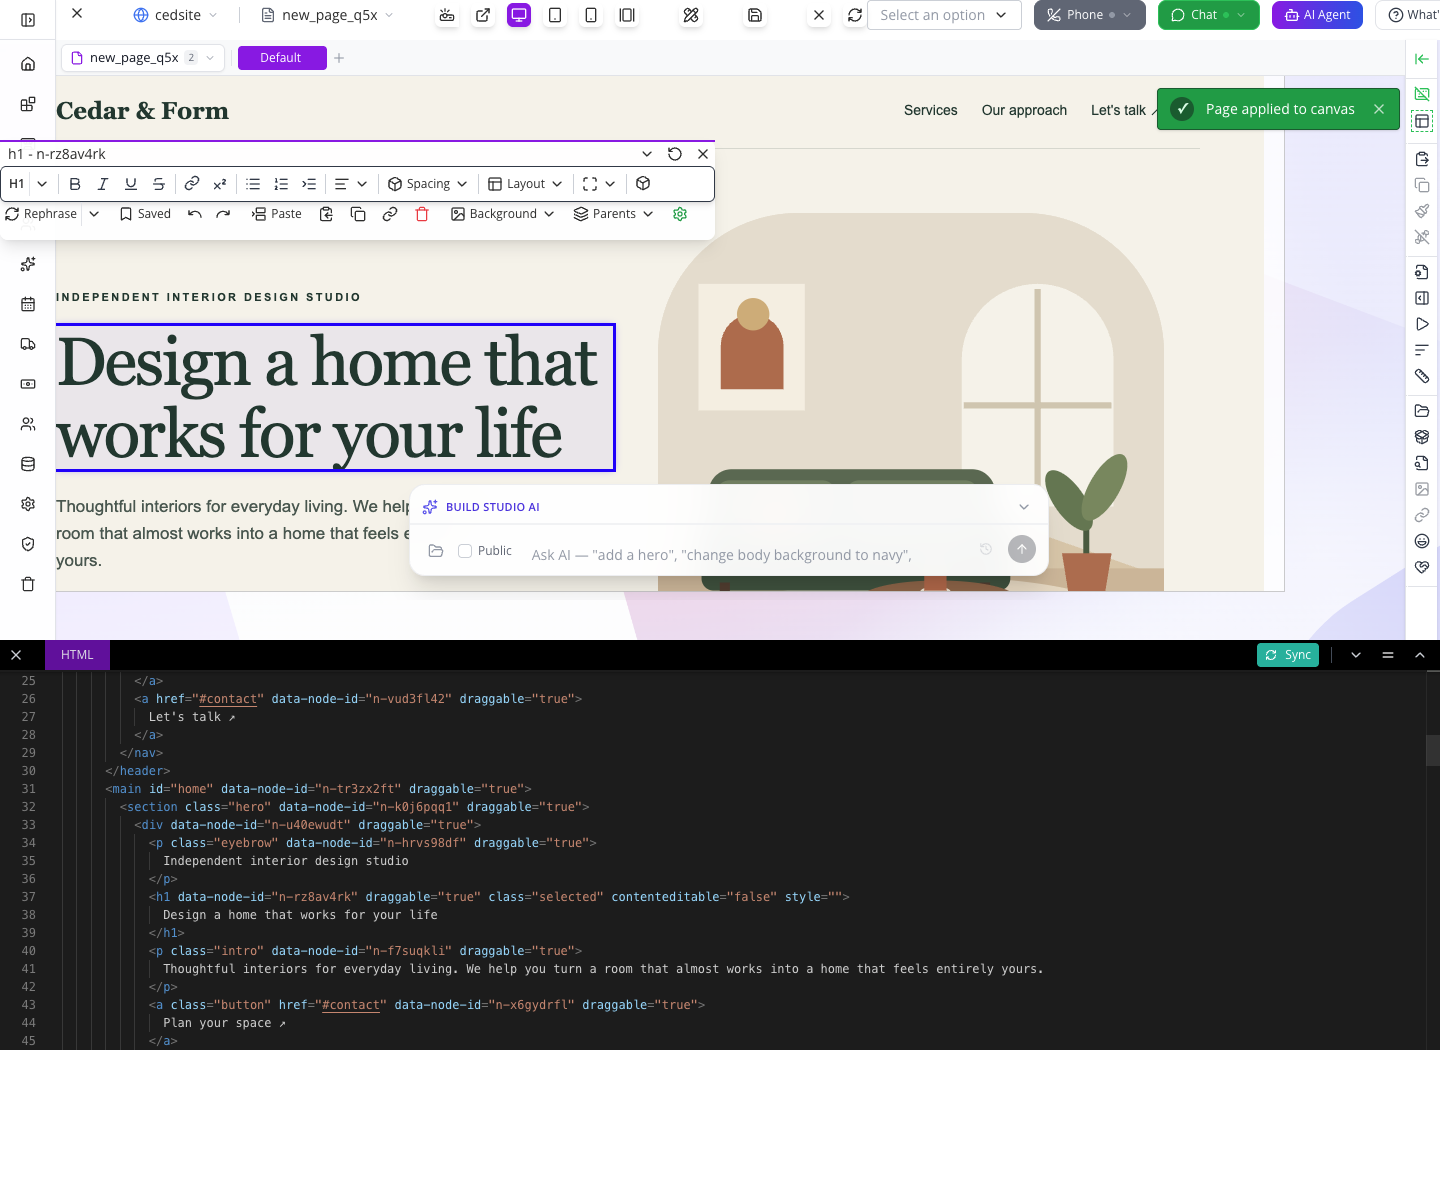
Watch for: applying an older copy of the HTML can undo a visual edit. Use Sync first. A
mailto:link opens the visitor's configured email app; it does not submit a form or automatically create a CRM lead.
There are two saves in this workflow. The HTML panel's Save applies code to the canvas. The top toolbar's Save persists the page record. You need the latter before you check the public website.
6. Check the narrow layout
Use the smartphone icon with the Phone View tooltip in the top toolbar, then scroll through the whole page. In the local 0.6.2 check, the iframe measured 448 pixels wide (446 pixels of content); the headline and illustration stacked into one column. Check the headline, navigation, illustration, service cards and contact button. Return to Desktop View when finished.
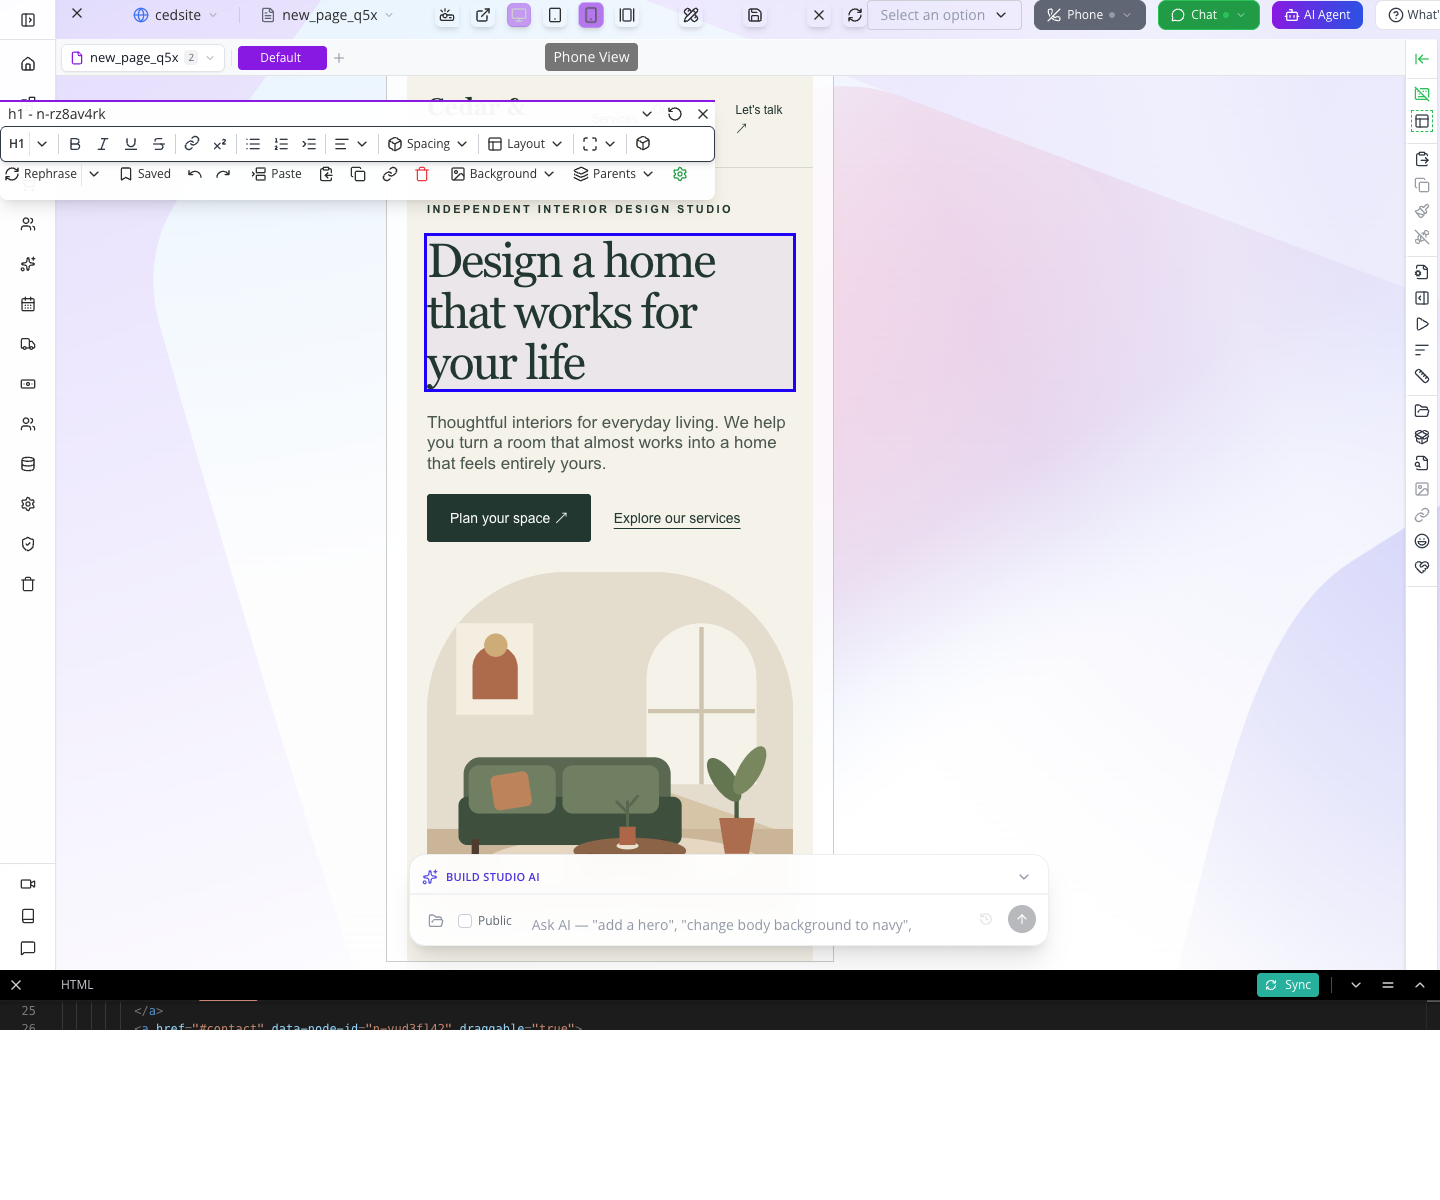
Look for meaning as well as fit. Can a visitor understand the first screen? Are all three service choices readable? Can they reach the contact action without something covering it? The public-page check later catches differences that the editor alone cannot reveal.
7. Save the page record
Press Save in the top toolbar. For a new page, the Page form opens. On Information, enter these values:
| Field | Example | Why it matters |
|---|---|---|
| Site | Your existing site; cedsite in the captures | Keeps both pages in the same website |
| Name | cedar-and-form | A stable identifier for the page |
| Slug | cedar-and-form | The page's address segment |
| Title | Cedar & Form — Interior Design | A readable page-record title |
Press the form's Save. Wait for Data inserted and the page selector to show cedar-and-form.
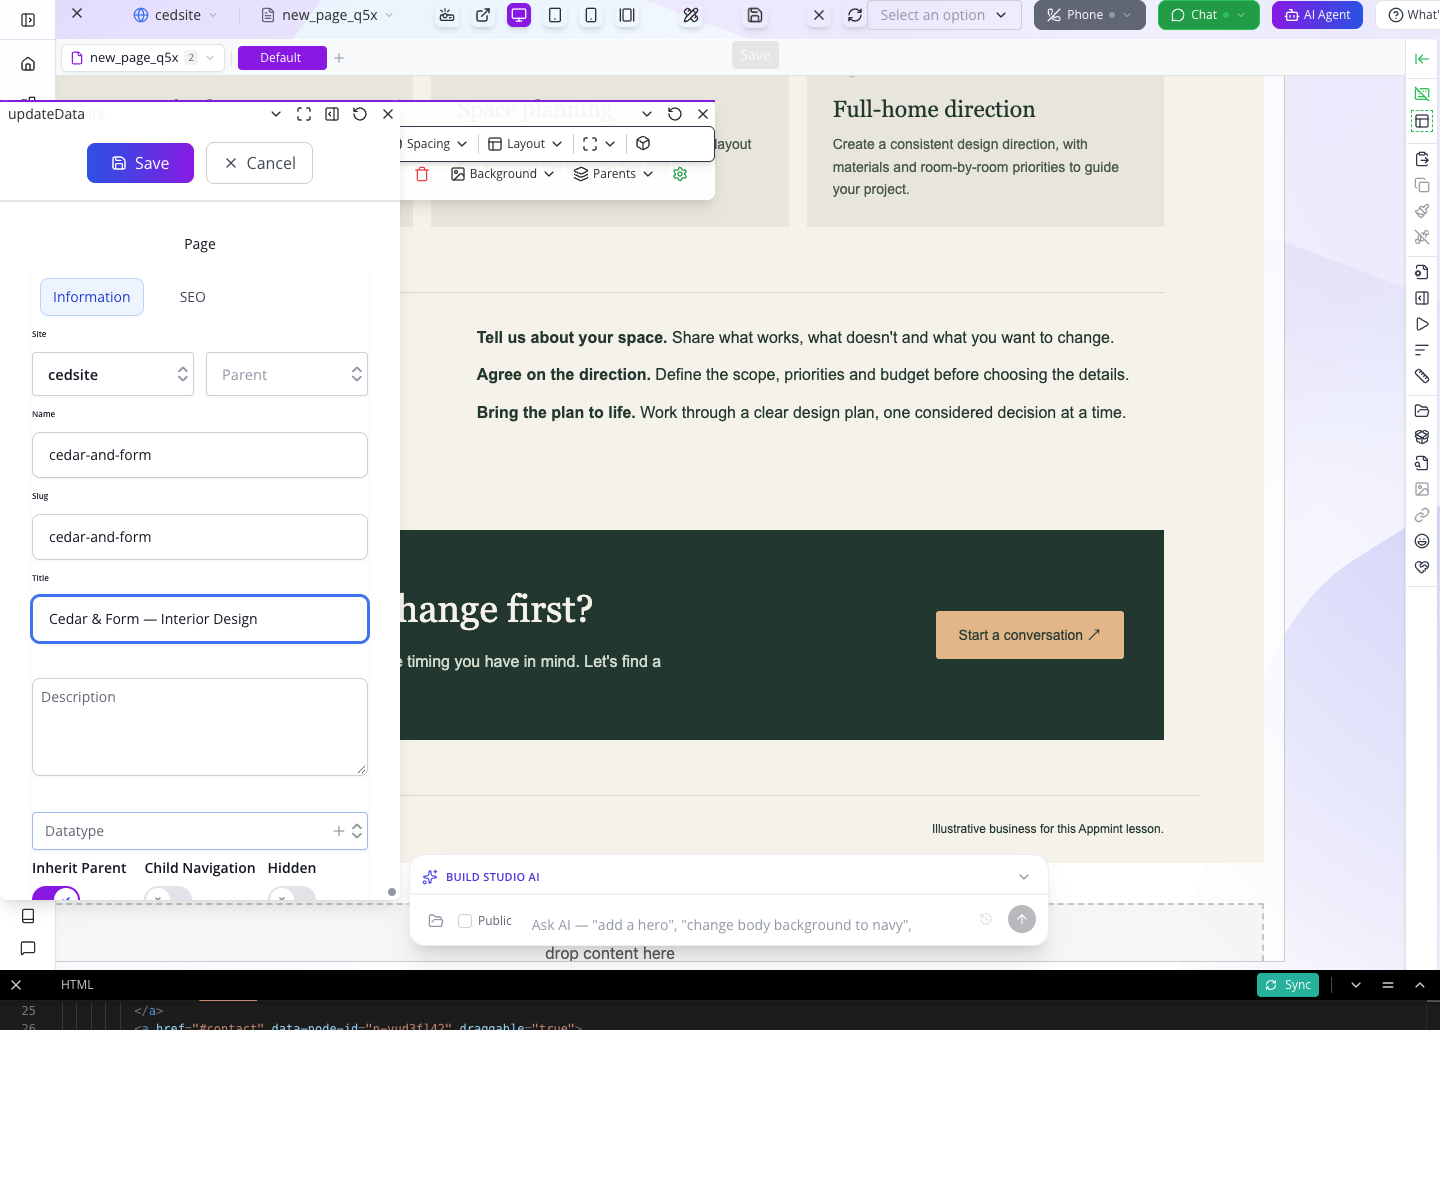
Watch for: keep Name and Slug identical for this exercise. That avoids disagreement between shortcuts that open the name and public routing that uses the slug. Changing the title later is not a request to change the address.
8. Leave and reopen the canvas
Choose Close Page in the toolbar. Click the Build Studio group name to open its overview, select All Pages, and find your page card. Hover the card and use its pencil Edit control.
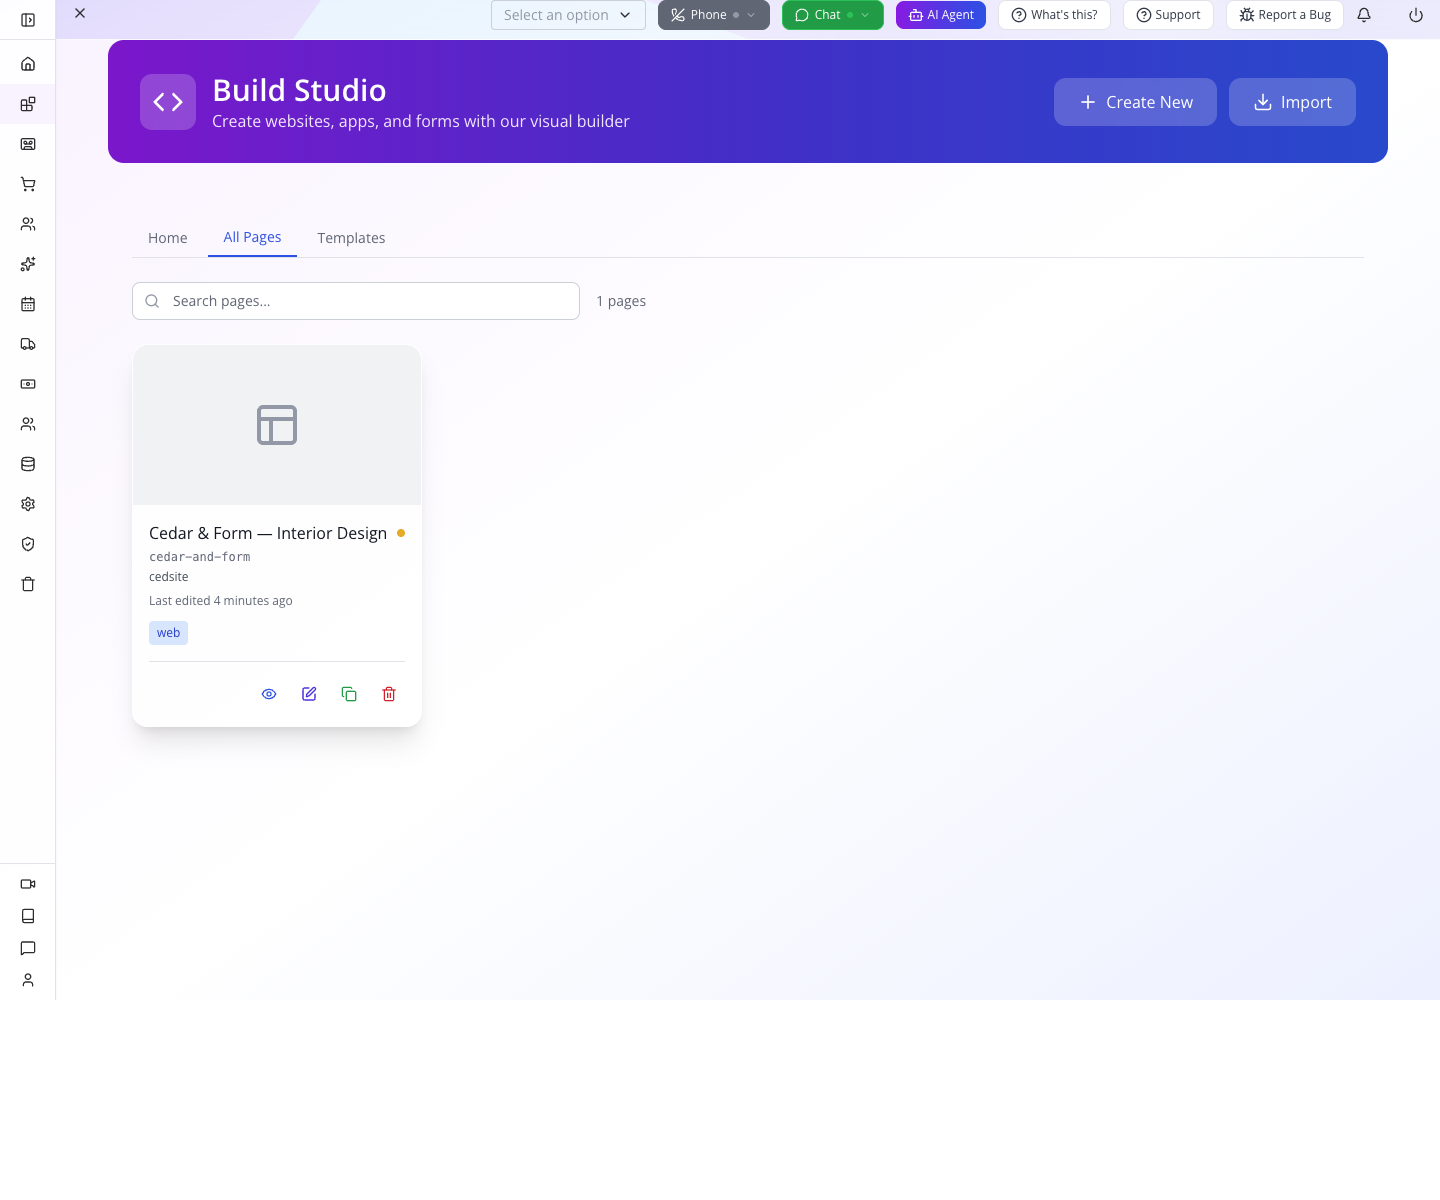
Wait for the page name and canvas content to load. Read the headline again. This is the saved result, after leaving and returning.
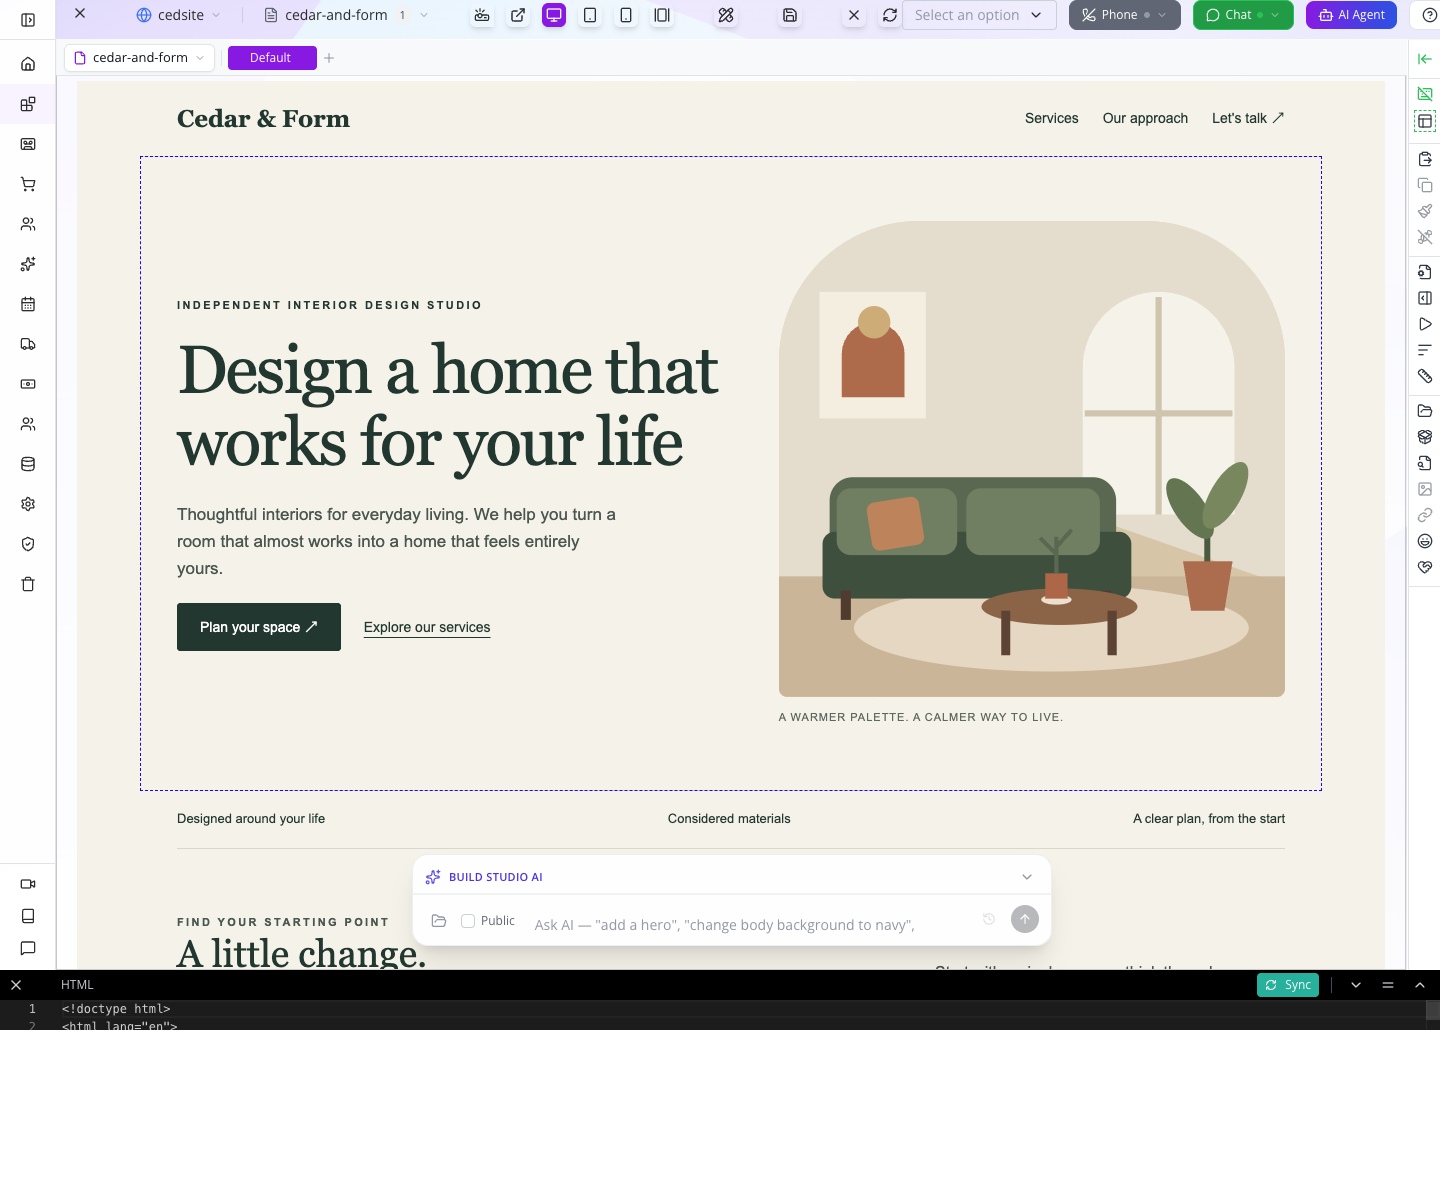
Saved Pages is also useful, but in this build it opens a Data Table View — Page table. Editing a row can open the page information form. For the visual canvas, use Build Studio → All Pages → Edit. Clicking only the card title does not open it.
Watch for: a bookmarked editor URL did not reliably reload the saved page during this walkthrough; it could open a new blank page. Reopen through the page card and verify the page selector before making changes.
Try it: change one service-card heading to wording that suits your business, save with the top toolbar and reopen through All Pages → Edit. Confirm that specific change remains.
Check yourself: you pressed Save HTML document to canvas and the page looks right. Is the public page necessarily updated? Answer: save the page with the top toolbar, then check it as a visitor.
Part 2 — Turn a page into a small website
1. Add the matching Services page
Open Build Studio → New Web Page again. Check the same site, open HTML, and paste the full Services starter. Apply it with the HTML panel's Save, then close the panel.
Replace the fictional contact email with your own as you did on the homepage. Press the top toolbar Save and use:
| Field | Value |
|---|---|
| Name | services |
| Slug | services |
| Title | Services — Cedar & Form |
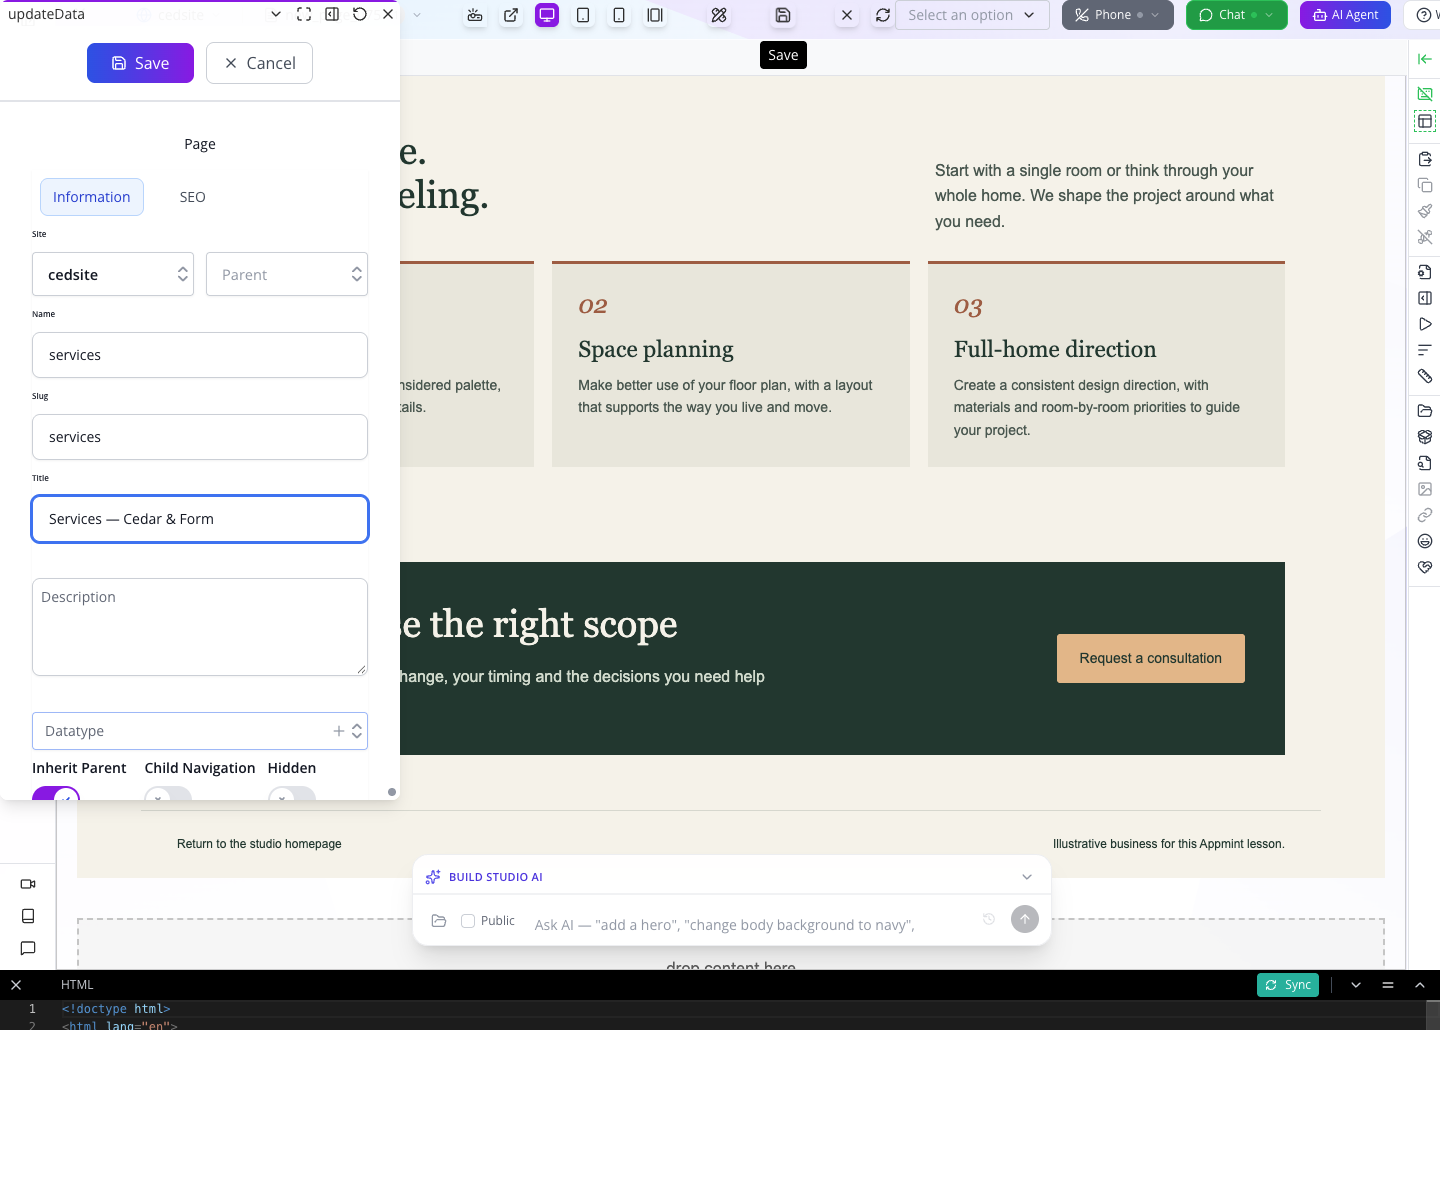
After saving, find both page cards in All Pages. The second page is a complete design with its own introduction, service cards and contact invitation, rather than an unexplained heading on an empty canvas.
2. Connect the homepage navigation
Reopen cedar-and-form through its Edit control. Open HTML → Sync. Find the navigation link whose text is Services and the Explore our services link. In each of those links, change the destination from #services to /services:
<a href="/services">Services</a>
<a class="secondary" href="/services">Explore our services</a>
Keep the other attributes already present on your elements. Apply the HTML, close the panel and press the top toolbar Save.
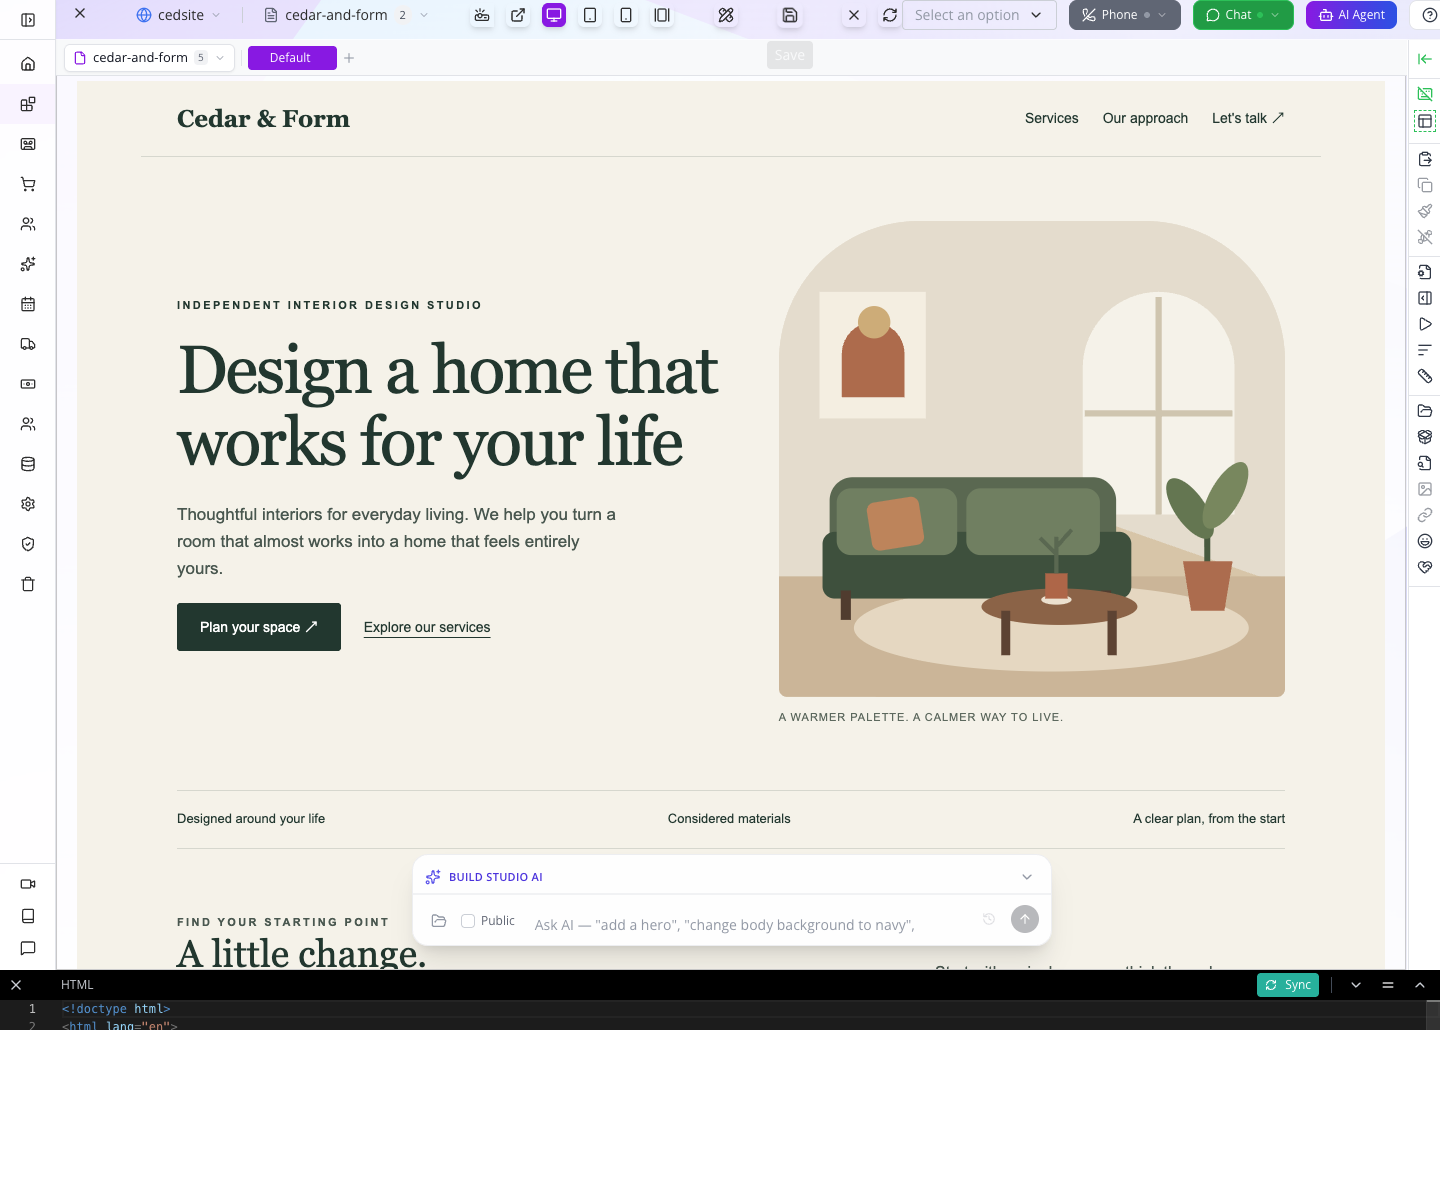
#services means a section within the current page. /services means the Services page in this website. Leave Our approach pointing to its section; not every navigation item needs a separate page.
The Services starter already provides Home and Return to the studio homepage links pointing to /. Next, tell the site which page that root address should serve.
3. Choose the homepage
Open App Root's Home screen and find Active Site. Choose Site Config, open Pages, then choose cedar-and-form in Home page. Press Save changes.
Reopen Site Config and wait for the page choices to load. The selected value should still be cedar-and-form.
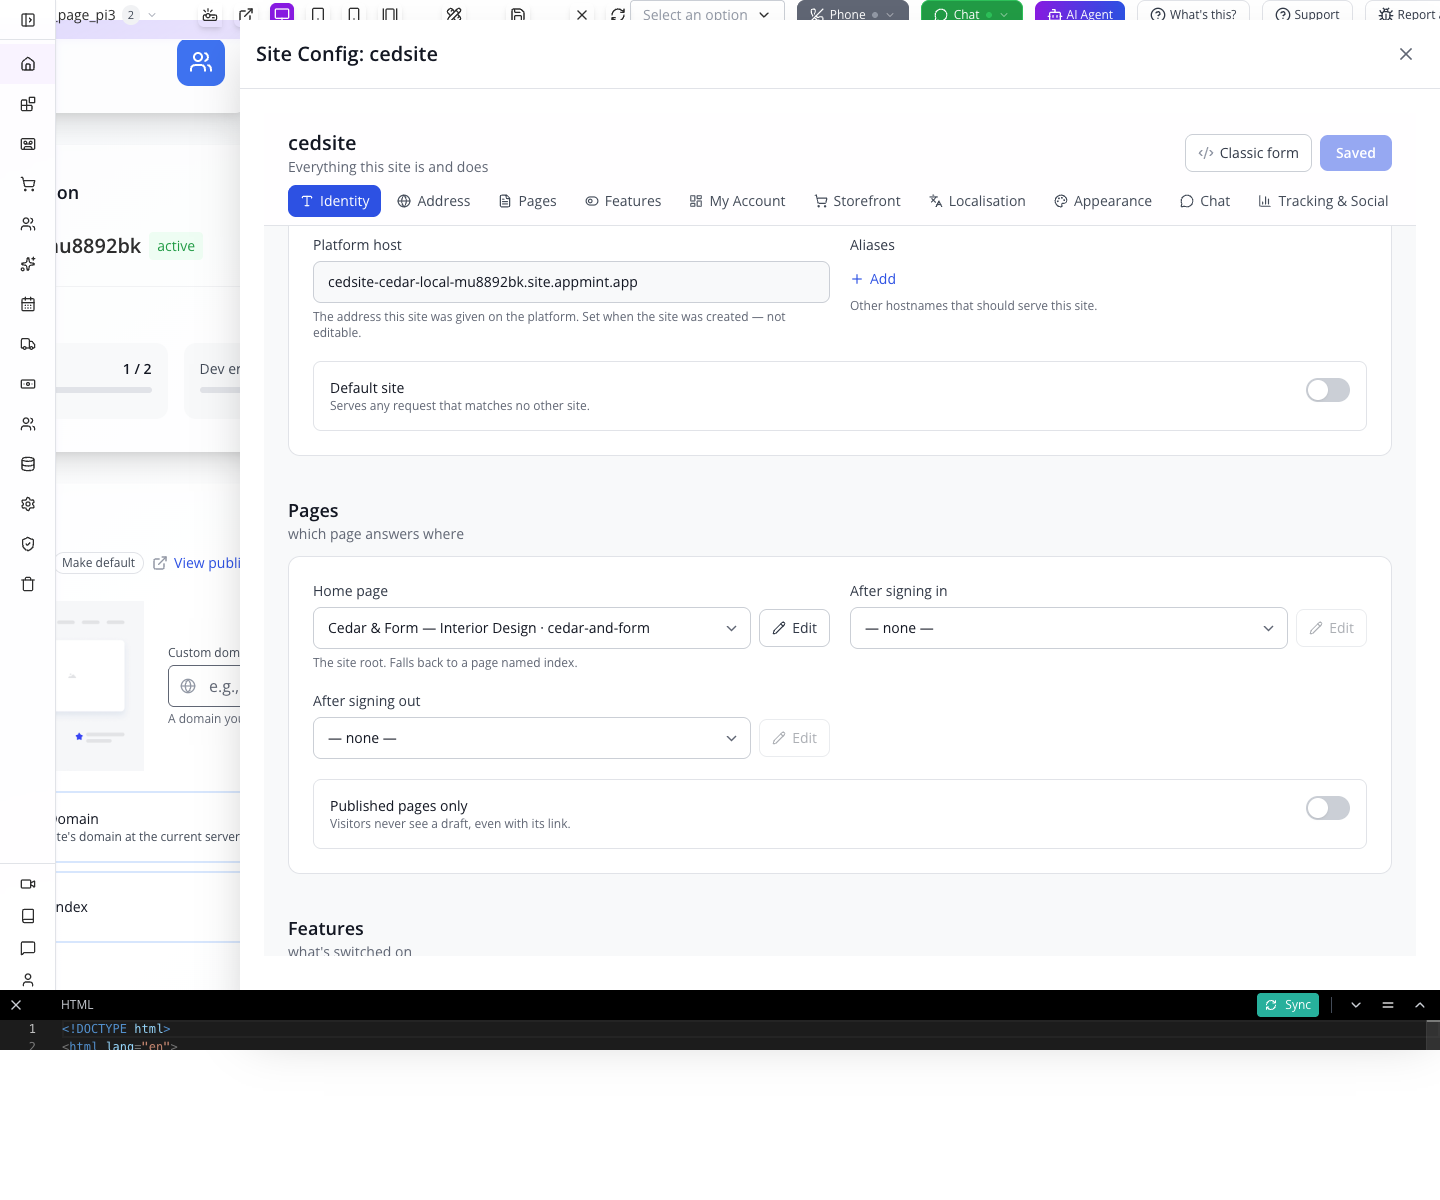
If Active Site says Nothing is loaded, choose Choose a site and select your site before opening these controls. A fresh sign-in or reload may require selecting it again.
The site and page names need not be the same. Here, the site is cedsite, while its homepage is cedar-and-form. A visitor can use the bare site address without knowing that internal page name.
Watch for: the selector can briefly show a placeholder while its choices load. Wait before concluding that the setting was lost or saving a second time.
4. Open the actual public address
On Active Site, choose View public site. Copy that supplied address into a private browser window. Do not copy the Studio editor URL.
Your site has its own supplied address. Read the page's headline to confirm you opened the right content. The screenshots below show the local rehearsal's anonymous renderer reading this learner's saved pages; its machine-local address is not a publishing address for your business.
On the site used for this course, saving the page made it publicly available; Build Studio did not require a separate Publish button. Treat saved edits as changes visitors may see. A Published badge on a dashboard is less useful than opening the actual page and checking its content.
5. Follow the whole visitor journey
In the private window, click Services. The new page should say Design support for the way you live. Click Home to return, then try Explore our services from the homepage and the return link at the Services page's foot.
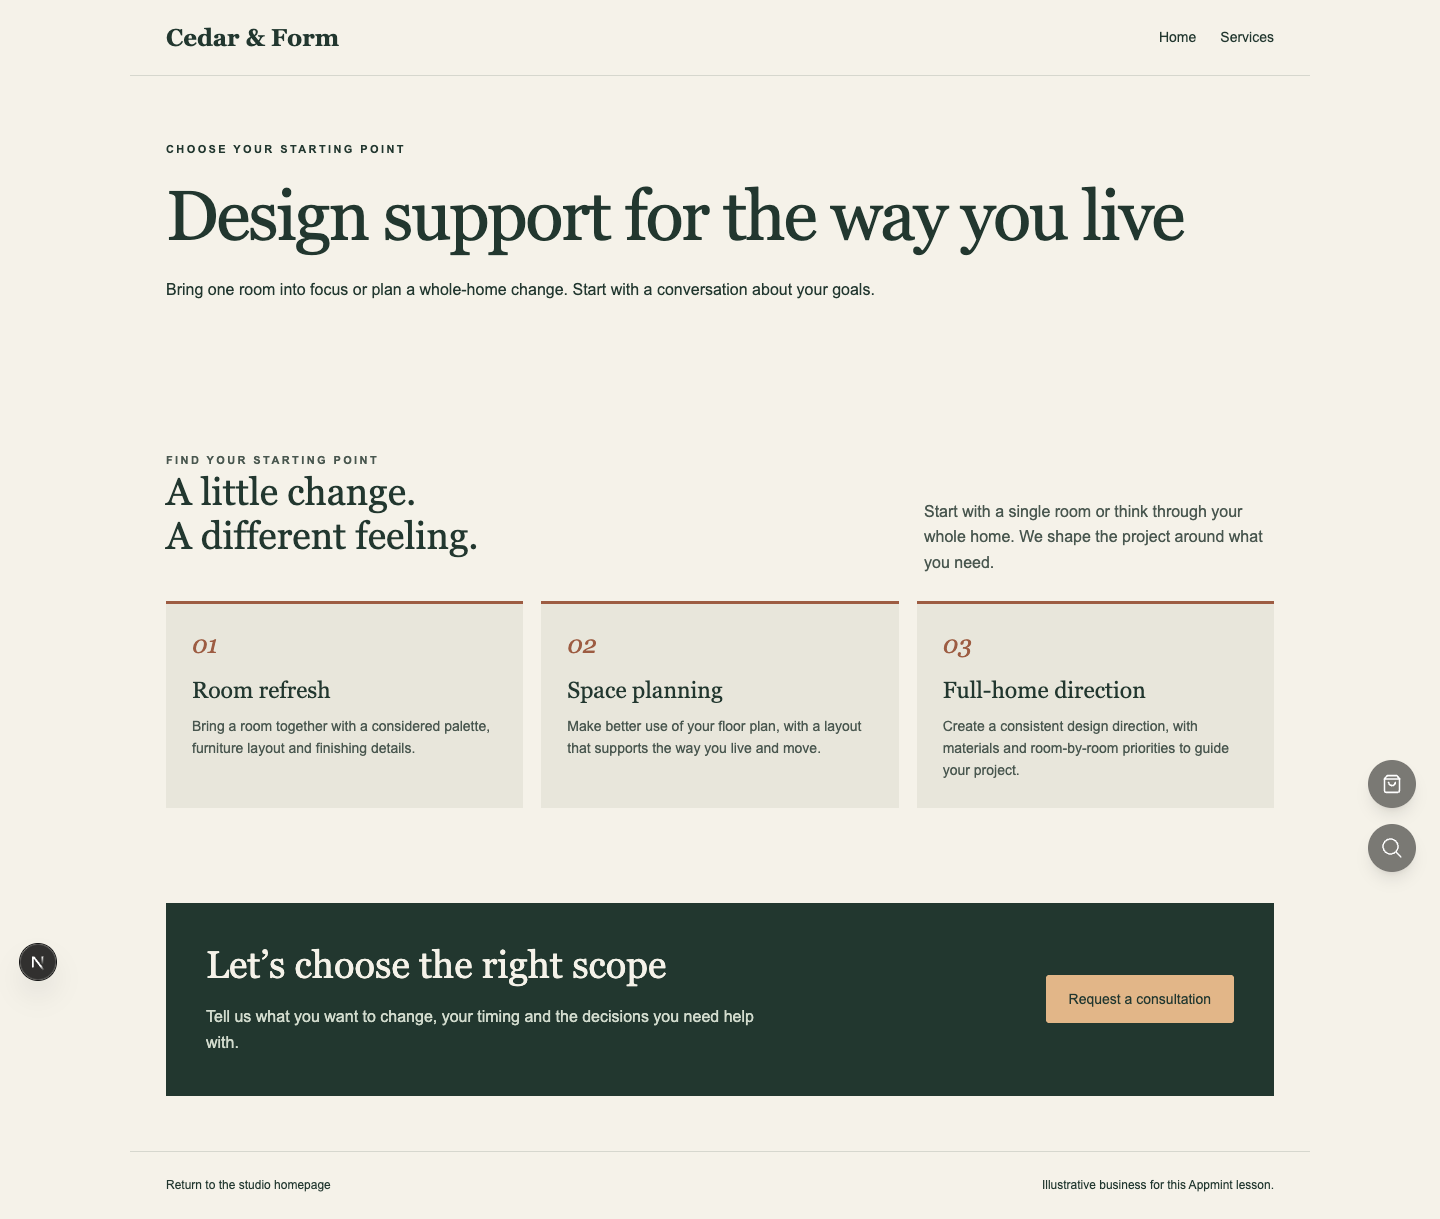
Scroll to the contact section. Inspect its destination and confirm it contains your enquiry email. If you click a mailto: button, your browser may ask to open an email program. Review its recipient and subject; you do not need to send a message to test the destination.

6. Repeat at phone width
Open the public address on your phone, or use your desktop browser's responsive mode. Read from top to bottom and follow the same links. Try a narrow width as well as a large phone.

Both pages were checked at 430 and 320 pixels wide and had no horizontal overflow. Navigation was followed again at each width. Your own text or images can change that result, so repeat this check after substantial content edits.
Try it: ask someone unfamiliar with your business to find a service and reach the contact action. Watch where they hesitate; rewrite the confusing label before adding another section.
Check yourself: the page opens, but the heading is wrong. Has the navigation passed? Answer: no. Confirm the destination page's content, not just that something appeared.
Part 3 — Search details, recovery and your own domain
1. Add a useful page description
Open the homepage's Page Config through the right-hand toolbar's Show Page Config control. On Information, find Description and enter:
Interior design studio for homes that work — consultations in Chicago.

On SEO, set Keywords to interior design, room refresh, Chicago. Leave Robots at the existing default for this public training page. Press the top toolbar Save to persist these page changes. Close and reopen the page through All Pages → Edit, then revisit Page Config and both fields. The values should still be present.
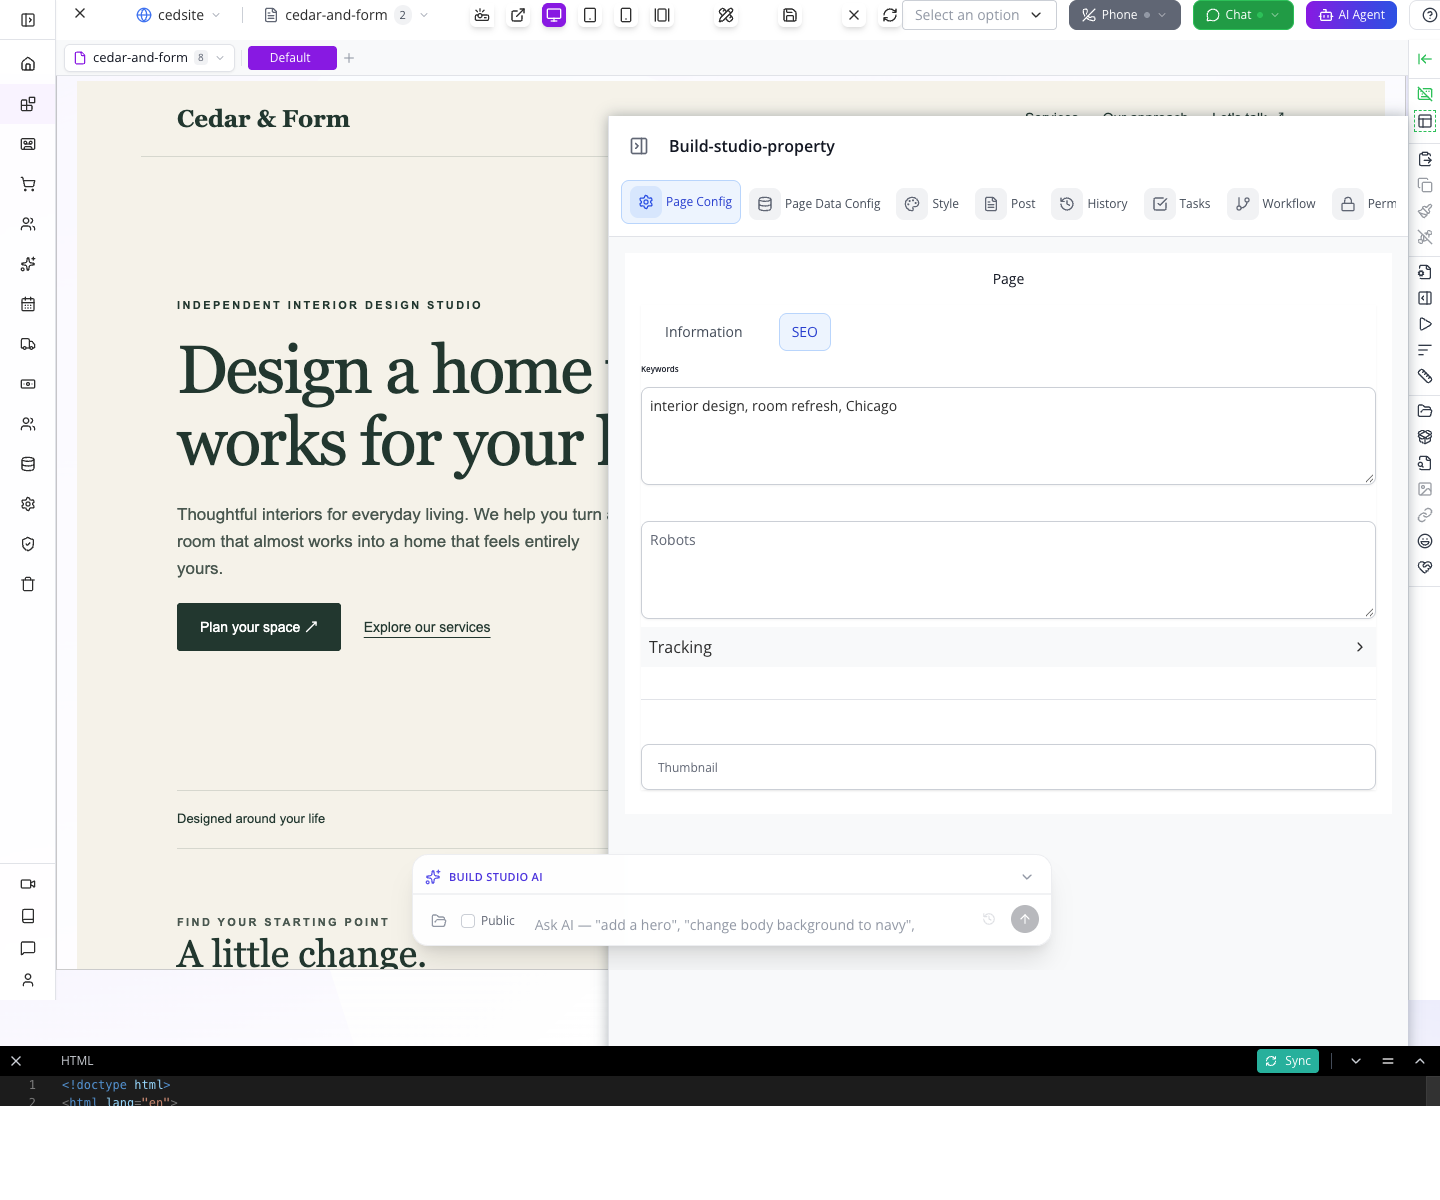
Use a description that accurately summarizes the page. Keywords do not guarantee search ranking, and setting a description does not guarantee a search engine will display that exact text.
The hosted page combines the Page record’s Title with the site’s Title. After loading, the local example read Cedar & Form — Interior Design | cedsite. The description and keywords above also appeared in the anonymous page's metadata. If the site title is still its technical name, give it your business name in Site Config → Identity → Title; avoid repeating the full page title in both fields. Keep imported HTML and saved page/site titles consistent, and wait for the public page to finish loading before reading the browser title.
2. Find earlier versions before you need them
From Show Page Config, select History. Saved versions appear with their version number, timestamp and View … at this point control. Use View to inspect the version you are considering before a recovery. This opens that snapshot on the canvas. To leave it, use Close Page, then All Pages → Edit to reopen the current saved page; do not press Save while you are only inspecting an old snapshot. History opened from a snapshot can show Nothing here. Reopen the current page before selecting a different version.
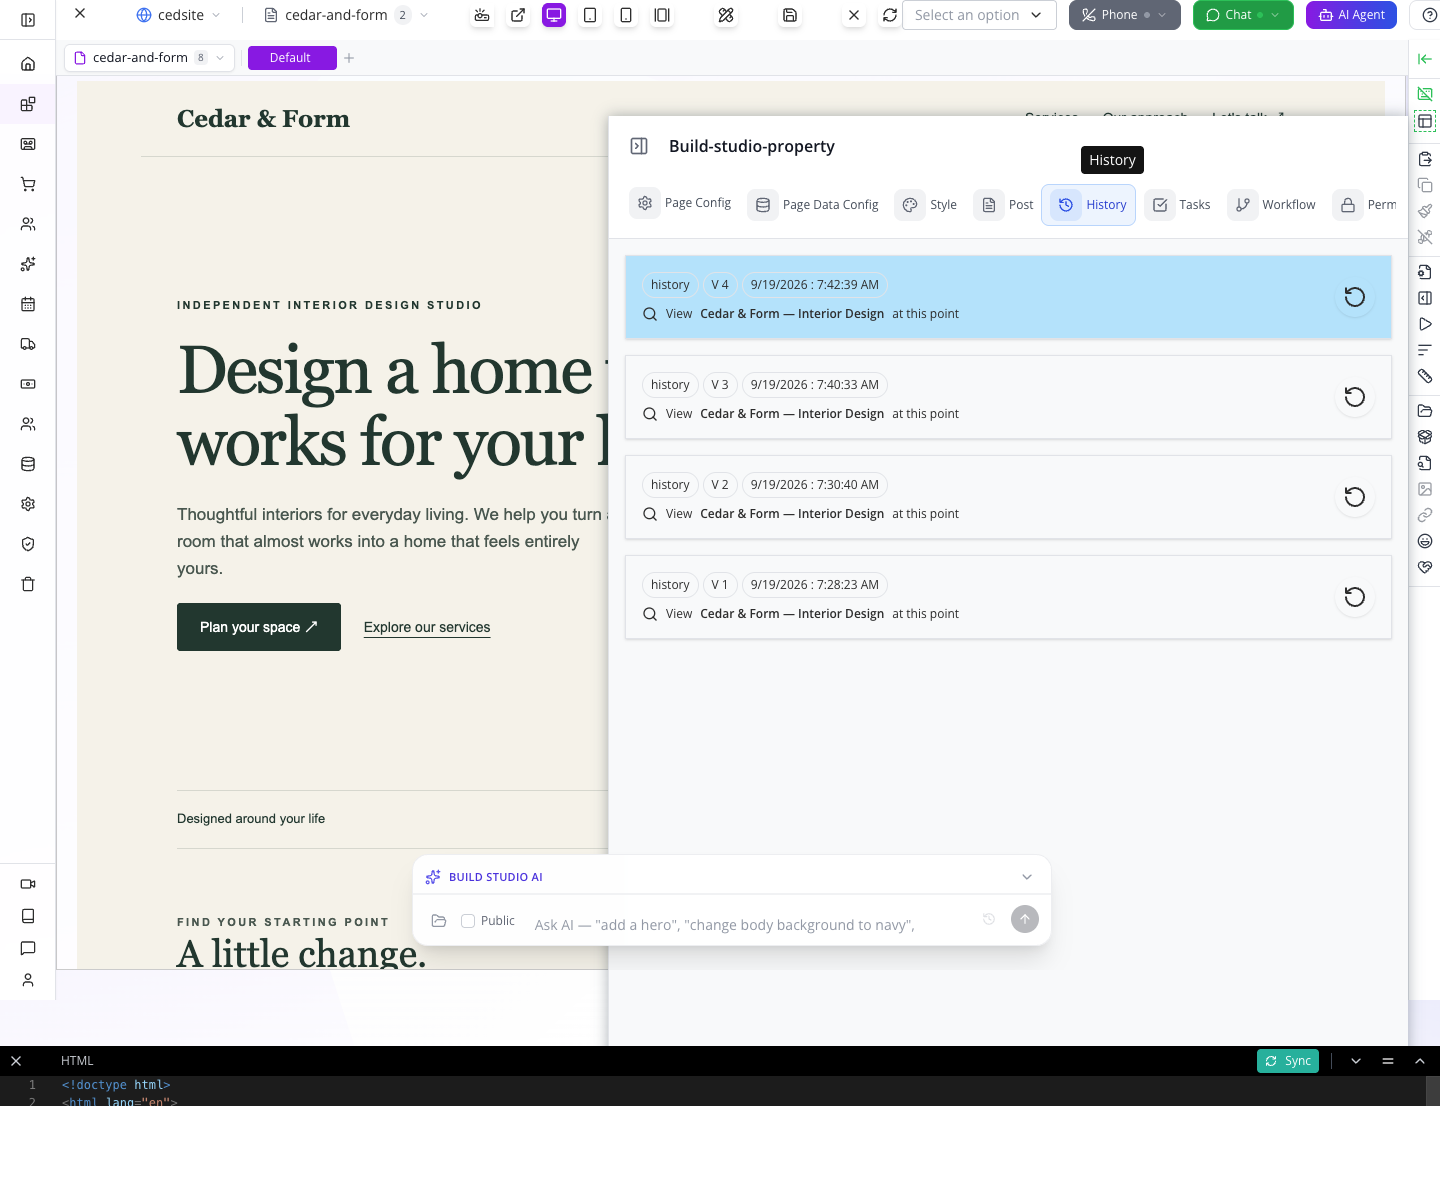
The circular-arrow Restore control asks for a second click within five seconds. Restore only the version you intend to recover. After a recovery, reopen the page and check the public result, including links and metadata; an older design may also contain older contact details.
This course's rehearsal opened History and its version view. It did not restore an older version over the finished website. The optional restore exercise belongs on a disposable training page: save two visibly different headlines and compare them before restoring. It is not required to finish this website.
3. Prepare the domain you want visitors to use
Your supplied Appmint address already works. A custom domain gives visitors an address such as www.yourbusiness.com; you need control of that domain's DNS records to connect it.
On App Root → Active Site, find the domain field with example text e.g., mystunningwebsite.com. Enter the full hostname you want, such as www.yourbusiness.com, without https:// or a page path.
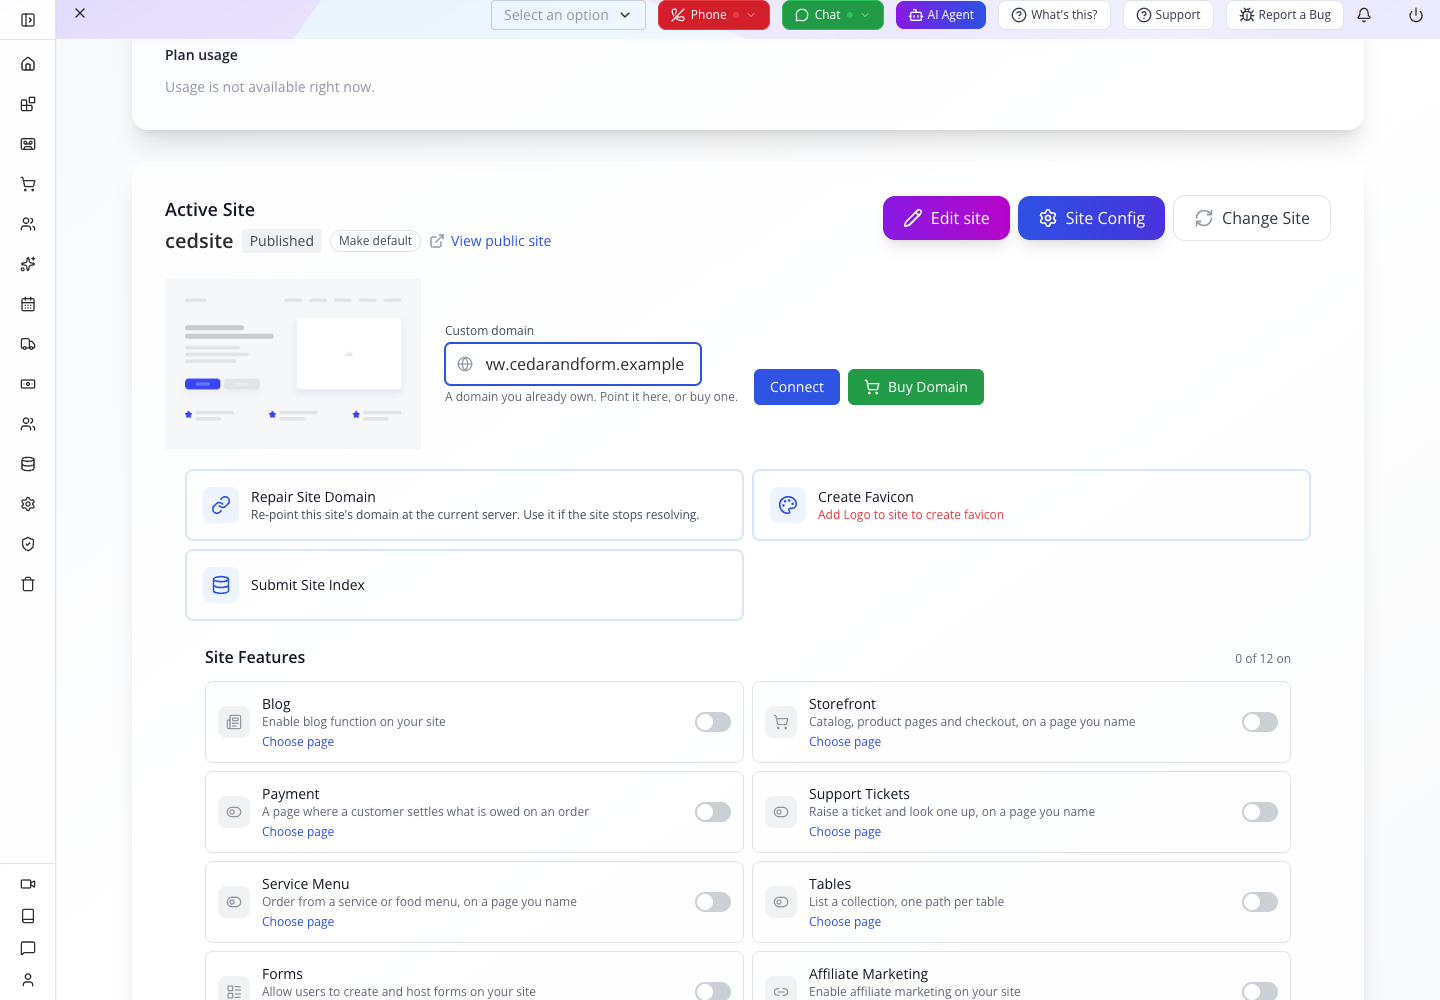
For your real domain, press Connect and follow the site's Show DNS Settings instructions. Use the hostname and target shown for your own site, not the training address in this course. The illustrated fictional .example domain cannot be registered or used to complete this connection.
A CNAME record maps a hostname such as www to another hostname. At your DNS provider, create or edit that hostname's record using the target supplied by Appmint. For example, Cloudflare's route is the domain's DNS → Records → Add record: choose the record type, fill its name and target, and save. If the hostname already has a record, inspect and edit the existing record rather than creating a conflicting second one. Cloudflare's DNS record instructions.
Keep the DNS provider's tab and Appmint's settings side by side. Check spelling, the exact hostname (www and the bare domain are different), and the destination. Preserve unrelated mail records. After DNS resolves, open your new HTTPS address in a private window and test both pages. If the browser reports a certificate problem, the connection is not ready to share yet; use your working supplied address while you investigate.
The domain exercise here stops at the genuine domain-entry screen because the training business has no controlled custom domain. The production guide lists the DNS and HTTPS shots needed to film a completed real-domain connection. Do not substitute an unrelated site's success screen.
4. Choose the next business capability
A beautiful page starts the journey; the next capability depends on how your customers buy:
| Visitor need | Next course | Result to check |
|---|---|---|
| Ask a question now | Customer conversations | A visitor message reaches the right inbox |
| Request a consultation | Enquiry and reservations | A saved enquiry and a booked slot |
| Return to private project information | Client dashboard | A signed-in customer sees their own records |
| Browse and buy products | Custom products online | Product, cart and order connect correctly |
| Show business data in the page | Operations dashboard | A bound view shows the intended records |
A form submission is not automatically a sales lead. A mailto: link is not a form. A public Services page is not a private client portal. Build and test each handoff explicitly as you add it.
Try it: write down one visitor action you want next and the record you expect it to create. For Cedar & Form, choose Request a consultation → CRM lead; a reservation is a second result after a time is booked. Continue with the enquiry course to build that handoff. For your business, choose the matching next course rather than adding every feature at once.
Check yourself: you entered a domain in a text field. Is the domain connected? Answer: the DNS connection and HTTPS visitor check must also succeed.
If something goes wrong
| Symptom | Check first | Next action |
|---|---|---|
| HTML remains visible and covers other controls | The code panel is still open | Use its small left-hand X |
| A visual edit disappears after applying HTML | Code was not synced from the canvas | Sync, repeat the edit and save both layers |
| New Page opens instead of the saved design | You reopened an editor URL | Build Studio → All Pages → the card's Edit control |
| Saved Pages shows a table | This opens the table view | Use All Pages for the visual editor |
| Homepage setting briefly looks empty | Page choices are still loading | Wait, then read the selected value |
| Services scrolls within the homepage | Link is still #services | Change that link's destination to /services |
| Public page has old content | The page record has not been saved, or the wrong page is open | Check the selector, save, reload the public page |
| Contact action opens the wrong email | Starter placeholder remains | Replace the email in each contact link, then save |
| Browser title is repeated or changes while loading | Page Title, Site Title and imported HTML title differ | Use a short Site Title and descriptive Page Title; inspect after loading finishes |
| Domain instructions show a placeholder or an unexpected target | Site/domain settings may be stale | Reopen settings and verify your site's supplied hostname before changing DNS |
What happened behind the scenes
Records, source references and verification details
The two Page records belong to site cedsite; the site's homePage is cedar-and-form. Page HTML is saved with the page, and the public site in this exercise serves saved content. The HTML panel's apply action and the record save are distinct operations.
Source references under /Users/imzee/projects/:
websitemint/packages/ui/src/components/build-studio/build-studio-store.tsx: opening by stored record identity, save and new-record form.websitemint/packages/ui/src/components/build-studio/build-studio-code-view.tsx: panel close, Sync and HTML apply controls.websitemint/packages/ui/src/components/welcome-screens/welcome-build-studio.tsx: All Pages and card Edit.websitemint/packages/ui/src/components/data-view/base-form/base-history.tsx: history view and double-click restore confirmation.websitemint/packages/ui/src/components/welcome-screens/site-domain-connect.tsxanddns-instructions-popup.tsx: domain entry and DNS guidance. The source includes static fallback DNS values; this course does not present those as verified current infrastructure.sdk/src/models/site.ts: homepage choice.appengine/src/site/site.service.ts: site/page routing and the published-pages-only branch.
The local capture ledger, public metadata readback and learner review record the 19 September rehearsal. The learner's own signup organisation and site were used for page creation, visual edit, Sync/apply, both saves, reopen, Services creation, reciprocal navigation, homepage save/readback, metadata, History View and anonymous desktop/mobile checks. A separate reviewer followed the visitor journey. The local renderer used actual base-app source and the learner's own saved pages; this is not a production-hosting test. Domain entry was illustrated without Connect or DNS changes. History View was inspected without restoring. No enquiry form was configured and no enquiry email sent.
Capture automation entered the initial starter through editor keyboard input; later HTML updates used the real Monaco editor input model, followed by the application's visible apply/save controls and anonymous readback. No server-side page records were fabricated. The graphics are lesson HTML/SVG assets, not generated screenshots of an imagined interface.
Where next
Continue with Maya Bennett's enquiry and consultation. For filming, use the companion-video guide, which pairs scenes with these real stills and distinguishes completed actions from remaining domain footage.