
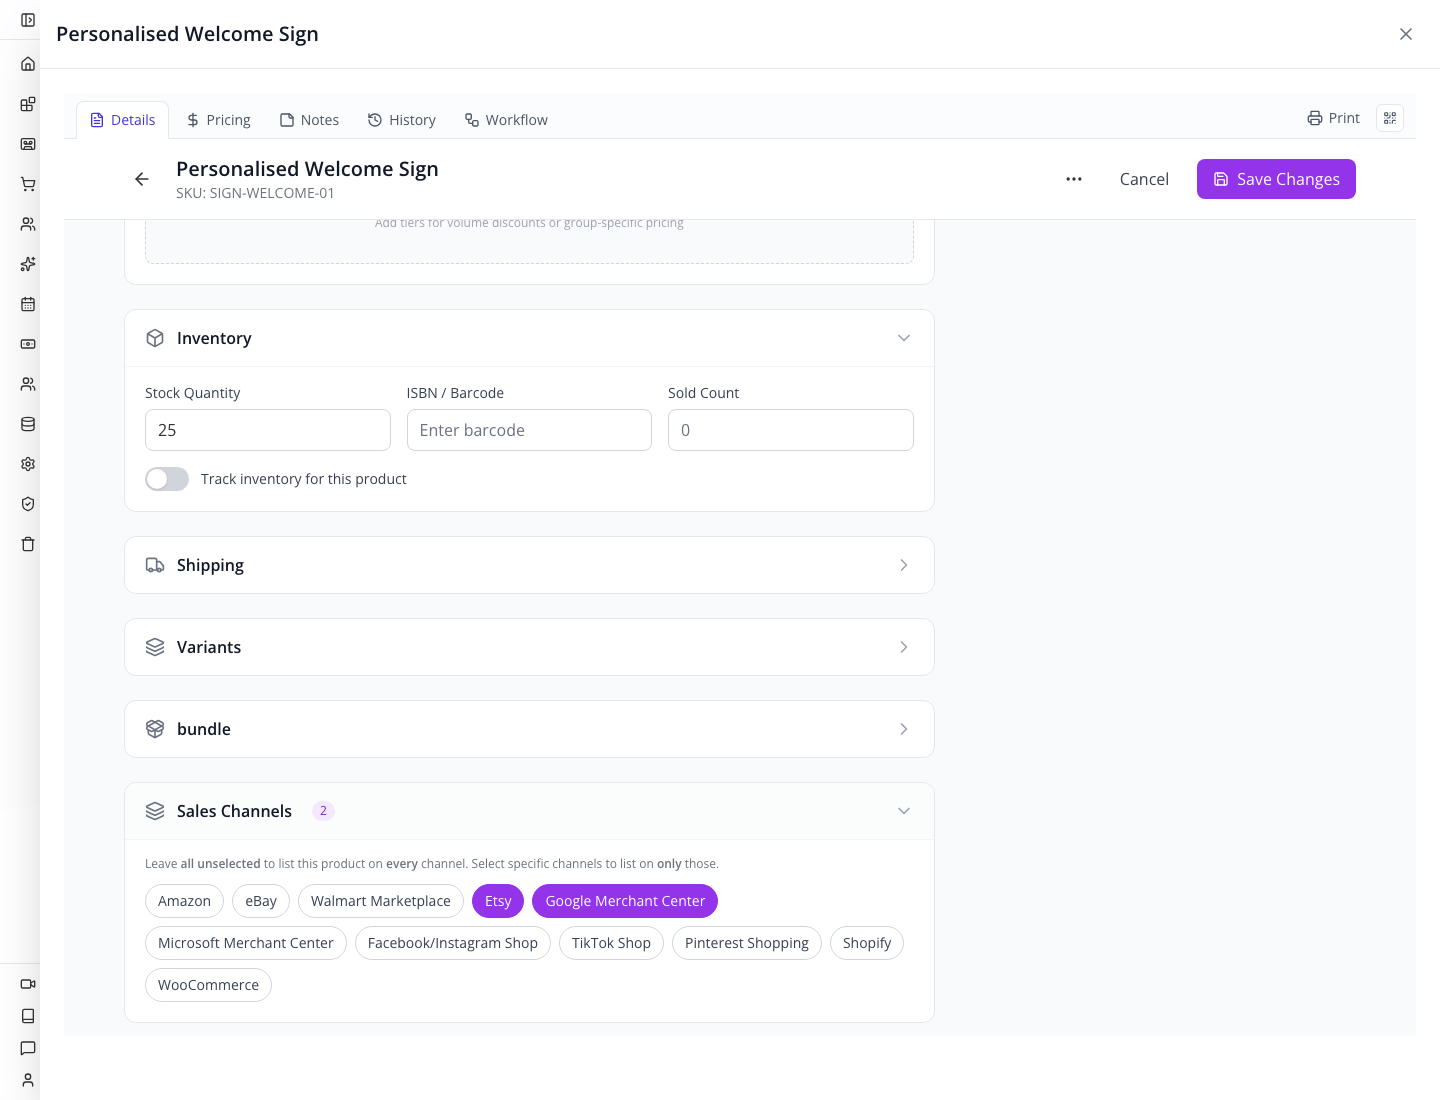
Two selected destinations keep the catalogue intent clear. Account connection, listing validation and publication are separate steps.
For: shop owners and catalogue operators adding another selling destination. Allow: 45–60 minutes for the Appmint preparation and pricing lab; provider account setup and review take separate time. Level: beginner configuration, followed by a developer validation lab. Product: Appmint Studio Manager. Checked: product selection and pricing persistence rechecked 24 September 2026 in local Studio and AppEngine; provider forms and adapter review from 18 September remain separately identified. Example: Tutorial Sign Studio, SKU SIGN-WELCOME-01, selling price $45, cost $18.
What you will have at the end
You will have selected the sign’s intended channels, found the real Google and Etsy connection controls, and learned to check a proposed channel price before sending it anywhere. You will be able to distinguish an eligible product, a connected account, a locally valid listing and a listing accepted by the destination.
The advanced lab demonstrates an important result with the real API: 15% markup on an $18 cost is not 15% added to the $45 selling price. It also checks a channel exclusion and the difference between Google’s and Etsy’s local validation results.
Walkthrough status: on 24 September, Google/Etsy product selections were saved, the page was reloaded and both selections persisted. A disabled pricing rule was created through Studio, reloaded and reopened; the actual authenticated API returned 20.70, 51.75 and the unchanged 45.00 control result. The rule was disabled, then deleted and its absence checked; the product’s original selection was restored. Provider forms were inspected in the earlier walkthrough without authorising external accounts. No listing, marketplace order or price/stock sync has been performed.
What you need
- The saved sign from Personalised products, including its description, price and cost. The course’s current website/image failures must be resolved before using it as a real external listing.
- Access to Storefront → Product and Storefront → Sales Channels.
- For actual connection: control of your Google Merchant Center account or Etsy shop, and permission to grant Appmint access. Use your real account identifiers; sample IDs in API documentation are not accounts you can connect.
- Product images you can publish, the correct product identifier if one was assigned, an accurate category and a working customer-facing product URL.
- For the optional API lab: a developer who can authenticate normally to your training organisation and send the documented requests. Keep tokens outside screenshots and source files.
Do not invent a GTIN to silence a warning. Handmade and one-of-a-kind products can require different identifier treatment. Google documents how to use identifier_exists when identifiers do not exist; that provider rule must also be represented correctly by the integration. See Google’s identifier guidance.
The story
Priya already maintains the welcome sign in Appmint. She wants people to discover it through Google and buy through the shop, and she is considering an Etsy listing. Her main risk is duplication: another price to maintain, another stock number to trust, or an Etsy buyer whose artwork never reaches the workshop.
We start with one SKU and two intended destinations. We will inspect what Appmint is preparing before allowing any external action. A useful first result is knowing what must be corrected, not a green badge obtained with invented product data.
The route
flowchart LR
    A[Catalogue product] --> B[Choose intended channels]
    B --> C[Connect the correct provider account]
    C --> D[Validate fields and price]
    D --> E[Send one controlled listing]
    E --> F[Inspect the actual destination]
    F --> G[Reconcile orders, stock and later updates]
Part 1 — Understand the two commerce screens
1. Open Sales Channels
Expand Storefront and choose Sales Channels. The module’s top tabs are Dashboard, Channels, Orders, Inventory, Pricing, Mappings, Optimization and Analytics.
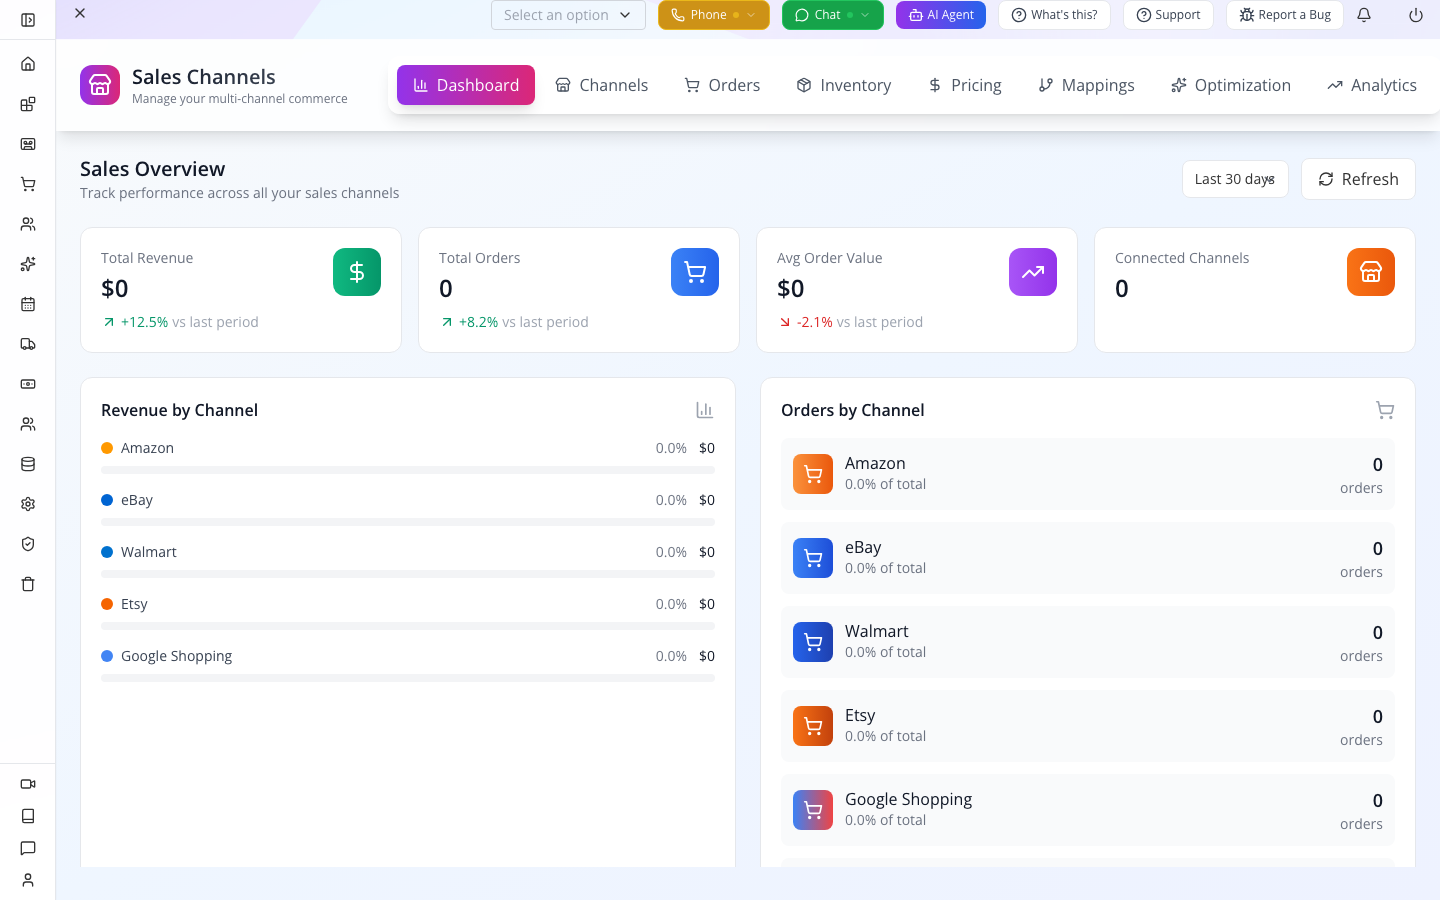
Use Dashboard for a summary, Channels for connection status, Pricing for rules, and Mappings for translating catalogue fields and categories. The actual product-publishing interface is reached through Product → Partner Sync, which we will open later.
The training dashboard shows zero revenue and orders. Its percentage changes nevertheless display +12.5%, +8.2% and -2.1%. Those are fixed display values on this build. Do not interpret them as sales growth for a new organisation.
2. Read the channel catalogue
Choose Channels. The checked catalogue has eleven entries: Amazon, eBay, Walmart, Etsy, Google Shopping, Microsoft Bing, Facebook, TikTok, Pinterest, Shopify and WooCommerce.
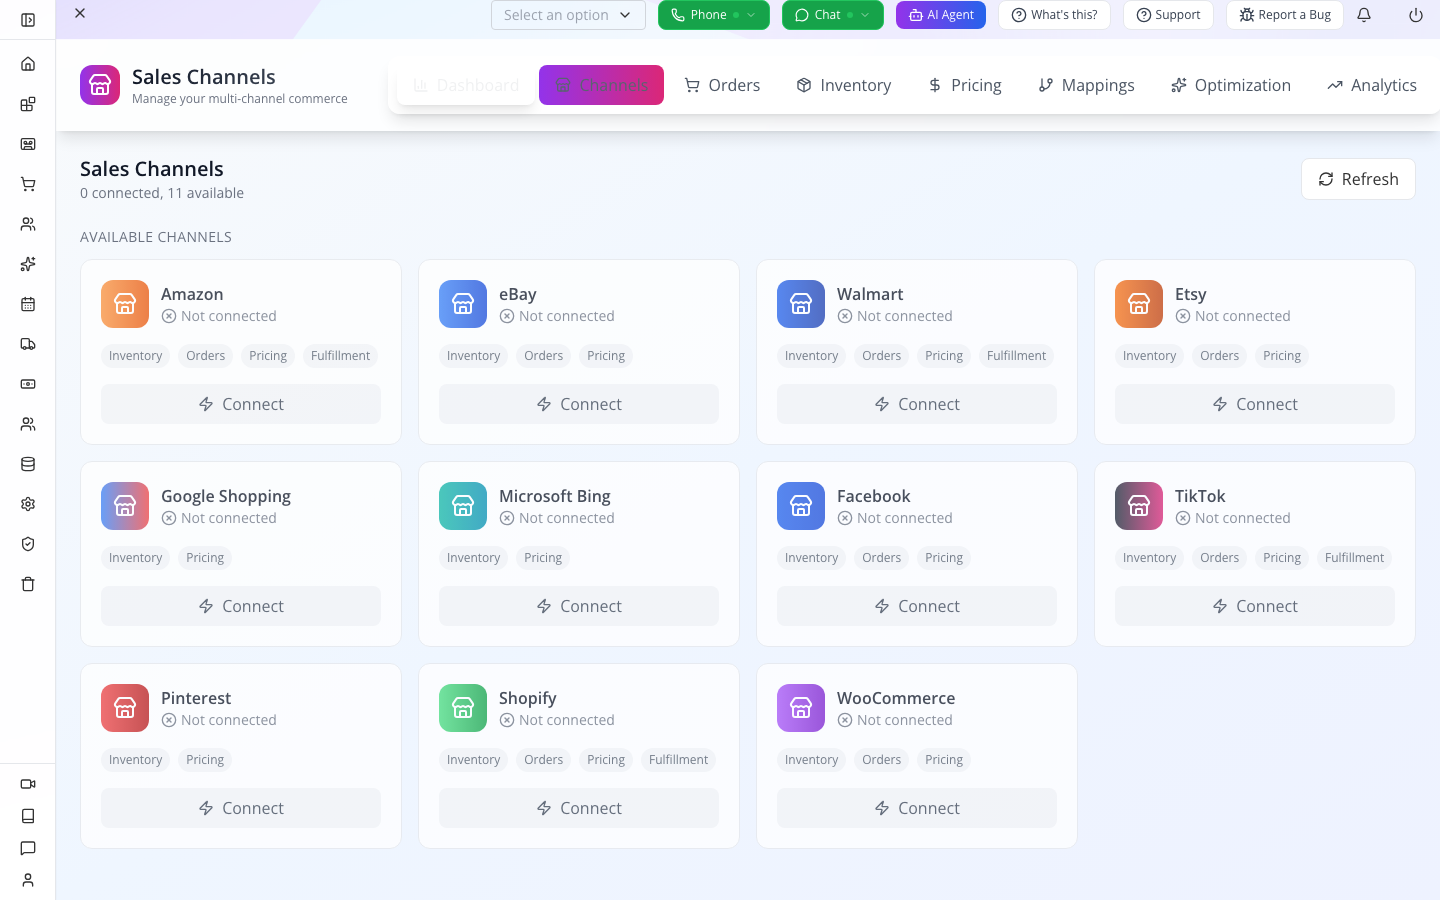
The labels Inventory, Orders, Pricing and Fulfillment describe the channel definition. They are not a receipt showing that each operation has run successfully for your account. Begin with one destination and test the exact operations your business needs.
Google appears as Google Shopping here and Google Merchant Center in the product selector. The names refer to the same intended Google destination in this lesson.
3. Restrict the sign to the intended channels
Open Storefront → Product, choose Products, and open Personalised Welcome Sign. Expand Sales Channels in the product editor.
Wait for the channel chips to load. This section briefly displayed No channels available. during its initial request, then showed all eleven choices. Do not create another account or product because of that transient state.
Select Etsy and Google Merchant Center. Their chips should appear selected. Choose Save Changes, wait for Product saved successfully, and reopen the product to check the selection.
Blank means all: leaving every chip unselected means the product is eligible for all channels in the validation model. Selecting two expresses a restriction. It does not connect either account or create a listing.
The saved record in this walkthrough contained etsy and google. A separate validation request for eBay returned Product is not enabled for this channel. Treat that as a validation check; confirm the chosen publishing path respects the restriction before using any bulk or all-partners action.
Try it. Point to the product’s selected chips, then the channel account status. Explain why the chips can be selected while the account still says Not connected.
Check yourself. Is an empty channel selection a way to block all external publishing? No. Keep the desired destinations explicit and control the publishing action separately.
Part 2 — Connect the account from the actual product-publishing screen
1. Open Partner Sync
Return to Product Center and choose its Partner Sync tab. The page title is Product Sync, with Commerce Sync and Social Media modes.
Stay on Commerce Sync. The product list is on the left; Sync Destinations contains provider cards on the right. The checked page showed the saved sign and 0 of 1 selected. Provider cards showed Not Configured.
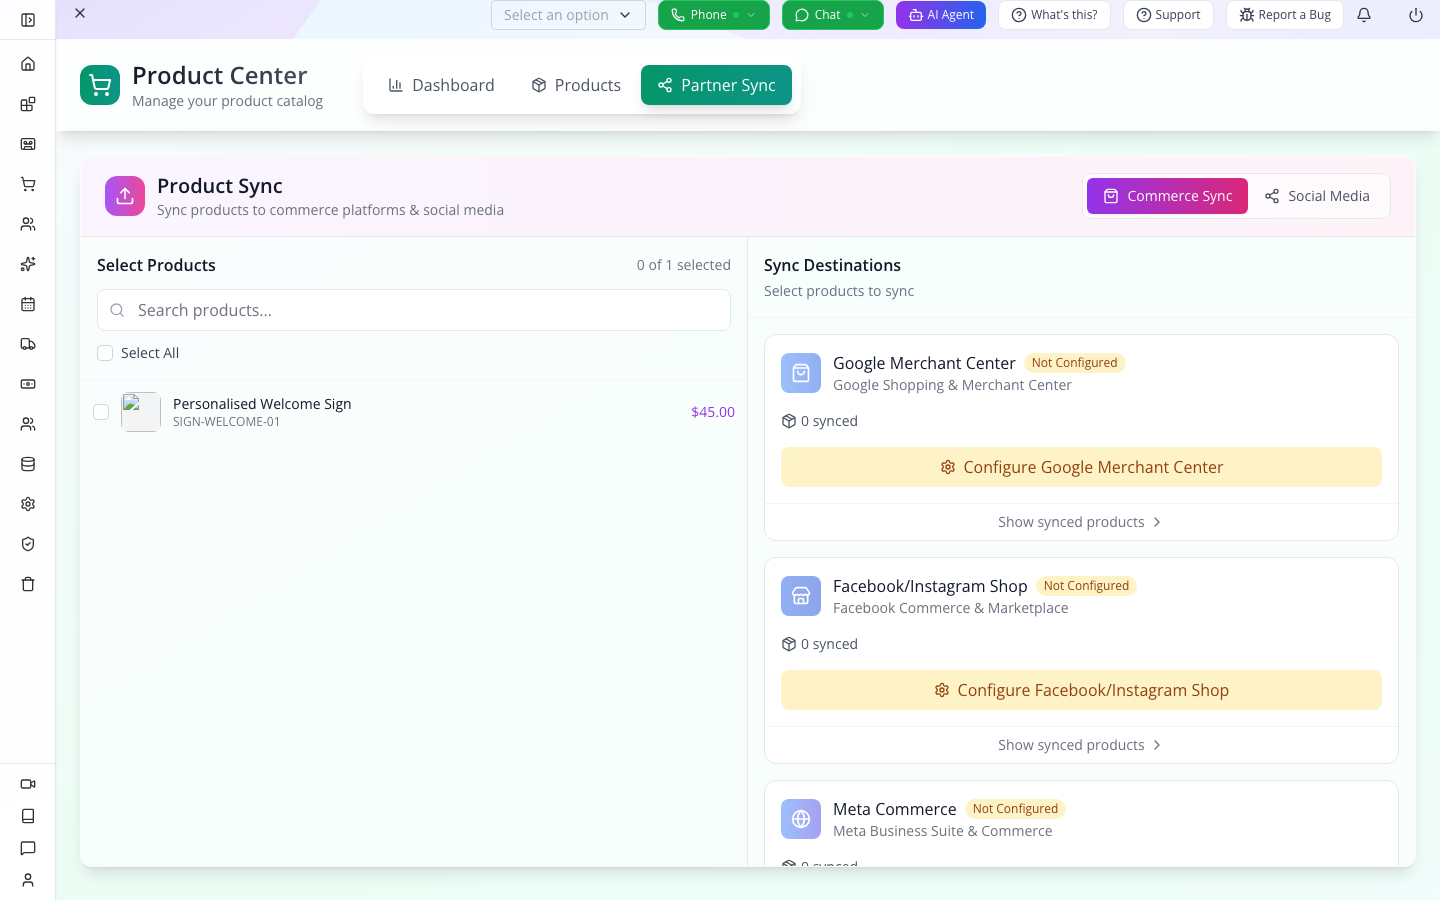
This is where you prepare a product push. The Sales Channels dashboard, provider configuration, product selection and external push are different actions. Keep Social Media for the social automation course.
2. Open Etsy Quick Connect
On the Etsy destination card choose Configure Etsy. The drawer offers Quick Connect, Manual Configuration and an Etsy Shop Setup Guide link.
Quick Connect displays Connect with Etsy and explains that it redirects to Etsy for authorisation.
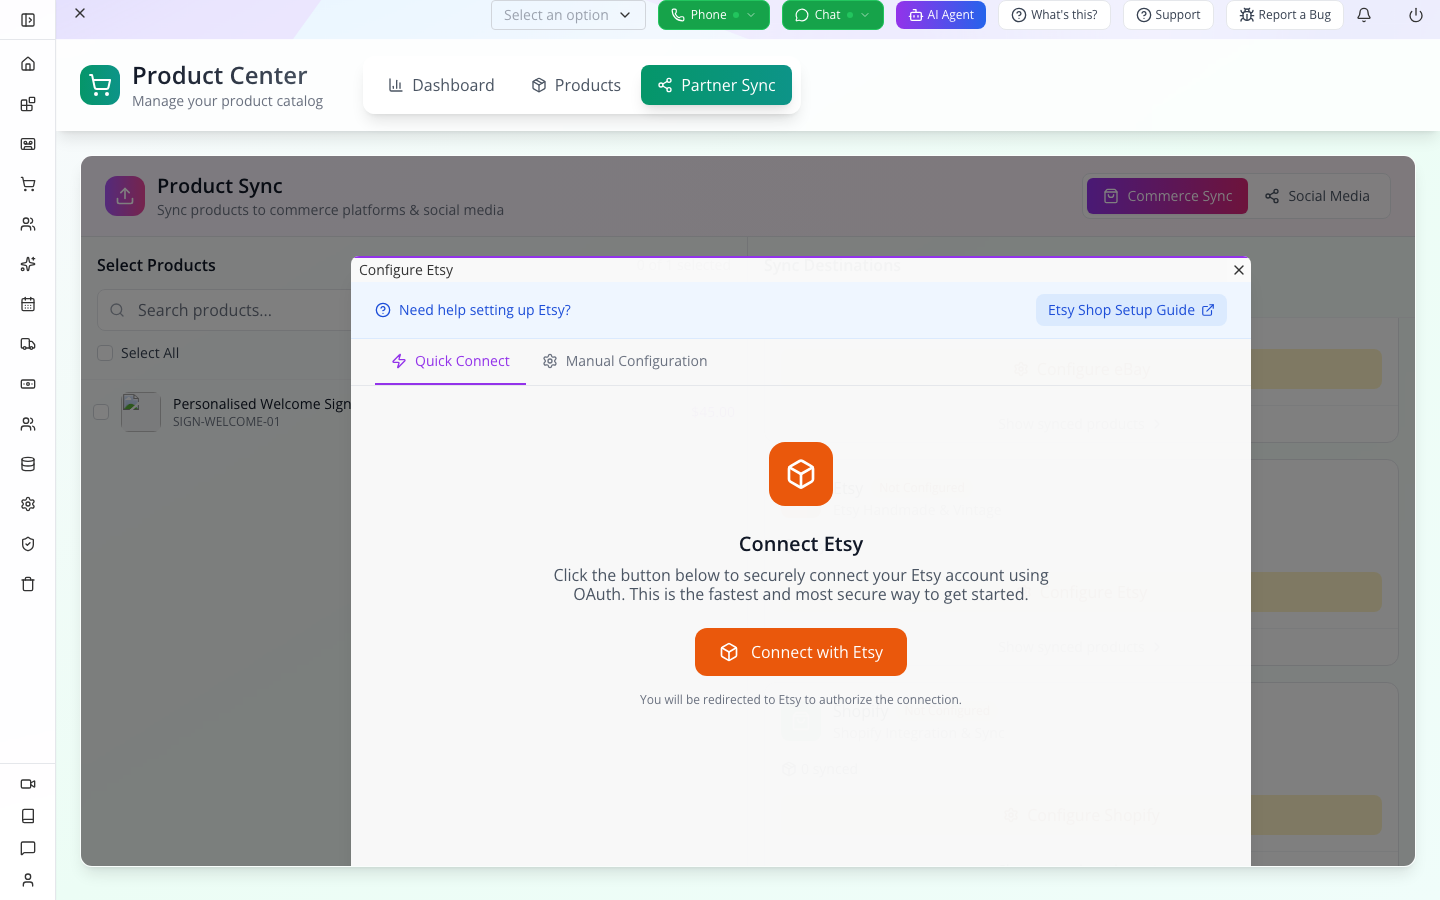
When connecting your own shop, use that ordinary provider flow. Check the account you are signing into and the access being requested before approving. Return to Appmint and verify the intended shop/account details and saved configuration. Reopen the setup to check persistence; simply closing a provider window is not confirmation of connection.
The walkthrough stopped before starting OAuth because no controlled Etsy shop was supplied. The screenshot shows the entry point, not a connected shop or a successful permission grant.
3. Understand Etsy Manual Configuration
In the same drawer choose Manual Configuration. This opens the integration-provider catalogue. Choose EtsyProvider to open EtsyProvider Configuration.
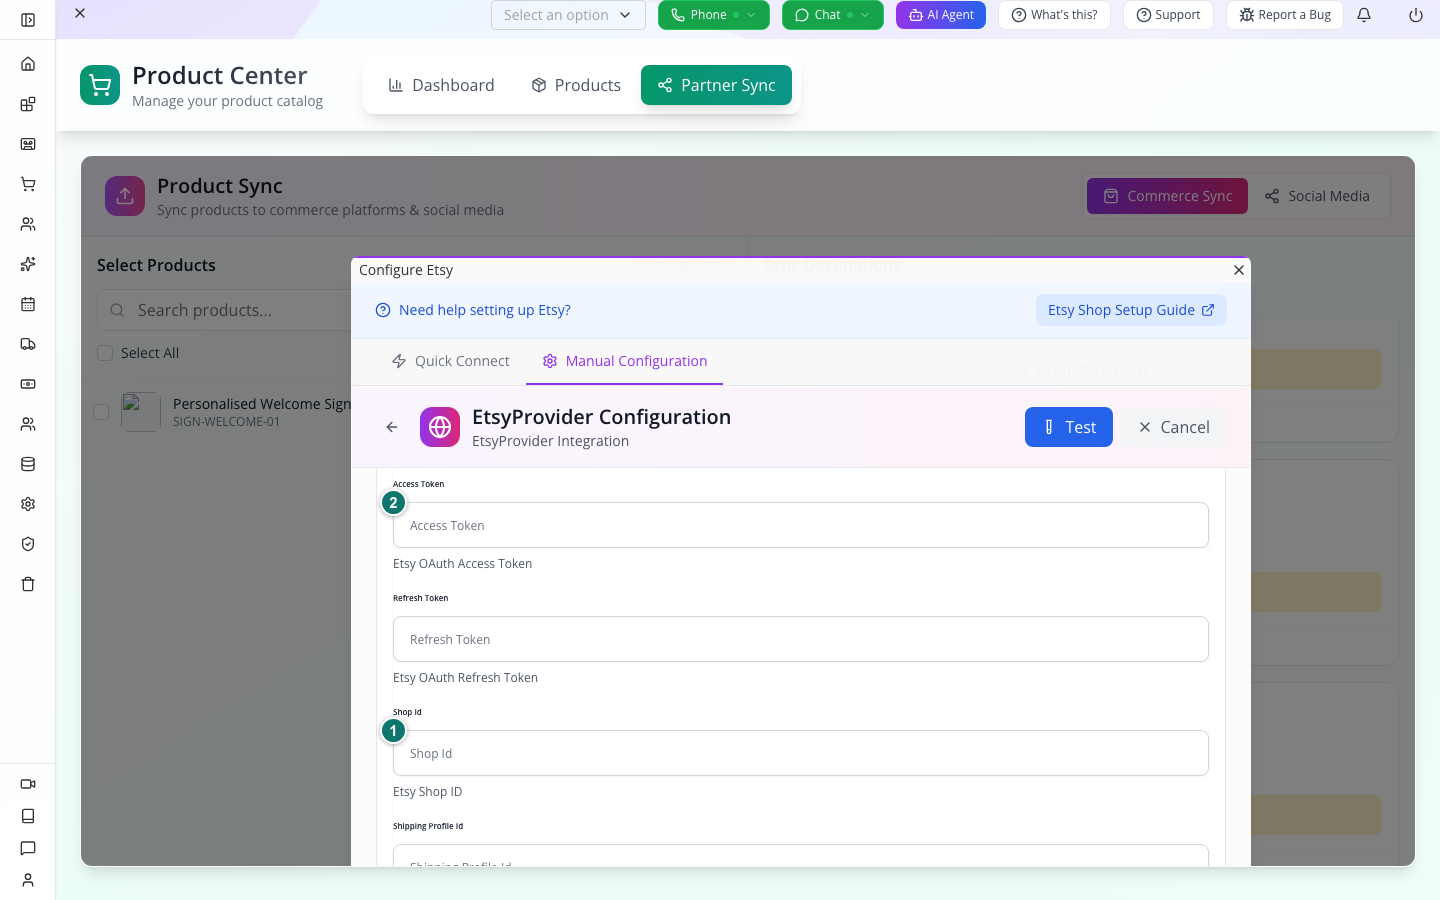
| Field | What belongs here |
|---|---|
| Name | A meaningful configuration name for your shop |
| Priority | Provider selection priority; the screen explains higher priorities are chosen first |
| Access Token | The valid Etsy OAuth token for the authorised account |
| Refresh Token | Its associated refresh credential where available |
| Shop Id | Your actual Etsy shop ID |
| Shipping Profile Id | The real shipping profile the listing should use |
Do not copy placeholder credentials or a shop ID from this lesson. Keep the supplied provider type. Save persists a configuration; Test is a separate control. The reviewed Etsy Test implementation reports configuration status without checking the account over the network, so it cannot establish that Etsy will accept a listing.
In this walkthrough the fields were left empty and no configuration was saved. If you only came to inspect the form, use Cancel.
4. Open Google’s connection entry
Back on Partner Sync, choose Configure Google Merchant Center. Use its Quick Connect entry for the intended Google account, or Manual Configuration → GoogleProvider when your administrator supplies the required configuration.

The manual form contains Customer Id, Refresh Token, Access Token, Merchant Id, Ads Account Id, Maps Api Key, Cloud Api Key and Store Path. GoogleProvider serves several Google capabilities, so the presence of an Ads or Maps field does not make it a prerequisite for selling this sign. For Merchant Center, have your administrator confirm the actual merchant identity and appropriate authorisation; do not fill unrelated fields with sample values.
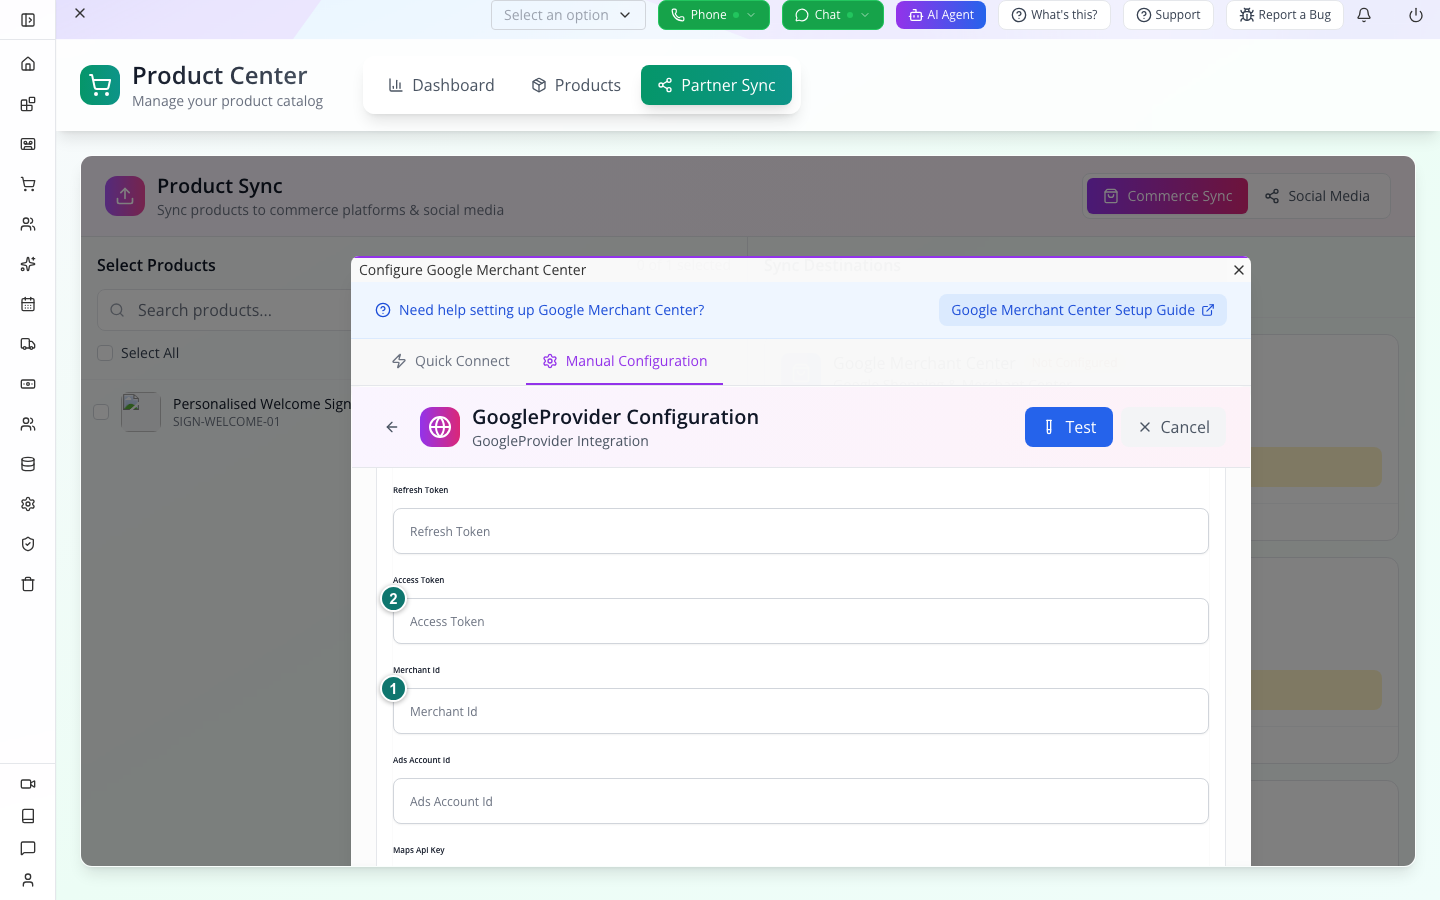
A connected Google identity must belong to the business/account intended for this catalogue. After returning from authorisation, check the Merchant Center destination and product link configuration before sending the sign. A successful general Google login is not the same as an accepted Merchant Center product.
For this fixture, first resolve the website course’s public-routing and product-page failures. A feed should not direct shoppers to an unrelated catalogue or an application error.
Try it. Open a provider’s setup guide from the drawer, then return without submitting anything. Identify where you would configure the account and where you would select the product to send.
Check yourself. Does Configure Etsy publish the sign? No. Configuration prepares the provider; product selection and the actual sync action come afterwards.
Part 3 — Check the data without inventing a successful listing
1. Learn what Mappings actually contains
Return to Storefront → Sales Channels → Mappings. Its sub-tabs are Categories, Attributes and Templates. Add Category starts a category mapping; it is not a product picker for an individual Google validation test.
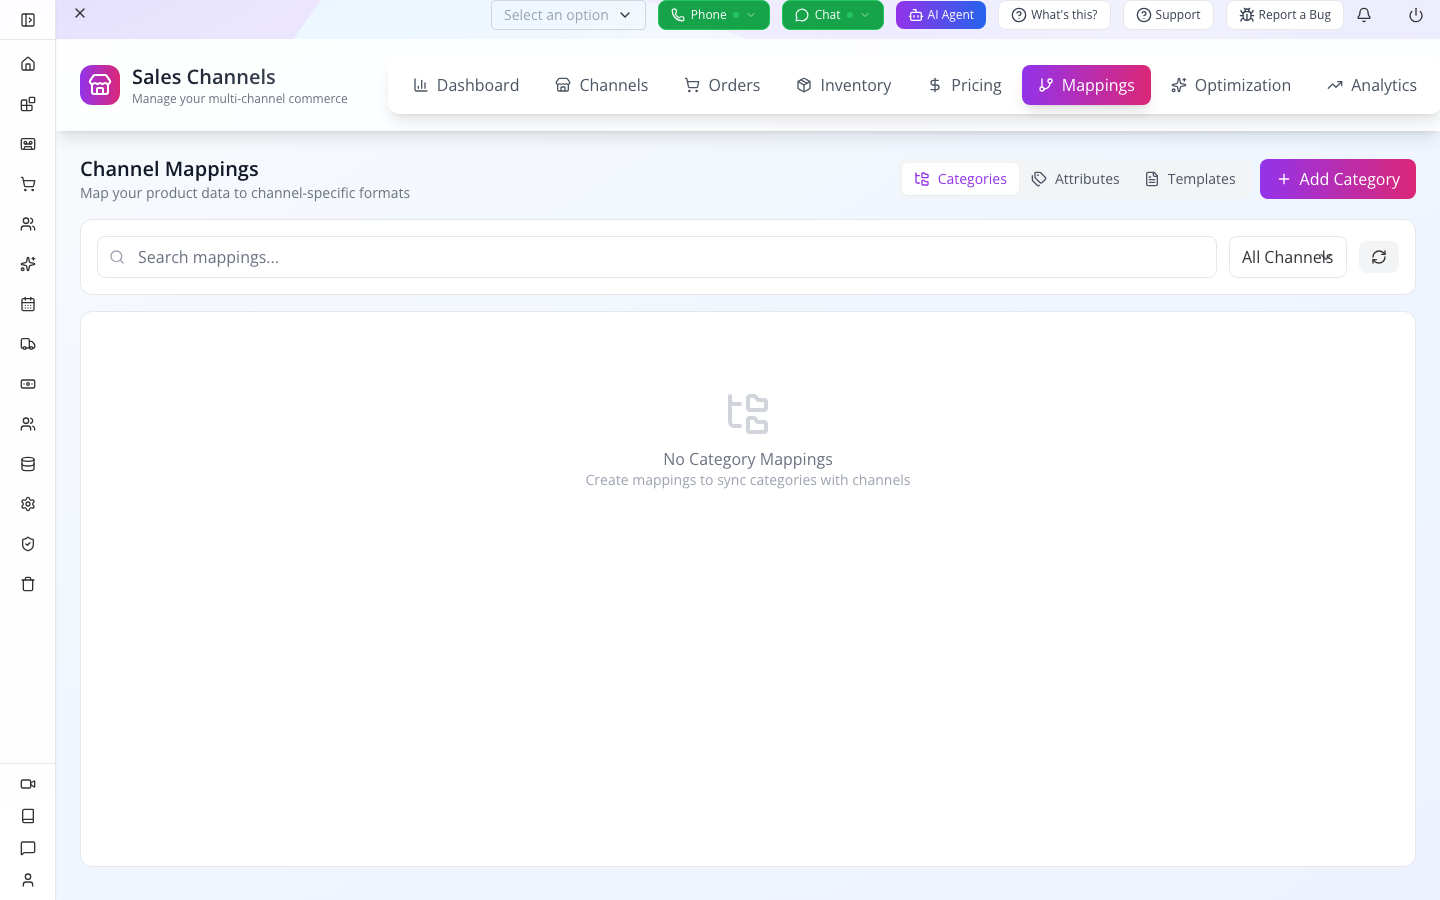
A mapping translates one vocabulary into another. Your catalogue may call a group “Welcome signs”; the destination expects an actual taxonomy identifier. Match the real destination category rather than entering a plausible number. An attribute mapping similarly relates an Appmint field to the field expected by that channel.
The controls depend on connected channels. With none connected, finish account preparation before trying to invent a destination choice. The developer lab below can test Appmint’s validation independently of an external account.
2. Read the sign’s actual validation results
The developer rehearsal sent the saved product’s data to the local validation endpoints. It produced:
| Destination | Local result | What to do with it |
|---|---|---|
Missing brand, gtin, link; category and image-count warnings | Correct the real data and identifier mapping; do not fabricate a barcode or working URL | |
| Etsy | valid: true, with brand/category/image-count warnings | Continue the provider-specific checks; this is not Etsy approval |
| eBay | Missing salesChannels, with exclusion warning | Expected for a product restricted to Google and Etsy |
Read the saved eligibility result for the exact responses. They are actual API output, not a screenshot of a nonexistent Validate form.
The Google validator and publisher also read identifiers differently on the checked source: validation checks a gtin field, while the converter uses the product’s ISBN/barcode value. Resolve that mapping before submission. Entering random numbers into both fields would only conceal the problem.
3. Check what personalisation will survive
The Appmint website’s name/artwork/size fields do not automatically become Etsy personalisation questions. The reviewed Etsy converter sets is_personalizable to false, and its create-listing request does not configure the three Appmint questions or upload their artwork.
For this sign, a complete Etsy readiness check therefore includes creating the intended personalisation experience at the destination and testing its order-to-workshop handoff. Do not advertise artwork upload merely because the Appmint product has a File attribute.
Etsy’s current API supports separate typed personalisation configuration, including text, selection and file questions. That capability requires the corresponding integration work; the checked Appmint adapter does not demonstrate it. See Etsy’s personalisation migration guide.
4. Review the listing as a customer would
Before a provider push, prepare a small comparison sheet:
| Detail | This example | Destination check |
|---|---|---|
| SKU | SIGN-WELCOME-01 | Matches the item you will fulfil |
| Name | Personalised Welcome Sign | Accurate and readable |
| Price | $45 base; $57 for 45 cm on the Appmint site | Destination’s size/price model represents what the buyer receives |
| Images | Working product images | Actual images exist at the destination, not only in Appmint |
| Maker and production timing | Your real process | Override or resolve inaccurate adapter defaults |
| Personalisation | Name, artwork, size | Buyer can supply all required instructions |
| Shipping | Your real destinations and service | Correct provider shipping profile and charge |
| Product link | Actual working site product URL | Opens outside the administrator’s session |
The reviewed Etsy adapter defaults to “someone else” as maker and “made to order” as timing. It also creates a new listing on a push. Those defaults must match your actual business before use; repeatedly syncing to fix a mistake may create another listing rather than update the first.
Try it. Explain why the Etsy valid: true result is compatible with an unusable personalised listing. The local validator only checked its own required fields; it did not create the customer’s questions or upload the pictures.
Check yourself. Does “three images recommended” mean your single saved image loads correctly? No. Open the actual image and destination preview.
Part 4 — Check channel pricing before it reaches a customer
1. Open the rule form
In Sales Channels → Pricing, stay on Rules and choose Add Rule. The form is Create Pricing Rule.
In a training organisation with no connected channels, enter Rule Name Tutorial cost markup 15 percent, Rule Type Markup – Add fixed percentage to cost, Value (%) 15, and Priority 10. Leave Min Price and Max Price blank. The available channel choice in this session was All Channels.
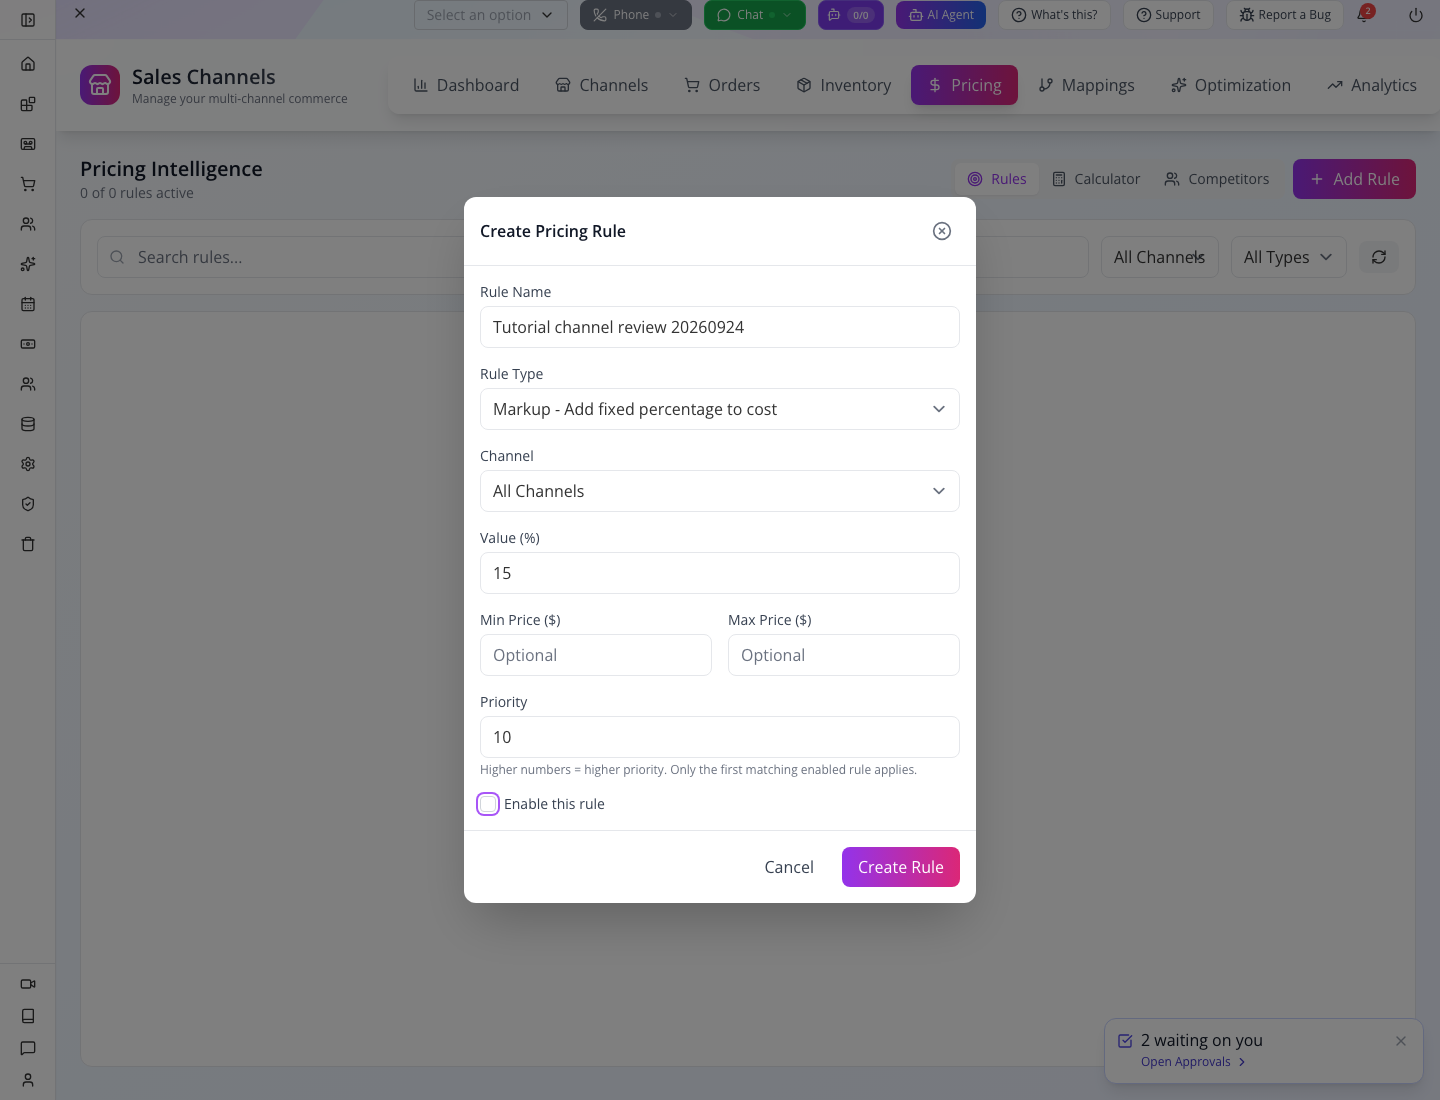
Before saving, clear Enable this rule. The current screenshot shows this disabled rehearsal configuration; its example name is Tutorial channel review 20260924. Use your own clearly recognisable training name. Use Create Rule, reload Rules, reopen your named training rule and check the switch is still off. Do not enable an unreviewed all-channel rule in a live shop. Only the separately scoped API calculation exercise below temporarily enables its exact-SKU test rule and disables it again.
2. Calculate a local estimate before connecting a seller account
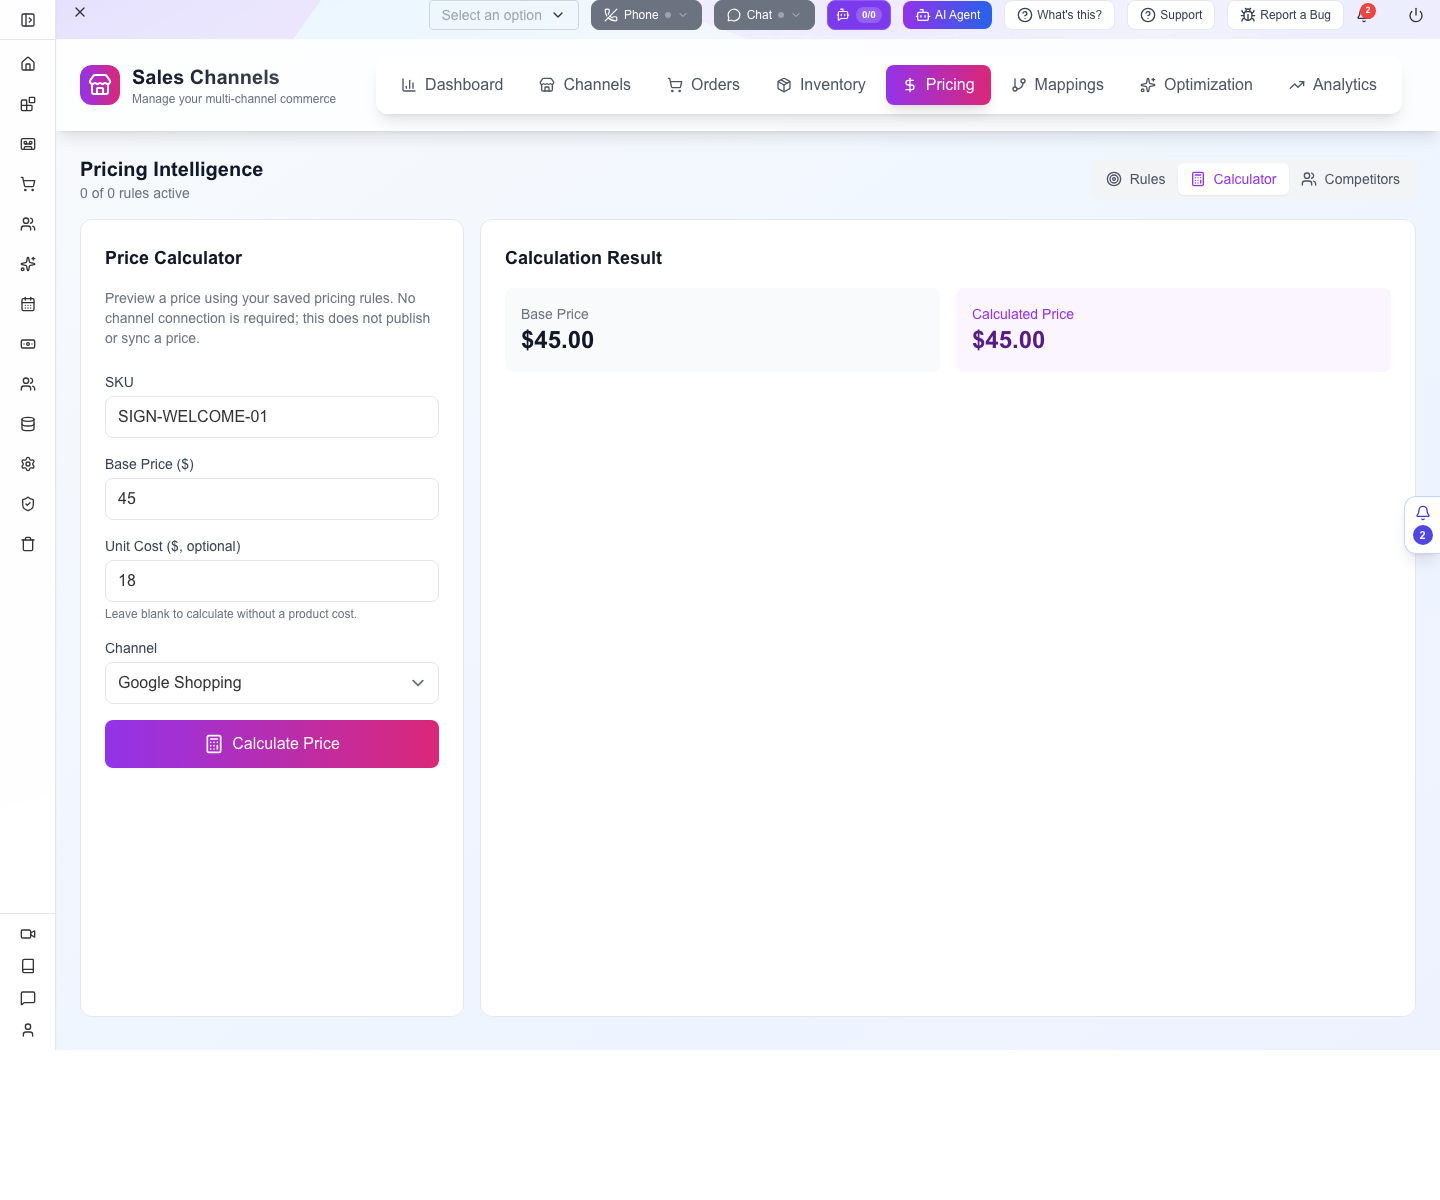
Choose Calculator inside Sales Channels → Pricing. This calculates with the organisation's saved rules. It does not publish, sync or contact a marketplace, so you can use it before connecting Google or Etsy.
Enter SKU
SIGN-WELCOME-01, Base Price ($)45and Unit Cost ($)18.Choose Google Shopping under Channel, then select Calculate Price. In the local rehearsal there were no active pricing rules, so Base Price and Calculated Price both showed $45.00. A disabled rule from the previous step should not change that result.
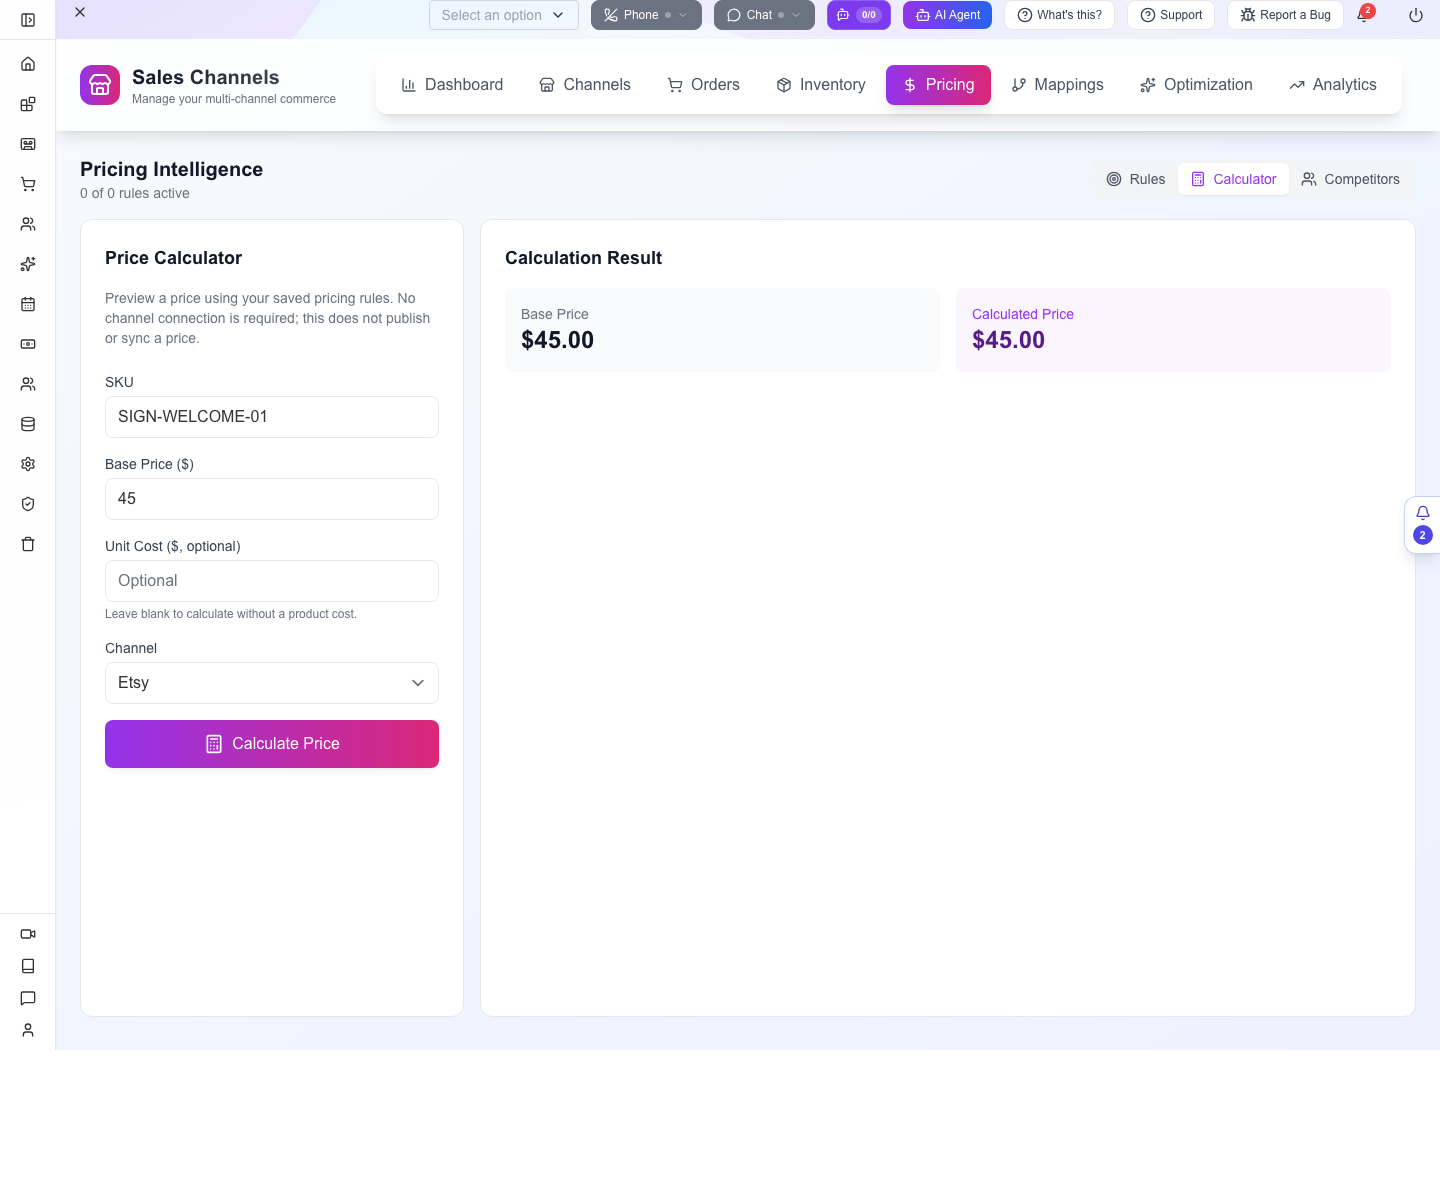
Choose Etsy, clear the optional Unit Cost ($) field and calculate again. With no active rules, the result stays $45.00. This checks that the selected channel and optional cost reach the calculator correctly.
Compare these baseline results with the scoped-rule experiment below. With its 15% cost-markup rule enabled, price 45 and cost 18 produce 20.70 before rounding; omitting cost changes the calculation basis to 45. The next section explains why those are very different selling decisions.
If an expected rule does not apply, check its enabled state, channel, SKU condition and priority before changing a listing. A successful calculation is a price estimate, not a marketplace listing or connection test. There is no .99 rounding control in the checked rule form; the supported API field is used explicitly in the next experiment.
3. Compare cost markup with a selling-price increase
The API rehearsal scoped the saved rule to Etsy and the exact training SKU, set roundTo to 0.99, and calculated both cases:
| Request inputs | Calculation before rounding | Returned price |
|---|---|---|
price:45, cost:18, markup15% | $18 ×1.15 = $20.70 | $20.99 |
price:45, no cost supplied, markup15% | $45 ×1.15 = $51.75 | $51.99 |
| Another SKU with the exact-SKU condition | Rule does not apply | $45.00 |
That first result is below the existing $45 selling price. If your intent is to cover marketplace fees by increasing the current selling price, do not select cost markup and expect a selling-price increase. Choose and test the appropriate model; the name you give a rule does not change its calculation.
The checked .99 calculation uses the whole-dollar floor plus .99. It is a price-ending operation, not a universal guarantee that every rounding operation respects a previously set min/max. Test edge cases before relying on price limits.
4. Clean up the experiment
The historical initial UI save stored All Channels as an empty string, and the Etsy-specific calculation incorrectly ignored that rule. The local backend repair recognises existing empty-string global rules and normalises new global saves; deployed matching still needs its own acceptance check. The developer rehearsal changed the channel to etsy, added the exact-SKU condition and rounding, verified the results, then set enabled:false and read it back.

Read pricing-lab.json to compare the before, calculation, control and disabled readback states. This makes the experiment reproducible without leaving an accidental discount active.
The fresh local check is recorded in pricing-live.json. It used a separate exact practice SKU, TUTORIAL-CHANNEL-20260924, with no rounding: 20.70 with cost, 51.75 without cost and 45.00 for OTHER-SKU. After checking enabled:false, we deleted only that rehearsal rule and verified it was absent. To remove your completed experiment, select its trash icon in Rules, confirm the deletion and reload. Keep a real business rule if your team still needs it; remove only the uniquely named practice rule.
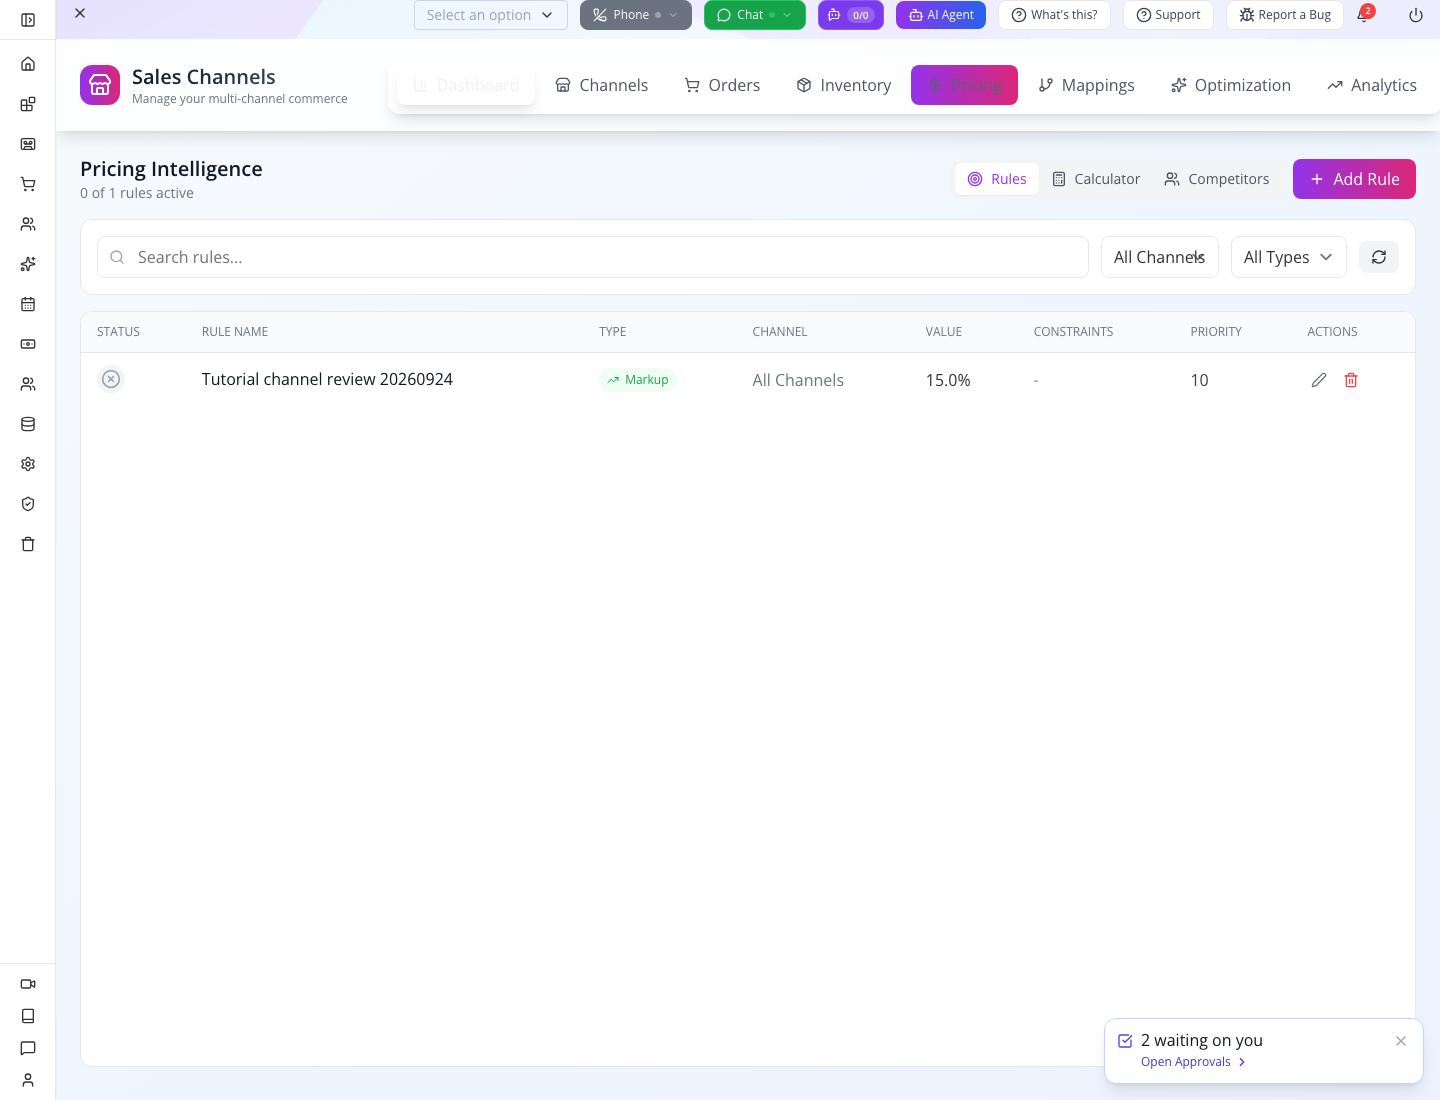
Priority: higher numbers run first, and only the first matching enabled rule applies. The old form said the opposite; the local repair corrects that label without changing the ordering. If your screen still says lower numbers have higher priority, report the old label and keep your rehearsal to one rule. Before enabling overlapping rules, test your own exact training SKU with two distinguishable results and confirm the higher-priority result, then disable the rehearsal rules.
Try it. Calculate both 15% cases on paper before looking at the returned values. Then explain which input your intended pricing model needs.
Check yourself. Does a correct local calculated price prove Partner Sync used that price? No. The reviewed product push sends the product to its provider separately; inspect the actual destination price.
Part 5 — Advanced: reproduce the validation and calculation
Complete the staff sign-in in the connected-client course, using your own practice organisation. Use its API, ORG and separate STAFF_TOKEN values; a customer or public guest token is not the operator credential for this lab. The AppEngine API reference exposes the endpoint schemas without requiring private source access.
Before any pricing request, verify the authenticated identity:
curl -sS "$API/profile/whoami" \
  -H "orgid: $ORG" -H "Authorization: Bearer $STAFF_TOKEN"
The response must be your staff email, not Anonymous User or another identity. Stop on an authentication error. Keep tokens out of screenshots, source files and shared transcripts.
Every relative route below uses the same headers. For example, this read lists rules without changing them:
curl -sS "$API/sales-channel/pricing/rules" \
  -H "orgid: $ORG" -H "Authorization: Bearer $STAFF_TOKEN"
For a POST, add -X POST, -H 'Content-Type: application/json' and send that step’s JSON with --data @your-local-request.json. Replace example product identifiers with your own saved practice product. The laboratory performs local validation/calculation only; it does not publish to a marketplace.
Read the product before validating it
GET /storefront/product/personalised-welcome-sign returned the training SKU, price 45 and cost 18. Extract the product’s data object for validation, preserving the actual channel list and fields.
Send that object to:
POST /sales-channel/mappings/validate/google
POST /sales-channel/mappings/validate/etsy
POST /sales-channel/mappings/validate/ebay
The result contains valid, missingRequired and warnings. A successful HTTP response means the check ran; inspect valid to learn whether the data passed.
Scope an existing training rule
Read GET /sales-channel/pricing/rules, find your named training rule and retain its returned id. Update that same rule with POST /sales-channel/pricing/rules, keeping its ID:
{
  "id": "<your existing training rule id>",
  "name": "Tutorial Etsy cost markup 15 percent",
  "channel": "etsy",
  "type": "markup",
  "value": 15,
  "priority": 10,
  "enabled": true,
  "roundTo": 0.99,
  "conditions": { "skuPattern": "^SIGN-WELCOME-01$" }
}
Using a new or omitted ID creates another rule; retaining the existing ID updates the experiment you already made. Do not change a business rule that happens to have a similar name.
Call POST /sales-channel/pricing/calculate/etsy with:
{"sku":"SIGN-WELCOME-01","price":45,"cost":18}Repeat without cost, then with a different SKU. Compare the returned calculatedPrice and appliedRule, not merely the HTTP status. Finish by saving the same rule with enabled:false and reading GET /sales-channel/pricing/rules/<ruleId>.
This laboratory isolates local validation and pricing. It does not show that a marketplace integration applied the rule or approved the product.
Part 6 — Run a controlled provider rehearsal when the prerequisites are ready
Choose a single prepared product in Product → Partner Sync → Commerce Sync and the one intended, configured destination. Check the selected count before invoking its sync action. Do not start with Select All or a push to every partner.
After the authorised push, inspect the individual provider result and then open the destination’s management interface. The View in Merchant Center or View in Etsy Shop Manager links take you to management pages; they are not themselves proof of a specific accepted listing. Locate the actual SKU/listing ID and compare the preparation sheet from Part 3.
For Etsy, the reviewed create path makes a new listing and does not upload its images. A draft listing and an active purchasable listing are separate states in Etsy’s API. Confirm the actual result at Etsy and finish the required images and settings there; do not assume Appmint’s success envelope means the listing is live. See Etsy’s listings tutorial.
Before a second push, check whether that provider updates the existing listing or creates a duplicate. Record the original external listing ID. Do not repeatedly press sync to repair a field without understanding that behaviour.
Reconcile operations after listing
The Orders, Inventory and Analytics tabs in Sales Channels are operational surfaces, not evidence that order import or stock synchronisation is running. The reviewed adapters do not provide a demonstrated complete order/price/fulfilment loop for the two destinations in this lesson.
For the first controlled marketplace order, compare the destination order number, SKU, quantity, customer instructions and fulfilment state with whatever appears in Appmint. Until that import is verified, operate the marketplace order in its own seller interface and maintain a deliberate stock reconciliation. Do not promise that a local Appmint status change sends tracking or a refund back to Etsy.
Use Optimization to review Appmint’s listing-quality suggestions, then inspect and save the product itself. A local score or an “applied” suggestion flag is not provider approval, a customer-visible edit or a published listing. Use Analytics only after you have identified the actual imported transactions behind the metrics.
Try it. Create a one-order reconciliation sheet before launching: Appmint SKU, external listing ID, external order ID, quantity, chosen personalisation, amount, fulfilment owner and stock adjustment. Make one person responsible for checking it.
Check yourself. Where should an operator fulfil an Etsy order when no reliable import has been established? In the actual Etsy seller workflow, while reconciling the Appmint record deliberately.
If something goes wrong
| Symptom | First check | Next action |
|---|---|---|
| Product initially says No channels available | Registry request still loading | Wait for the chips; the captured empty state resolved |
| eBay validation rejects salesChannels | Product intentionally restricted to Google/Etsy | Keep the exclusion, or deliberately add eBay and save before validating |
| Calculator does not offer supported channels | Current Calculator screen and channel-list load | Refresh and report a failed load; seller connection is not required for a local estimate |
| All Channels rule never applies | Rule is enabled, SKU conditions match and no higher-priority rule wins | The local empty-string matching defect is repaired; compare the returned appliedRule in the scoped API lab |
| 15% returns about 21 rather than 52 | Cost was supplied | Distinguish cost markup from a selling-price increase |
| No rounding control | Current rule form | Treat roundTo as an API-only rehearsal field on this build |
| Priority behaviour disagrees with the hint | Actual matched rule | Test a single rule, then controlled overlaps |
| Google asks for GTIN on a handmade item | Real product identifiers and adapter mapping | Follow provider identifier rules; never invent a barcode |
| Etsy validates locally but lacks questions/images | Adapter does not transfer these features | Complete and test the actual destination configuration before selling |
| Provider Test says configured | Whether Test performs a network check | Verify real account access and a controlled provider result |
| Re-sync creates another Etsy listing | Create-versus-update behaviour | Compare external IDs and resolve duplicates in the actual seller workflow |
| Dashboard percentages look positive on zero sales | Fixed display values | Use actual orders and amounts; do not report those percentages as growth |
What happened behind the scenes
Source and verification notes for developers
Paths below are relative to /Users/imzee/projects.
websitemint/packages/ui/src/components/storefront/product/product-form.tsx: channel chips load asynchronously; the product storessalesChannels.appengine/src/sales-channel/channel-mapping.service.ts: local eligibility and required-field validation. Etsy currently uses the fallback required set of SKU/name/price, not an Etsy-specific category requirement.websitemint/packages/ui/src/components/storefront/sales-channel/channel-mappings.tsx: Categories/Attributes/Templates UI; the earlier topic’s individual-product validation screen was not present.channel-pricing.tsxin that UI folder andappengine/src/sales-channel/pricing.service.ts: empty-string All Channels mismatch, request field mismatch, priority ordering, cost markup, single-rule selection and rounding.websitemint/packages/ui/src/components/storefront/product/product-sync.tsxandpartner-config-panel.tsx: Partner Sync, actual Configure actions, OAuth and manual provider configuration.appengine/src/storefront/storefront.partner-sync.service.ts: provider dispatch and product payload. This path needs its own eligibility and price-application verification; validation and calculation tests alone do not establish publishing enforcement.appengine/src/integrations/etsy/product.converter.ts,etsy.service.ts,etsy.provider.ts: create-listing payload, fixed maker/timing defaults, missing personalisation/image setup and non-network Test response.appengine/src/integrations/google/product.converter.ts: product link construction and ISBN-to-GTIN mapping differ from the validator’s raw-field checks.
No software source was changed for this course. The course records issues and continues through the working setup and local API checks.
Where next
- Social media automation for posts and campaigns, separate from marketplace product listings.
- Payments and payouts for following the money.
- Reliable background jobs for scheduled processing and sync operations.
Evidence and video handoff
Live work used training organisation learnmu4qn1ha and the product created in the preceding course. Product eligibility was saved in the UI and read through the API. The initial pricing rule was created in the UI; channel/rounding/SKU scoping and the calculation comparison were explicitly an API lab. Its final rule is disabled. Provider setup was inspected with blank credentials. No external account, publishing, payment, order import or provider refund is claimed.
See screens and timestamps, initial validation, pricing experiment, eligibility readback, and the companion-video guide.