
For: business owners, finance operators and developers connecting an earning workflow. Time: 35–45 minutes for the training ledger and settings; provider setup is a separate session. Level: beginner, with a developer section. Product: Appmint Studio Manager → Finance. Screens checked: 24 September 2026, local Studio Manager 0.6.2. The original illustrated ledger and a fresh-account repeat both passed; customer destination setup was also exercised locally.
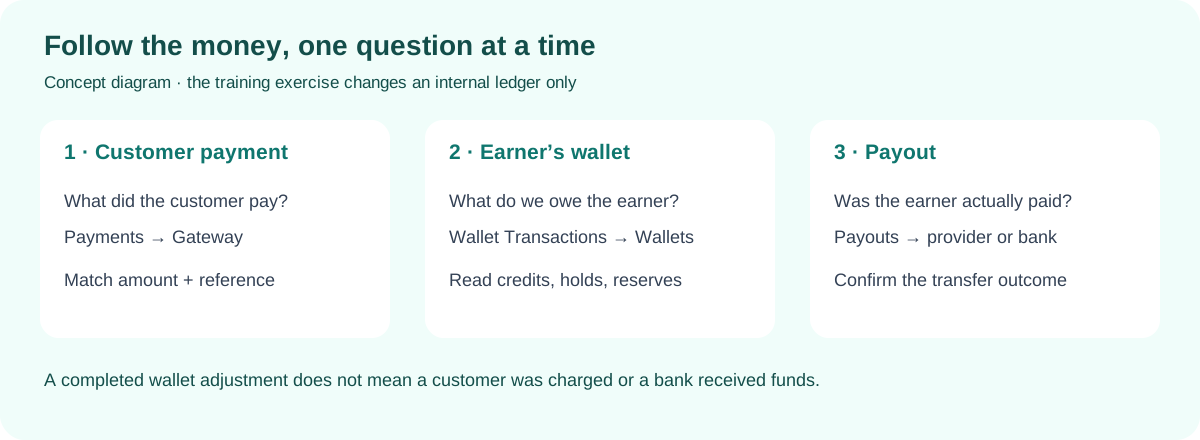
A customer buys something. A partner earns a share. The partner asks to be paid. Those sound like one transaction, but they leave different records in Appmint. Knowing which record to open is the difference between answering “Where is the money?” and guessing from a green badge.
This course starts with the screens and a small, reversible training ledger exercise. It then follows the handoff to a payout, including the destination, approval and bank-file checks that matter before money goes out. The opening ledger exercise does not charge a customer or send a transfer. The later sandbox branch follows a verified $53 Stripe test payment, and the ACH branch builds and downloads a $5.40 training bank file. No bank submission or settlement is claimed.
What you will have at the end
- A map of the eight Finance tabs and the question each answers.
- Saved rules that require a person to approve each payout and leave payout cycles on demand.
- A clearly named practice wallet and an explained credit/debit trail.
- A method for checking customer payments separately from earnings and payout records.
- A checklist for introducing a real payment provider or payout destination without confusing local records with provider outcomes.
What you need
Use an owner account in a training organisation. Keep this exercise out of the live business ledger: the example amounts are practice entries, not income or money owed to a real person. No payment gateway or bank account is needed for the practice section.
Start in Studio Manager. If you have just created your organisation, complete your welcome and first setup first. Use the actual customer, order and earner identities from your business when you later apply the workflow outside training.
The story
Cedar & Form wants to pay reviewers who refer design clients. Jordan needs to distinguish the client's purchase, the reviewer's earned balance and the eventual transfer. Before connecting that process to real people, Jordan rehearses the internal ledger with Tutorial Ledger Practice and makes the approval policy explicit.
The practice record is deliberately separate from Ada's future affiliate account. A display name entered in a wallet form does not establish that a customer signed in, supplied a payout destination or earned a commission.
The route
flowchart LR
    A[Customer pays for an order] --> B[Payments: local payment record]
    B -. compare provider reference .-> C[Gateway: provider records]
    D[Qualifying earning or adjustment] --> E[Wallet Transactions]
    E --> F[Wallet balance]
    F --> G[Payout request and approval]
    G --> H[Provider transfer or ACH file]
    H --> I[Confirm outcome and reconcile]
The dotted comparison matters: a locally recorded payment and a provider charge need to be matched. A manually recorded cash payment will not have a card-provider charge to match.
Part 1 — Find the right record before changing anything
1. Open Finance
In Studio Manager's sidebar, open Finance, then Dashboard. The module heading is Finance — Wallets & Payouts Management.
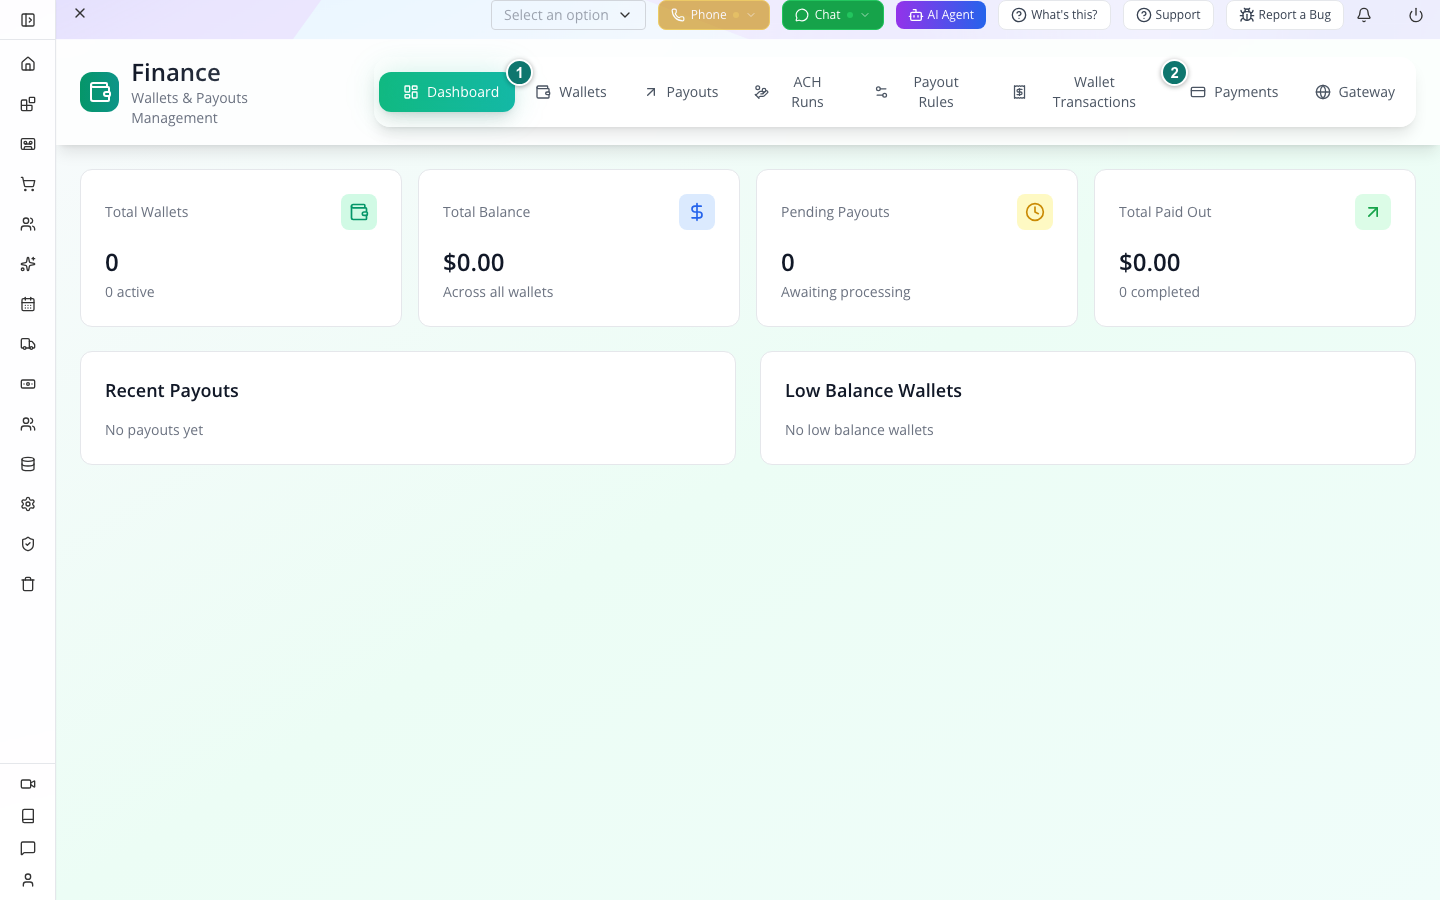
1 — Wallets is where you inspect an earner's balance. 2 — Payments is the customer payment ledger. The tabs between them cover paying earners and tracing wallet entries.
The in-page strip has more destinations than the sidebar. Use that strip throughout this course:
| Tab | Open it when you need to know… |
|---|---|
| Dashboard | What the currently loaded wallets and payouts add up to |
| Wallets | Who has a balance, which amounts are held/reserved, and what payout methods exist |
| Payouts | Which requests need attention and what happened to an individual request |
| ACH Runs | Which approved bank payouts are waiting for a file, and the state of each bank file |
| Payout Rules | Who approves requests and how payout cycles are initiated |
| Wallet Transactions | Which credit or debit changed a wallet, with its reason and reference |
| Payments | What Appmint recorded for customer charges, manual payments and refunds |
| Gateway | What configured payment providers return about their transactions |
You should see: in a new organisation, zero wallets, zero balance and no payouts. Those zeroes do not mean a payment provider has been connected or queried successfully.
Watch for: the dashboard totals the lists loaded by the page. It is an overview, not a complete reconciliation report across every page of records or every currency.
2. Open Payments
Select the Payments tab. Its own sub-navigation contains Transactions, Take Payment and Verify Payment. Stay on Transactions first.
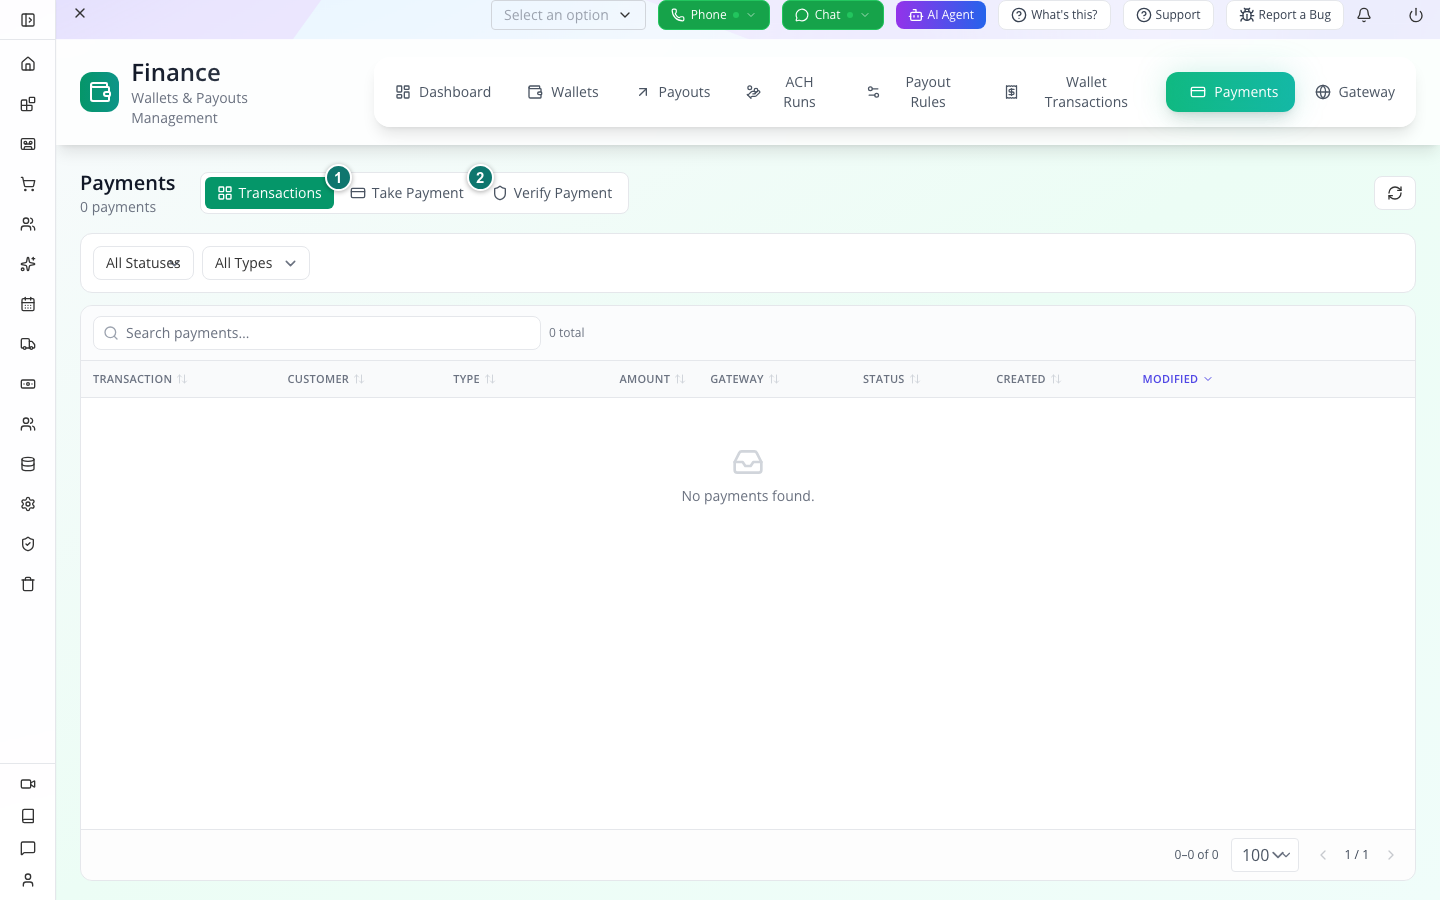
1 — Take Payment is an action surface. 2 — Verify Payment is separate from reading the transaction list. The table includes TRANSACTION, CUSTOMER, TYPE, AMOUNT, GATEWAY, STATUS, CREATED and MODIFIED. Status and type filters narrow the list; the footer controls pagination.
For an existing business, start with the payment reference from the order you are investigating. Compare the customer, amount, currency, gateway and reference before taking any action. A matching amount alone can belong to another order.
For a new organization: expect 0 payments and No payments found. In the 24 September repeat, the shared training organization already contained an earlier manual invoice payment (RECOVERY-DEPOSIT-200, $200). We left it unchanged. Its presence is a useful distinction: a manual payment can exist while Gateway has no provider configured.
3. Understand the Take Payment entry
Select Take Payment inside Payments. The current screen opens Payment request.
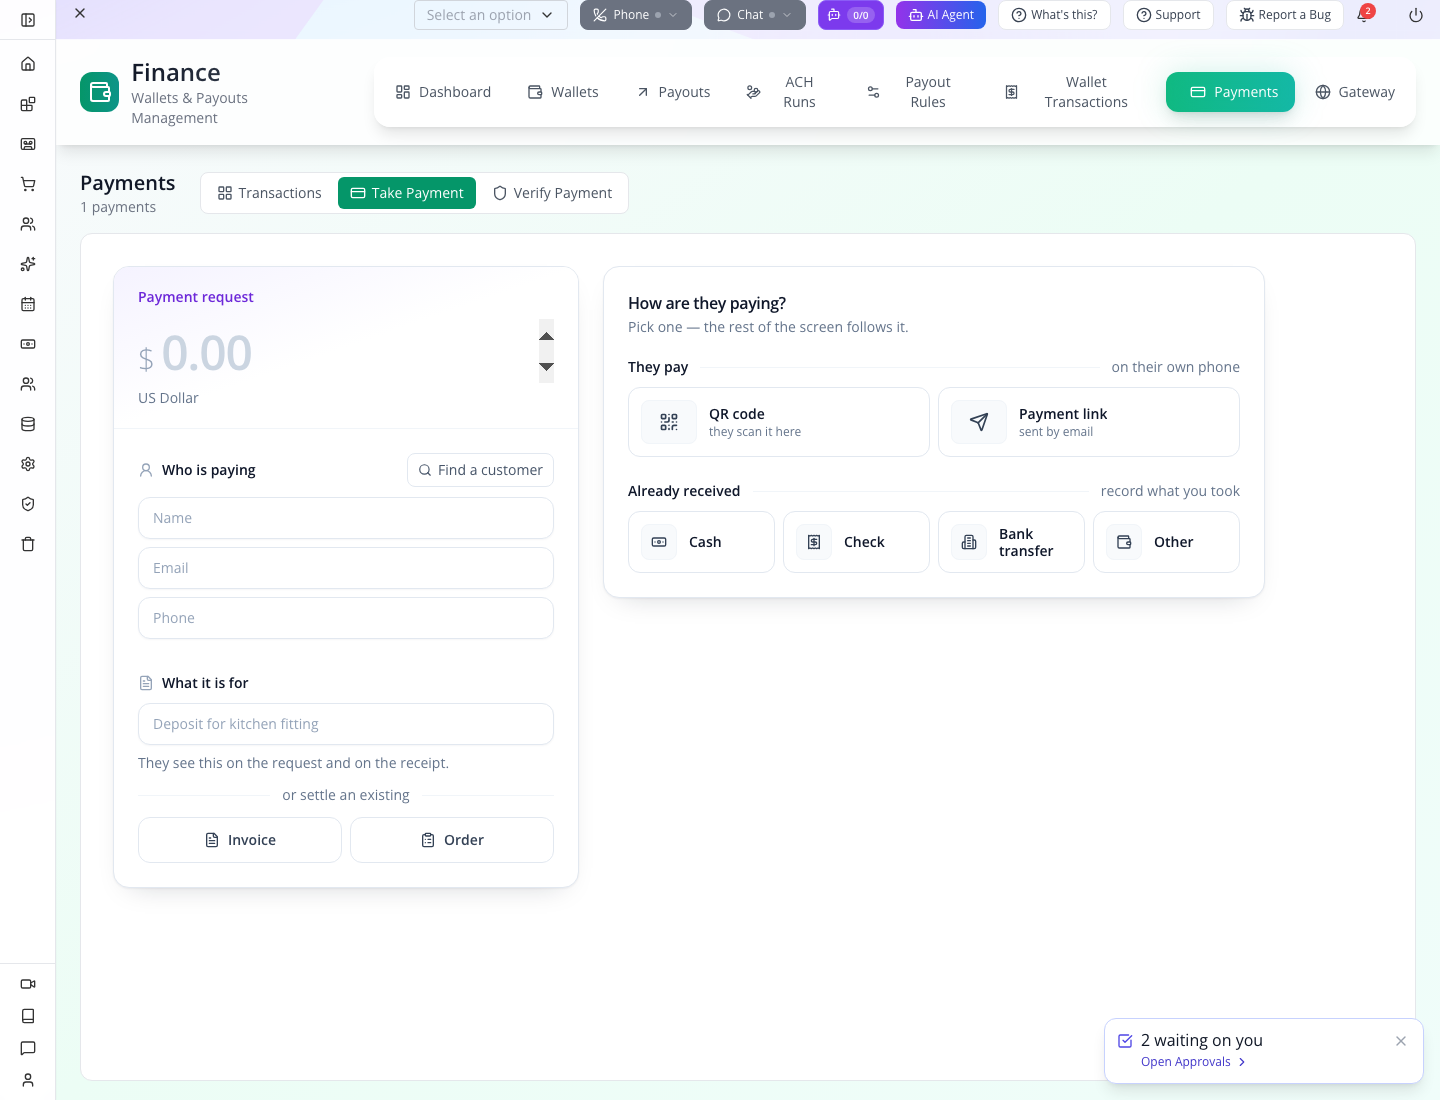
Work down the form in this order:
- Enter the amount. This form displays US Dollar and submits USD; it does not offer a currency selector. Use it only for the matching USD obligation.
- Under Who is paying, use Find a customer to identify the payer. Match their identity, not just an amount from another payment.
- Explain What it is for. The form says the customer sees this on the request and receipt. If you are collecting an existing balance, choose Invoice or Order instead of describing an unrelated new charge.
- Under How are they paying?, distinguish requesting money from recording money already received. QR code and Payment link let the customer pay through their own phone or an emailed link. Cash, Check, Bank transfer and Other sit under Already received.
For the ledger exercise, inspect these choices and return to Transactions without submitting. Recording “already received” asserts that a separate payment happened; it does not charge a card or make a bank transfer. We did not collect another payment during this repeat.
Verify Payment is a separate tab. It asks for Payment Gateway and Payment Reference (a gateway payment-intent ID or transaction reference). Use the provider's real reference after provider setup; a made-up reference cannot verify the ledger credit in Part 3.
For a store sale, the online store course prepares the product and order. Neither that course nor this ledger exercise completes payment-provider onboarding. Before a card checkout, complete the provider preparation below; then match the resulting order and provider reference here.
4. Open Gateway
Select Gateway in Finance's main tab strip.
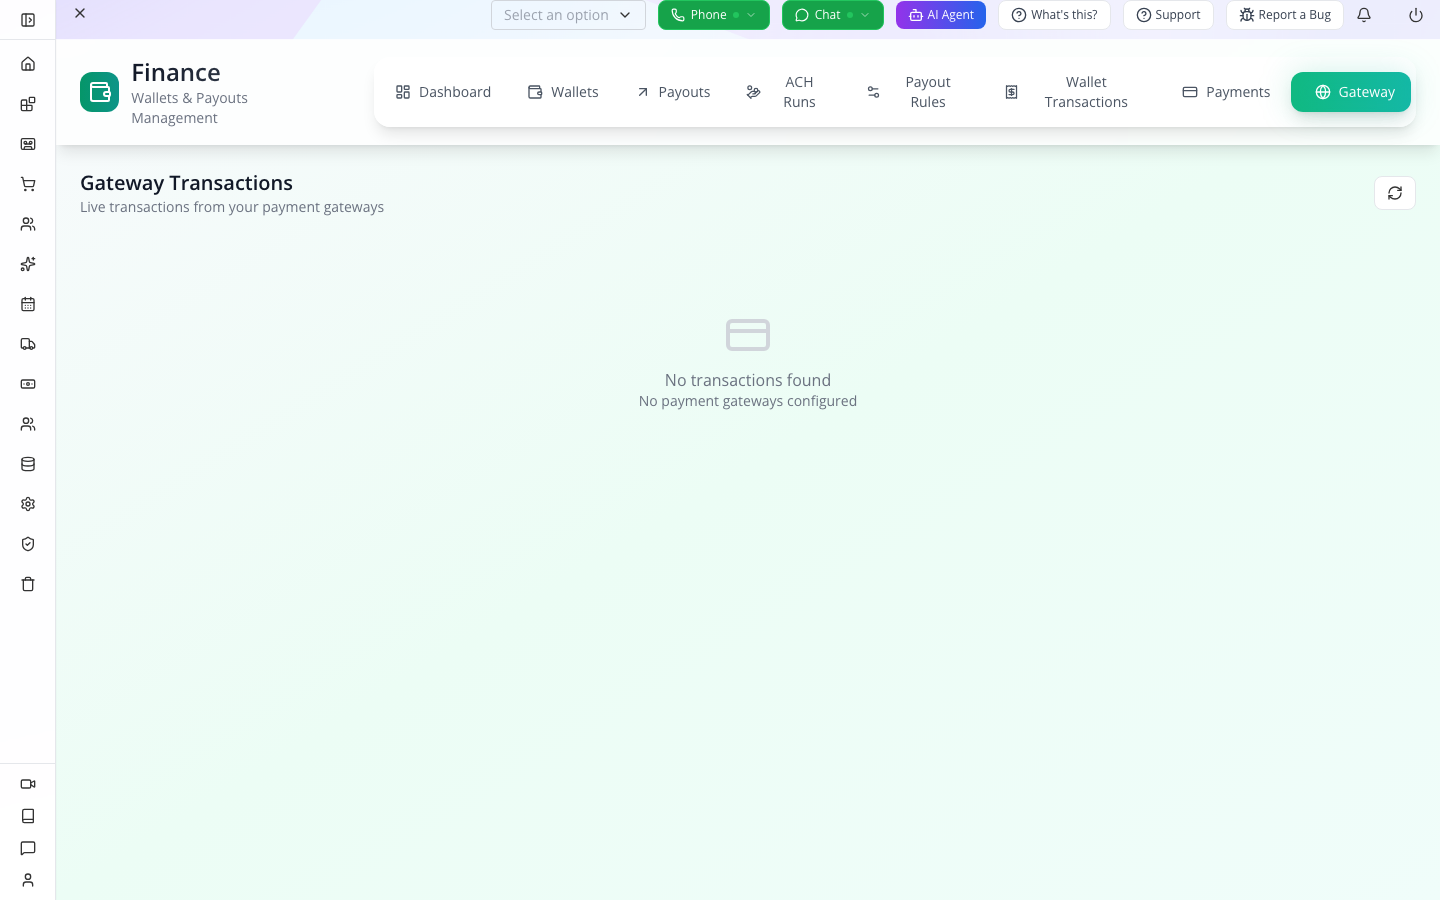
The heading is Gateway Transactions, with the description Live transactions from your payment gateways. The captured training organisation shows No transactions found and No payment gateways configured.
These messages are different from a declined card. There is no configured provider to ask yet. Typing a payment reference into this list cannot connect one.
Prepare the payment provider: the ledger exercise does not perform provider onboarding. The companion store course now includes an actual sandbox checkout; prepare the provider before following that branch. For Stripe, first create/select an isolated sandbox, obtain its publishable and server credentials, and use the provider's test payment details. Follow Stripe's API-key setup and Stripe's test payments guide. Keep server credentials private and use keys from the same sandbox throughout. In the verified store rehearsal, order AZ1QTIMKN showed Paid $53, Balance $0 and one matching Stripe payment. The provider independently returned succeeded with livemode: false. Follow the sandbox checkout and operator readback to see the actual screens and checks.
Paying an earner is a separate integration from charging a shopper. A PayPal payout exercise needs an enabled payout application, sandbox sender and controlled sandbox recipient; follow PayPal's Payouts API setup. Adding a PayPal address to an Appmint wallet only stores the destination—it does not enable that provider account or transfer money. The local destination exercise below deliberately uses a nonpayable training address.
When a provider is configured, compare its transaction reference with the local payment. Check the gateway account and test/live environment as well as the amount. An offline payment may legitimately have no provider record; a purported card charge needs an explanation if the provider cannot find it.
Try it: go back to Payments → Transactions, then return to Gateway. Say which screen reads Appmint's stored records and which asks the payment integration for provider records.
Check yourself: does an empty Gateway list prove the customer has not paid? No. First check whether the payment was cash/offline, whether the correct provider is connected, and whether a query failed. The list alone cannot settle that question.
Part 2 — Choose who approves a payout
1. Open Payout Rules
Select Payout Rules in the main Finance tab strip.
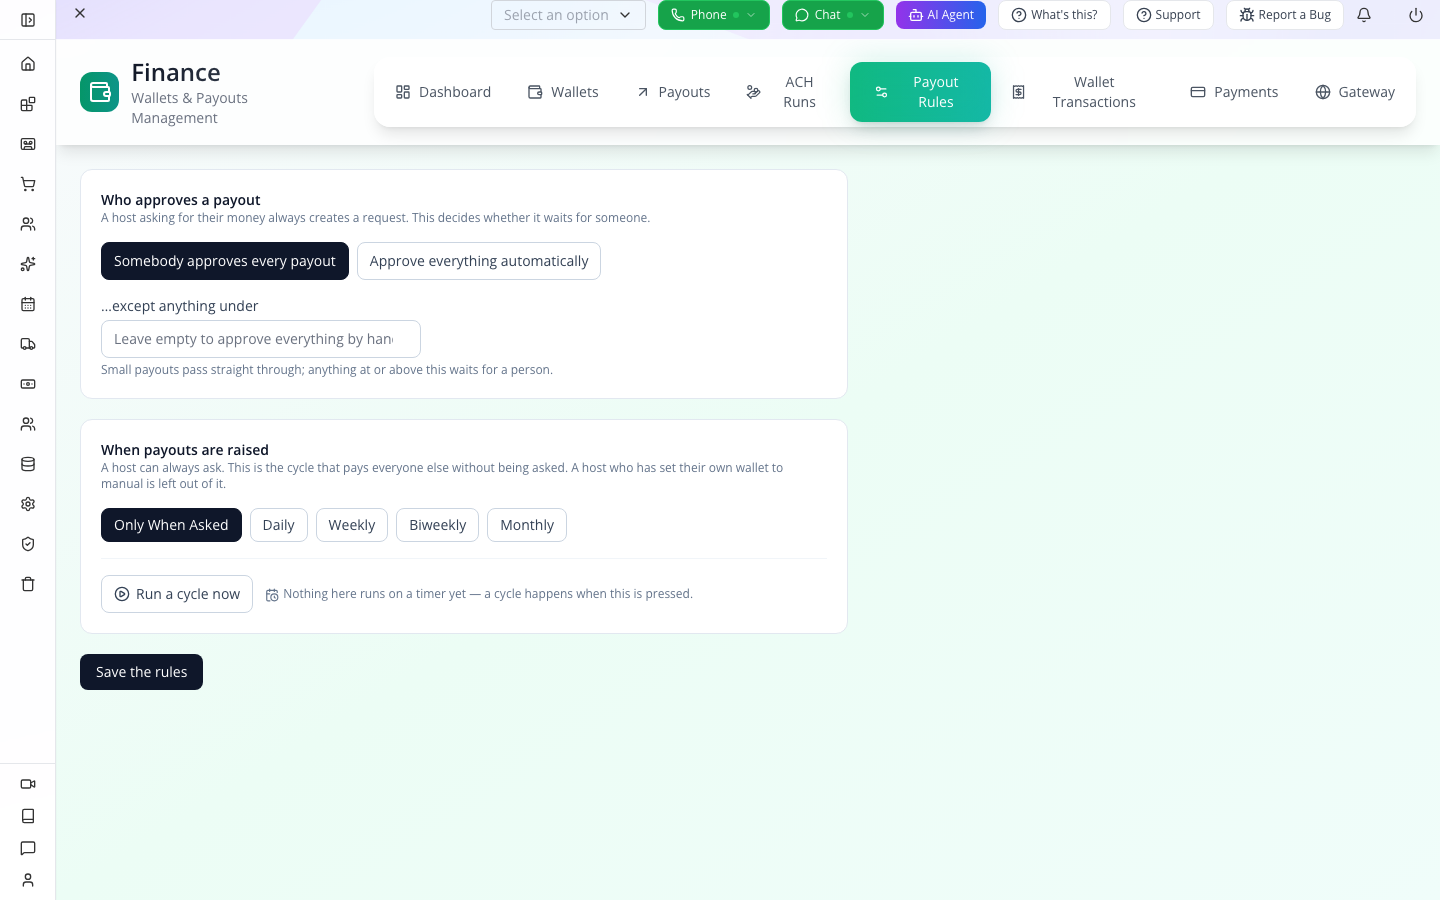
There are two separate decisions: Who approves a payout and When payouts are raised. Approval decides whether a request waits for a person. A cycle decides which eligible wallets get requests created. Neither setting is a substitute for a verified transfer outcome.
2. Require approval for every amount
Under Who approves a payout, select Somebody approves every payout.
Leave …except anything under empty. That field is an exception to manual approval. Entering an amount would let smaller payouts pass through the approval stage.
For example, with an exception of 10, a request below 10 can qualify for automatic approval; a request exactly at 10 waits for a person. For this exercise there is no exception.
3. Keep the cycle on demand
Under When payouts are raised, select Only When Asked.
The other choices are Daily, Weekly, Biweekly and Monthly. The screen also says Nothing here runs on a timer yet — a cycle happens when this is pressed, beside Run a cycle now. Selecting a frequency does not start a background timer in this build.
Watch for: Run a cycle now evaluates eligible wallets across the organisation. It is not a preview for just the wallet you last opened. Keep it out of a single-wallet practice exercise.
4. Save and check the policy
Press Save the rules at the bottom. The screen shows Saved. beside the button. Leave the tab and reopen Payout Rules to check the selected choices.
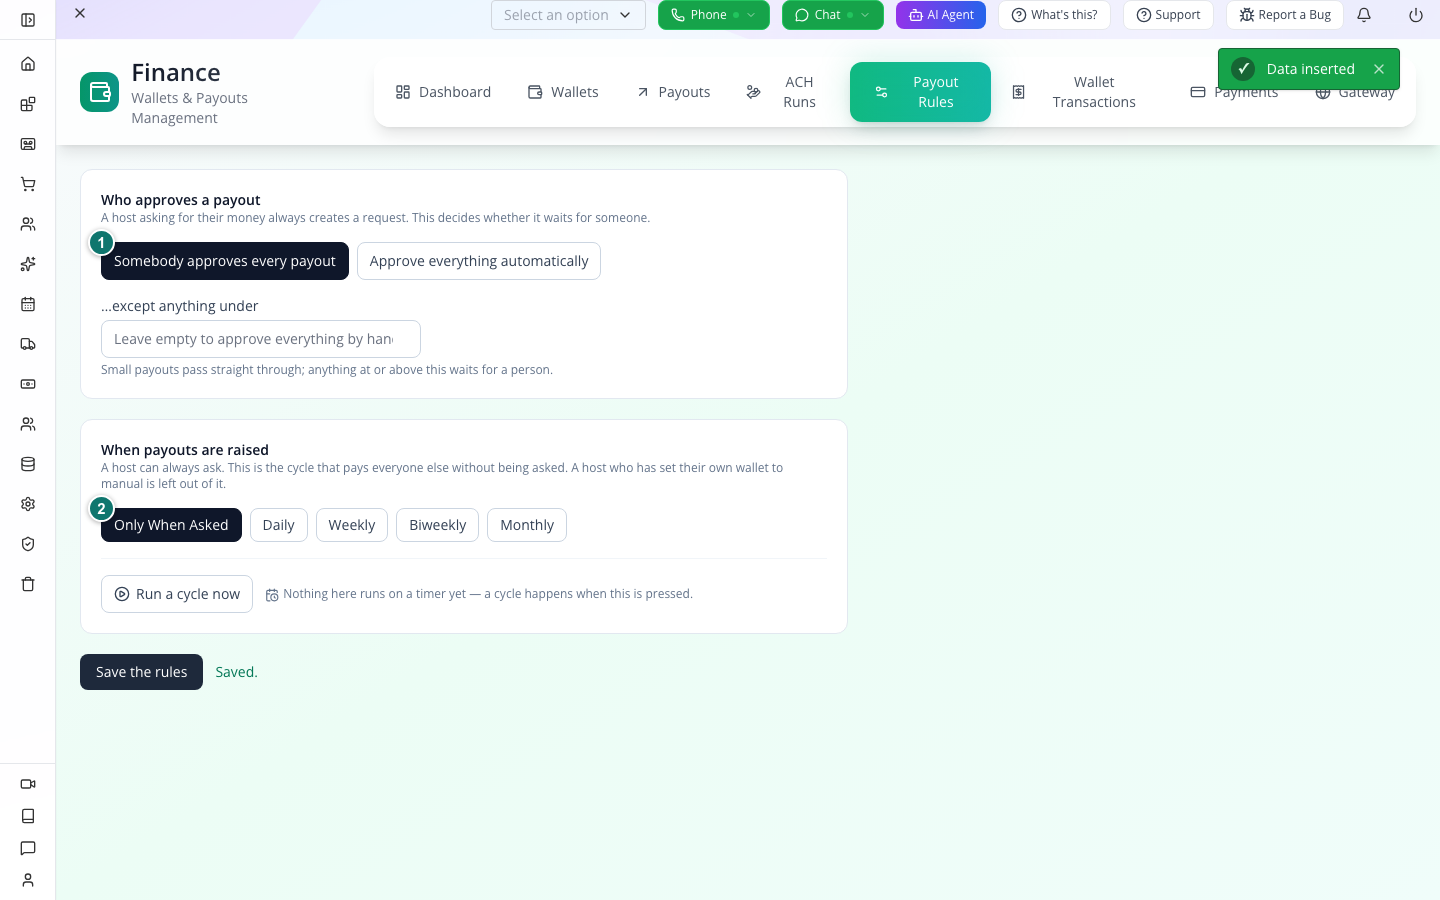
1 — Somebody approves every payout is selected. 2 — Only When Asked keeps cycles on demand. The blank exception means the policy has no small-amount shortcut. The saved record was independently read back with approval.mode: manual and schedule: manual.
Try it: explain the difference between “approve every payout manually” and “run a cycle manually”. The first controls approval; the second controls creating requests for eligible wallets.
Check yourself: changing the rule to automatic would not show that someone received money. Request creation, approval, provider processing and settlement are separate events.
Part 3 — Make a ledger entry you can explain and reverse
This is a standalone training wallet. Its owner ID is a lab marker, not a customer's account ID. It has no email address, bank details or payout destination. The exercise teaches the ledger controls; the real earner connection comes afterwards.
1. Open the wallet form
Select Wallets and look for wallet number TUTORIAL-LEDGER-01 before creating anything. If it exists, open that record and inspect its transactions; reuse a completed practice result instead of repeating the adjustments. For an intentionally separate rehearsal, choose a different unique practice wallet number and keep it throughout the exercise. If the selected number is absent, press Create Wallet at the upper right. The drawer opens in Modern view. JSON is an alternate editor; stay in Modern for this exercise.
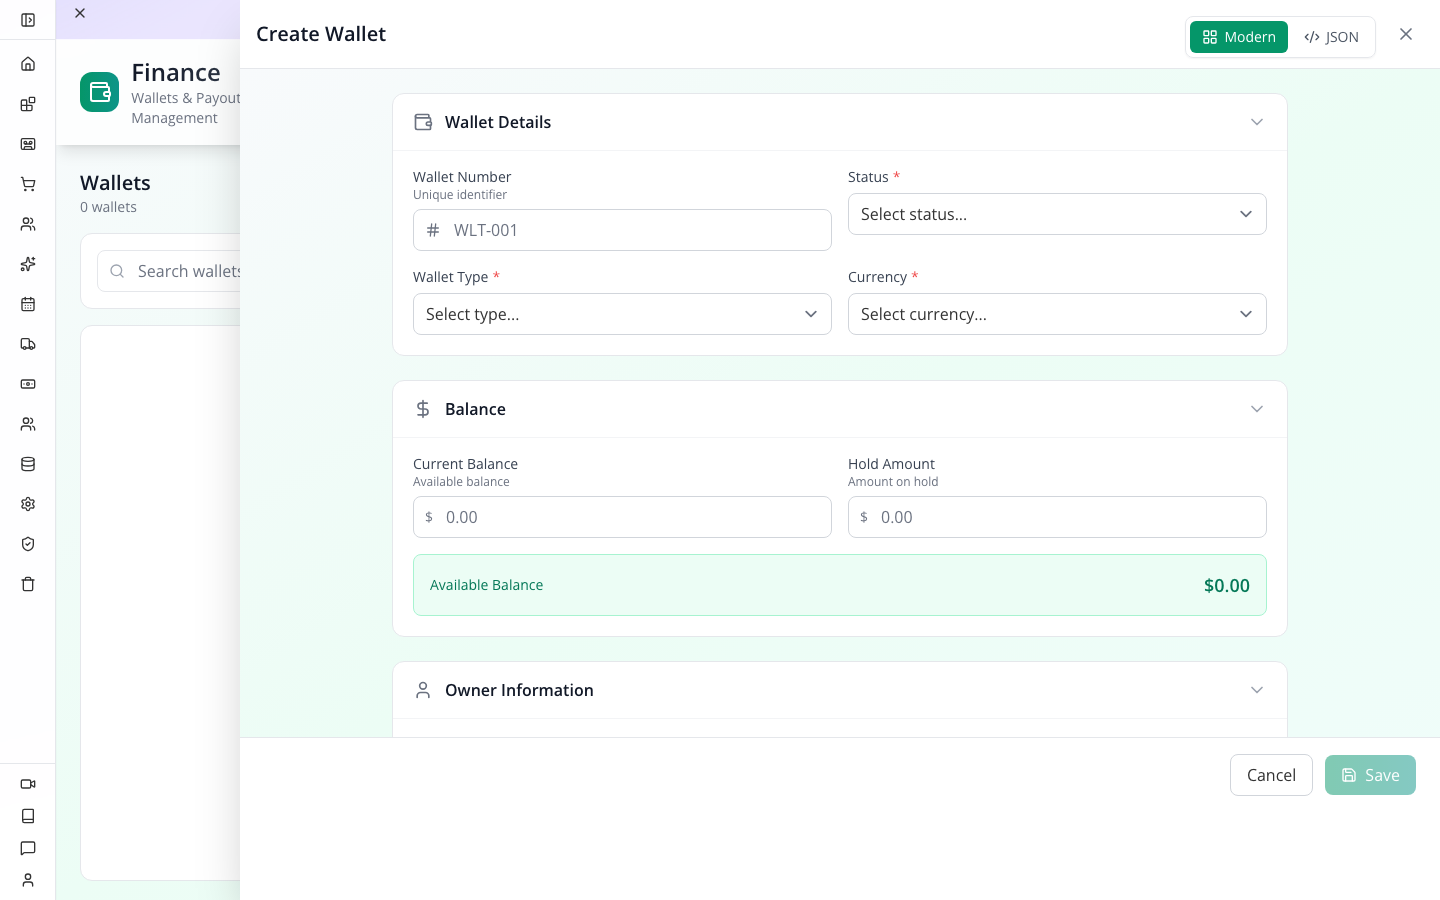
The form separates wallet details, balance and owner information. The opening-balance fields are editable, but beginning at zero makes the later change visible as a transaction rather than an unexplained starting number.
2. Fill Wallet Details and Balance
Use these exact training values:
| Field | Value | Purpose |
|---|---|---|
| Wallet Number | TUTORIAL-LEDGER-01 | Identifies the practice record in the list |
| Status | Active | Allows the ledger exercise |
| Wallet Type | Partner | Describes this practice wallet |
| Currency | USD - US Dollar | Keeps every amount in the exercise in one currency |
| Current Balance | 0 | Creates no unexplained opening credit |
| Hold Amount | 0 | Starts the exercise without a hold |
The form previews Available Balance $0.00. Do not enter 5.40 directly into Current Balance: the next steps deliberately create a traceable adjustment.
3. Fill Owner Information
Scroll to Owner Information and enter:
| Field | Training value |
|---|---|
| Owner Type | Partner |
| Owner ID | 66eaa0000000000000000018 |
| Owner Name | Tutorial Ledger Practice |
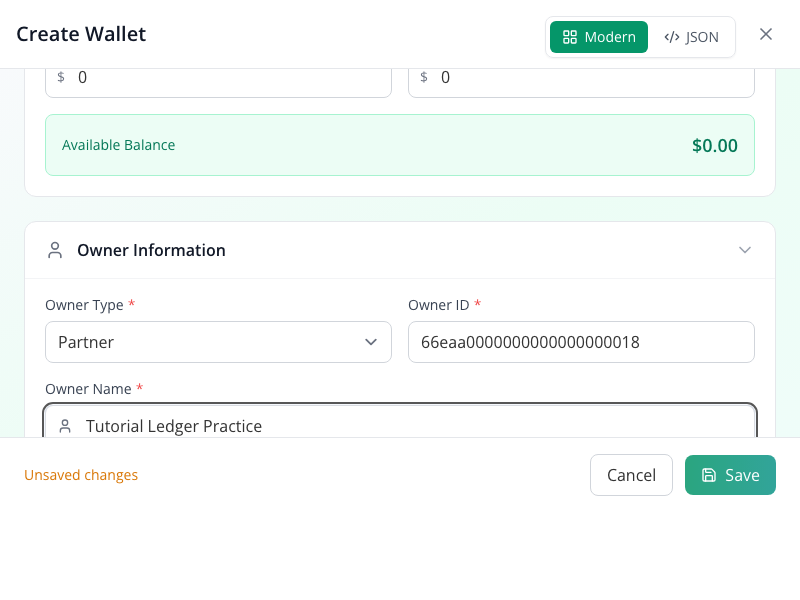
The ID above is an exercise marker. In a connected earning workflow, the owner must be the actual earner's record, not an arbitrary number copied from this lesson. Creating this form does not register a customer or give that person a login.
4. Save the wallet
Press Save at the bottom of the drawer. Wallet saved successfully appears and the wallet list gains one row. If saving returns the module to Dashboard, select Wallets again before opening the record. Its identifying line reads USD · TUTORIAL-LEDGER-01, its type is partner, and its balance is $0.00.
Open that row to inspect Wallet Details.
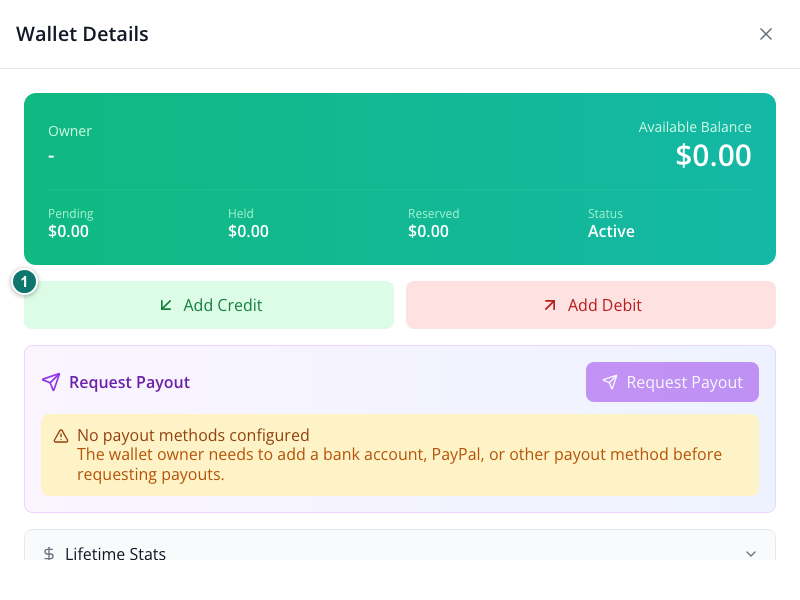
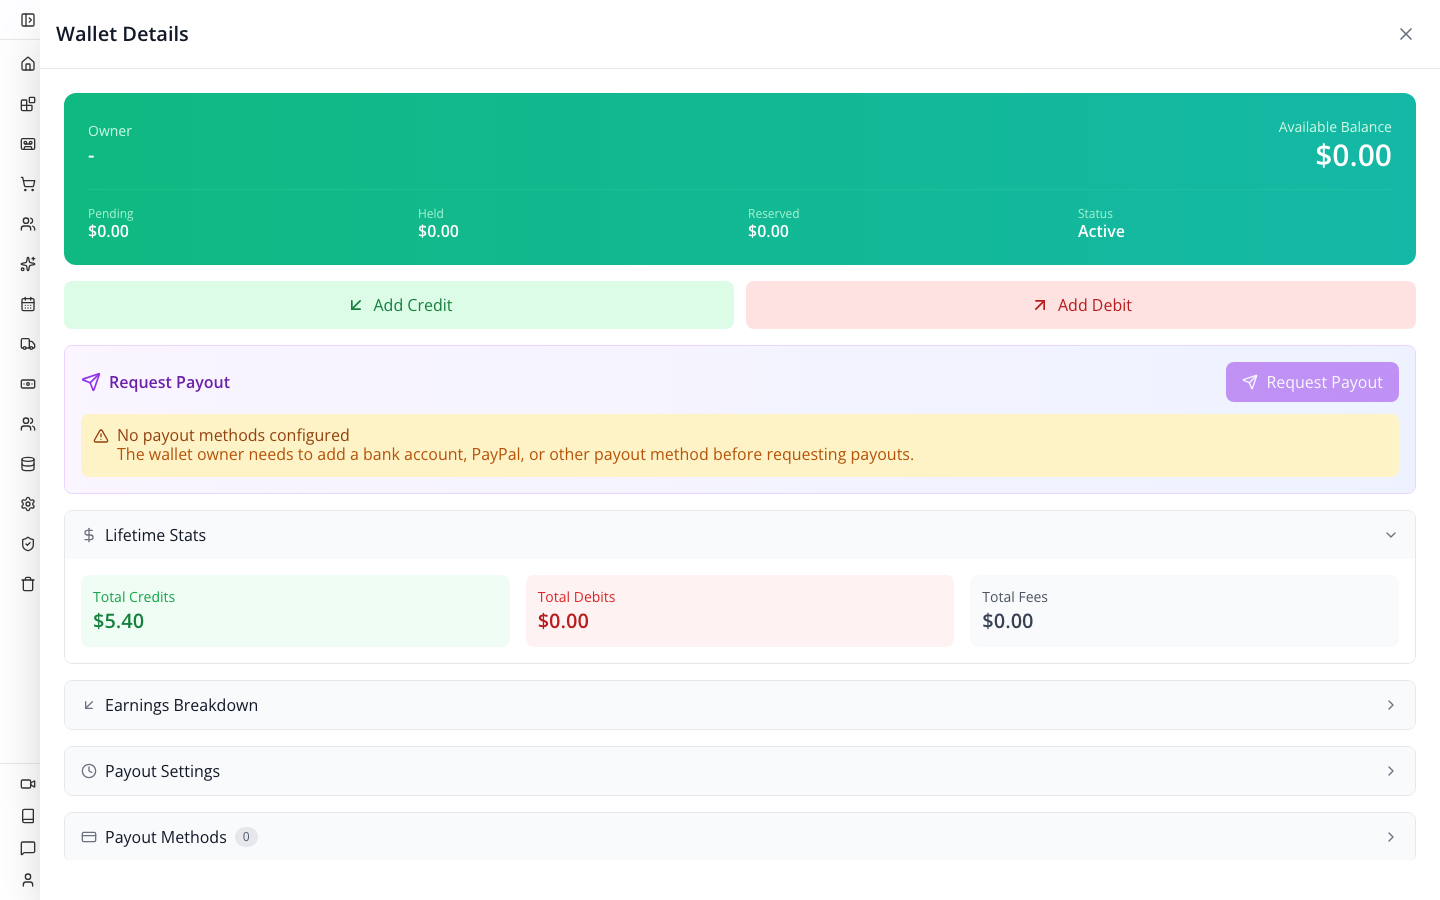
1 — Add Credit opens the ledger action used next. The card also shows Pending, Held, Reserved and Status.
Watch for: the captured wallet list and drawer show
-for Owner even though the form saved Owner Name. The Modern form stores these fields inside the wallet's data, while the detail header reads a separate owner object. A saved name alone is not a verified connection to a customer. Keep this standalone exercise out of actual payouts.
Before making an adjustment, record the saved wallet ID and current balance. If a save times out, the browser closes or a success notice is missing, reopen that same wallet and inspect Wallet Transactions for the intended reference, amount, direction and balance change before retrying. A matching text reference is a way to find evidence; it is not a guaranteed idempotency key. If the outcome is still unclear, stop and reconcile the saved record instead of adding a second adjustment. Apply this read-before-retry check to both the credit and reversal below.
5. Describe the credit before adding it
Press Add Credit. In the New Credit panel, fill:
| Field | Value |
|---|---|
| Amount | 5.40 |
| Type | adjustment |
| Reference | TUTORIAL-LEDGER-01 |
| Description | Training ledger credit only — no sale, commission or bank funds received |
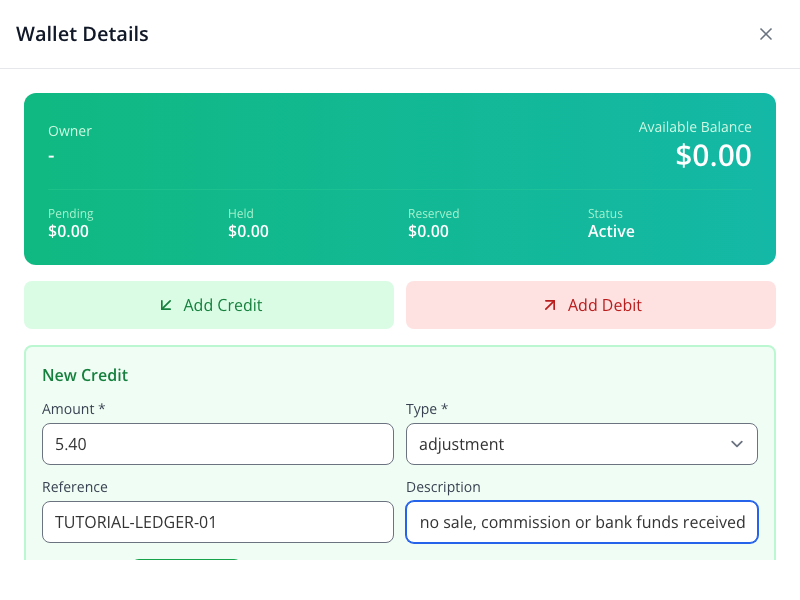
Choose adjustment because that is what this action represents. Choosing commission would describe a different business event; it would not make a referral qualify or make a customer pay.
The reference joins this entry to your explanation. Use a real order, job or correction reference for actual business entries. The amount by itself will not tell a colleague why the balance changed.
6. Add the credit
Press the second Add Credit button inside the New Credit panel. Credit added appears. The wallet balance becomes $5.40 and the Transactions section gains one entry.
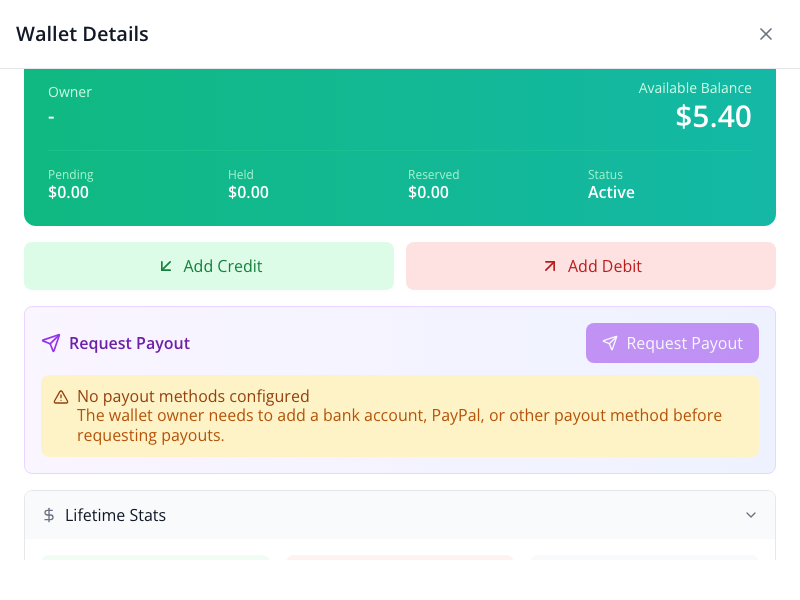
The captured transaction number is SF4VZD7I6IYE; yours will be generated separately. Its category is Adjustment, and its amount is +$5.40.
This is a completed ledger write. It does not show a successful customer charge, an earned affiliate commission or cash in a bank account.
7. Reverse the exercise with an explained debit
Press Add Debit. Fill the New Debit panel:
| Field | Value |
|---|---|
| Amount | 5.40 |
| Type | adjustment |
| Reference | TUTORIAL-LEDGER-01-REVERSAL |
| Description | Reverse the training adjustment — no payout or refund sent |
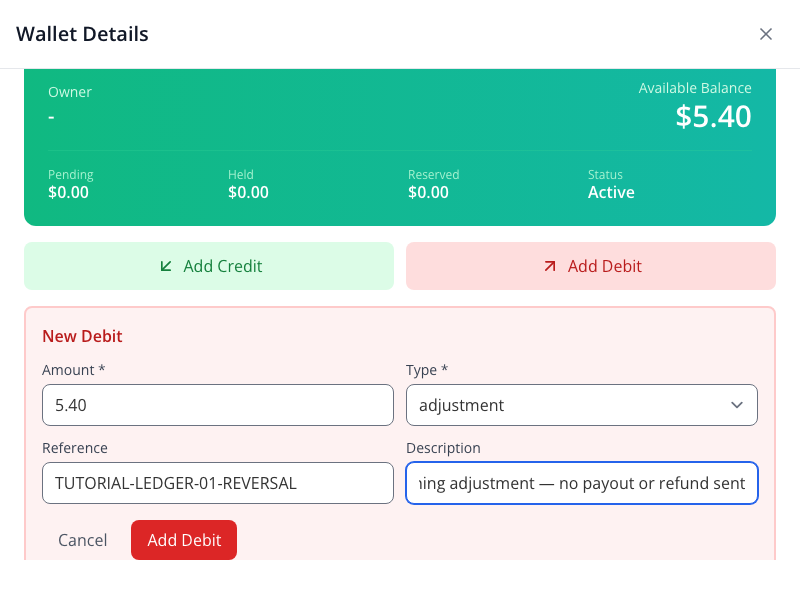
Press the second Add Debit button inside the panel. Debit added appears and the wallet returns to $0.00.
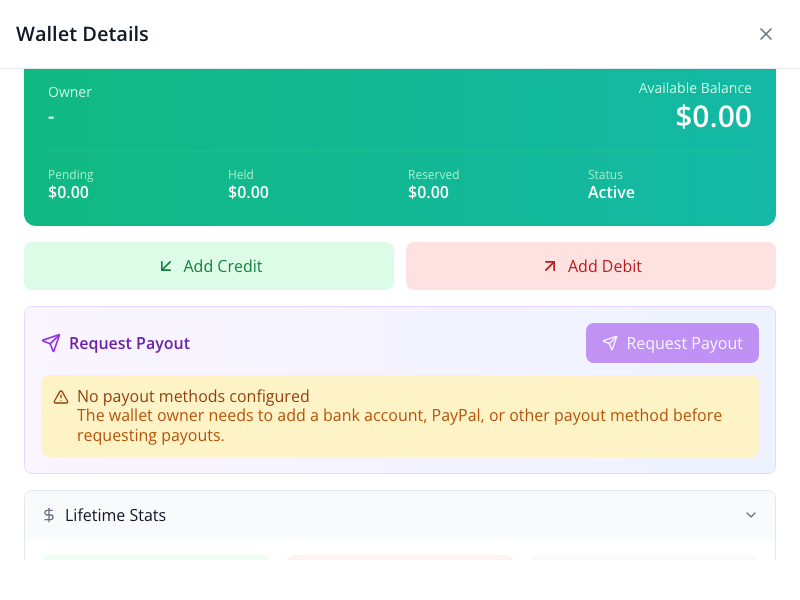
The original credit remains in the history. This is intentional: another operator can now see both the practice change and its reversal. A debit adjustment is not the Request Payout action, and it does not refund a customer payment.
8. Read the pair in Wallet Transactions
Close Wallet Details using the × in the upper right. Select Wallet Transactions in the Finance tab strip.
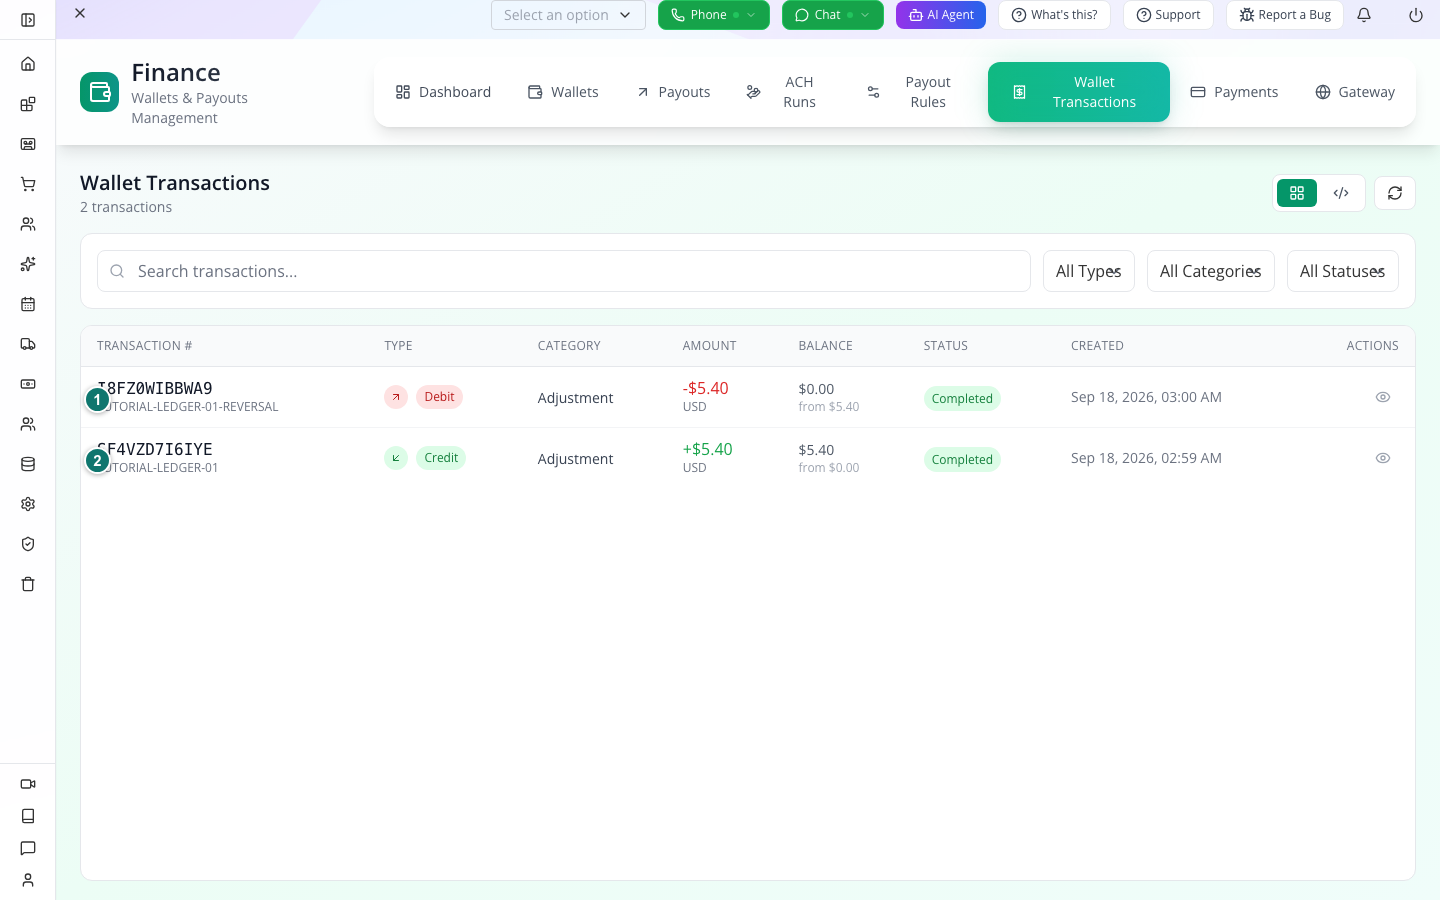
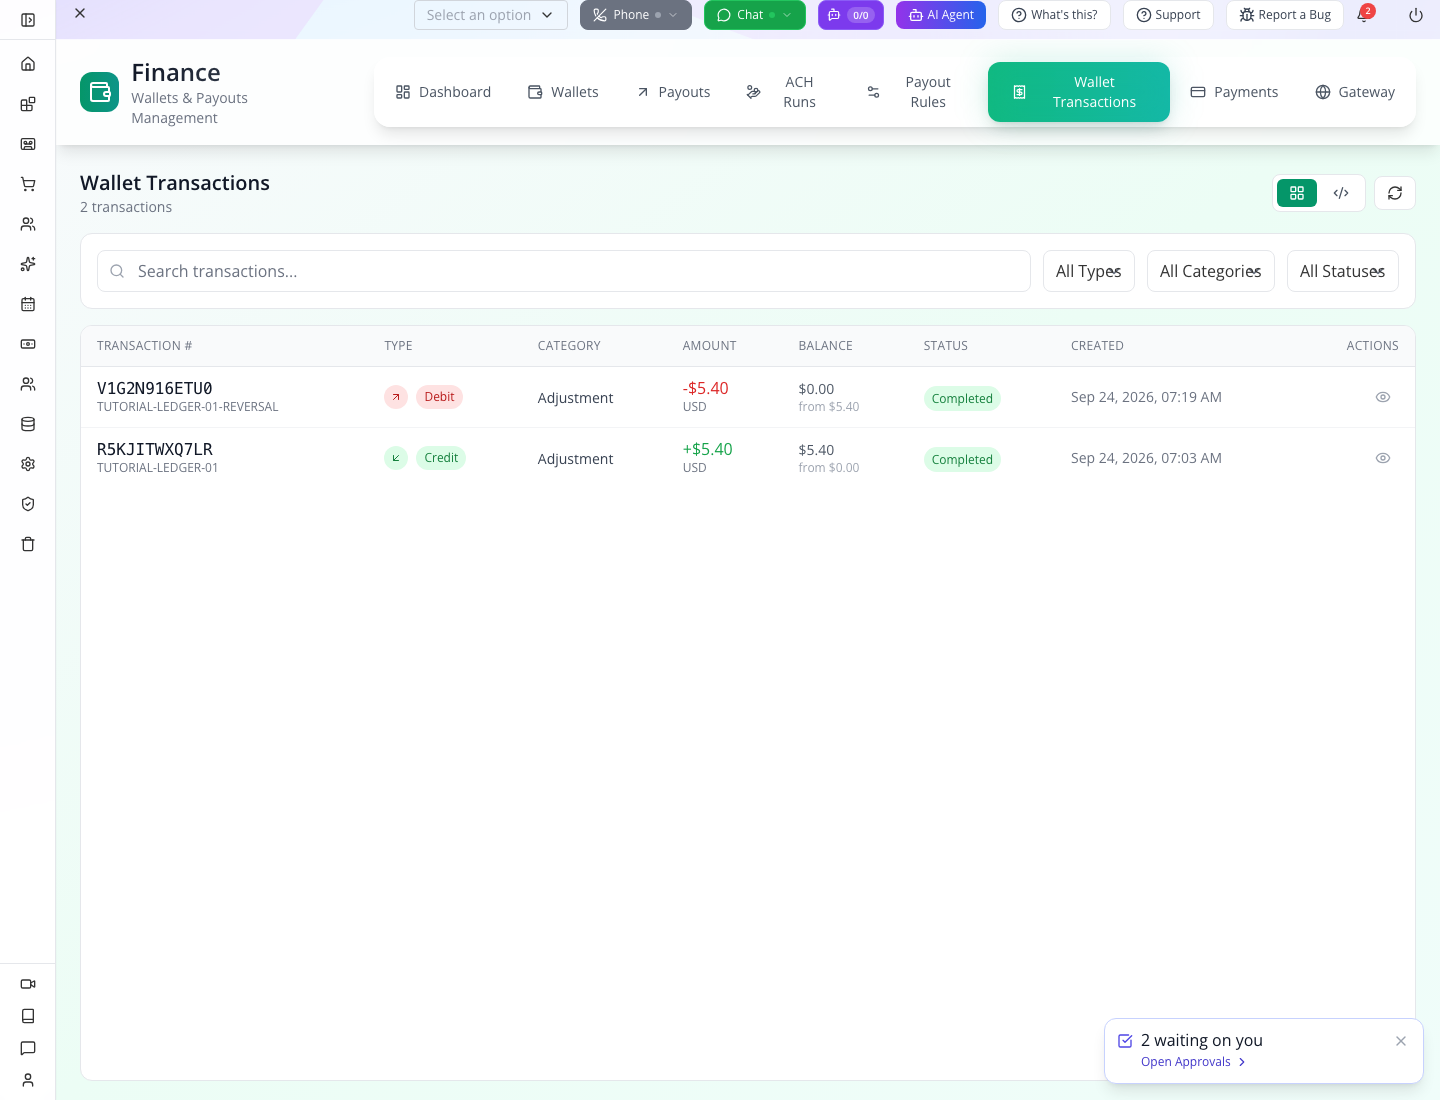
1 — The reversal is a debit of $5.40, from $5.40 to $0.00. 2 — The original entry is a credit of $5.40, from $0.00 to $5.40. Both are completed entries in this internal ledger.
Open the reversal row. In Transaction Details, compare Type, Category, Balance Before, Balance After, Reference ID and Description.
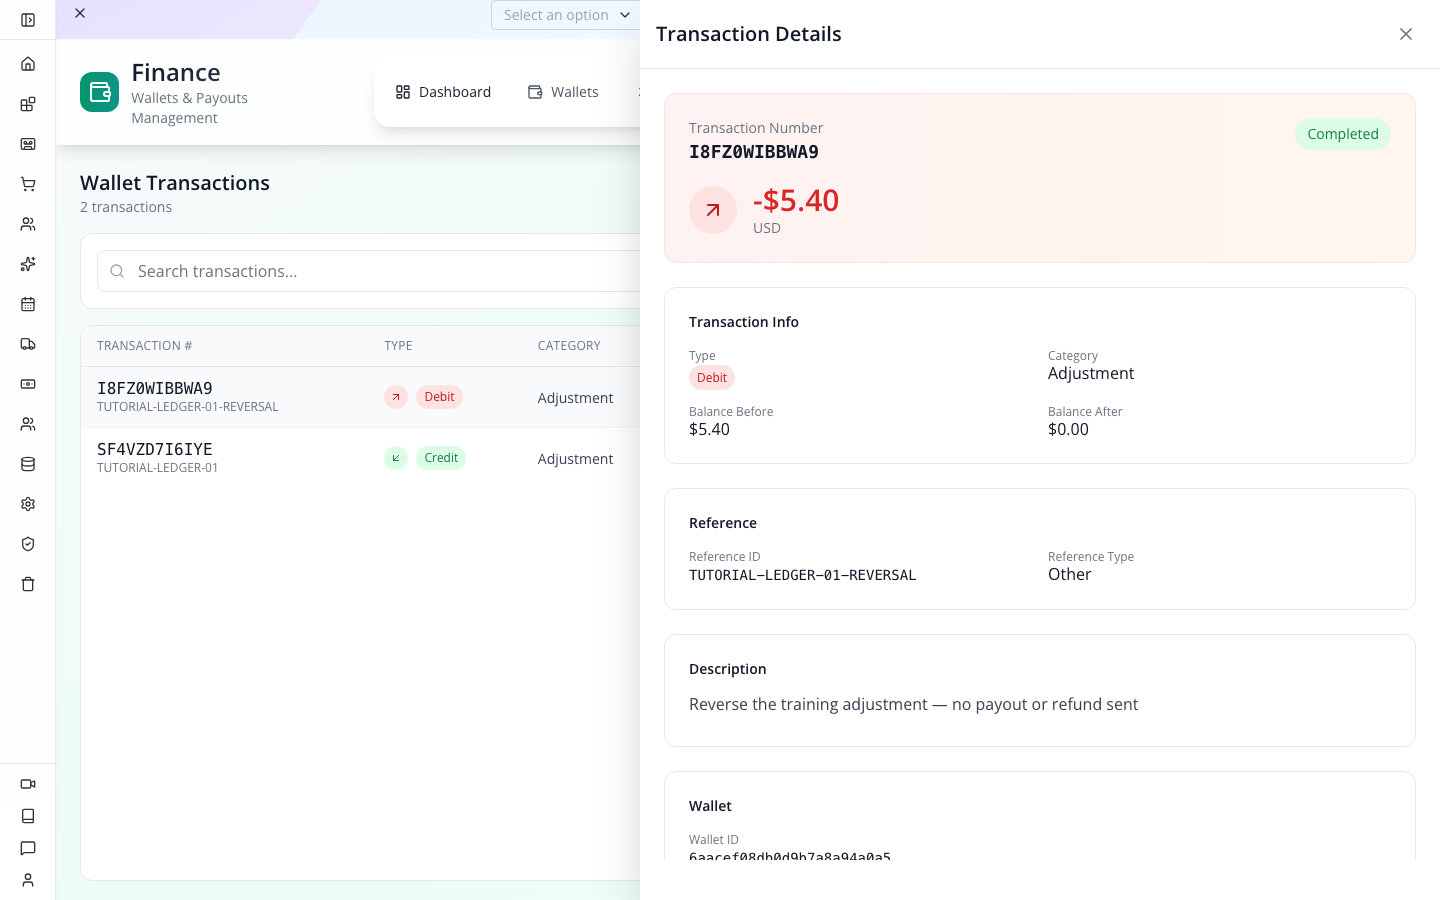
The reference type displays Other for this example. Appmint infers some reference types from text patterns; the reference is not an automatic link that creates an order, payout or job.
Close the detail, leave the tab, then reopen Wallet Transactions. Both rows should still exist. Reopen the wallet too: the balance should remain zero. These records were also read back independently after the exercise.
Watch for: the wallet's Total Debits still reads
$0.00after this adjustment debit. In this build that lifetime field increases for payout debits, not every debit category. Read the individual transactions when reconciling adjustments; do not use Total Credits minus Total Debits as an all-purpose balance calculation here.
9. Practice a refusal without creating another entry
Return to the zero-balance wallet. Press Add Debit, enter 1 for Amount, select adjustment, and use TUTORIAL-INSUFFICIENT as Reference. Press the form's Add Debit button.
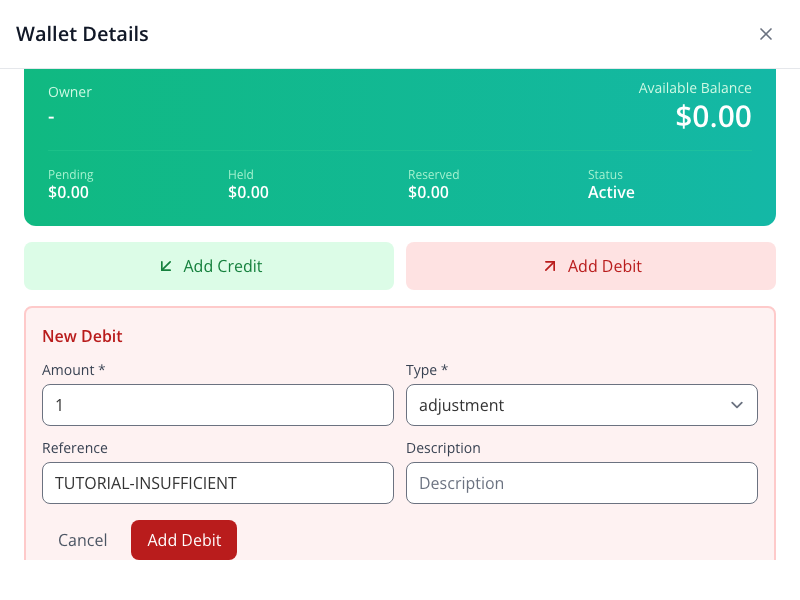
The result is Insufficient balance. Close the drawer and check Wallet Transactions: there should still be only the original two entries. A failed attempt should not become a third debit.
Try it: tell a colleague why the ending balance is zero without opening the dashboard. Use the two transaction amounts and their before/after balances.
Check yourself: the debit's status is Completed. Was anyone paid? No. Its category and description identify an internal adjustment. A payout needs its own request, destination and transfer outcome.
Part 4 — Prepare a real earner for a payout
The training wallet is finished at zero. Leave it as an audit example. Use the wallet created by a real earning workflow when introducing payouts.
A customer buying something does not, on its own, credit an affiliate or delivery wallet. The earning workflow must identify the earner, calculate the share and write its wallet transaction. Start from that transaction's reference and confirm the corresponding business event before requesting money out.
Trace a delivery earning back to its job
A useful comparison is the driver's wallet below. It contains two job-generated earnings, rather than the manual credit used in the first exercise. The local delivery rehearsal followed normal driver registration, owner approval, job assignment, pickup, dropoff and completion. Each job had a $9 customer price and $6 driver pay. No physical delivery or customer charge is represented by these training records.
Open Finance → Wallets and select the wallet belonging to the linked driver customer. Check its owner before comparing amounts.
Expand Earnings Breakdown. This example shows Base Earnings $12.00 and Adjustments $0.00. The earlier standalone practice wallet has a different purpose; do not merge their histories.
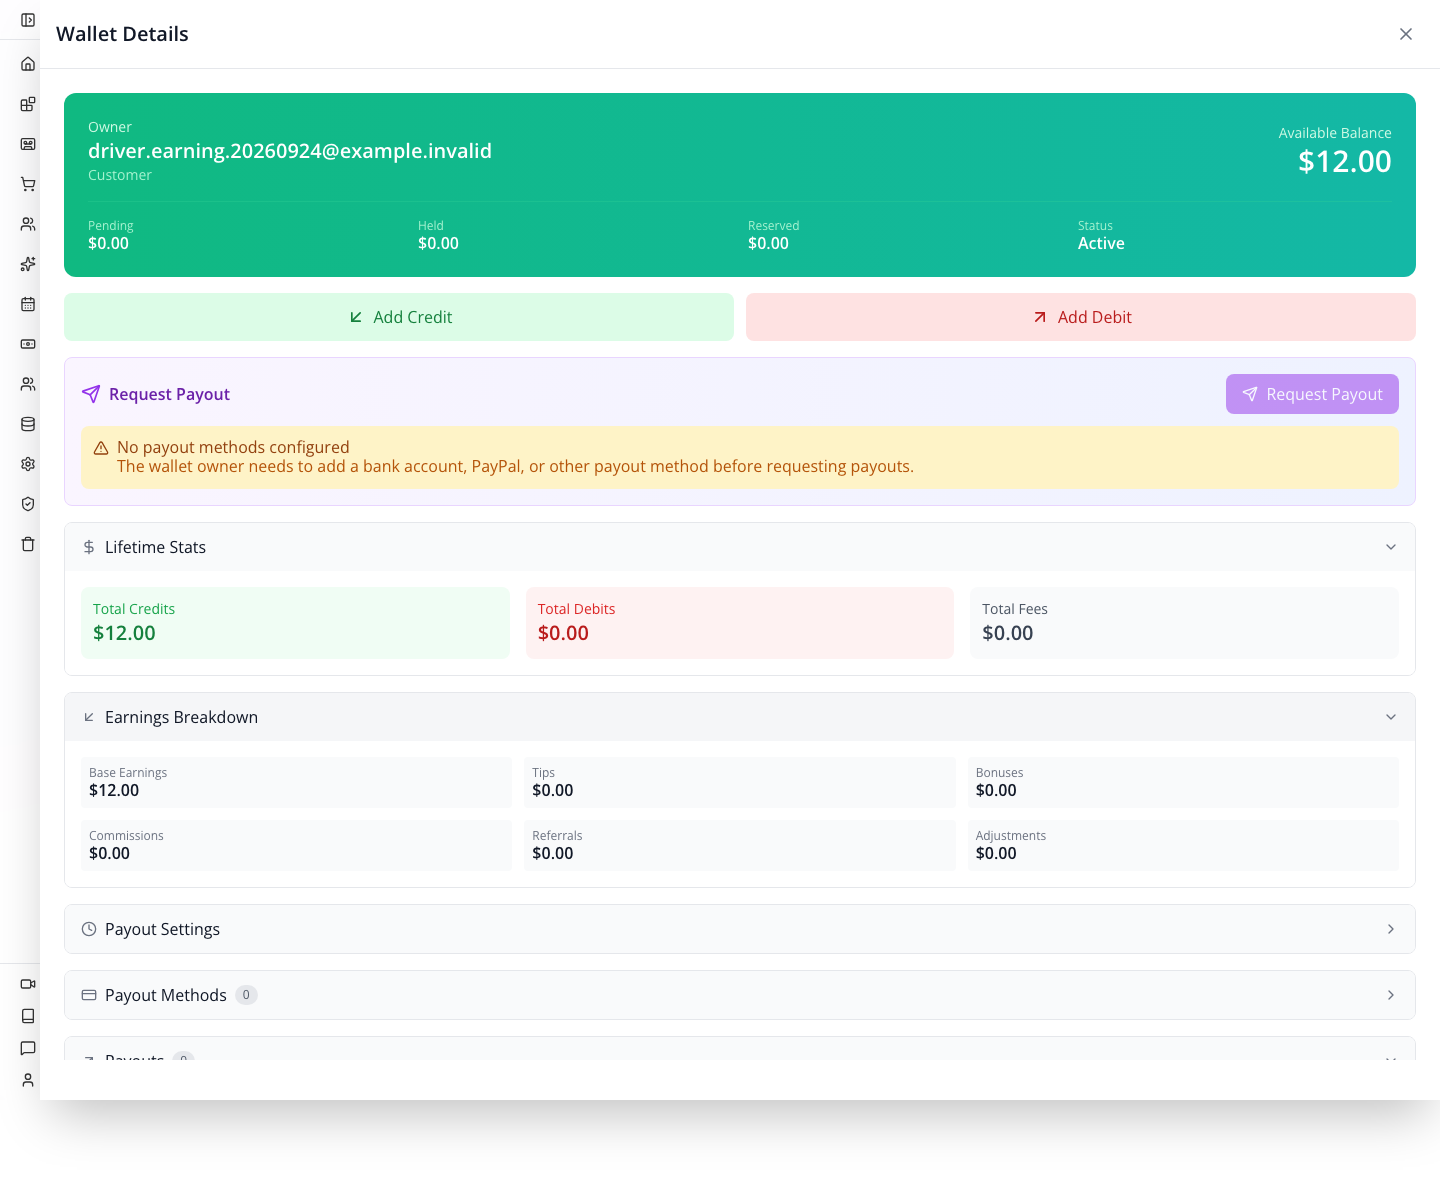
Expand Transactions. Find the two Earning rows, each +$6.00. Their descriptions include the delivery job numbers V9L8YAVMR1 and CB9N2IKCXN. Match those references to the completed jobs and their recorded driver-pay amounts. An amount without a source reference is harder to investigate later.
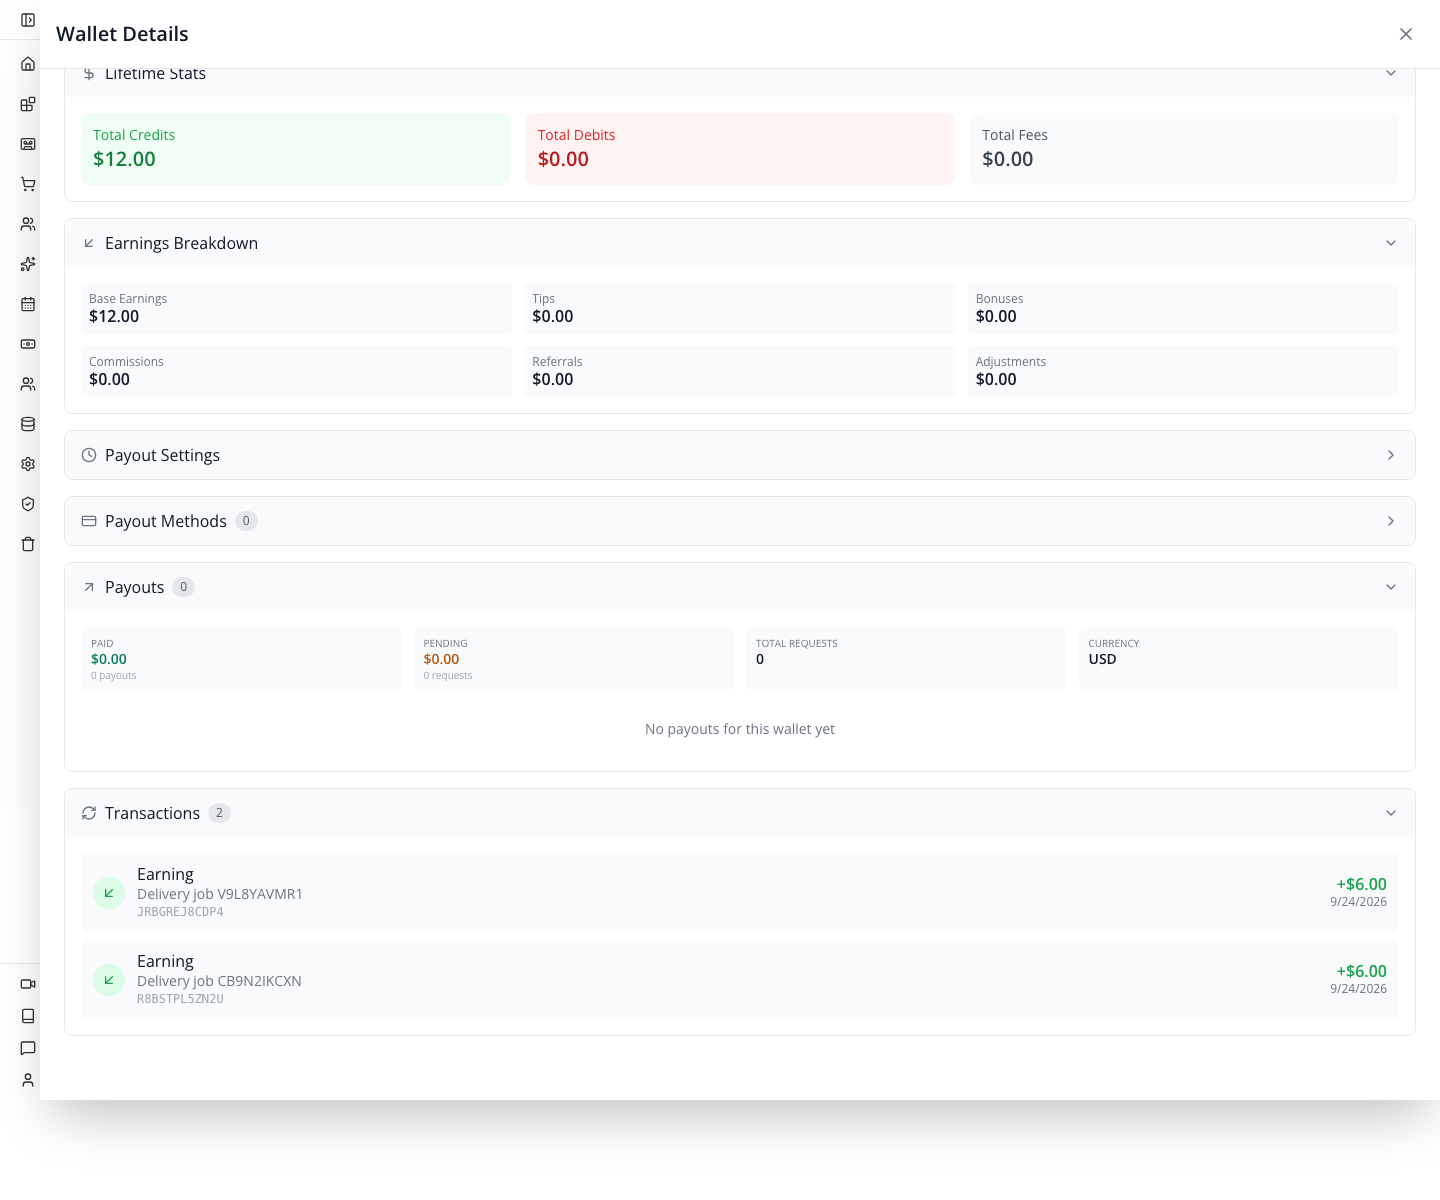
Check Payouts separately. Here Paid $0.00, Pending $0.00 and Total Requests 0 mean no payout was requested from this wallet. The yellow No payout methods configured message explains why Request Payout is unavailable. An earning can be correctly recorded before a recipient supplies a destination.
The repaired completion workflow saves the earning and its status together with the completed job result. Repeating the first completed job did not add a second credit; the next distinct job added the second $6 entry. If a completed job has no matching earning, investigate its linked customer and completion error before entering an adjustment—otherwise a later retry could obscure the history. Continue with the delivery course for the operational setup.
Read the wallet's readiness
Open the earner's row in Wallets. Inspect these items together:
| Item | What to establish |
|---|---|
| Owner | The wallet belongs to the intended earner's actual record |
| Currency | The earning and requested payout are in the intended currency |
| Transactions | Credits have a traceable reason and source reference |
| Held / Reserved | These amounts may already be unavailable for another request |
| Payout Methods | A destination belongs to the intended recipient and is usable |
| Payouts | A request for the same earning is not already pending or processing |
In the captured training wallet, Request Payout is disabled and the screen says No payout methods configured. Expanding Payout Methods shows no entries. The drawer tells you the wallet owner needs to add a bank account, PayPal or another payout method; it does not provide an Add method button here.
Do not turn the lab marker into a real recipient by adding banking details to it. Connect the actual customer/earner account through the application that owns the earning workflow. Developers can follow the customer-authenticated destination exercise below. It uses the signed-in customer to select the wallet owner; entering Owner Name in the generic wallet form does not establish that relationship.
Read available funds carefully
The payout service checks:
amount available for a new request
  = balance − held balance − already reserved balance
For a hypothetical wallet with 20 balance, 3 held and 5 reserved, a new request has at most 12 available. This is an explanation, not a captured balance from the exercise.
The current wallet detail header labels balance as Available Balance without doing that subtraction. Read Held and Reserved alongside the headline. A server refusal can therefore be correct even when the headline appears large enough.
Follow the lifecycle without skipping its evidence
The real payout walkthrough depends on a connected recipient and a configured payment rail. No real or sandbox transfer was submitted in the captured exercise. Use this table to understand the existing request records and to prepare that separate provider session:
| State or action | What it means in Appmint | What to check next |
|---|---|---|
pending | A request exists | Recipient, destination, currency, amount and reason |
approved | Approval passed | The execution method and available destination |
processing | Processing has started | Provider response or bank-batch membership |
completed | Appmint recorded completion | The external outcome and the wallet debit |
failed | The request did not finish successfully | Failure reason and whether funds were released |
cancelled | The request was cancelled | Reserved balance and the reason recorded |
The payout drawer's source implements Approve, Process and Cancel actions for appropriate states. Their presence does not establish that your recipient or provider is ready. A completion entered by an operator is an assertion that a separate payment happened; it is not a way to send that payment.
The current UI sends approvedBy: admin. Do not treat that text alone as the verified identity of the human approver. Hiding a Finance menu is also not a substitute for server permission enforcement or separation of duties.
Part 5 — PRO: understand bank files, provider outcomes and API boundaries
ACH Runs: a file is one stage of paying by bank
Select ACH Runs in Finance. The top section is Waiting for the next run, followed by Runs.
If either list fails to load, the screen displays an error instead of reporting zero payouts or runs. Select Refresh after resolving the connection problem. Previously loaded rows can remain visible, but Build the file stays disabled while loading or showing an error; use the refreshed list before building.
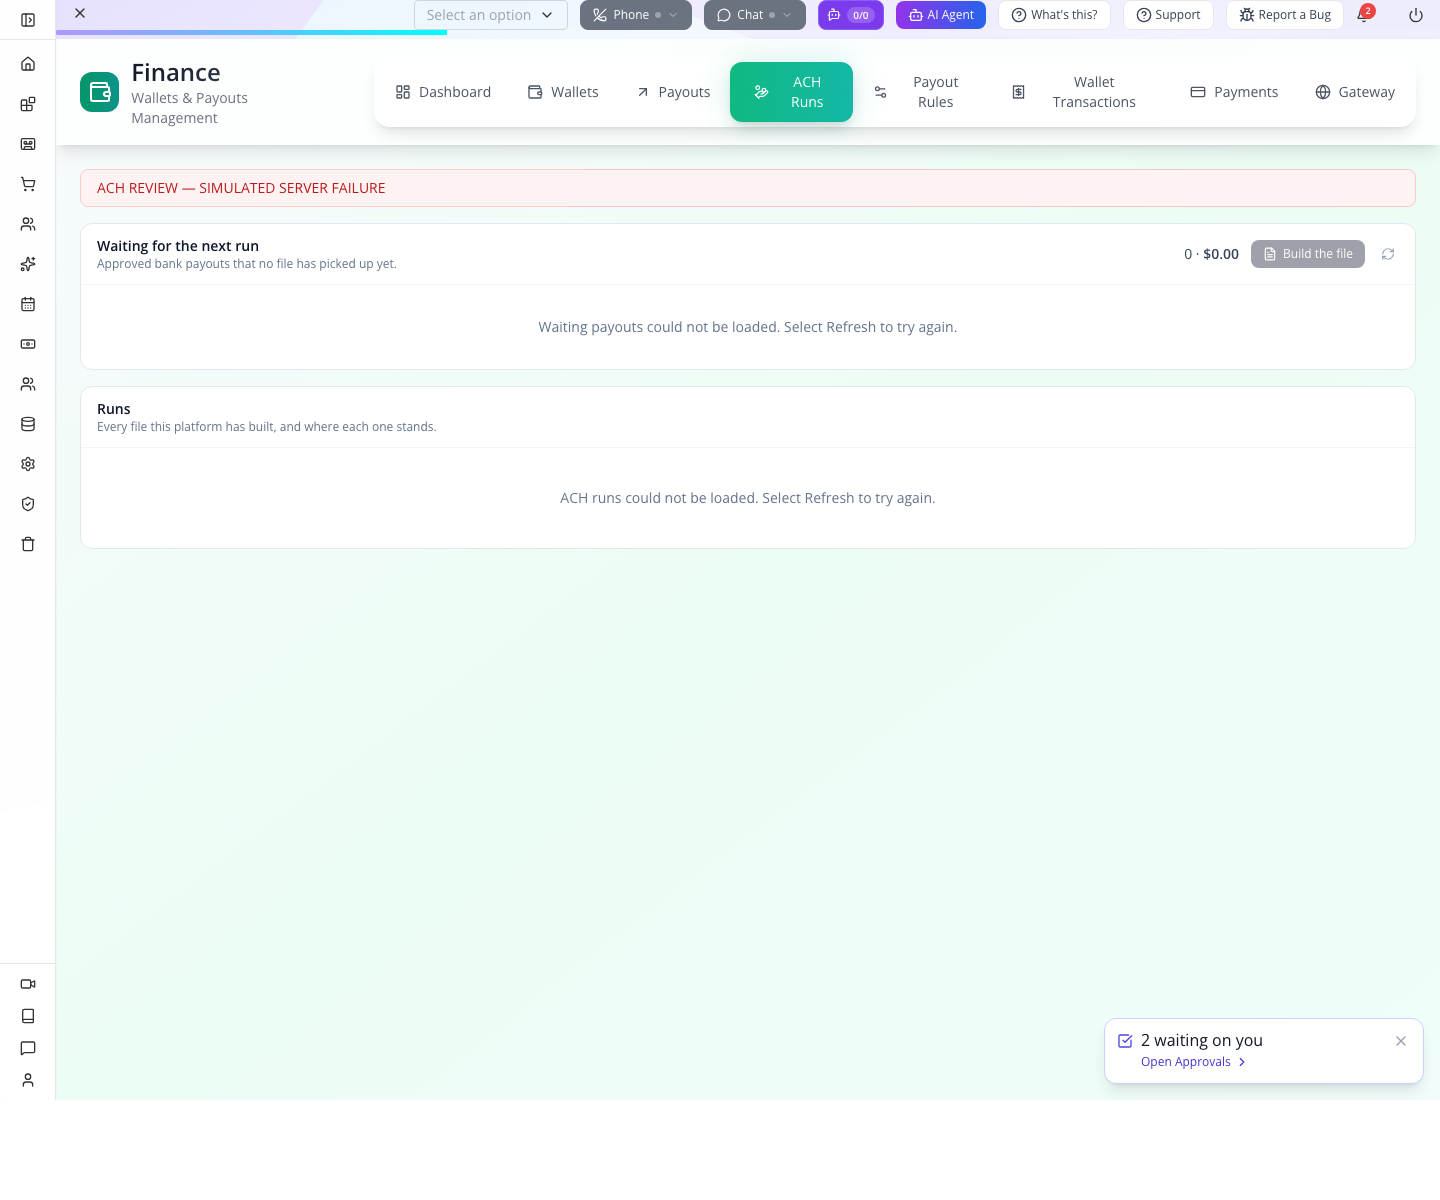
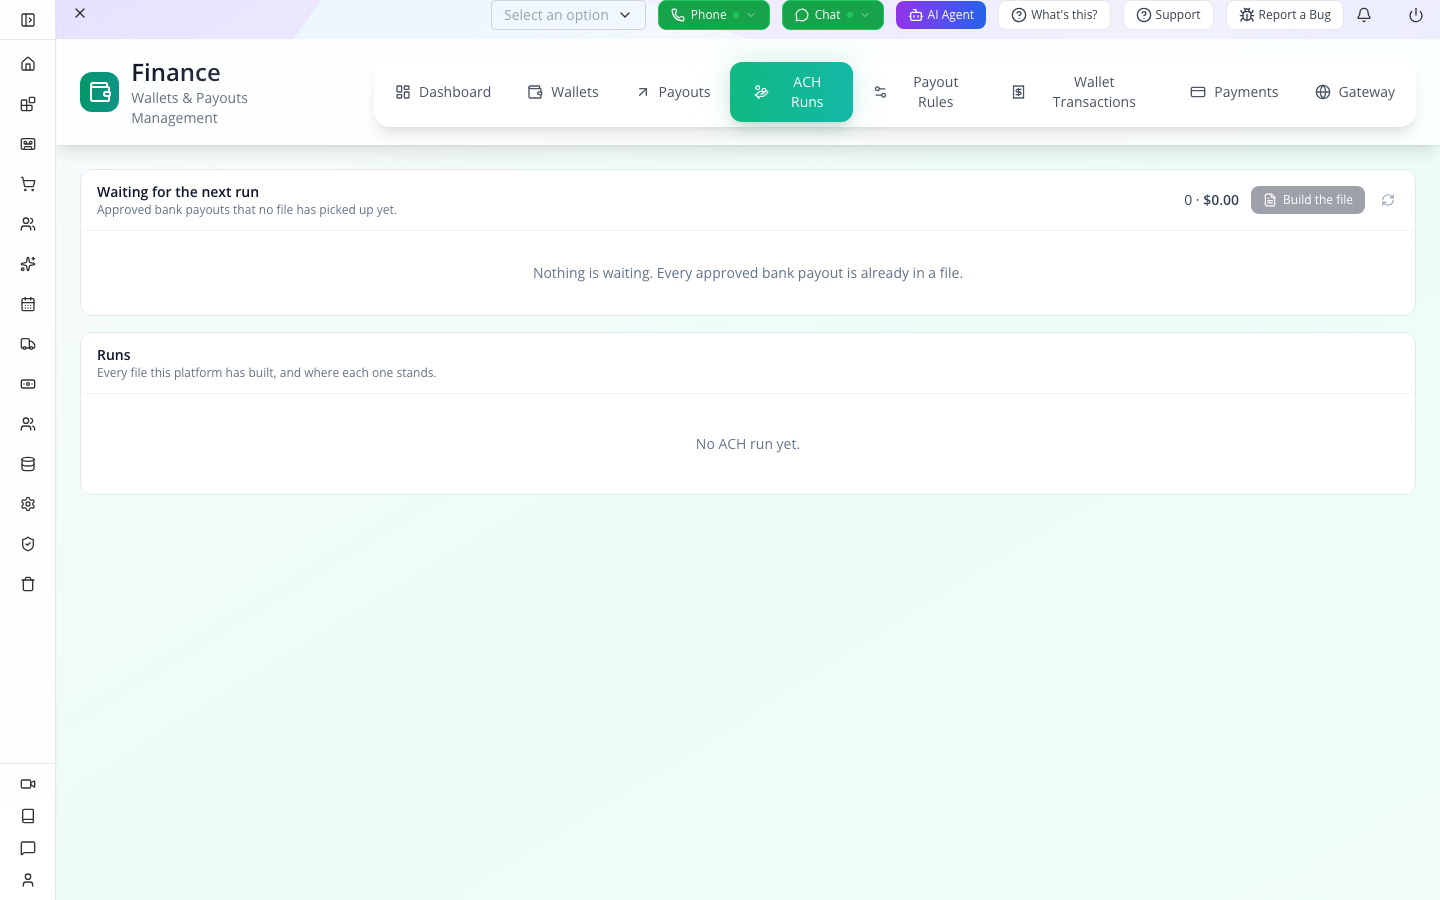
The captured state is 0 · $0.00 and No ACH run yet. Build the file is unavailable with nothing eligible. This is the actual starting screen; there is no captured bank submission or settlement in this lesson.
Build and download the training file
The next captures show a later, completed local file rehearsal. Its recipient was a normally registered customer with a customer-owned wallet. The $5.40 came from an explicitly labelled training adjustment, not a commission or delivery earning. Its fictional bank destination remained pending/unverified. This demonstrates file creation only; never submit the training file to a bank.
For your own operational run, first establish the recipient, the earning reference, the customer's usable bank destination and the organisation's bank-file configuration. The customer requests a payout against their own wallet; an authorised operator reviews and approves it. An empty Waiting for the next run list is not a form for adding a bank account or inventing an earning.
Open Finance → ACH Runs after the request has been approved. Read every row under Waiting for the next run. The captured run contains TRAINING ACH FILE ONLY, one request, a masked account ending 0001, and $5.40. Match the recipient, request number, destination and total to the request you approved. The button builds the eligible waiting requests together; check the whole list before proceeding.
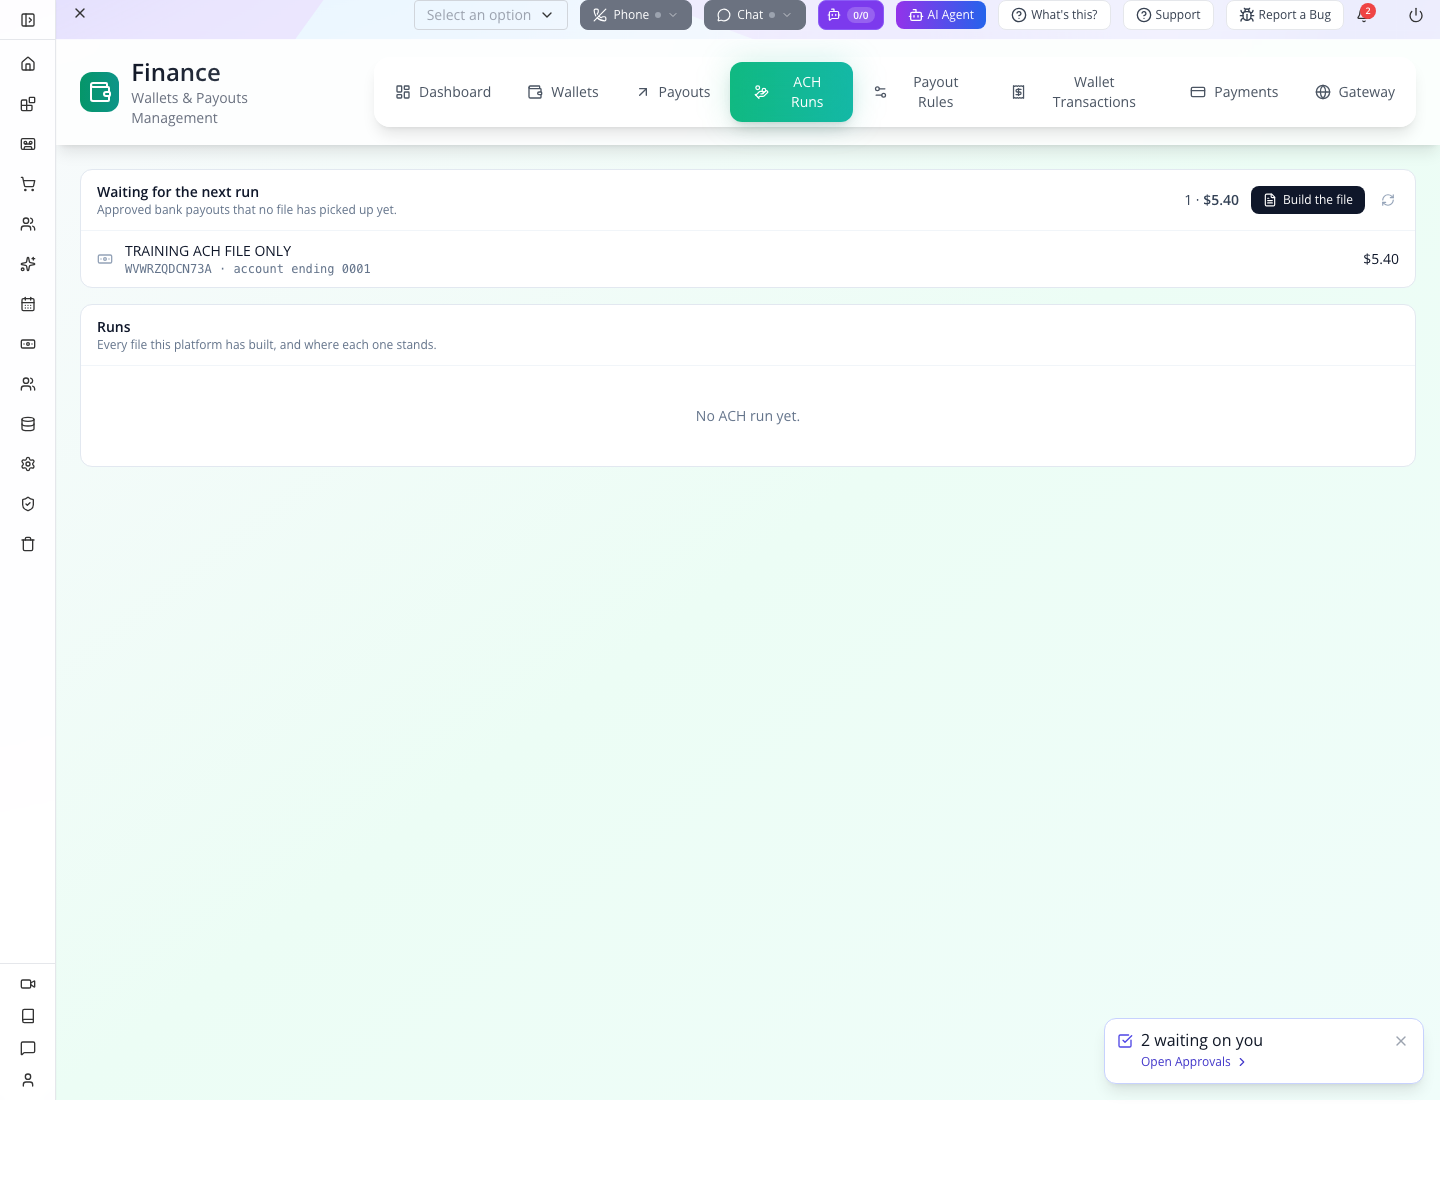
Select Build the file. The confirmation asks Build a file for 1 payout? and states the amount. Compare both count and total with the list. Select Cancel if either differs from your intended run. Building a file creates the payment instructions; it does not transfer money.
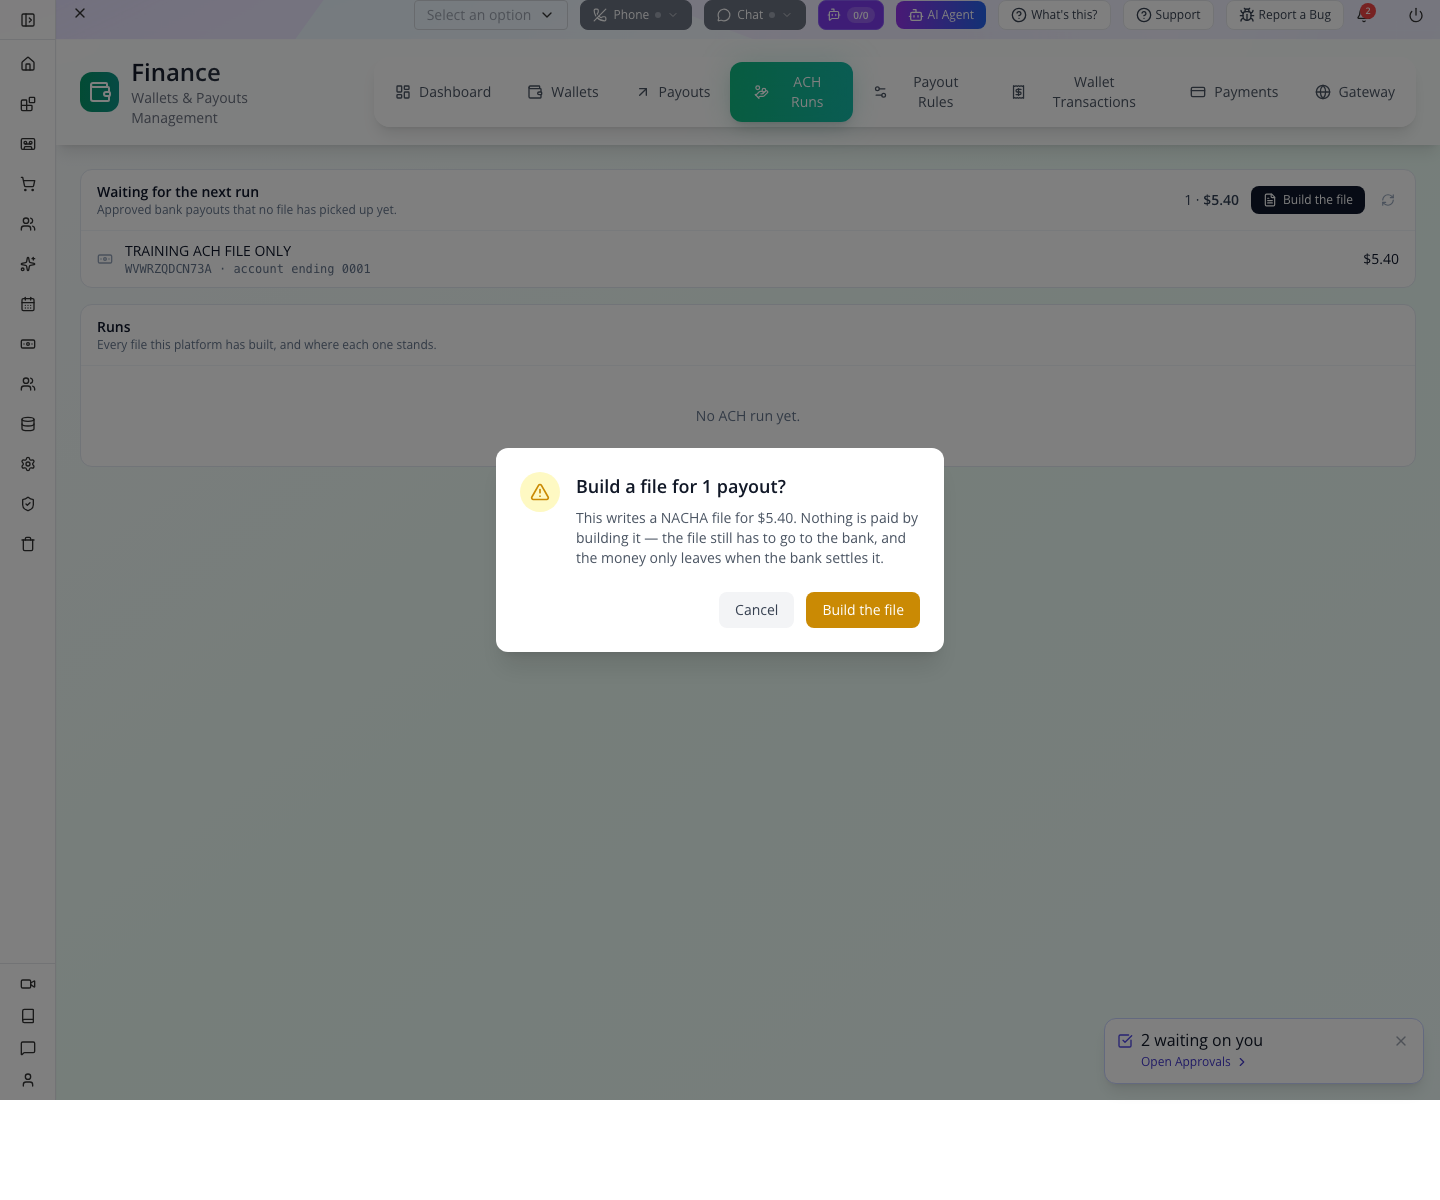
Confirm Build the file once. Look under Runs for the resulting batch. In this rehearsal, Batch 0000001 contains 1 entry · $5.40 and reads Waiting to go to the bank. The waiting count becomes 0 · $0.00, because the approved request now belongs to a file. That zero means nothing is waiting for a new file—not that the recipient has received their money.
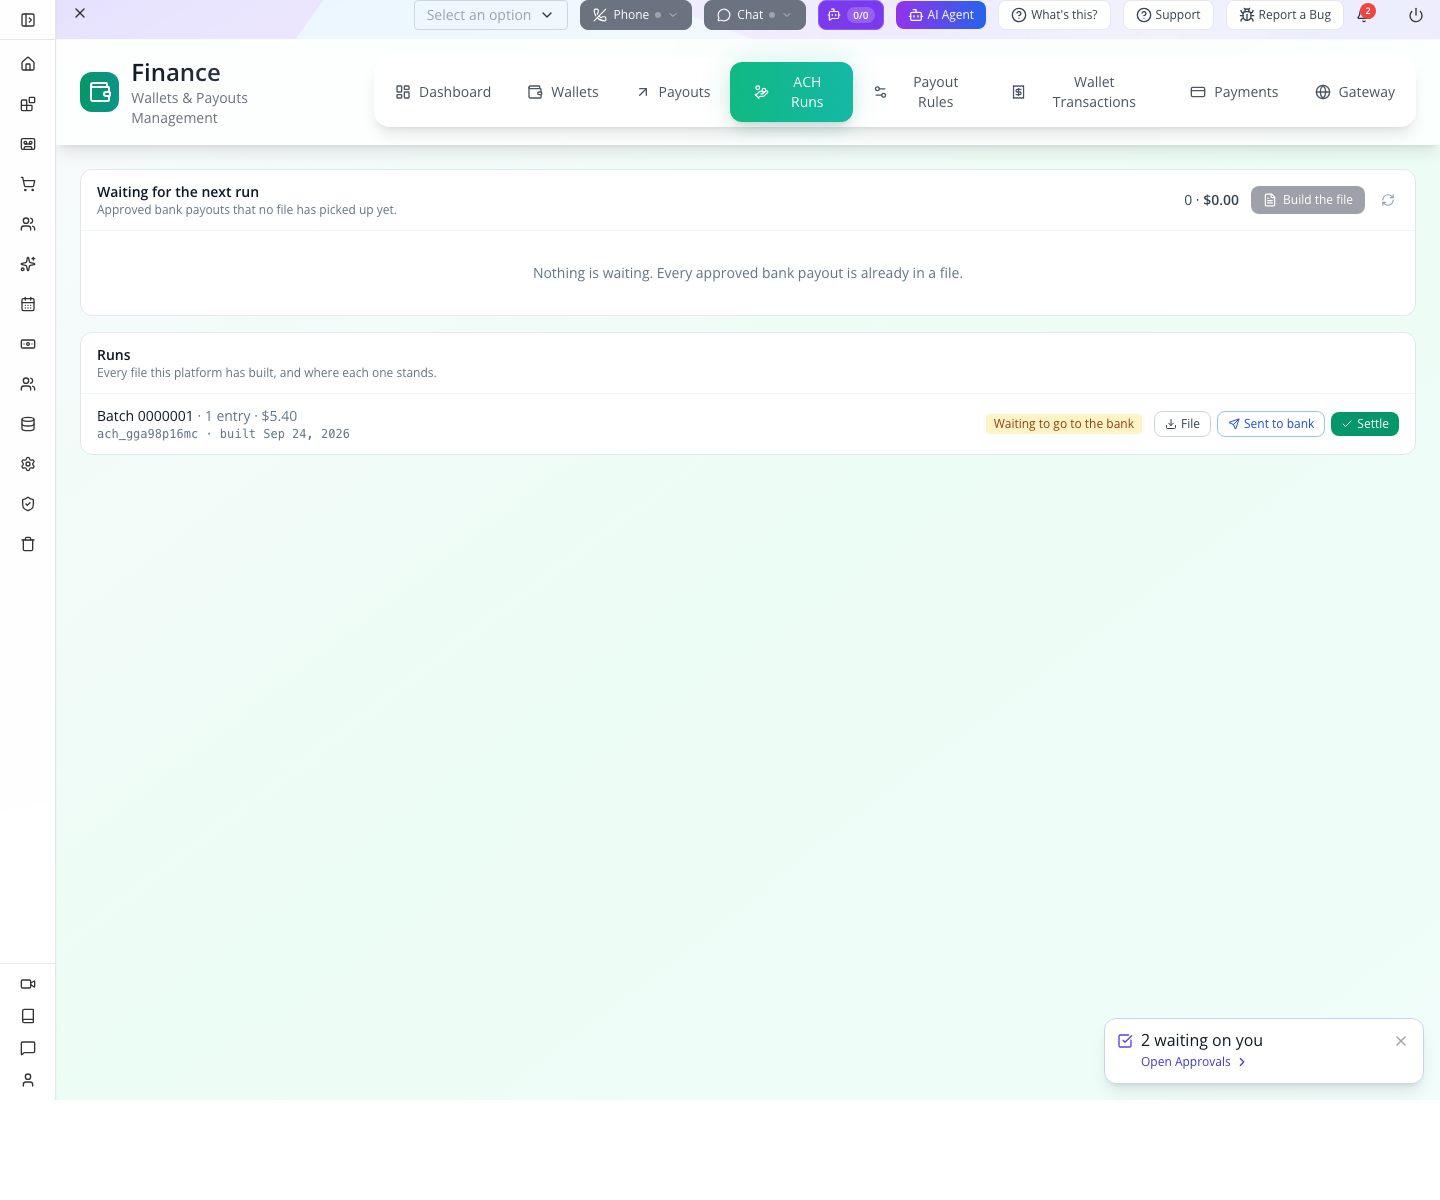
Select File on that batch. Save the download with its batch reference so your finance operator can reconcile it. Downloading it again should retrieve the same file; do not build another run just to recover a download. The actual browser download in this rehearsal matched the API download and a repeat download byte for byte.
Check the file against the batch before any bank handoff. The training file contained one credit of 540 cents, zero debit cents, and 10 records of 94 characters. Its payout reference and batch identifier matched the saved records. These local structural checks do not establish bank acceptance.
Keep the run at Waiting to go to the bank during this training exercise. Sent to bank records a handoff through your bank's process; Settle records an outcome that must already be supported by bank evidence. Neither is the next practice button to press. The checked wallet still held $5.40 balance, $5.40 reserved, and $0 lifetime debits after file creation.
Watch for: a request can be processing because it is included in an ACH file while the file is still waiting for the bank. Read the request, the batch and the external bank outcome together. The local training destination's pending status also shows why file generation alone cannot prove ownership of a bank account.
After building, reopen Finance → Wallets and read the payout summary for the file’s recipient. In this example it shows $0.00 paid · $5.40 pending. The reserved amount still belongs to a processing request. Only a completed payout contributes to Paid.
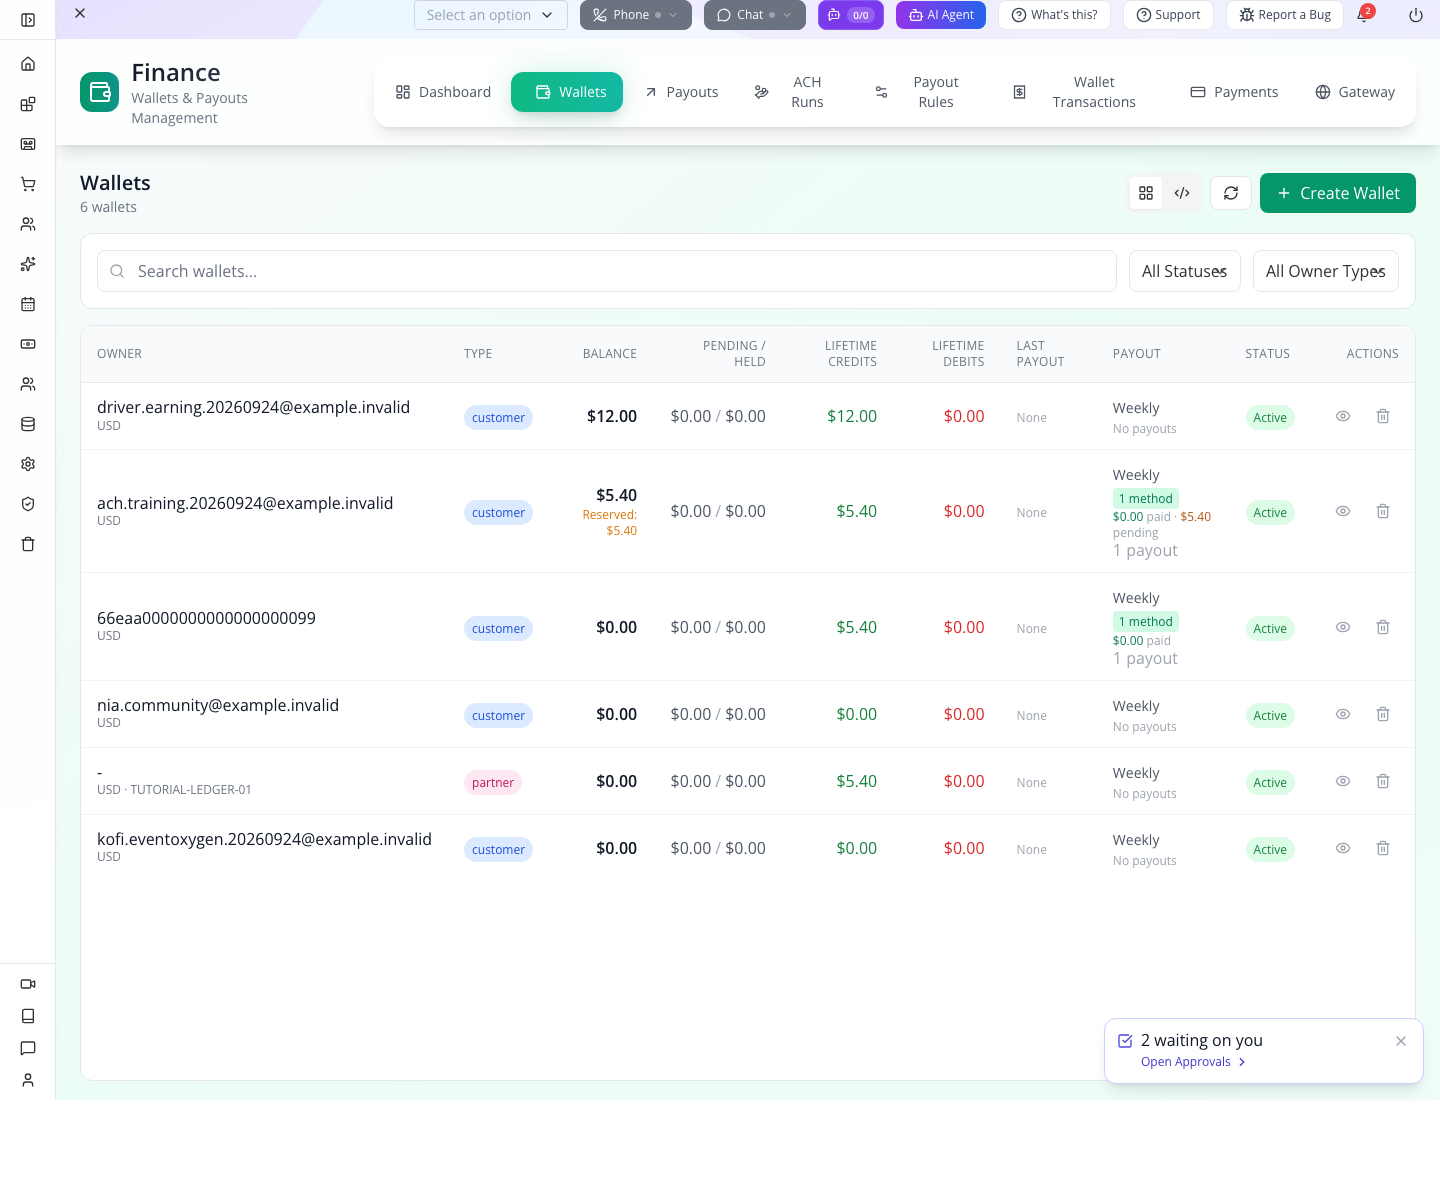
The full operational sequence is:
| Stage | Operational meaning |
|---|---|
| Approved bank requests waiting | Requests eligible to be included in a file |
| File built | The NACHA file exists; money has not moved merely because it was generated |
| File downloaded and sent | An operator submits the file through the bank's agreed process and records that handoff |
| Bank outcome received | Reconcile the bank's confirmation with the individual requests |
| Settled or returned | Record the actual outcome and check wallet/payout entries |
The source's labels include Waiting to go to the bank, With the bank, Settled and Partly returned. Do not click a settlement action just to move a tutorial to its last screen. Keep the original file identifier, bank acknowledgement and affected payout references together.
Reconcile the actual sandbox refund
For the store rehearsal, open order AZ1QTIMKN → Payments. The current summary shows Gross collected $53.00, Refunded $53.00, Net retained $0.00 and Uncollected balance $0.00. The original paid row stays in the history. The refund reference belongs to the money returned; do not mistake the retained payment row for a second charge or a missing refund.
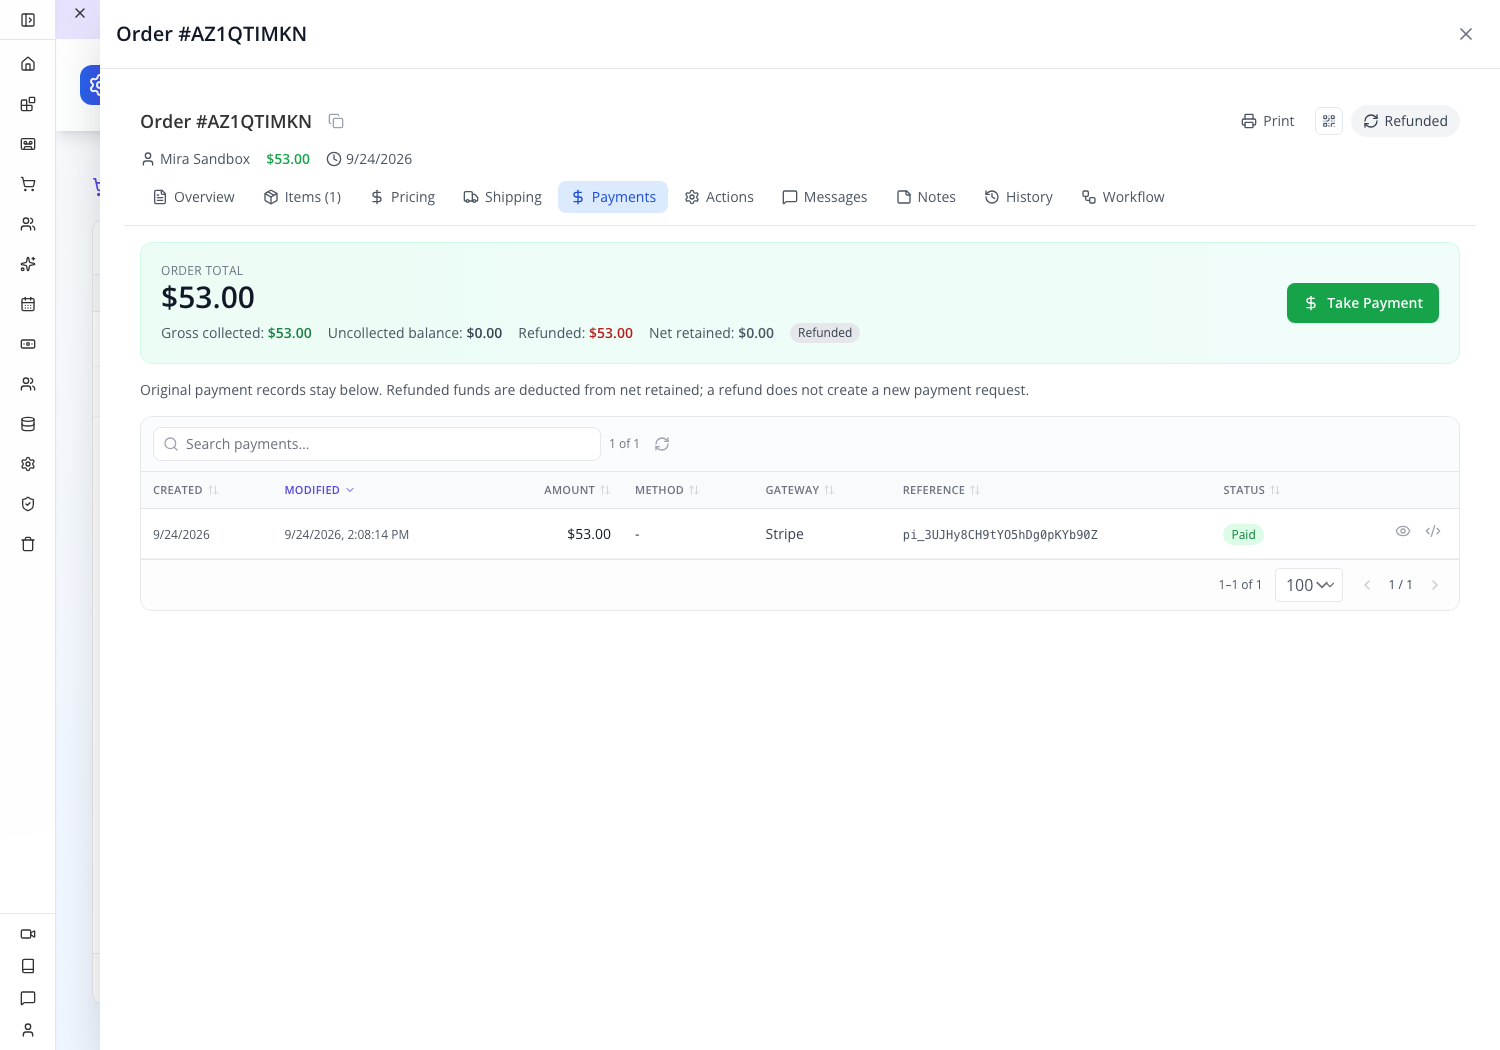
The provider independently returned one succeeded Stripe refund for 5,300 USD minor units against the original test payment, with livemode: false. Follow the order refund steps for the amount, reason, single submission and readback. This is separate from recording an RMA's inspection and resolution.
Check the individual provider outcome
For PayPal, keep both the batch reference and the item's result. A batch identifier is a lookup key, not the answer to “did this recipient receive the money?” PayPal's batch-details endpoint includes individual item statuses, including outcomes that require attention. PayPal: show payout batch details, PayPal: transaction statuses.
For a customer refund, confirm the actual refund status as well as its reference and amount. Stripe distinguishes pending, succeeded, failed and other refund states; a submitted refund is not automatically a successful one. Stripe: Refund object.
Appmint's inspected payment-service paths still return pending placeholders for several PayPal and Helcim operations. A locally returned paypal_pending or helcim_pending is not evidence of a provider refund. Keep those integration gaps separate from a provider's genuine pending transaction.
Developer checkpoint: canonical owners and customer authentication
The server's dedicated wallet-creation path stores the owner in the record's top-level owner object. Its createWallet implementation currently uses the customer datatype regardless of the supplied owner-type label. Owner lookups use the owner ID.
The Modern wallet editor used in the practice instead saves data.ownerId, data.ownerType and data.ownerName through generic record saving. The resulting record had no top-level owner object. That explains the blank header and why this practice record is unsuitable as a connected payout recipient.
For a production integration, create or retrieve a wallet through the appropriate earning/customer workflow, then read it back and confirm the canonical owner before crediting money owed. Verify existing records before assuming a generic form has linked them correctly.
These API surfaces have different audiences:
| Surface | Purpose |
|---|---|
POST /finance/wallets | Administrative wallet creation for an existing owner identity |
POST /finance/wallets/:walletId/credit | Internal ledger credit with amount, category, reference and description |
POST /finance/wallets/:walletId/debit | Internal ledger debit; not a customer card refund |
GET /finance/wallets/:walletId | Wallet, transaction and summary data |
POST /finance/wallets/:walletId/request-payout | Request against spendable balance and a saved destination |
GET /client/finance/wallet | The authenticated customer's wallet, transaction rows and calculated summary |
GET /client/finance/payout-methods | The customer's destinations; creates their zero-balance customer wallet if absent |
POST /client/finance/payout-methods | Add a destination to that customer wallet |
PUT /client/finance/payout-methods/:methodId | Rename, select or disable an owned destination |
DELETE /client/finance/payout-methods/:methodId | Remove an owned destination |
GET /client/finance/payouts | The customer's payout history |
Connect the signed-in earner and save their own destination
This is an API exercise for the developer connecting the earner portal. It does not require a customer to open source code. The Studio wallet drawer has no destination-entry form, so do not look for an Add method button there.
Prepare: use a controlled customer in your training organization and the API origin and ORG organization ID from Build a connected web or mobile client, Part 1. That lesson explains ordinary customer signup and sign-in. A Studio employee account and a customer account are different identities. For a real recipient, the recipient signs in with their own customer credentials; the developer must not substitute an owner token.
Sign in through
POST /profile/customer/signin, with theorgidheader and JSON fieldsemailandpassword. Keep the response private. A successful local sign-in returned 201 and atoken; retain that value asCUSTOMER_TOKEN. If the response requires another verification step, complete it before continuing.curl -sS -X POST "$API/profile/customer/signin" \ -H "orgid: $ORG" -H 'Content-Type: application/json' \ --data '{"email":"<your-controlled-customer-email>","password":"<private-customer-password>"}'Confirm the identity before opening their money records. Read
GET /client-data/profilewithAuthorization: Bearer $CUSTOMER_TOKENandorgid: $ORG. Checkdata.emailand retainsk, the customer ID. Do not continue if this is a different person.curl -sS "$API/client-data/profile" \ -H "orgid: $ORG" -H "Authorization: Bearer $CUSTOMER_TOKEN" curl -sS "$API/client/finance/wallet" \ -H "orgid: $ORG" -H "Authorization: Bearer $CUSTOMER_TOKEN"A new customer can receive 200 with no wallet record on the second request. That is not a failed login. The next endpoint prepares that customer's wallet when needed.
Read
GET /client/finance/payout-methodswith the same headers. The response is an array, initially[]. This call creates a zero-balance customer wallet if none exists. Repeating the read reuses the wallet. Read/client/finance/walletagain and comparewallet.owner.idwith the profile'ssk;wallet.owner.datatypeshould becustomer.In training only, add a clearly marked nonpayable destination. This demonstrates storage without supplying bank details or sending money. If a matching training method already exists, reuse its ID instead of creating a duplicate.
labelis for recognizing the destination;paypal.emailis the destination address.curl -sS -X POST "$API/client/finance/payout-methods" \ -H "orgid: $ORG" -H "Authorization: Bearer $CUSTOMER_TOKEN" \ -H 'Content-Type: application/json' \ --data '{"type":"paypal","label":"Tutorial destination — not payable","paypal":{"email":"[email protected]"}}'The checked response was 201, with a generated
id,status: "pending"andisDefault: truefor the first method. Save that generated ID asMETHOD_ID. A pending saved address has not been verified by PayPal. Real recipients must supply their own usable destination through your authenticated portal and complete its supported verification process.Read
/client/finance/payout-methodsagain. FindMETHOD_ID, compare its type, label and address, then read/client/finance/wallet. Confirm the canonical owner remains the signed-in customer andsummary.availableBalanceremains zero. The destination operation must not create an earning. In Studio, reopen Finance → Wallets to inspect the customer's separate row; the standaloneTUTORIAL-LEDGER-01record should remain unchanged.A customer can rename or choose their owned method with
PUT /client/finance/payout-methods/$METHOD_IDand JSON such as{"label":"My payout address","isDefault":true}. Verification belongs to the trusted provider/admin workflow. The local application now rejects a customer'sstatus: "verified"update with 403. Customers may disable their own method with{"status":"disabled"}; they cannot reset a disabled method to pending to bypass verification. A saved address or a self-declared status is not evidence of control of an account.Clean up the nonpayable practice method when the checks are complete:
curl -sS -X DELETE "$API/client/finance/payout-methods/$METHOD_ID" \
  -H "orgid: $ORG" -H "Authorization: Bearer $CUSTOMER_TOKEN"
curl -sS "$API/client/finance/payout-methods" \
  -H "orgid: $ORG" -H "Authorization: Bearer $CUSTOMER_TOKEN"
Expect
success: true, then an empty array if it was the only method. The zero-balance customer wallet remains. Do not delete a real destination with pending payout obligations as a practice task.
The boundaries we checked: a customer bearer alone reached their Finance routes; no staff or application bearer was required. No bearer returned 401. A customer requesting the staff wallet-list endpoint returned 403. Another controlled customer's attempt to rename this customer's destination returned 404. These checks use actual authenticated accounts in the same organization, not invented owner IDs.
Before requesting a real payout: use POST /client/finance/payouts/request with the customer's bearer and JSON fields amount, methodId and optional notes. The example training wallet has no earned funds and its destination has been removed, so do not submit that request here. First establish the genuine earning, available balance and verified destination, then complete the separate provider test session. Request creation, approval, execution and settlement remain distinct checks.
Developer branch: prepare the customer-owned ACH request
This is the setup used for the Build and download the training file sequence above. It uses the API because no bank-originator setup screen was exercised. It is separate from the zero-balance PayPal destination exercise; do not reuse that deleted method ID.
Use the normal customer signup/sign-in and identity checks above. Read
/client/finance/payout-methodsto establish the canonical customer wallet. Add a bank method with the same customer's bearer and organisation header:POST/client/finance/payout-methodsThese values are fictional local file-validation inputs, not bank-approved sandbox details. Keep them out of live business records and bank submissions. Save the returned method
id, then read the methods again. The actual saved status waspending; do not change it to verified to make the lesson proceed.Prepare the organisation's originator settings with an owner session. The executed local request used
POST /repository/createwith the owner's bearer, the sameorgid, JSON content type and this body:{ "datatype": "setting", "isNew": true, "data": { "type": "payout_ach", "ach": { "originatorName": "TRAINING ONLY", "originatorId": "TRAINING01", "odfiRoutingNumber": "123456780", "companyEntryDescription": "TRAINING", "immediateDestinationName": "TRAINING ONLY", "immediateOriginName": "TRAINING ONLY" } } }Inspect existing organisation configuration before creating a setting; reuse an existing training setup. An active ACH provider configuration takes precedence over this fallback setting. The rehearsal had no active organisation ACH provider and omitted
notifyEmail. The application's existing finance encryption key remained in place. Do not replace encryption keys while setting up a payout method.Establish the wallet's available balance. In this file-only rehearsal an owner added a clearly described 5.40 adjustment, using the ledger controls explained earlier, to the canonical customer's wallet. This is the reason the request could reserve 5.40; no earning was invented. For a real payout, trace the qualifying earning instead. Reopen the wallet and check ownership, currency, available amount and existing reservations before submitting.
Request the payout as the customer—not as the owner. Send
POST /client/finance/payouts/requestwith the customer's bearer, the same organisation header and JSON:{ "amount": 5.4, "methodId": "<bank method id returned in step 1>", "notes": "TRAINING FILE ONLY — not verified, not submitted, not an earning" }Retain the returned payout identifier. Read the wallet and request again; the same request must account for the reserved amount. If the response is unclear, inspect existing requests before retrying.
Review as the authorised owner, using a separate owner session. The executed approval was
POST /finance/payouts/<returned payout id>/approvewith the owner's bearer, organisation header and JSON:{ "approvedBy": "<signed-in owner's email>", "notes": "Training file controls only. No bank verification or submission." }The
approvedBytext is not authentication; the bearer and server permissions govern the action. After approval, open Finance → ACH Runs and match the request to the waiting row before following the illustrated build/download steps. Do not call a processing, sent or settlement endpoint to manufacture the final state.
Result: one customer-owned request produced one local training file. Its 5.40 remains reserved. The file, destination and approval have separate meanings; none certifies a real earning or completed transfer. Preserve the review batch for inspection instead of recreating the request to obtain another screenshot.
If something goes wrong
| Symptom | First check | What to do |
|---|---|---|
| Take Payment opens a blank request | Have amount, payer, purpose and collection method been selected? | Prepare those fields or choose an existing Invoice/Order; do not record money as received before it actually arrived |
| Gateway is empty | Does it also say No payment gateways configured? | Set up the intended provider before expecting provider transactions |
| Wallet owner displays a dash | Did the generic editor save only data-level owner fields? | Check canonical ownership before using it for payouts; keep the lab wallet standalone |
| Balance changed, but no customer payment exists | Was the action Add Credit or Add Debit? | Read Wallet Transactions; those actions change an internal ledger |
| Total Debits is zero after the practice reversal | Was the debit an adjustment? | Reconcile the transaction rows; the lifetime field omits this category in the inspected build |
| Another debit is refused | Is the balance already zero? | Do not repeat it; verify that the failed request added no transaction |
| Request Payout is disabled | Is the balance zero or the method list empty? | Inspect the actual earning and recipient setup; do not manufacture a balance |
| A request exceeds available funds | Are funds held or reserved? | Compare the server's spendable amount with all three balance fields |
| A weekly policy does nothing by itself | Does the screen display the no-timer notice? | A saved frequency is not a background scheduler in this build |
| A payout or refund is reported as complete locally | Can you match its provider/bank outcome? | Reconcile the external result and local entry before telling the recipient it arrived |
What happened behind the scenes
Software records and current source paths
Paths below are under the software checkout, not the documentation tree.
websitemint/packages/ui/src/components/finance/app.tsxdefines the eight tabs and aggregates loaded lists for dashboard totals.finance/wallet-form.tsxsaves Modern fields through generic record saving;finance/wallet-list.tsxreads the separate canonical owner, renders balances, and submits credit/debit requests. The header usesdata.balance; it does not subtract Held and Reserved.finance/transaction-list.tsxrenders the ledger table and Transaction Details drawer. The captured credit and debit have distinct transaction numbers, categories, descriptions and balance transitions.finance/payout-rules.tsxwrites asettingrecord withtype: payout_config, approval policy and schedule. It exposes an explicit cycle action and a no-timer message.finance/payment-list.tsxembedsfinance/take-payment.tsx, which provides the current Payment request form. The older storefront-only empty-state capture is historical.appengine/src/finance/payout.service.tsimplements wallet credits, debits, holds, reserves and payout transitions. Adjustment debits change balance without incrementinglifetimeDebits; payout debits increment that field. Recipient notifications are conditional on a resolved email.appengine/src/finance/payout.controller.tsexposes administration endpoints.finance-client.controller.tsandfinance-client.service.tsimplement the customer-facing boundary and payout methods.appengine/src/finance/payout-batch.service.ts,nacha.tsandexecutors/paypal-payout.executor.tsimplement bank-file and PayPal execution paths. These were inspected, not exercised with an external destination in this capture.appengine/src/finance/payment.service.tscontains payment-provider operations and the pending placeholder paths discussed above.
Where next
- Sell personalised products online: prepare the order and storefront flow that can produce customer payment records.
- Run a customer campaign: connect a real affiliate earning story to an identified recipient.
- Reconcile and close BusinessMade's books: the separate accounting workflow when your business uses BusinessMade.
For filming, use the companion production guide. It identifies the real captures and the provider sequences still requiring a separate recording session.
Capture evidence and scope — 18 September 2026
Practiced on local Studio Manager 0.6.2 and API port 3300 in organisation learnmu4qn1ha, using the registered training owner. Actual UI actions: eight-tab navigation; empty Payments; standalone Take Payment; empty Gateway; empty ACH Runs; manual payout policy saved; Modern practice wallet created; 5.40 adjustment credit; 5.40 adjustment debit; refused 1.00 debit; transaction detail inspected. Readback saved in assets/appmint-finance/ledger-readback.json; still metadata in evidence.json.
Wallet 6aacef08db0d9b7a8a94a0a5, number TUTORIAL-LEDGER-01, has no canonical owner, email or payout method. Its data-level owner marker 66eaa0000000000000000018 is intentionally fictional and was not a customer account. Final balance zero. Credit SF4VZD7I6IYE; reversal I8FZ0WIBBWA9. The failed debit created no third entry. Payout rules read back as manual/manual with no automatic threshold.
No paid order, qualifying affiliate commission, card charge, customer refund, payout request, approval, provider transfer, bank destination, ACH batch or scheduled cycle was executed. Those earlier topic promises are replaced with the observed training ledger and explicitly bounded provider/developer material. No notifications were sent from the email-free wallet exercise. No video file is claimed; the production guide is preparation for a later recording.
Concurrent source changes caused repeated Vite reloads; the tutorial Vite process was restarted with watching disabled to keep the capture stable. The application source was not edited. Reported gaps are date/build-specific and are logged in research for retesting.
Fresh-account repeat — 24 September 2026
Rehearsed in a separately registered local learner organization with normal owner/customer sign-in. Manual approval and on-demand rules survived leaving and reopening the tab. Created the course's standalone practice wallet at zero, credited 5.40 once, debited 5.40 once, then confirmed a 1.00 debit was refused. The transaction list contained only the two completed adjustments. The customer API exercise established a separate canonical customer wallet and pending fictional destination; customer-versus-staff and two-customer ownership checks passed.

The local walkthrough report records the application verification issue discovered while testing destinations and its fix status. No checkout, provider transfer, bank file or settlement is claimed by this repeat.
Sandbox payment and ACH file acceptance — 24 September 2026
The later Stripe rehearsal completed a real test-provider checkout on order AZ1QTIMKN for $53 and matched the operator payment row to a succeeded test intent. The ACH rehearsal used a separate canonical customer wallet, synthetic $5.40 adjustment and pending fictional bank method. Request, approval, file build and actual browser download passed. The batch remained built, the request processing, and no bank submission or settlement occurred. File validation evidence records the totals, repeat-download match and duplicate-build refusal. These later passes supersede the earlier empty-screen scope only for the actions explicitly listed here.