
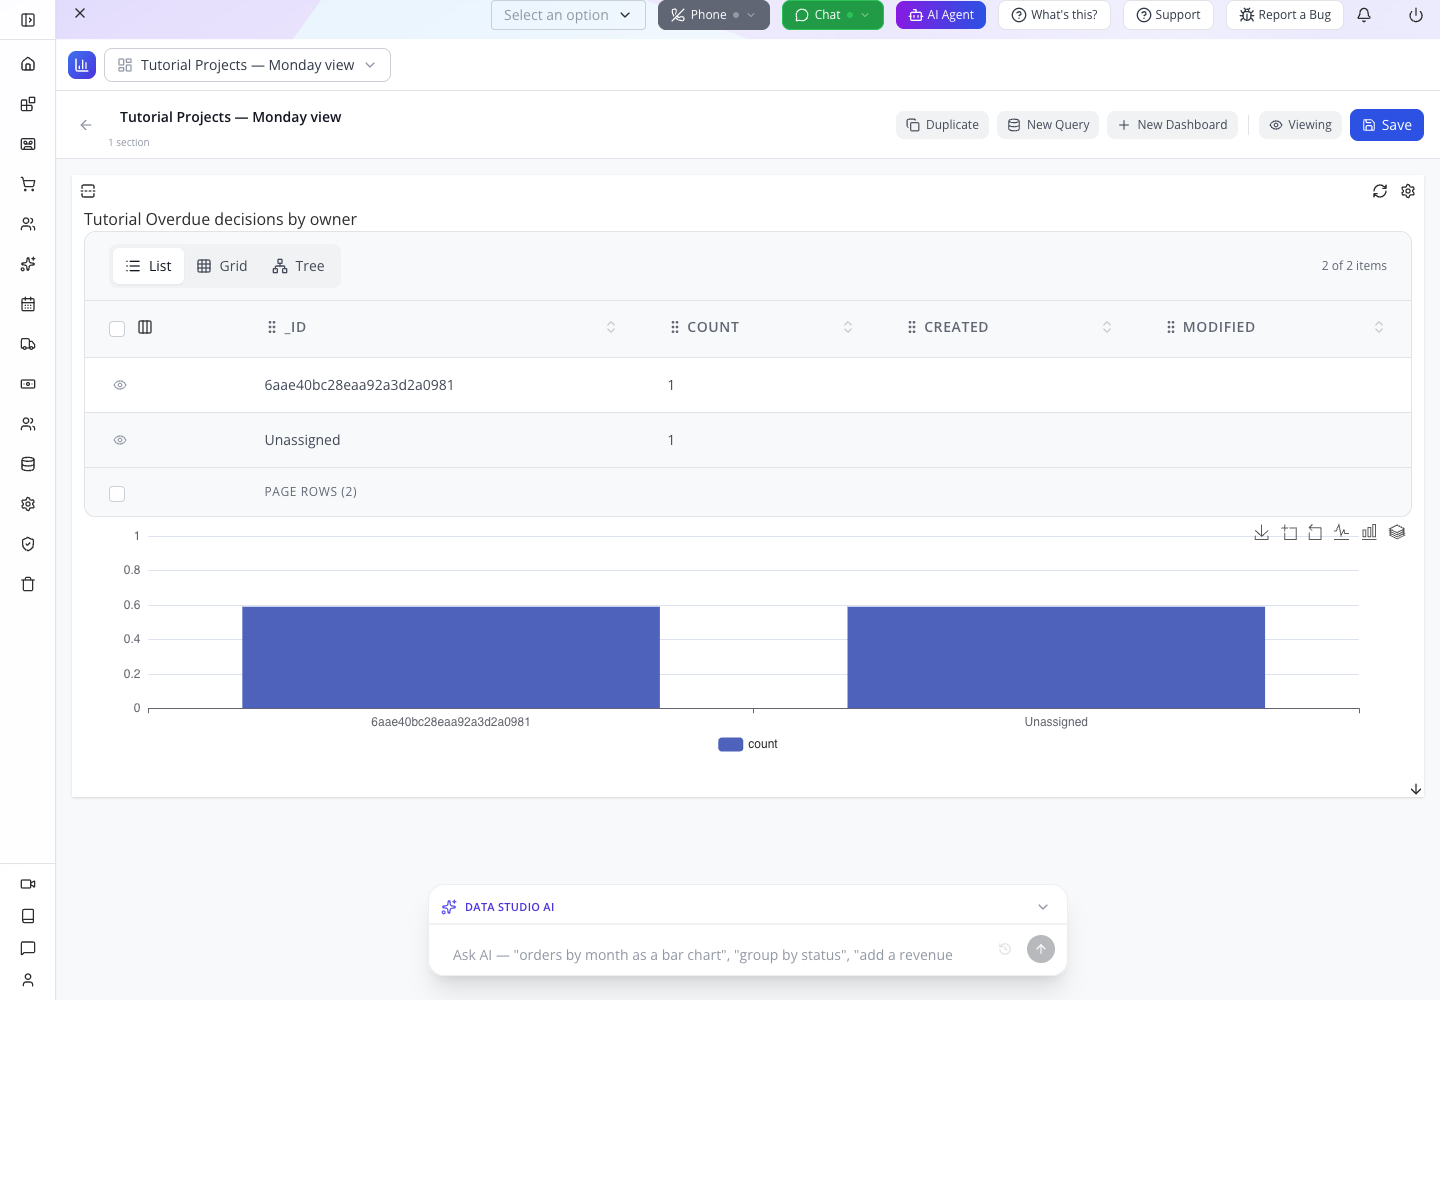
Your Monday question is simple: which project decisions are late, and who is responsible? By the end of this course you will have the records, the chart, the matching project list, and a task that turns one decision into an action.
For: business owners, operations managers and developers who manage work that does not fit an existing module. Product: Appmint Studio Manager. Allow: 60–90 minutes for the main exercise; another 20 minutes for recovery and collaboration. Level: beginner with a supplied schema and query; explanations and extensions for developers. Walkthrough: local Studio Manager 0.6.2, 19 September 2026.
What you will have at the end
- A custom Design Projects collection with project, client, owner, budget, stage and decision-date fields.
- Five saved projects, including an unassigned project and a completed project that should stay out of the overdue count.
- An Overdue decisions by owner bar chart and a detail query identifying its two matching projects.
- A saved Projects — Monday view dashboard.
- A private project Workspace and an actionable task visible in My Tasks after reloading.
- Practice identifying validation problems and restoring a versioned practice record.
The batch-import section checks a deliberately invalid row in Validate only mode. You will see its row number and required-title error without adding any batch records.
What you need
Use your own training organization from Welcome to Appmint. Sign in as its owner for this exercise: you will create a collection, save records and build queries. Appmint is free; this exercise does not require an upgrade.
Download these small practice files:
| File | What it contains |
|---|---|
| Design Projects schema | The six fields and their form controls. |
| Overdue count pipeline | The filter and owner grouping used by the chart. |
| Overdue detail pipeline | The same filter, returning project names and dates. |
| Validation practice CSV | Three proposed imports, with one deliberately blank project title. |
Open the JSON files in a text editor so you can copy their contents. They contain no account credentials. You do not need to edit application code.
You can finish the exercise with one user and no customers. Select your own account as Owner. Leave Client empty if your training organization has no customers yet; connect a real customer later using the CRM course. A project title such as “Bennett kitchen” does not create a customer named Bennett.
The story
Cedar & Form has five design projects. A budget spreadsheet tells Jordan what each project costs, but not which decision needs attention today. Jordan needs a repeatable view that excludes completed work, includes projects without an owner, and leads to a task someone can finish.
We use 18 September 2026 as the exercise's review date. Keep that date while learning so your results match the screenshots. Later, change the review date deliberately in both queries.
flowchart LR
  A[Collection: define the six fields] --> B[Data Explorer: save five projects]
  B --> C[Data Studio: count and reconcile]
  C --> D[Workspace: assign the next action]
A collection defines the fields. A record is one project. A query selects or summarizes records. A dashboard arranges saved queries. A Workspace is the collaboration area for discussions, files and tasks; creating one does not replace your organization or automatically link it to a project record.
Part 1 — Build a form that fits your projects
1. Open Collection Builder
In Studio Manager's left sidebar, open Database → New Collection. If the sidebar is collapsed, point at the database icon to see its label, then select it to open the menu.
The builder has seven tabs: Schema Builder, Notifications, Schema Tree, JSON Schema, Form Preview, Collection Info, and Live View. On the right, Elements provides controls; Properties configures a selected field; Theme changes appearance; Magic contains interactivity settings. Save at the top saves the collection definition.
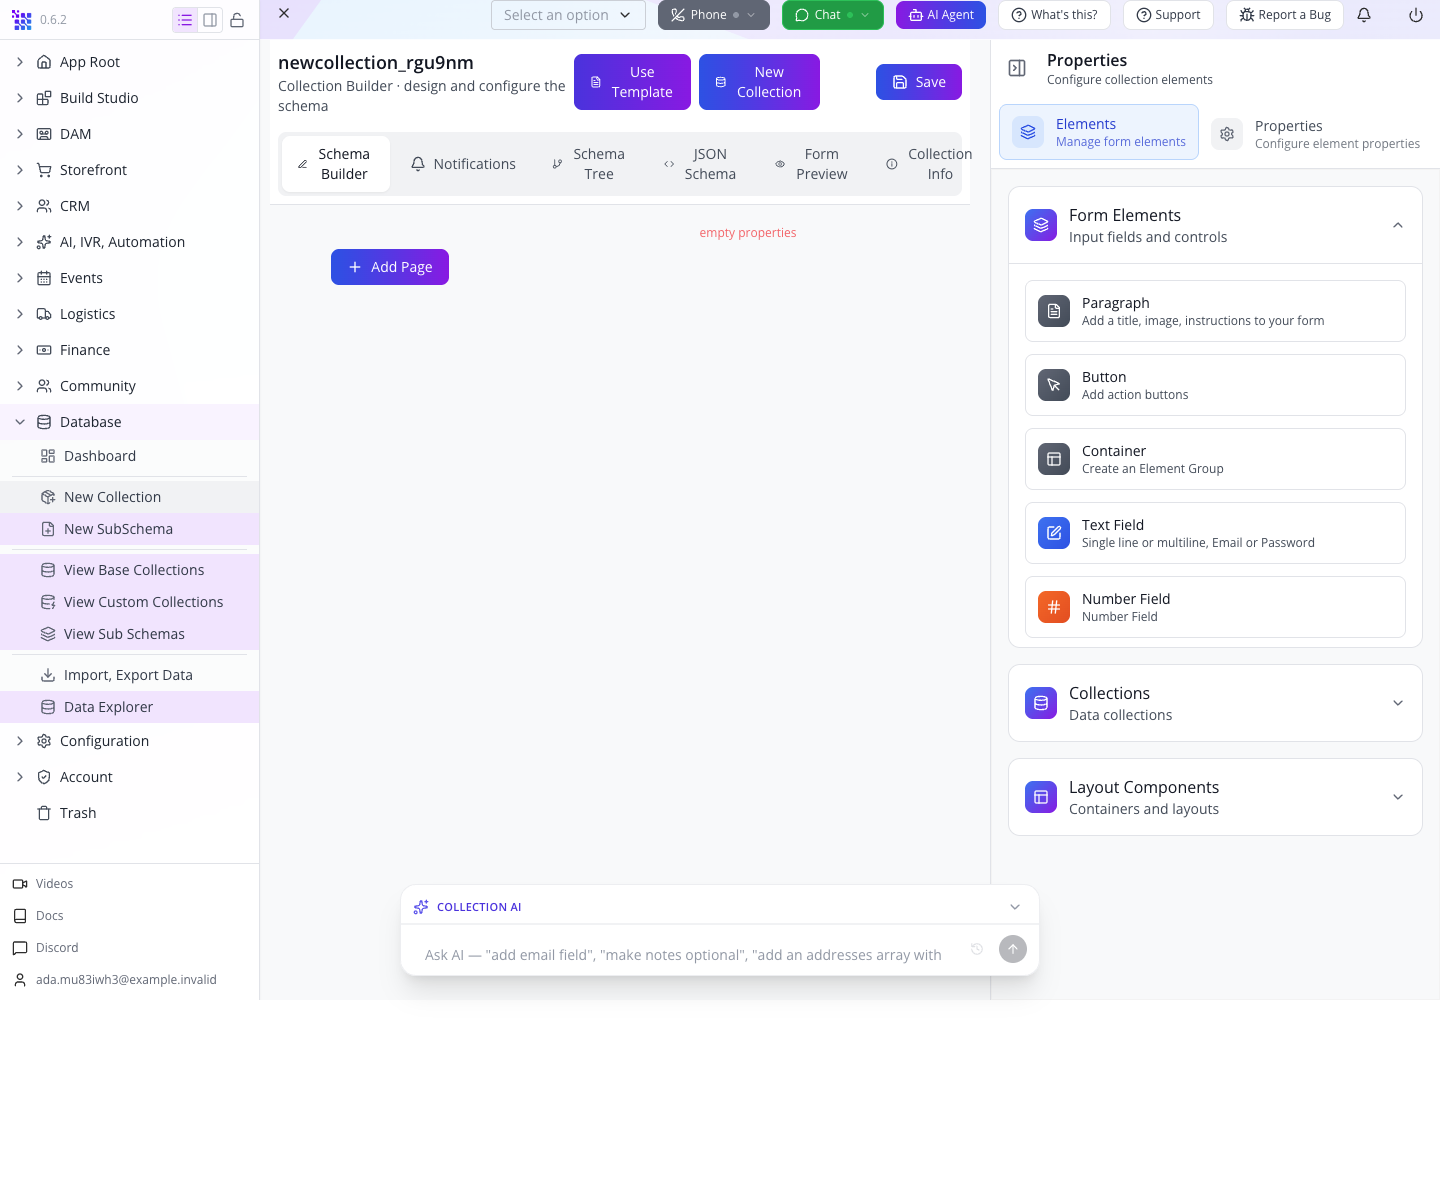
The new collection initially has a generated name. In this build, its schema also starts empty and the canvas says empty properties. That is why simply dragging a field into a new canvas may do nothing. The supplied schema in step 3 gives the canvas its object structure and fields in one operation.
2. Give the collection a stable identity
Open Collection Info. Enter:
| Control | Value | Why it matters |
|---|---|---|
| Name | cf_project | The identifier used by queries and API clients. |
| Title | Design Projects | The readable name people choose in Studio. |
| Enable Versioning | On | Retains this collection's history and supports Trash retention. |
| Enable Workflow | On | Makes the collection available for workflow-related processing; it does not create a workflow by itself. |
These last two controls are switches; their default text is Use setting. Turn each on. Leave other settings at their existing values for this exercise. Do not change collection roles simply to make the builder work.
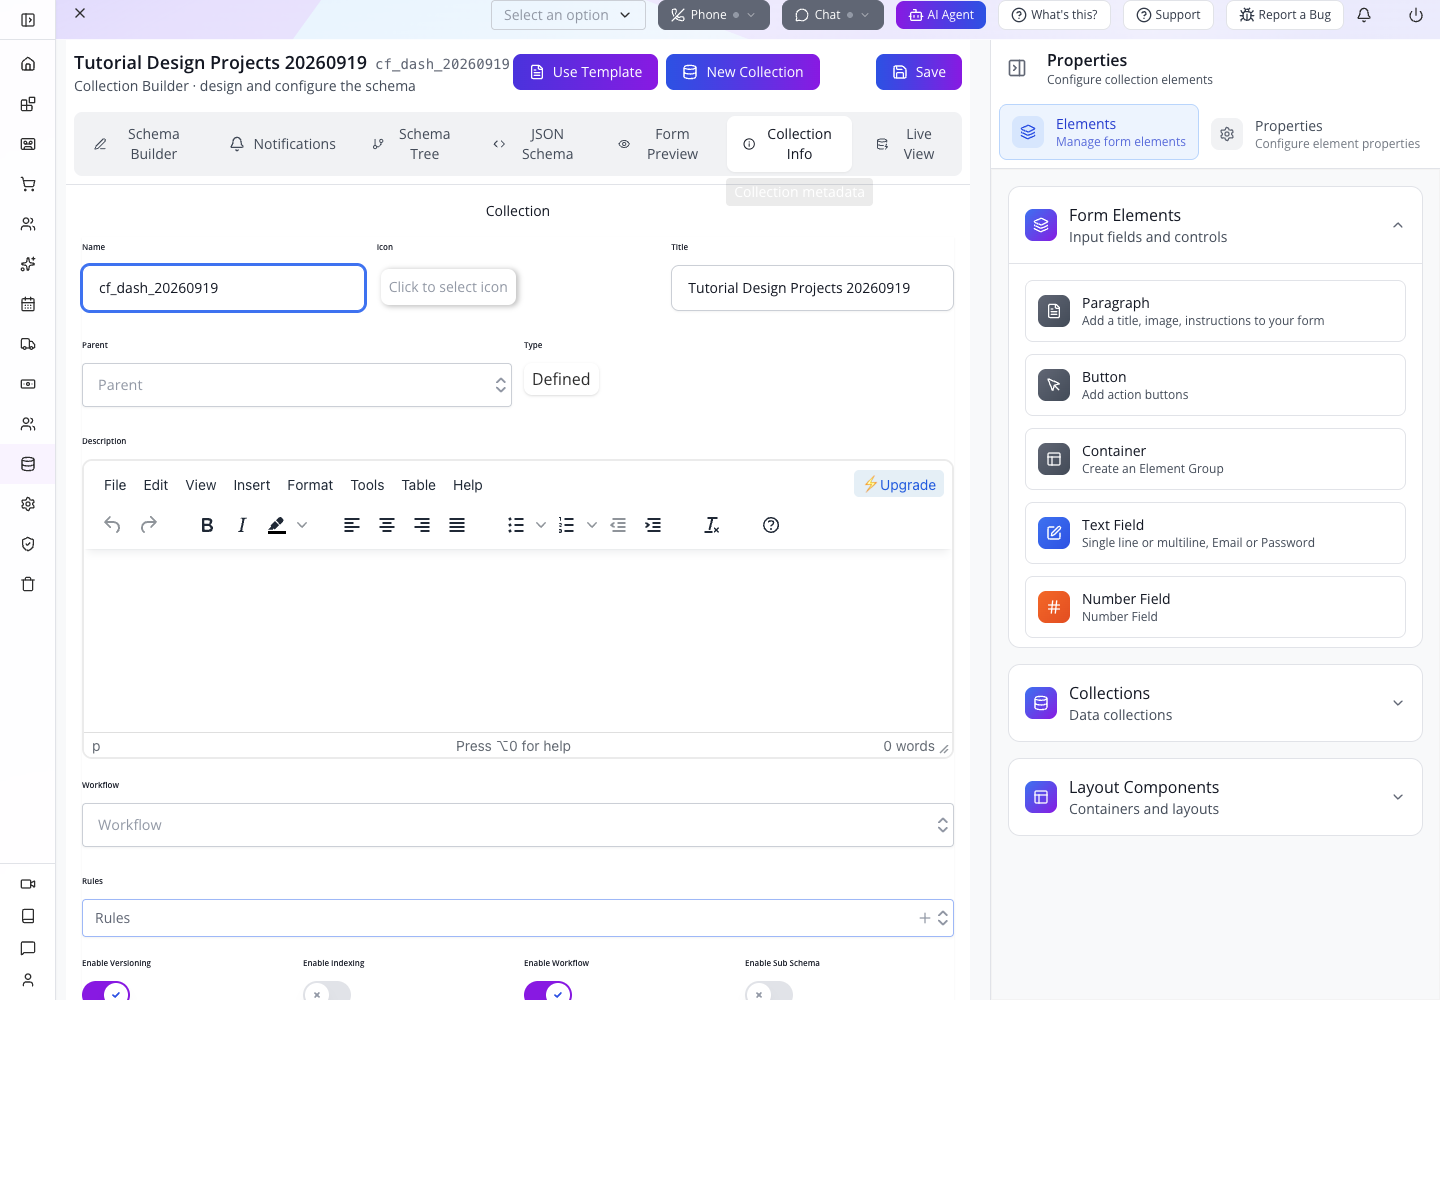
After editing Name, let the builder settle before switching tabs. The header should show Design Projects and cf_project. If that name already belongs to your earlier practice collection, reopen it instead of creating another one. Before entering the five records, inspect the existing collection in Data Explorer. Reuse a practice record already present under the same title; compare and correct its fields against Part 2 rather than adding it again. For the exact two-project query result, use only the five specified practice records. If the collection contains unrelated projects, create a separate empty practice collection with another unique identifier of 3–20 characters instead of deleting those records, and select that same collection in both queries. Additional matching records legitimately change the totals. Carry your chosen collection identifier through every later query and Trash check.
3. Paste the supplied schema
Open JSON Schema. Click inside the code editor, select all of its existing content, and paste the complete contents of design-projects.schema.json. Wait a moment before opening Form Preview.
Pasting is preferable to typing the JSON character by character: code-editor auto-completion can insert quotes and brackets while you type. If the editor reports invalid JSON, replace the whole document with the file contents; do not append the file after an existing closing brace.
The schema defines these fields:
| Stored field | Form label | Meaning |
|---|---|---|
title | Project | Required project name; at least one character. |
client | Client | Lookup in the organization's customer collection. |
owner | Owner | Lookup in the organization's user collection. |
budget | Budget | A numeric amount; the schema declares a minimum of zero. |
stage | Stage | One of Brief, Concept, Detail, Build or Complete. |
nextDecisionDate | Next decision date | The date of the next decision needed on this project. |
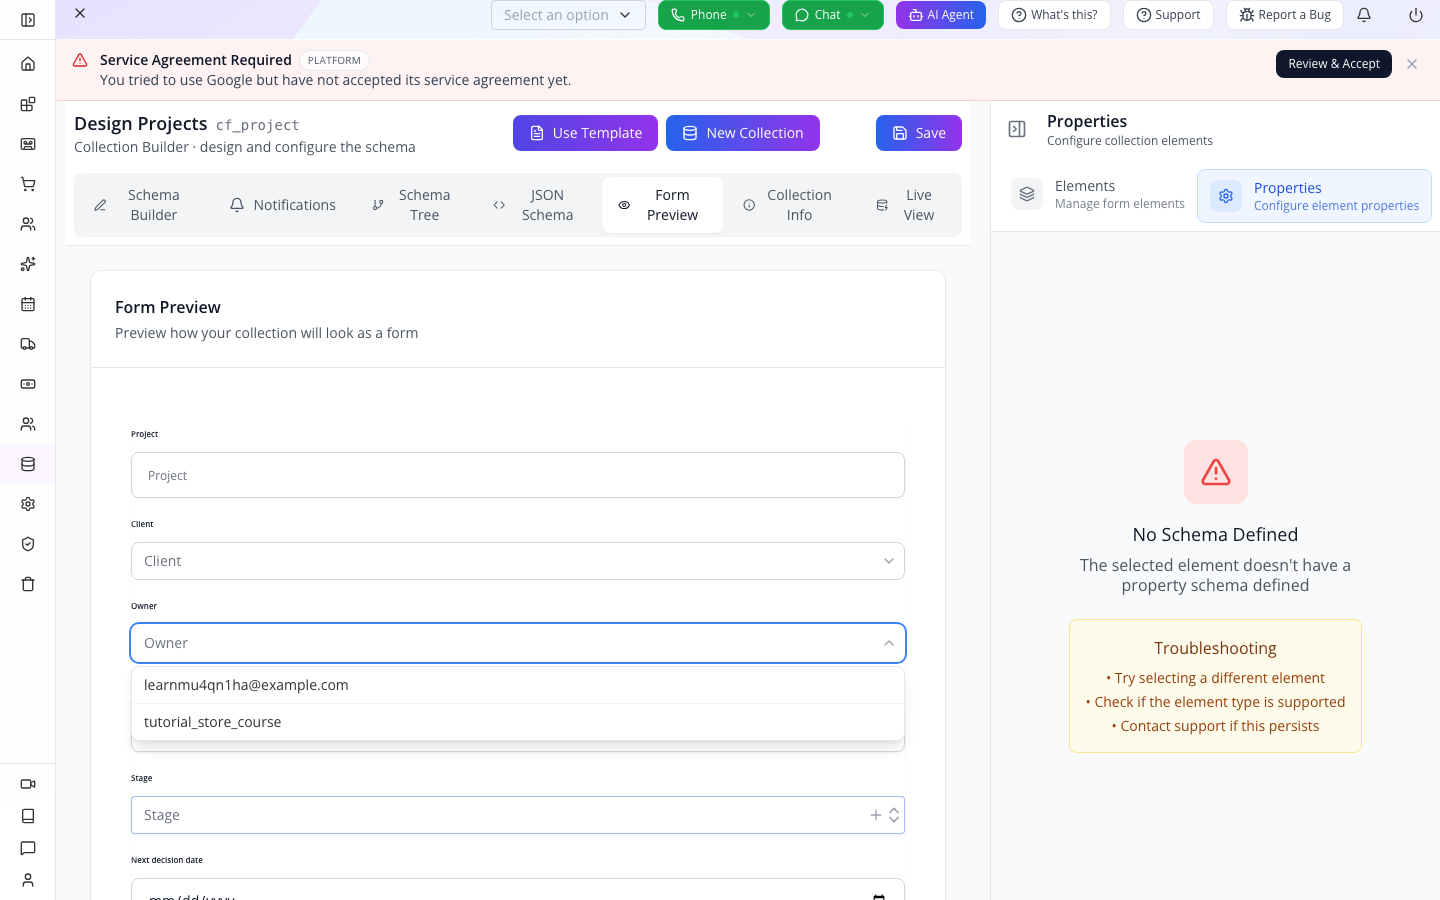
The two lookups store a record identifier, not a typed person's name. Owner displays user email addresses in the search results. In this build, a saved lookup can show its raw identifier when reopened; that is not a second user.
4. Understand the visual editor before changing the form
Return to Schema Builder. With an initialized object schema, drag Text Field from Elements into the dashed canvas to add a field. Select a field and open Properties to edit its Name, Title, validation options and presentation.
You do not need to add more fields to the supplied schema. This is how you extend it later, for example with a site-survey note. Wait after renaming a field before editing its next property or changing selection: field-property updates are delayed in this editor.
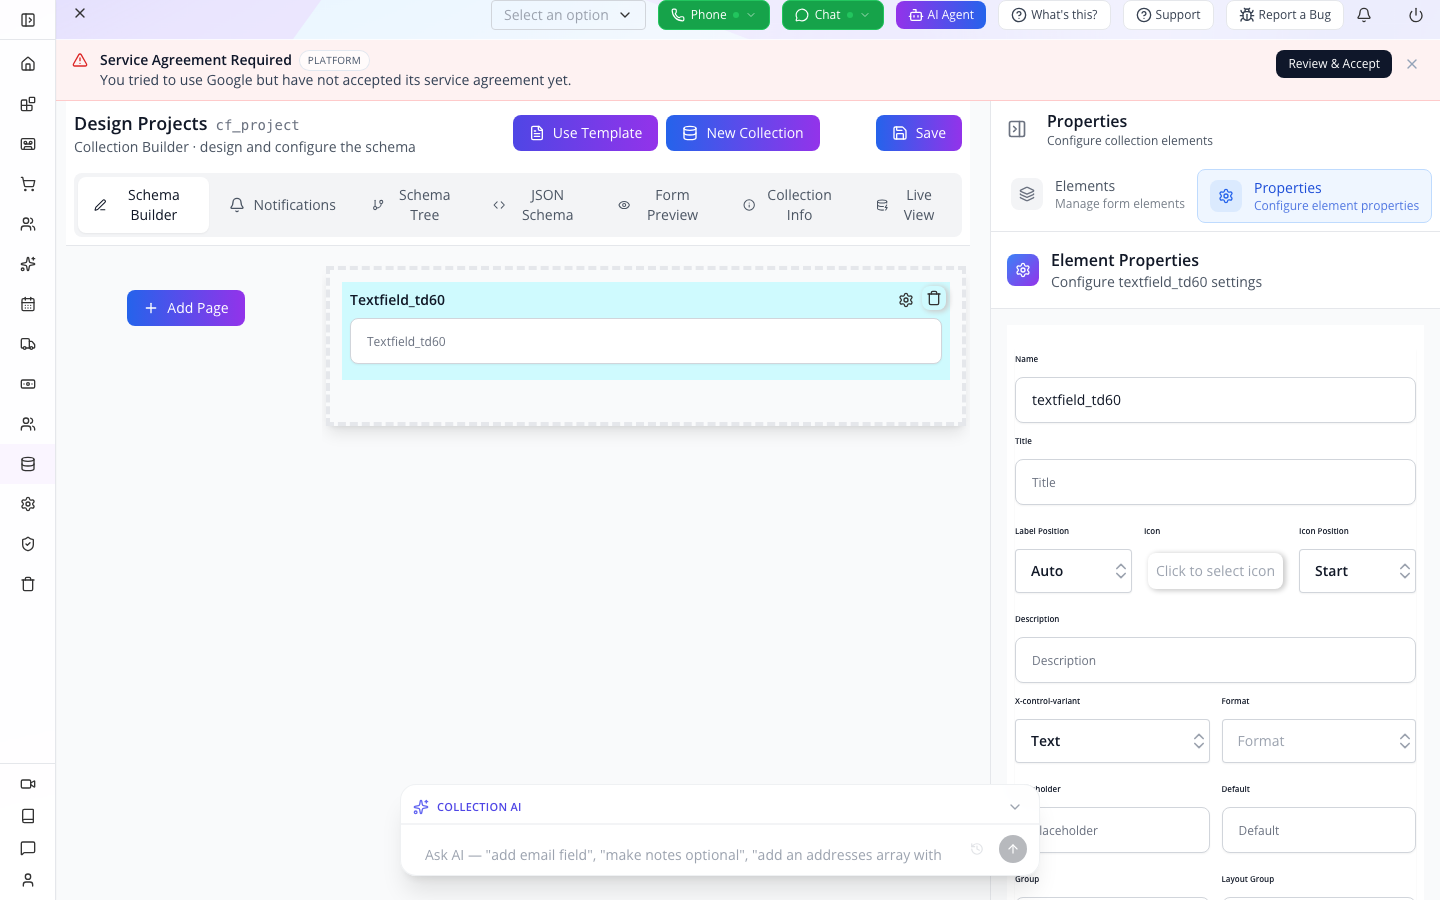
Gotcha — “Single Selection” is a yes/no control. The palette's Single Selection item defaults to a boolean checkbox. It is not the five-stage dropdown this exercise needs. The supplied schema uses the choice-list control with a string value and five explicit options. Do not replace it with the default checkbox.
Gotcha — lookup Properties can say “No Schema Defined.” That occurred when selecting a lookup in this build. The supplied JSON configures the lookup's
dataSourcedirectly. Use Form Preview to check that it actually loads the intended collection.
5. Save, then find the collection again
Select Save at the top. Open Database → Data Explorer. In Search collections…, type Design, then select Design Projects.
Search by its title. Typing cf_project did not find this collection in the tested search, even though that identifier is displayed beneath its title. An empty search result is not evidence that saving failed.
The right side should say Design Projects — Browse and manage cf_project data. With no projects yet, choose Add First Record or Add Record.
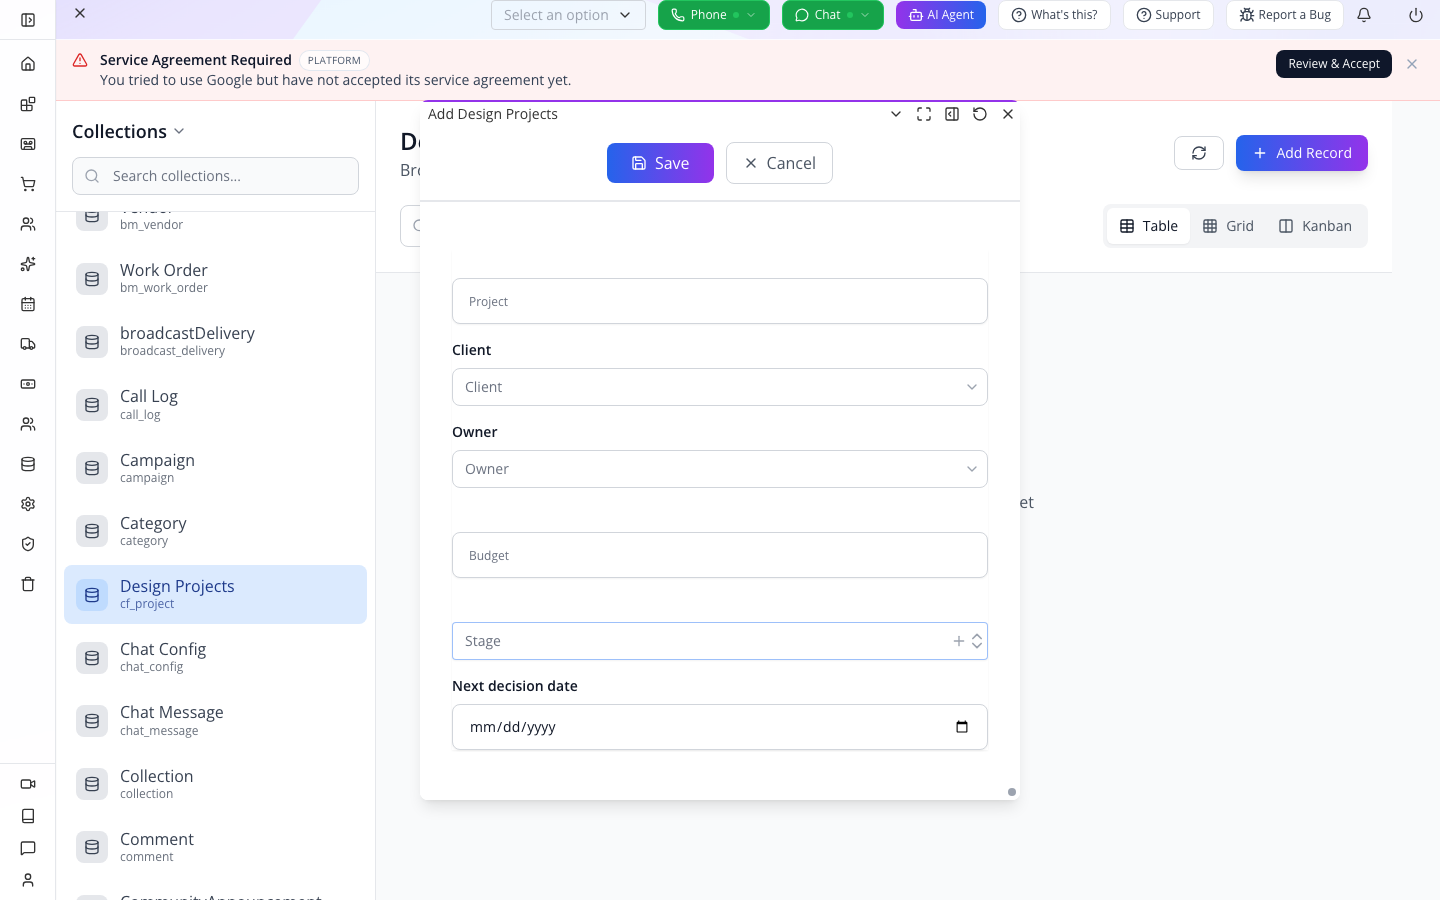
Try it: locate Schema Tree, JSON Schema and Form Preview in the builder. Which one changes the definition, and which one lets you inspect the resulting form? The JSON editor changes the definition; preview is where you check the form people will use.
Part 2 — Enter five records and understand the stored values
1. Test the required field before entering real work
In Add Design Projects, leave Project empty, enter 18000 in Budget, and select Save.
You should see Missing required fields: title. No record is added. This is a useful check: a chart full of unnamed projects would be difficult to act on.
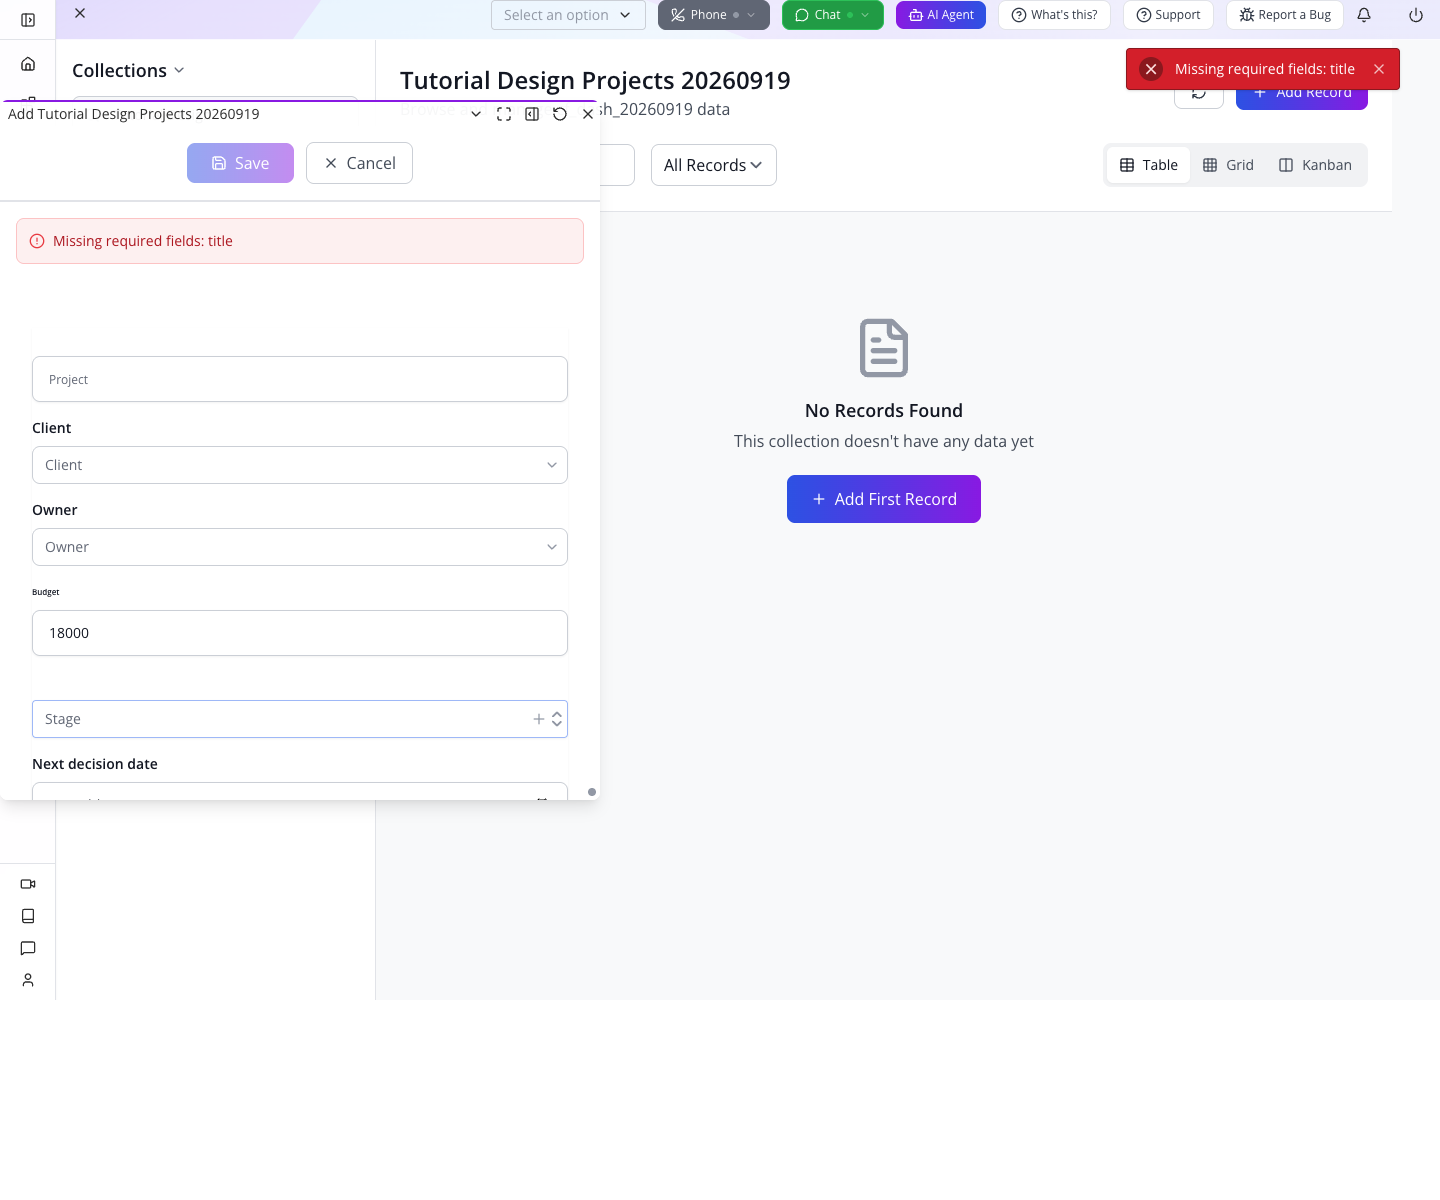
Enter Tutorial Bennett kitchen in Project. The stored name title in the error corresponds to the form label Project.
2. Complete the first project
Fill the rest of the form:
- Client: leave empty for the starter exercise. If you already have the intended customer, open the lookup and choose the actual result.
- Owner: open the lookup and select your own account's email address. Clicking a result selects it; typing text alone does not establish a link.
- Budget:
18000, without a currency symbol. - Stage: open the dropdown and choose Concept.
- Next decision date:
2026-09-10.
Select Save. The drawer closes and Tutorial Bennett kitchen appears in the table.
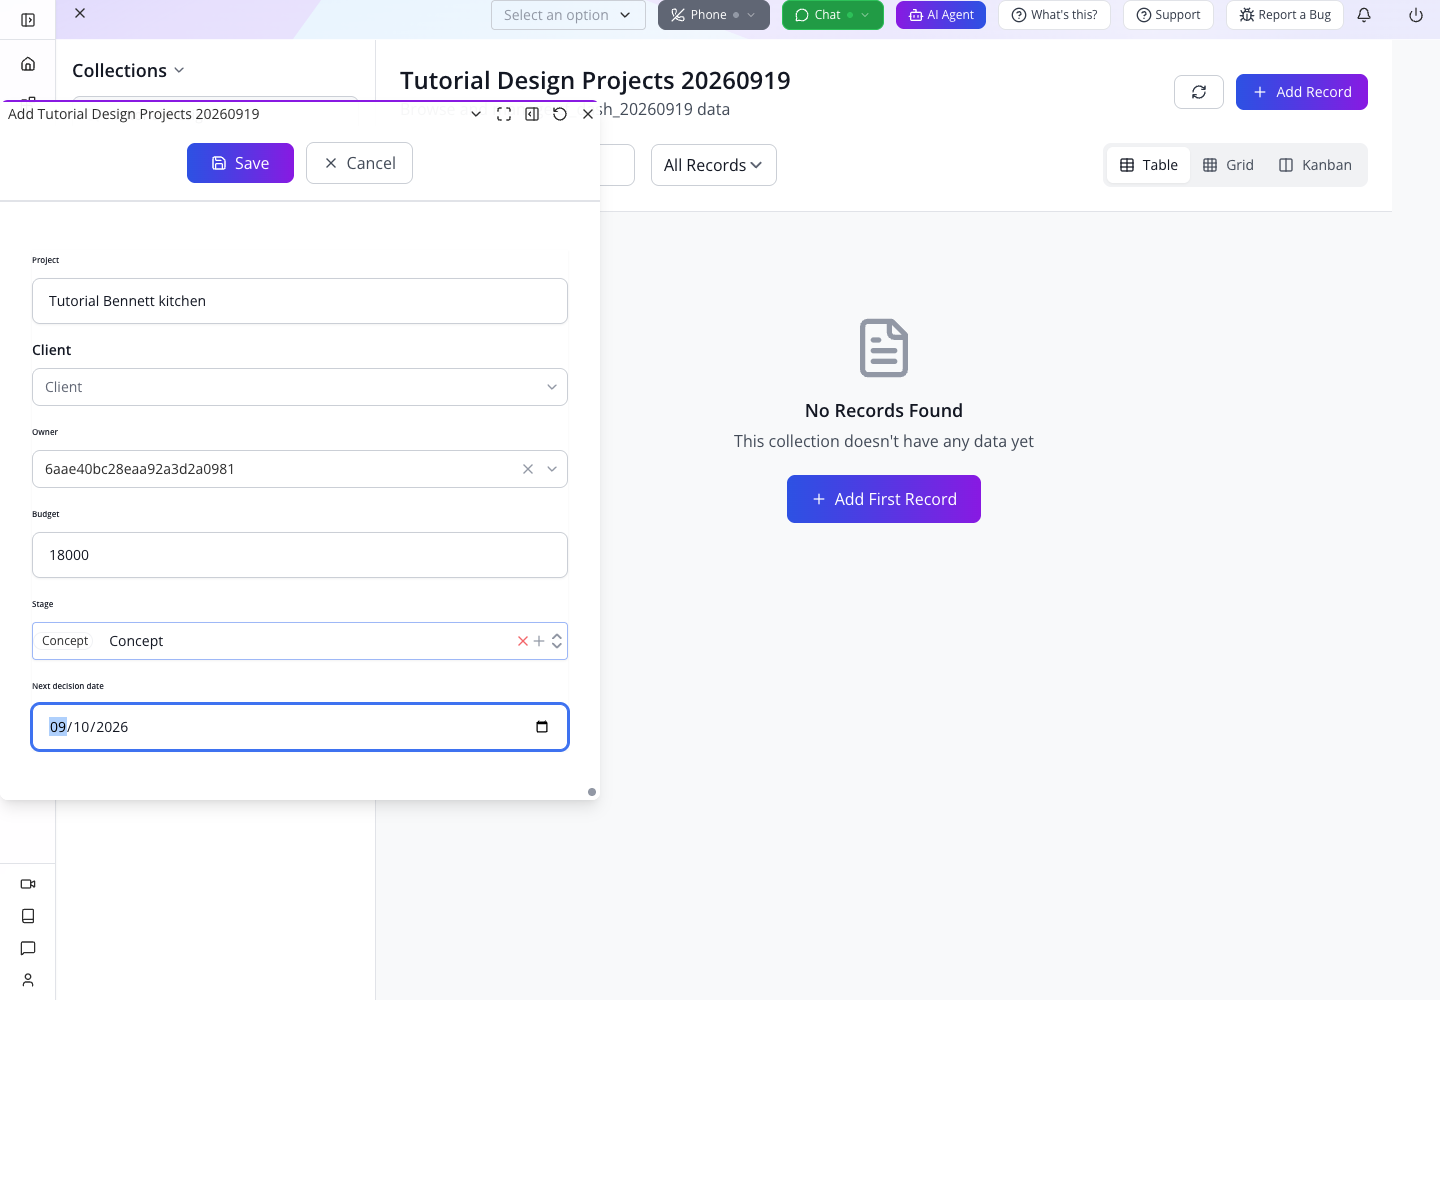
The date input displays a calendar date. The stored value observed later was 2026-09-10T00:00:00.000Z. Our fixed-date query accounts for that representation; do not mix arbitrary localized date strings such as 10/9/26 into raw records.
3. Add the other four projects
Select Add Record for each row below. Keep Client empty unless you have a real matching customer. “Your account” means select the same user you chose for Bennett kitchen.
| Project | Owner | Budget | Stage | Next decision date |
|---|---|---|---|---|
Tutorial Reyes loft | Your account | 42000 | Detail | 2026-09-25 |
Tutorial Ahmed studio | Leave empty | 12000 | Brief | 2026-09-08 |
Tutorial Park terrace | Your account | Leave empty | Complete | 2026-08-30 |
Tutorial Okonkwo bathroom | Your account | 9000 | Build | 2026-09-30 |
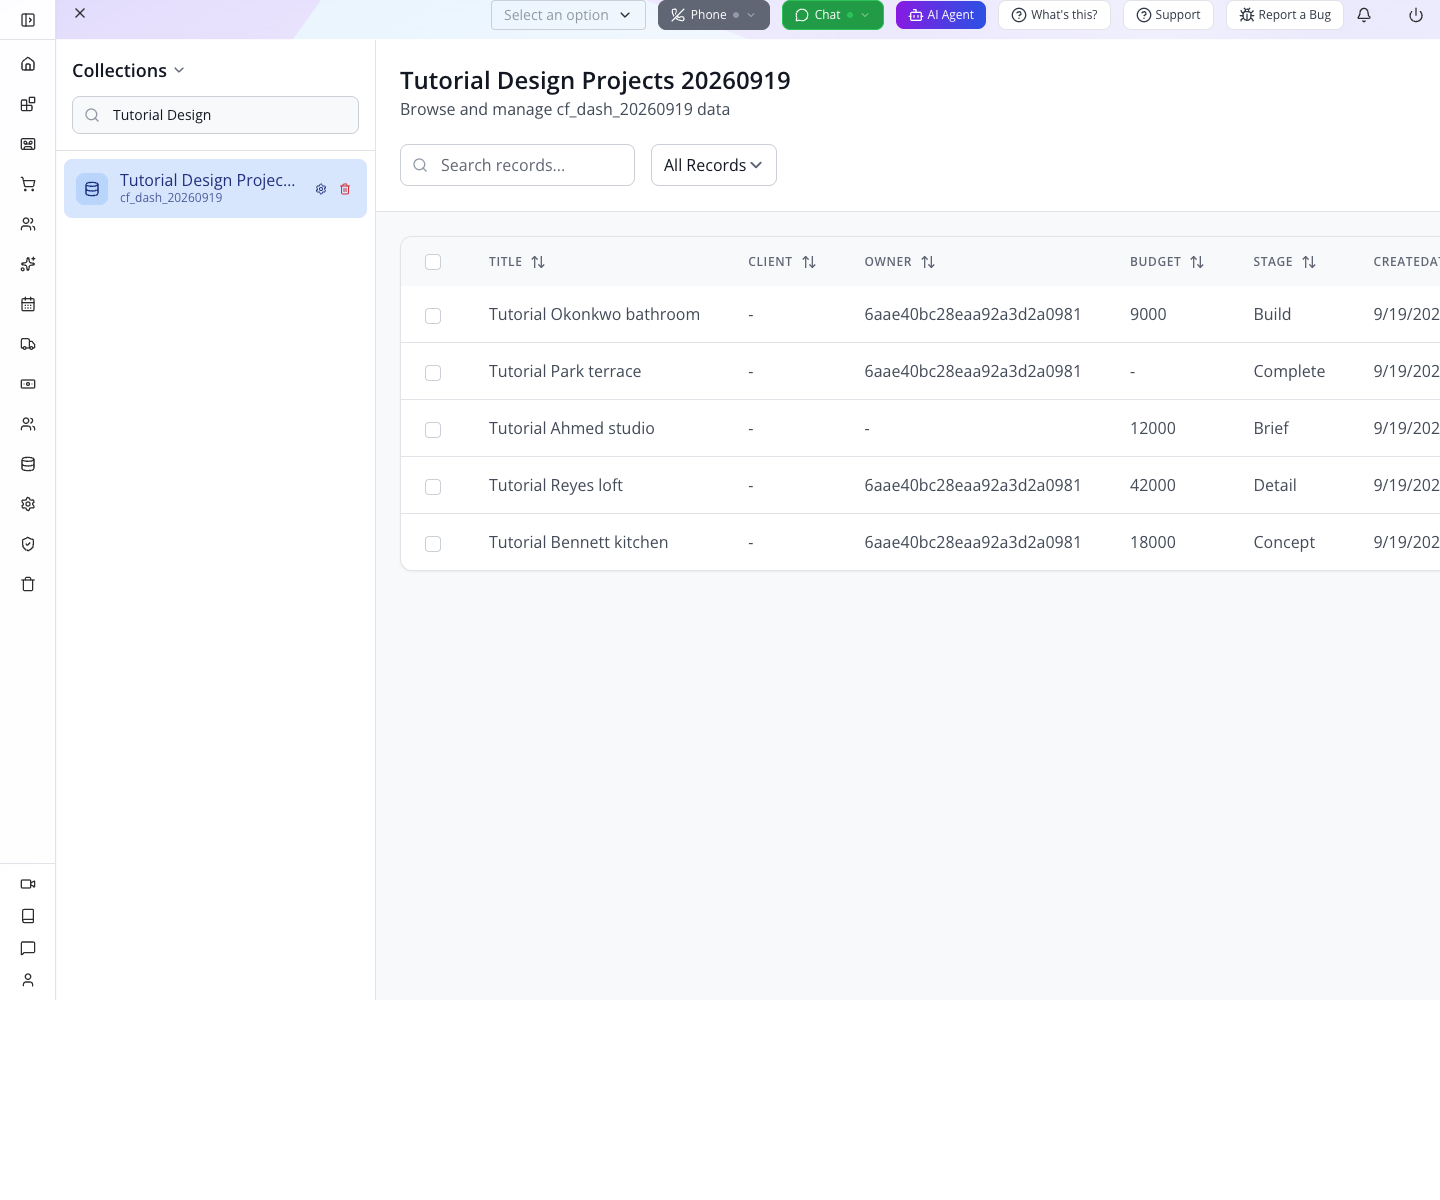
The empty budget means “not entered,” not a confirmed zero. The empty owner is deliberate: an operational report should expose work that nobody owns.
The table displays only a subset of the schema fields. The missing date column does not mean the date was lost. Use a row's Edit pencil to read its form or Edit Raw JSON to inspect its stored structure. Close the raw editor without saving if you are only inspecting it.
4. Predict the answer before building the chart
On the exercise review date, 18 September 2026:
| Project | Include? | Reason |
|---|---|---|
| Bennett kitchen | Yes | September 10 is earlier than the review date; project is not Complete. |
| Ahmed studio | Yes | September 8 is earlier; missing owner must not hide it. |
| Park terrace | No | Its old date belongs to a Complete project. |
| Reyes loft | No | September 25 has not passed. |
| Okonkwo bathroom | No | September 30 has not passed. |
Your target is two projects, grouped into one assigned and one unassigned. A project due on September 18 itself is not overdue under this exercise's “earlier than” rule.
Part 3 — Create the chart and prove its numbers
1. Open the query editor
Choose App Root → Dashboard Builder in the sidebar. The application heading is Data Studio. Choose New Query.
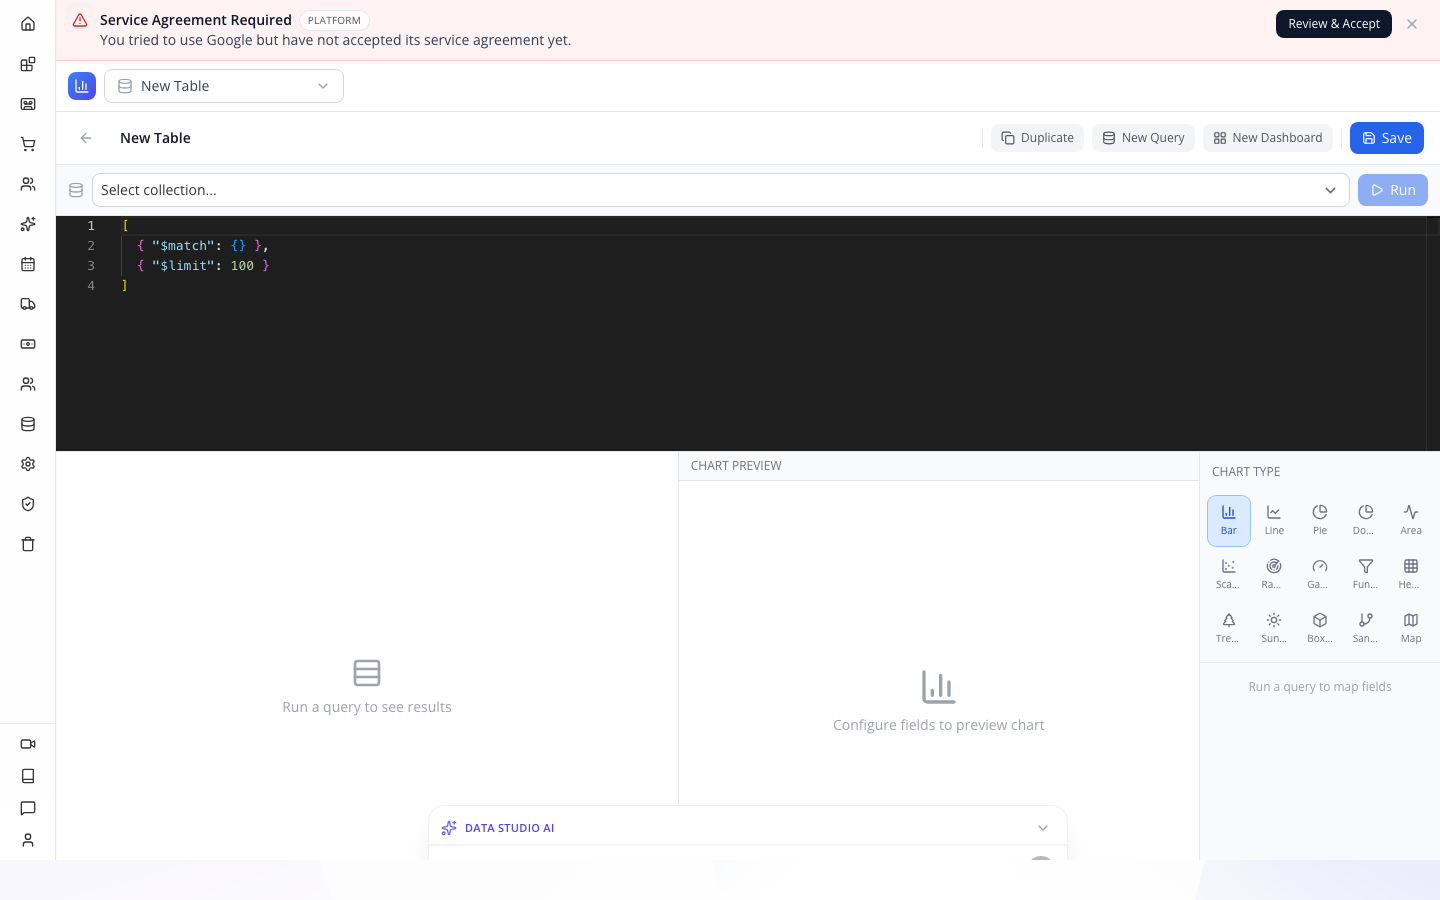
The editor has a title at the top, a collection selector, a code area, Run, result rows, chart preview, and chart controls. Enter Tutorial Overdue decisions by owner in the title and select Design Projects in the collection selector.
2. Paste and run the count query
Paste the overdue count pipeline into the code editor, replacing its starter query. Select Run.
Its three stages do specific jobs:
- Match: keep a nonempty string decision date before
2026-09-18and a stage other thanComplete. - Group: count matching records by
data.owner; missing owners becomeUnassigned. - Sort: put the groups in a predictable order.
The result should show 2 rows · 2 fields, with count equal to 1 for your user's identifier and 1 for Unassigned. Two result rows are two groups; the sum of their counts is the number of projects.
The data. prefix matters. Project fields live inside the record's data object. Querying owner instead of data.owner targets a different part of the record.
3. Choose and save the chart
Under CHART TYPE, choose Bar explicitly. In FIELD MAPPING, set Category (X-Axis) to _id and Values (Y-Axis) to count. Leave Split by (optional) at None. Select Save.
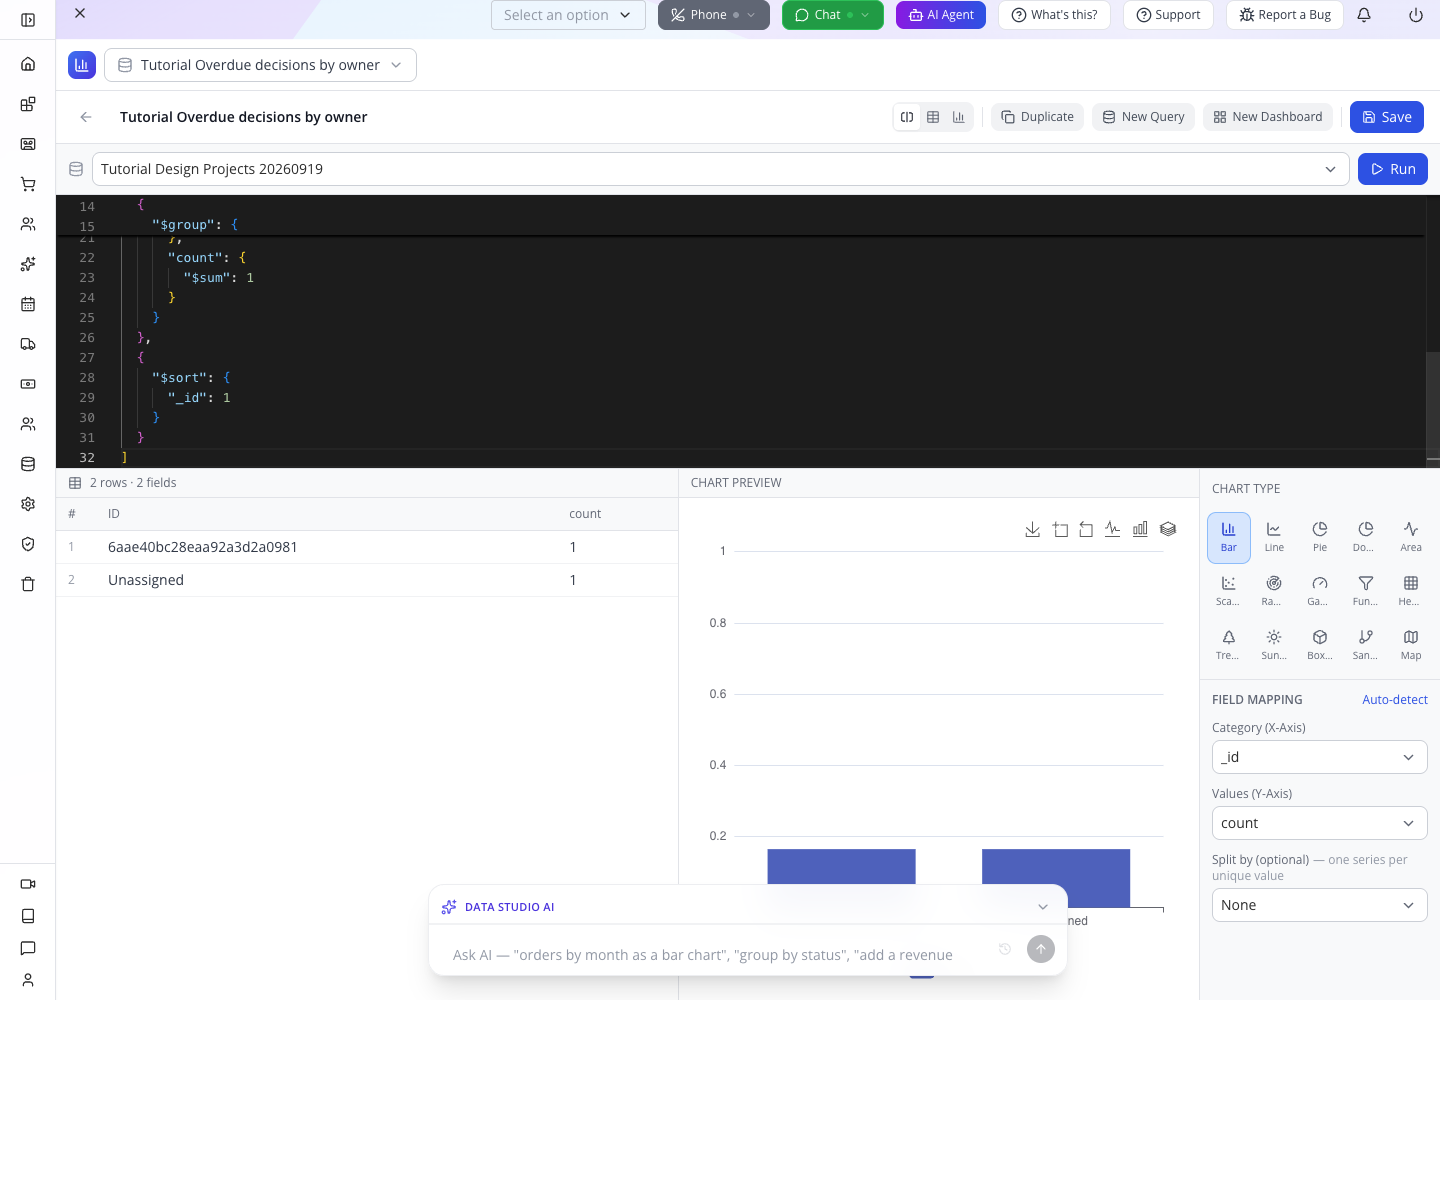
The long identifier on one bar is expected: the query groups by the stored user ID. A production dashboard can resolve that identifier to a readable name, but do not replace it with a hard-coded employee name that would mislabel somebody else's data. The Unassigned bar is already readable and immediately actionable.
4. Save a detail query using the same filter
Choose New Query. Enter Tutorial Overdue decision detail, select Design Projects, and paste the overdue detail pipeline. Choose Run, then Results only in the editor's output-view toolbar. Save the query.
You should see Tutorial Ahmed studio and Tutorial Bennett kitchen, with their owner, stage and decision date. These are the two records represented by the chart.
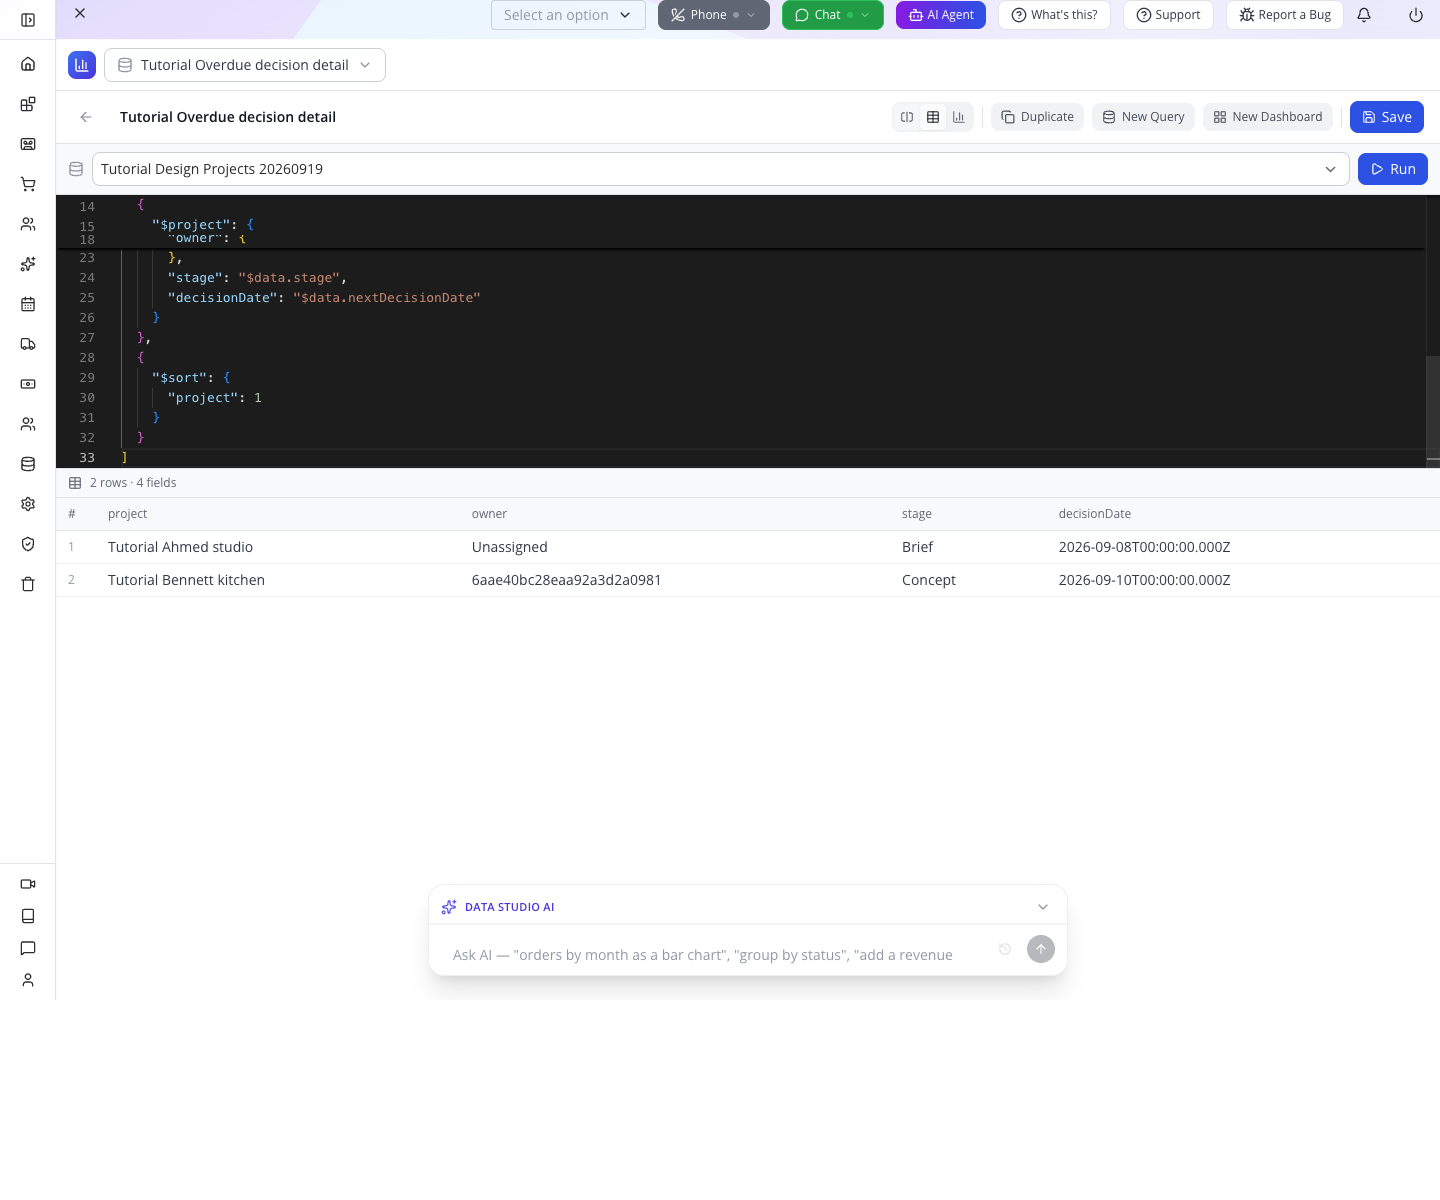
This is the reconciliation: the detail query has two project rows; the grouped query totals two. Both use exactly the same first filter stage. If they disagree after later edits, compare the collection, review date, excluded stage and empty-date handling before blaming the chart.
Gotcha — the date is fixed, not automatic. Opening this saved query next month does not change
2026-09-18to today. For a later review, update the cutoff in both queries. The exercise uses a UTC date boundary; agree on the business timezone before implementing a dynamic daily report.
5. Assemble the manager's dashboard
Choose New Dashboard and enter Tutorial Projects — Monday view in Dashboard title….
On the right, open Queries. Drag Tutorial Overdue decisions by owner from the list into the central Empty Dashboard area. The heading changes from zero sections to 1 section.
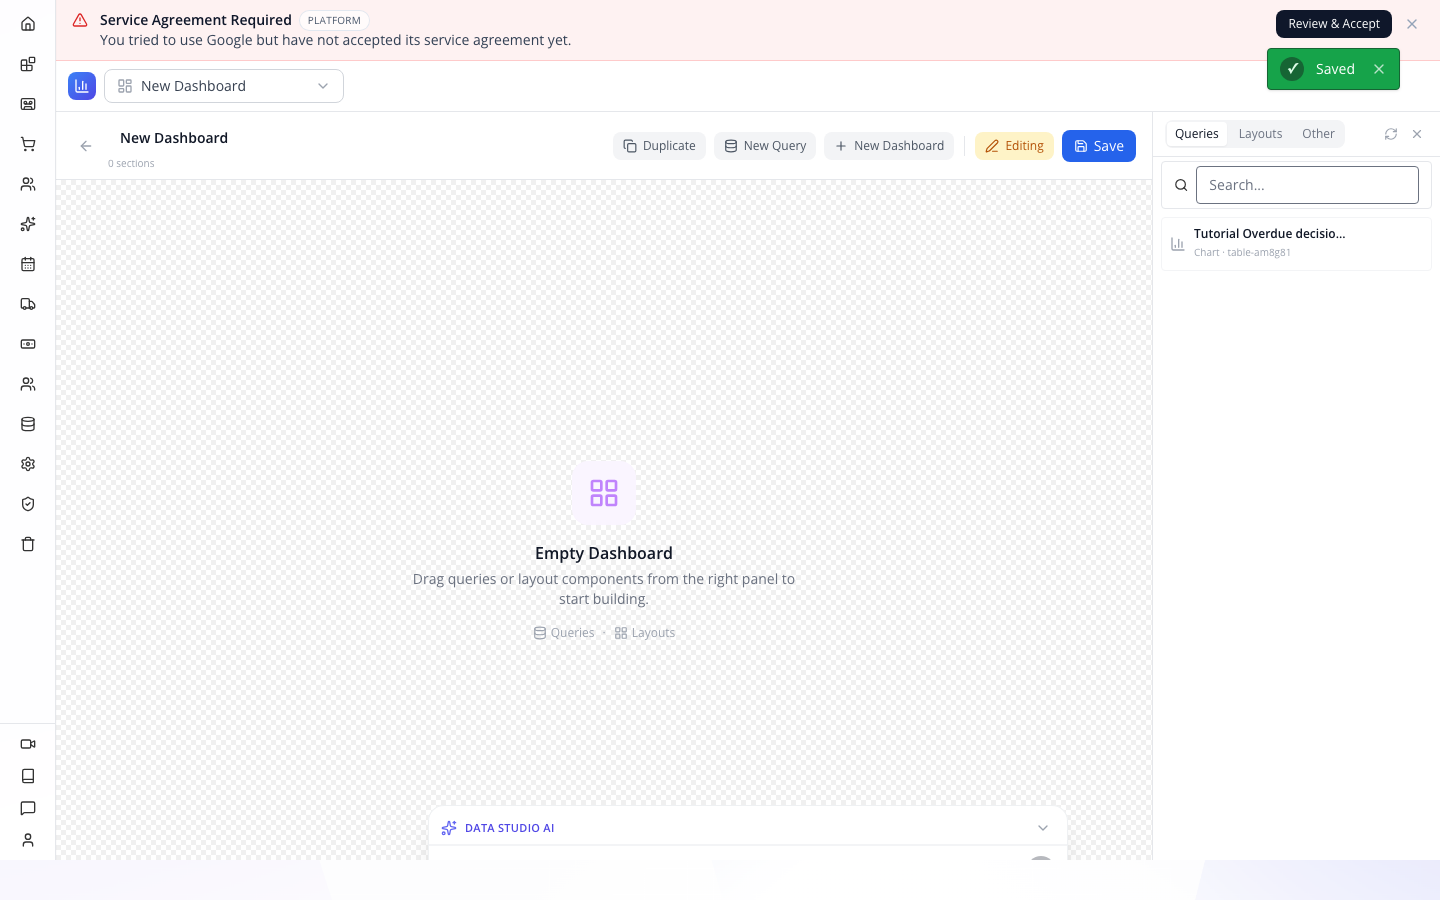
Select the dashboard's Save. A second form titled Save Dashboard opens. Set Name to tutorial-projects-monday, check that Title is Tutorial Projects — Monday view, leave the generated section settings in place, and select the form's Save.
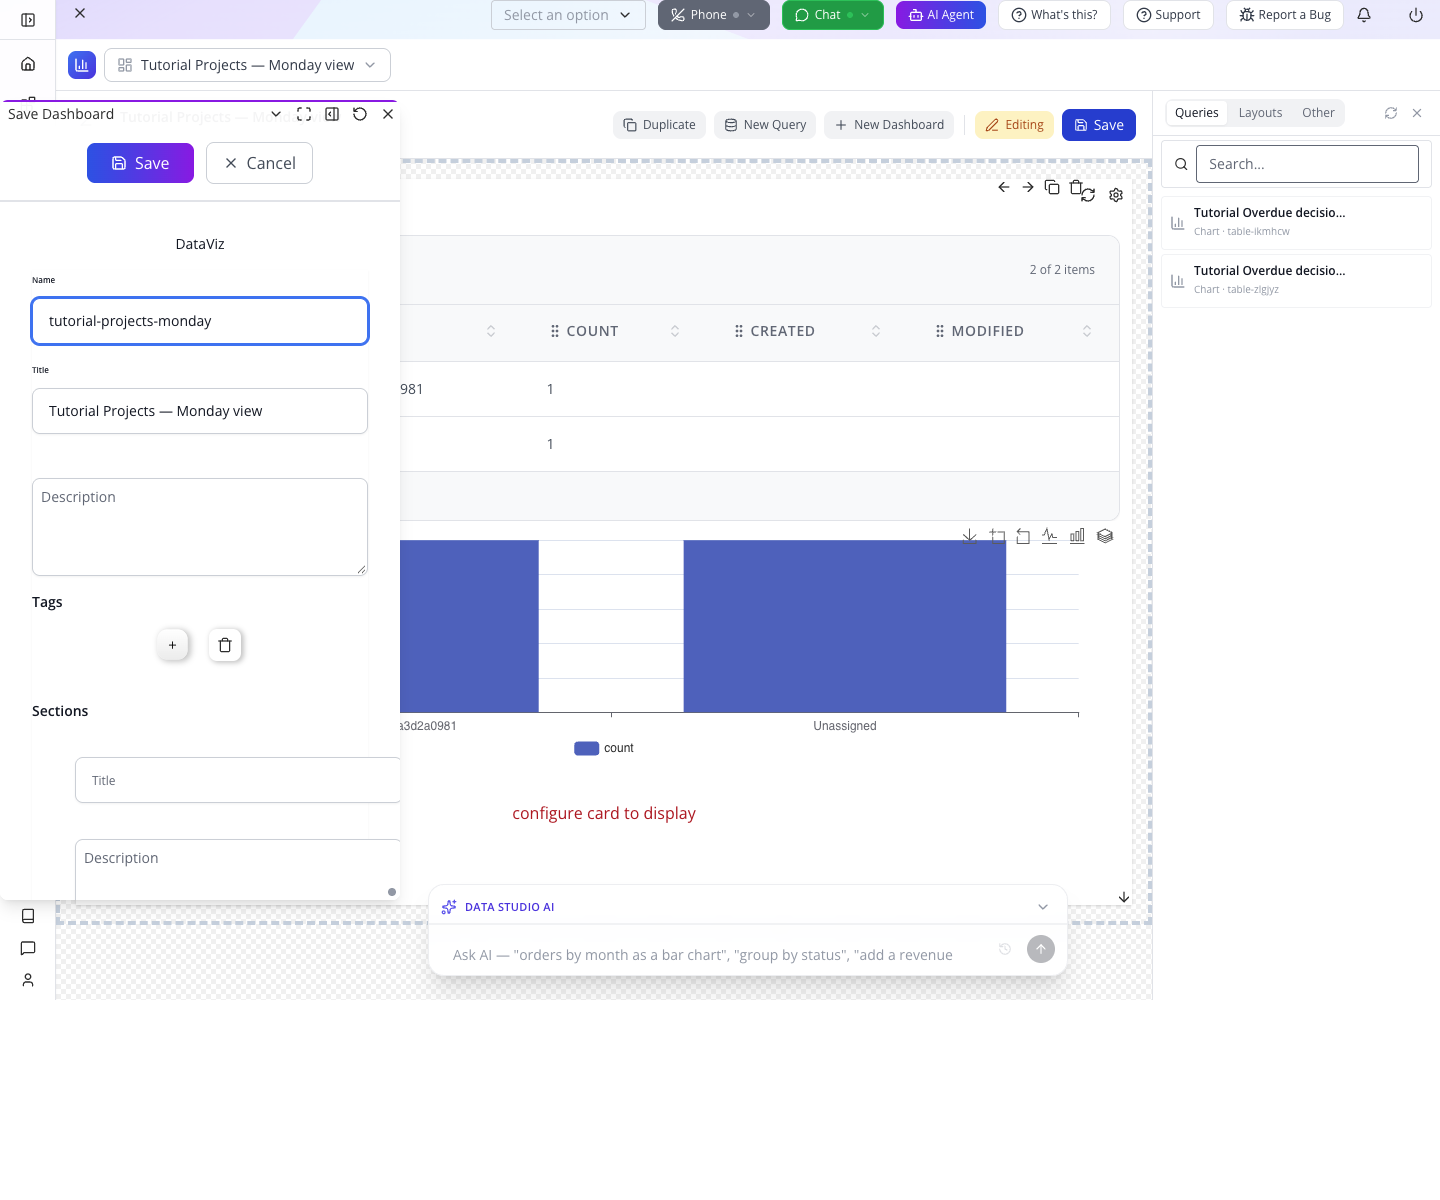
Do not stop after opening that form: the save result in this walkthrough was Data inserted after submitting it.
6. Reopen the saved result
Use the item picker at the top left, choose Home, and select Refresh. The home list should show your dashboard and queries. Open Tutorial Projects — Monday view and check the mode button. If it says Editing, select it to switch to Viewing; an already reopened dashboard may start in Viewing.
The saved card displays the result table and the chart. Both show the same two owner groups.
The table and chart should appear together without a configuration warning. If either result is empty, open the saved query, check its selected collection, and run it again before changing the dashboard layout.
Check yourself: is an unassigned project a reason to drop a row from the chart? No. It is a reason to assign the next action.
Part 4 — Turn a finding into a task
1. Open Workspace and create a private project space
Choose App Root → Workspace. The left rail has Home, Inbox / Mentions, My Tasks, My Calendar, and Recent Files. These are personal views across the spaces you can access.
Beside WORKSPACES, select the plus button titled New workspace. Enter:
- Name:
Tutorial Bennett kitchen — private. - What it is for:
Decisions and files for the Bennett kitchen project. - Private: checked.
- Ends on (optional): leave empty for this ongoing practice space.
- Members: leave empty to start with your own account only.
Select Create. The heading should say Workspace · private · 1 member.
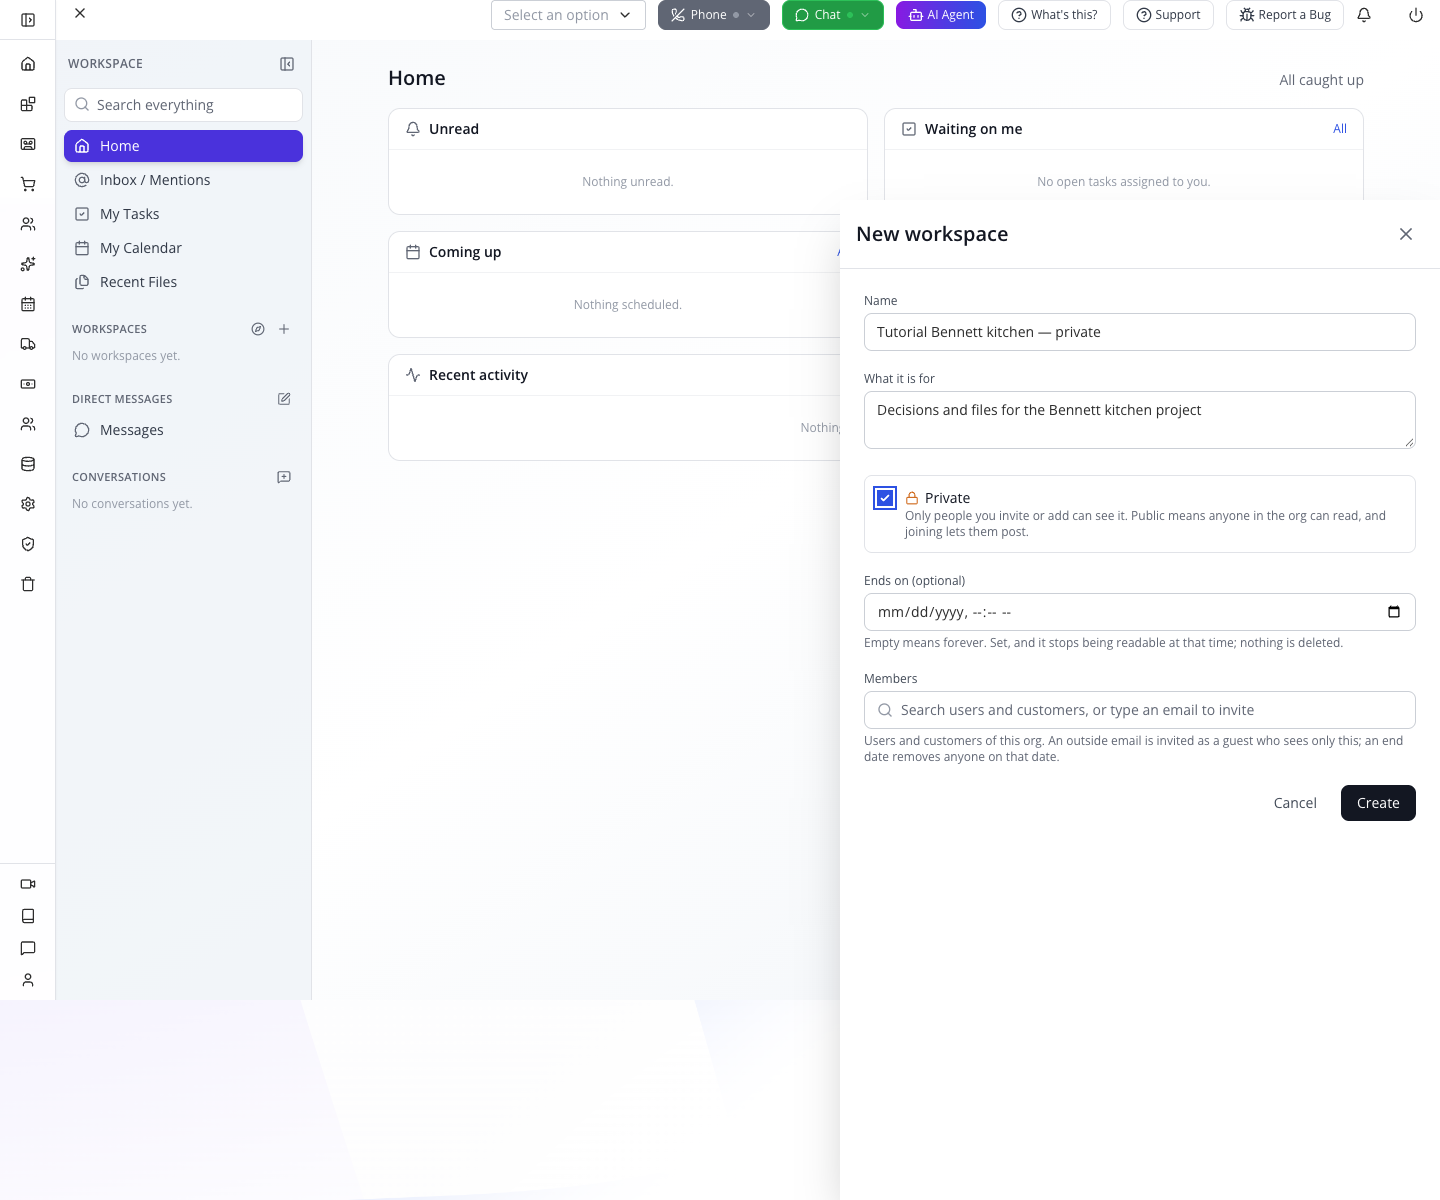
Private limits access to people added or invited to the space. Public allows people in the organization to read it; joining allows participation. Use a private space for client-specific project material. An expiration ends access; it is not the same as deleting its contents.
2. Write a task with a clear finish line
Inside the space select Tasks → New task. Fill:
| Control | Value |
|---|---|
| Title | Tutorial Confirm lighting plan |
| Details | Compare the two pendant options with the room photograph. Done means the preferred option and reason are recorded in this task. |
| Assign to | Search for and select your own account. |
| Due | Leave empty for this exercise. |
| Agenda | No agenda. |
Leave files and expiration unchanged. Select Create task.
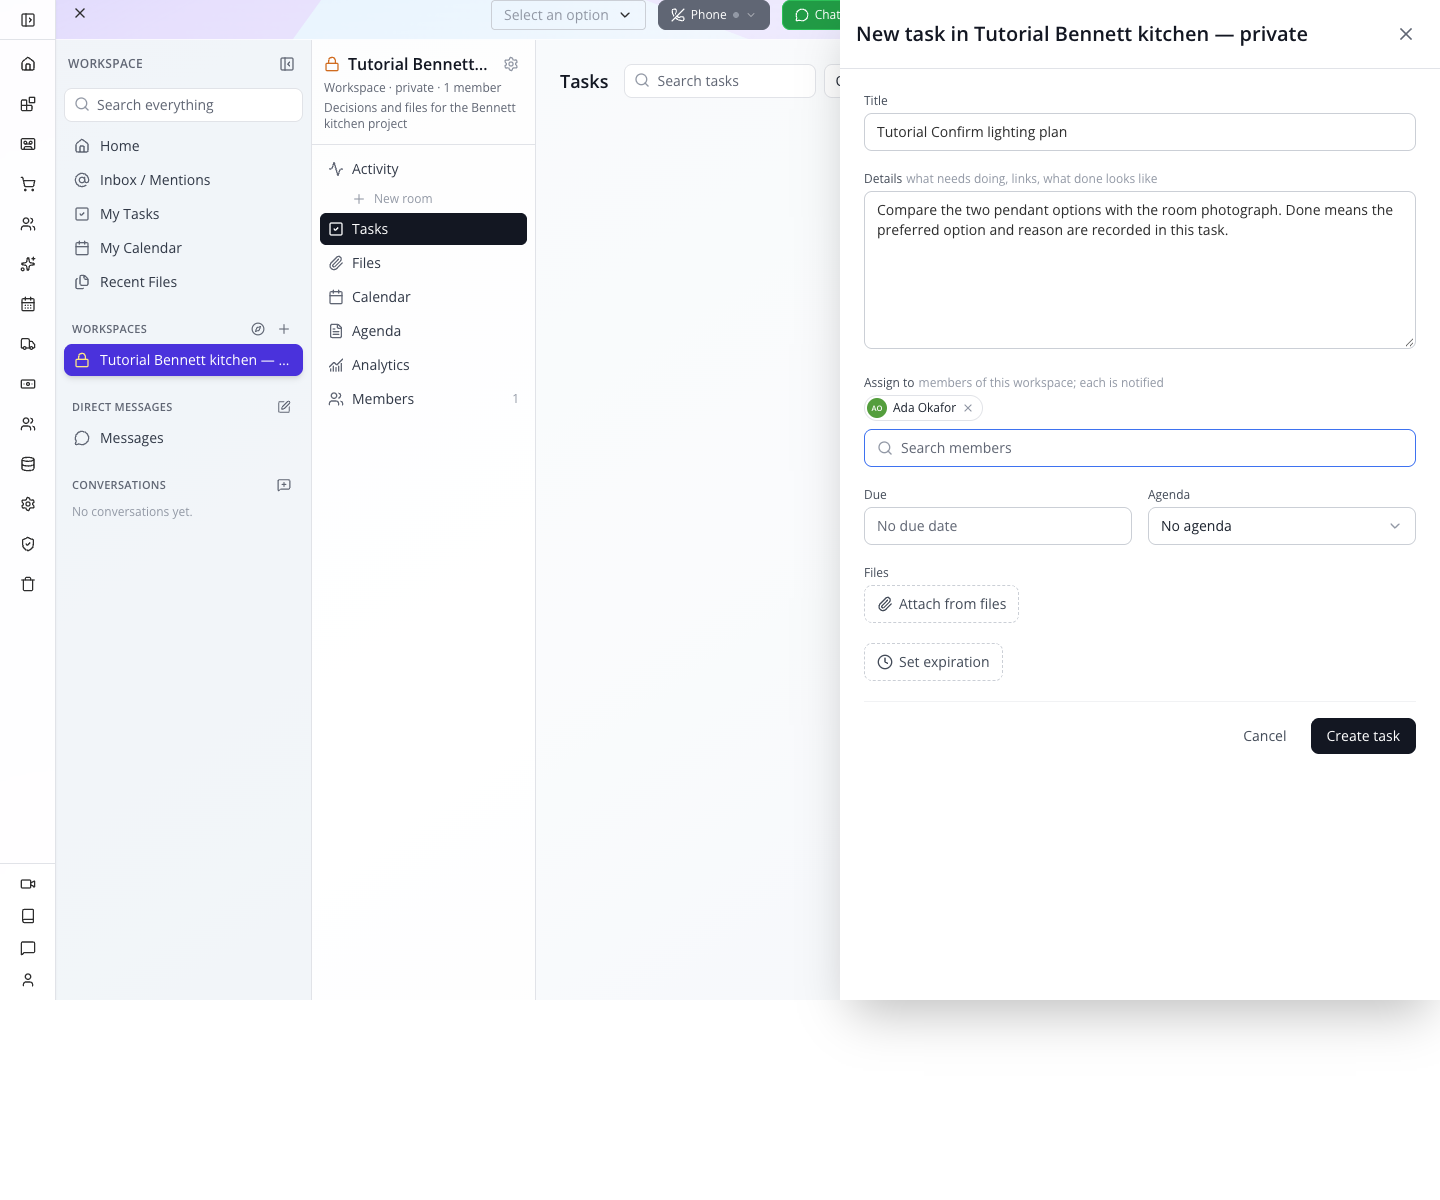
The task appears under To do. The form explains that assignees are notified; this exercise assigns only your own training account. When using this with colleagues, choose the actual responsible person rather than assigning everyone in the space.
3. Check it from the assignee's view
Reload Studio, open Workspace, and select My Tasks. You should see Tutorial Confirm lighting plan, its project-space name, and To do status.
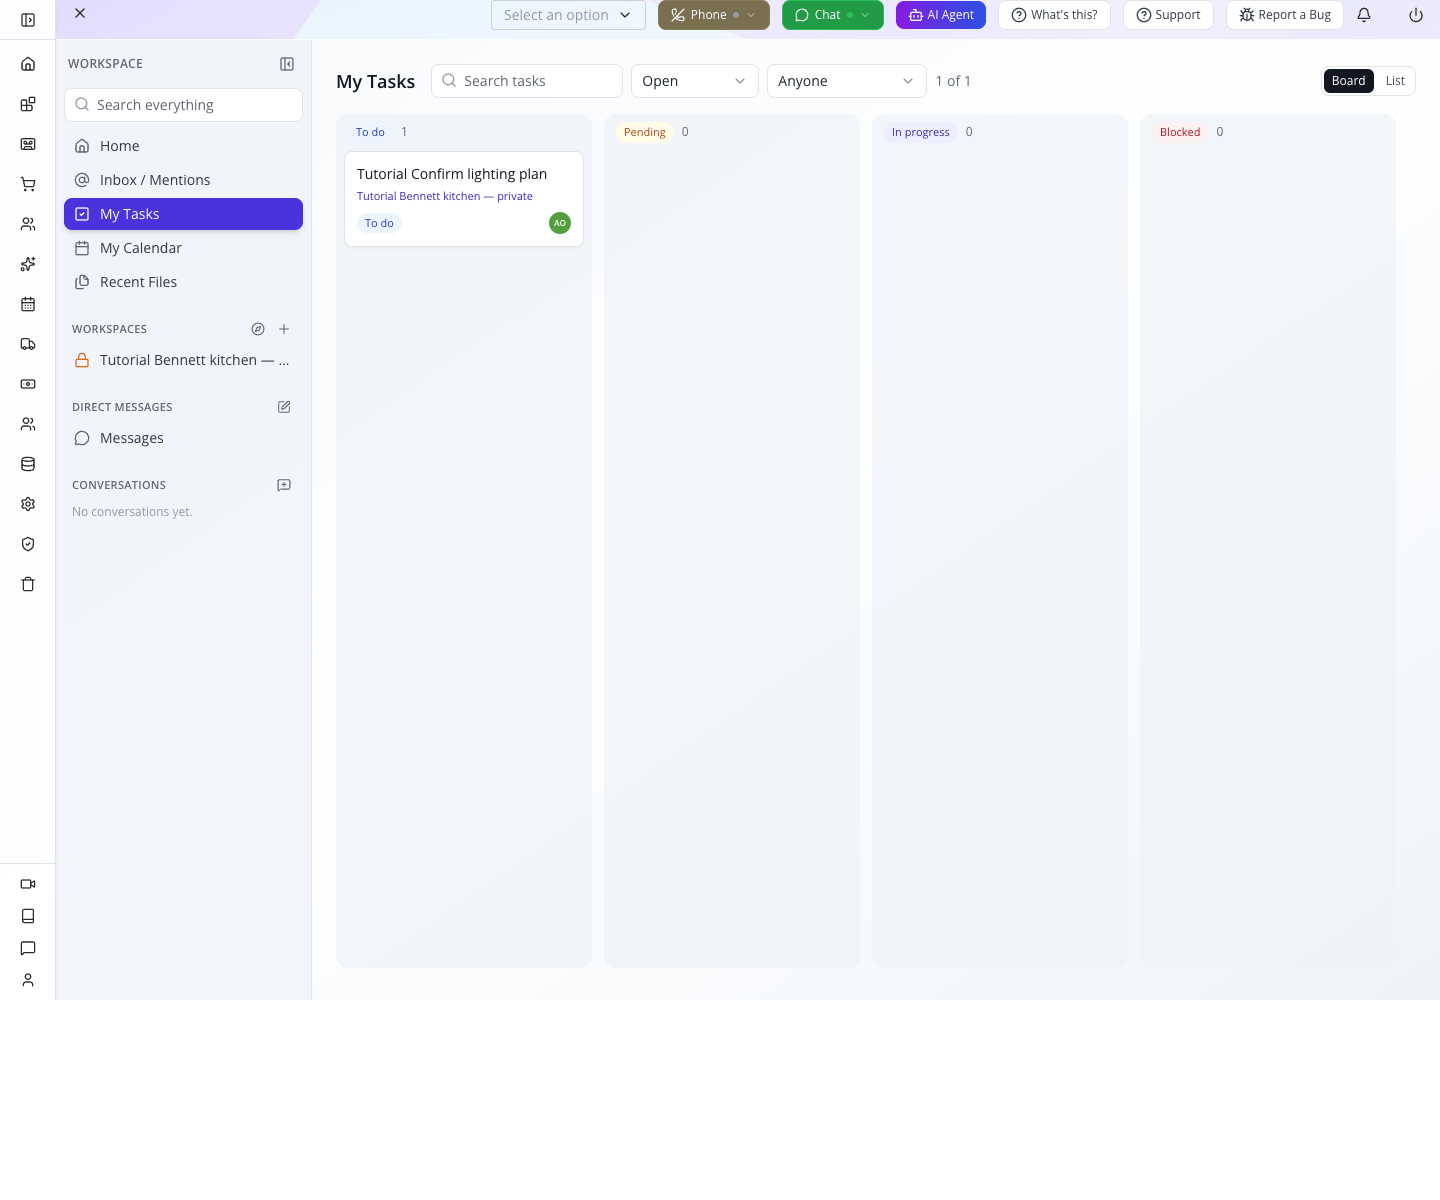
An unassigned task does not appear in a particular person's My Tasks. Workspace membership and task assignment are different decisions: membership gives access; assignment identifies responsibility.
The workspace also exposes Activity, Files, Calendar, Agenda, Analytics, and Members. Keep project conversation and files together there. The collection remains the structured source for the dashboard; a similarly named workspace is not an automatic database relationship.
Part 5 — Recover a practice record and inspect an import
Recover a versioned project
Use only the disposable practice project for this exercise. Confirm that Enable Versioning was turned on before deleting it; Trash retention is conditional, not universal.
- Open Database → Data Explorer → Design Projects.
- On Tutorial Okonkwo bathroom, select the row's Delete trash icon. Read the confirmation and select Delete. It leaves the project table.
- Open the dedicated Trash application at
/app/trashon the same Studio address you already use. On the tested build, the sidebar's Trash icon instead opened an older generic table whose columns did not expose a useful restoration action. - Locate Tutorial Okonkwo bathroom, check SOURCE DATATYPE matches your chosen collection identifier (
cf_projectif you used the example name), and select its Restore action. - Return to Data Explorer → Design Projects and confirm the project is back. The successful result matters more than a stale Trash list that has not yet refreshed.
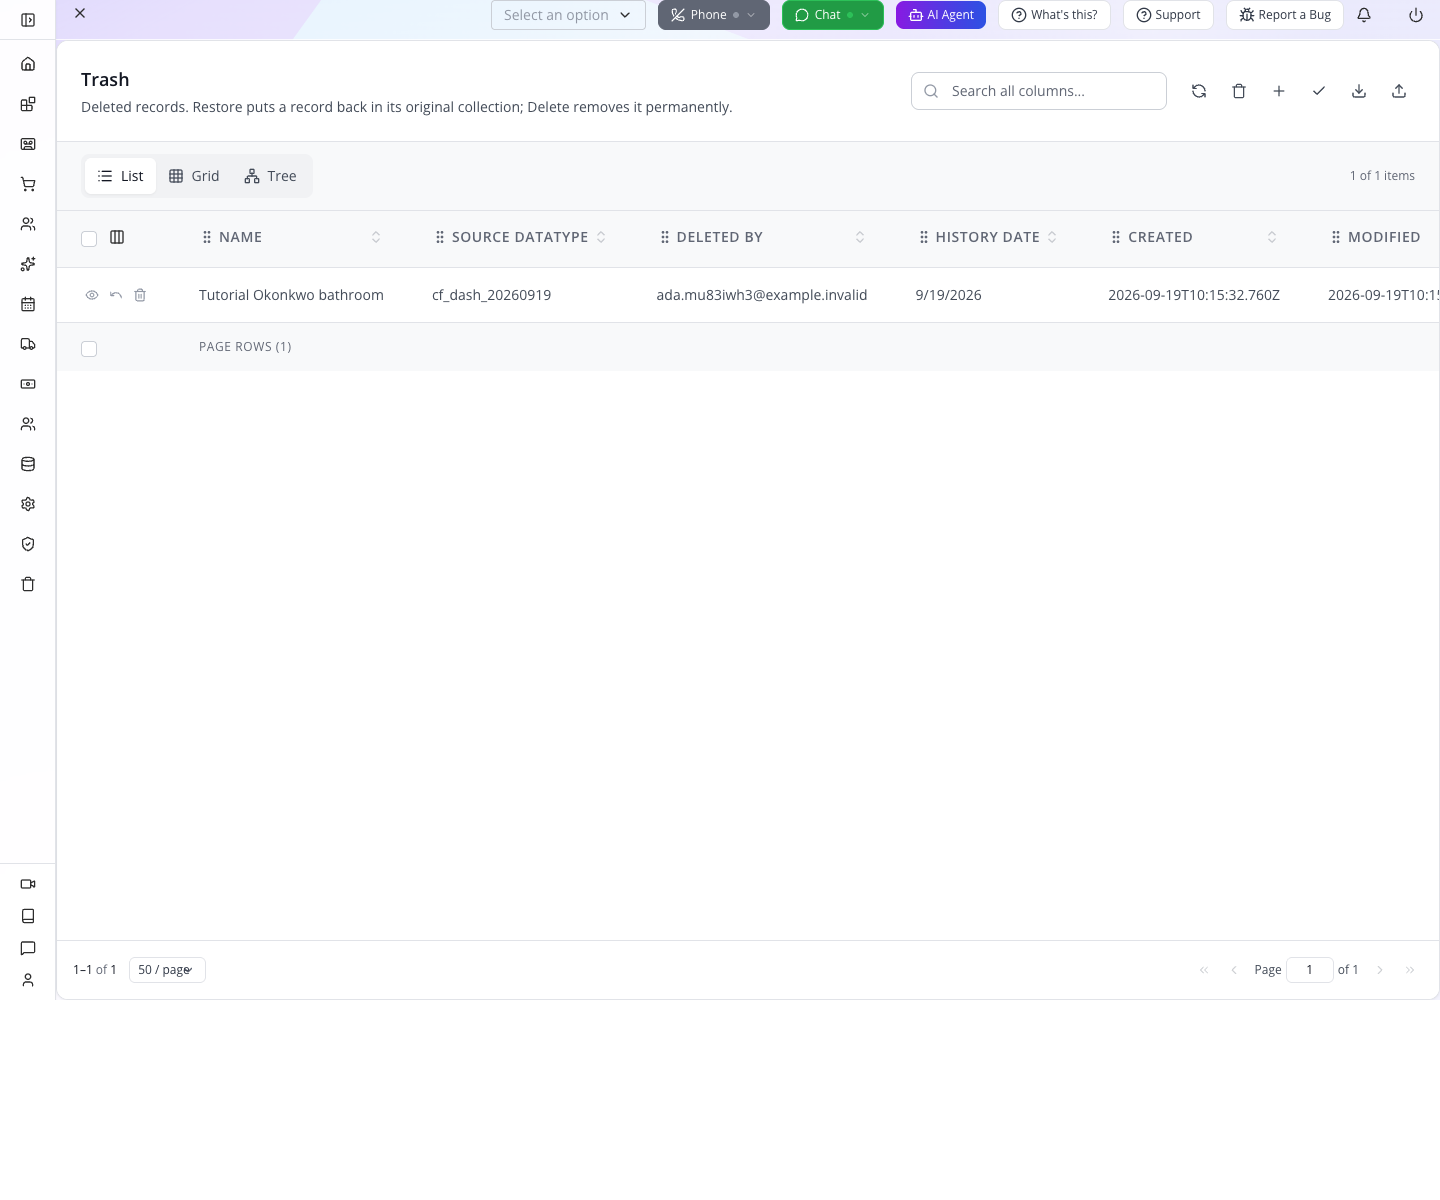
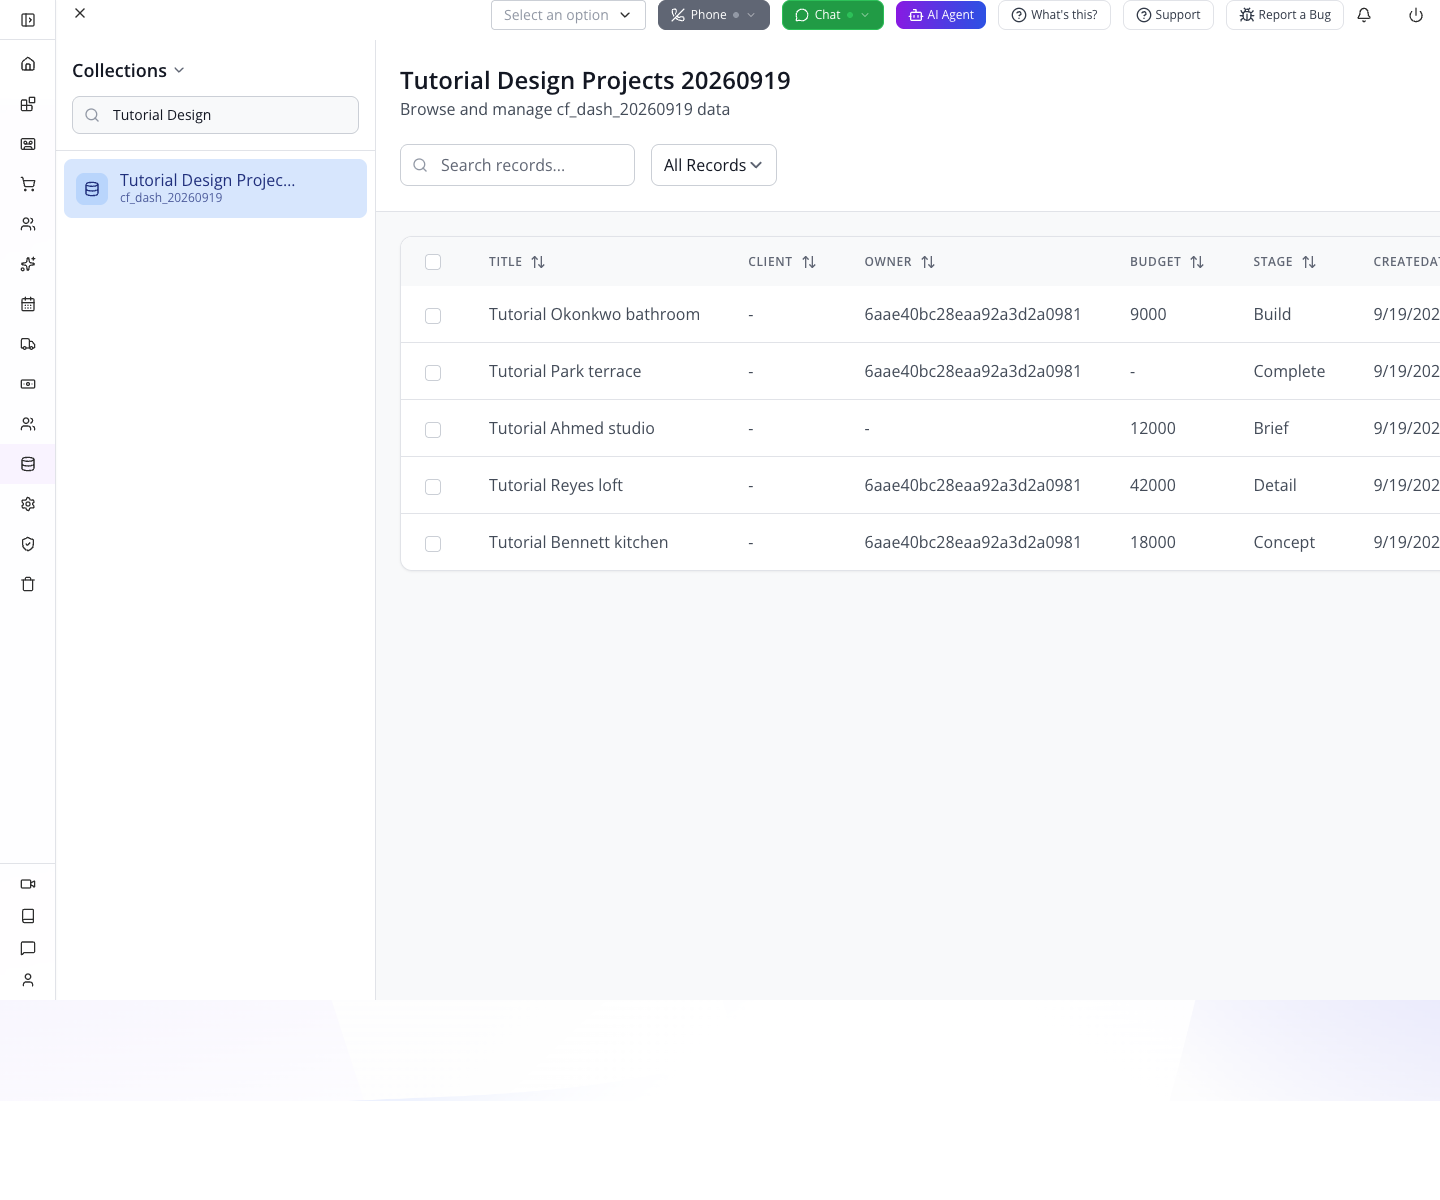
Delete inside Trash permanently removes the retained copy. That is different from Restore. Restoring the record is also different from restoring an earlier budget value: record-version history and deleted-record recovery solve different problems. This walkthrough verifies the deleted-record path only.
Inspect a batch before writing it
Open the practice CSV. The middle row deliberately has no title. You already saw the record form reject that error; the batch exercise checks whether the importer catches it too.
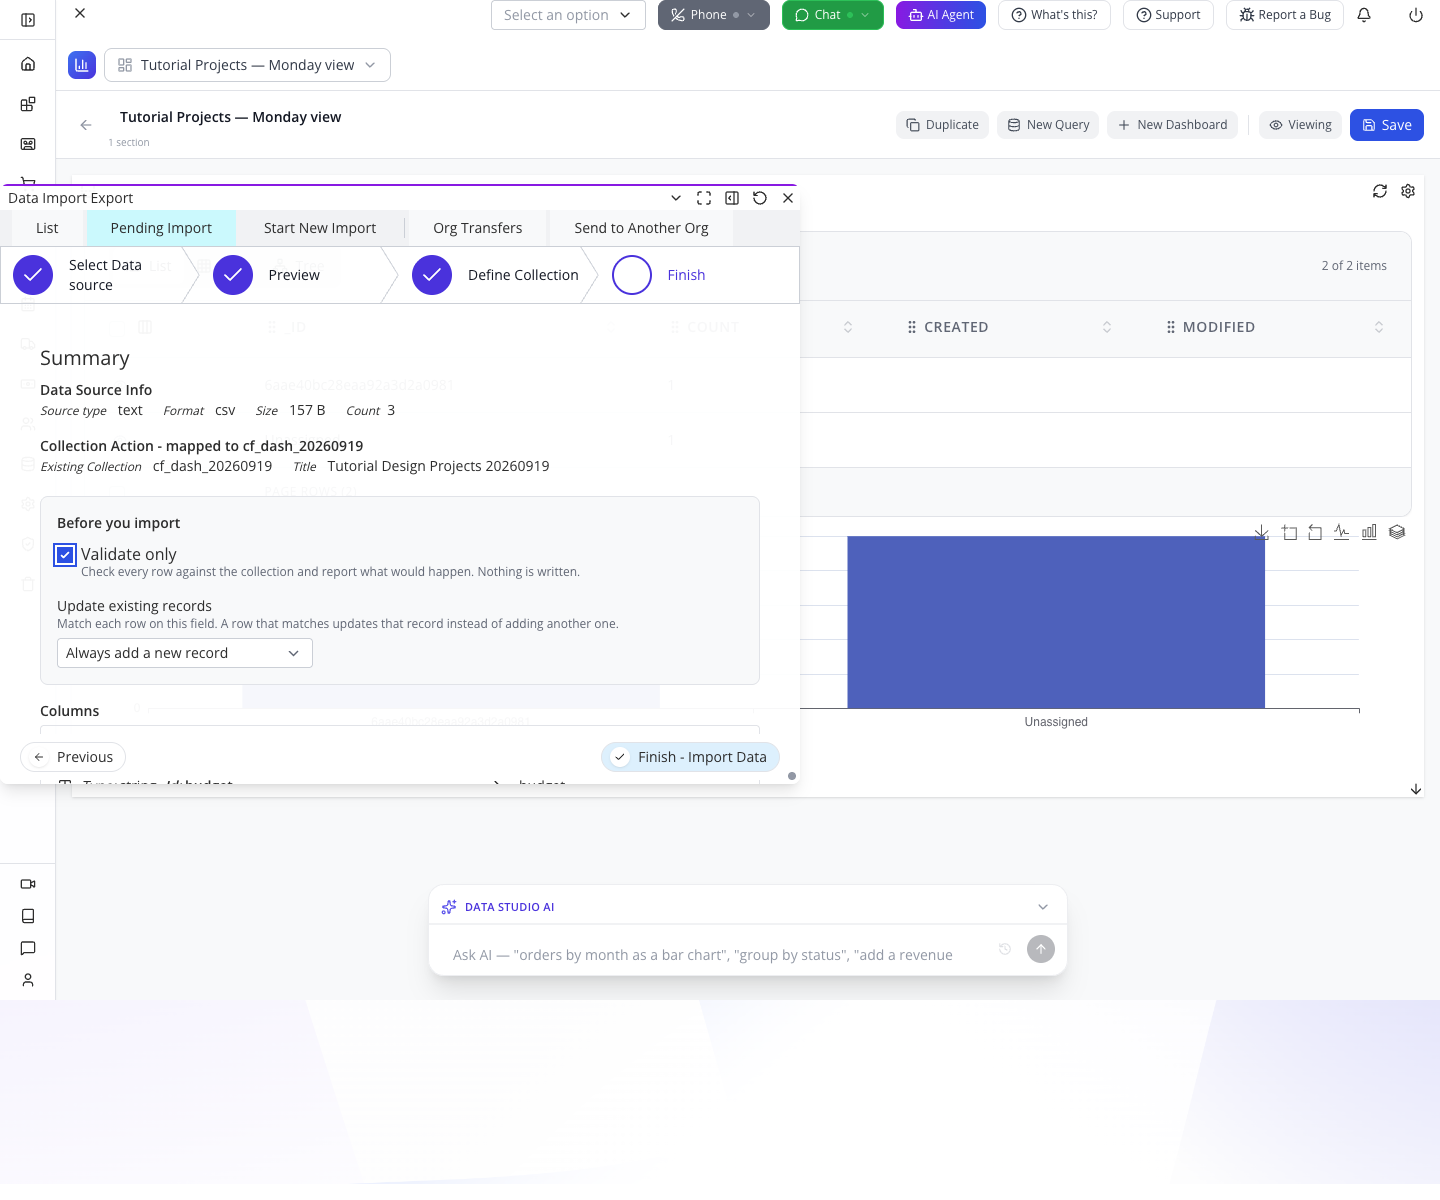
- Open Database → Import, Export Data → Start New Import.
- In Select Data source, choose Paste JSON or CSV.
- Paste the complete CSV into the editor and select Process Data. Wait for processing, then select Next. If the editor overlaps the button, use Tab to focus Next and press Enter.
- In Preview, check that three rows appear and the middle title is empty. Choose Next.
- In Define Collection, select the existing Design Projects collection. Check that
title,budget,stageandnextDecisionDatemap to fields with those same names. Choose Next. - In Finish, check Validate only. Leave Update existing records at Always add a new record for this diagnostic. Choose Finish - Import Data.
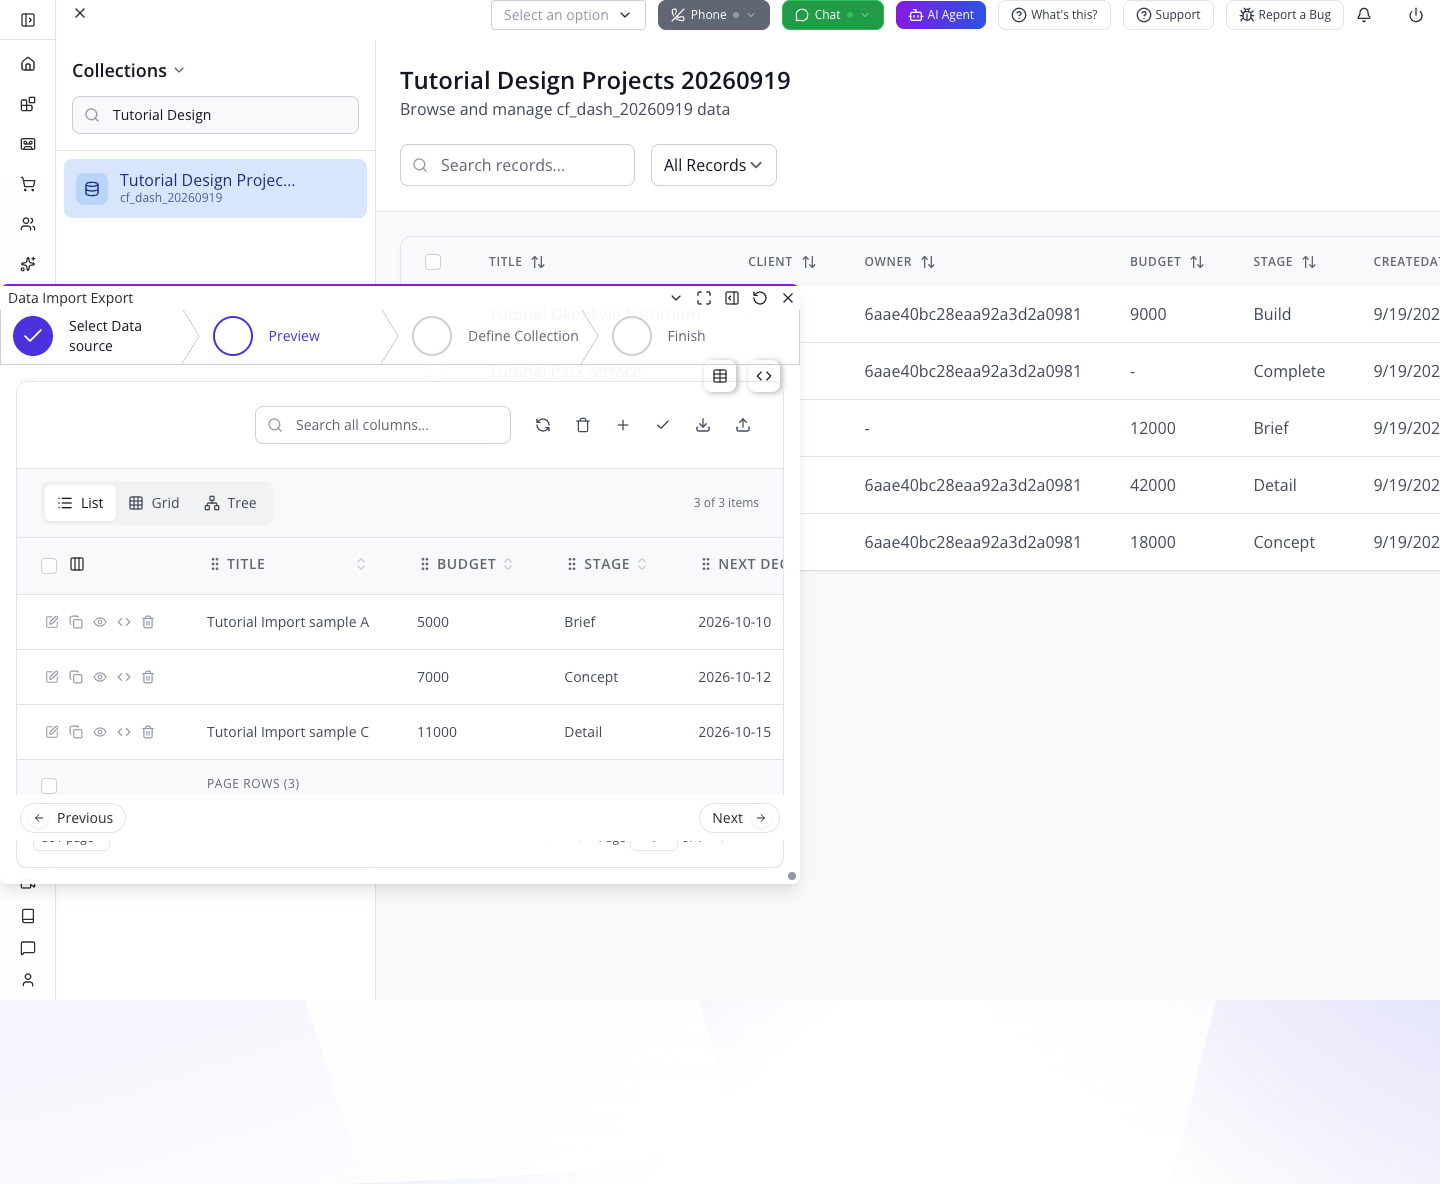
The report should say Validation found errors — nothing was written, with Rows read 3, Created 0, Skipped 2, and Failed 1. Under Rows that failed validation, row 2 reports title must have required property 'title'. The two valid rows are counted as skipped because Validate only does not write them.
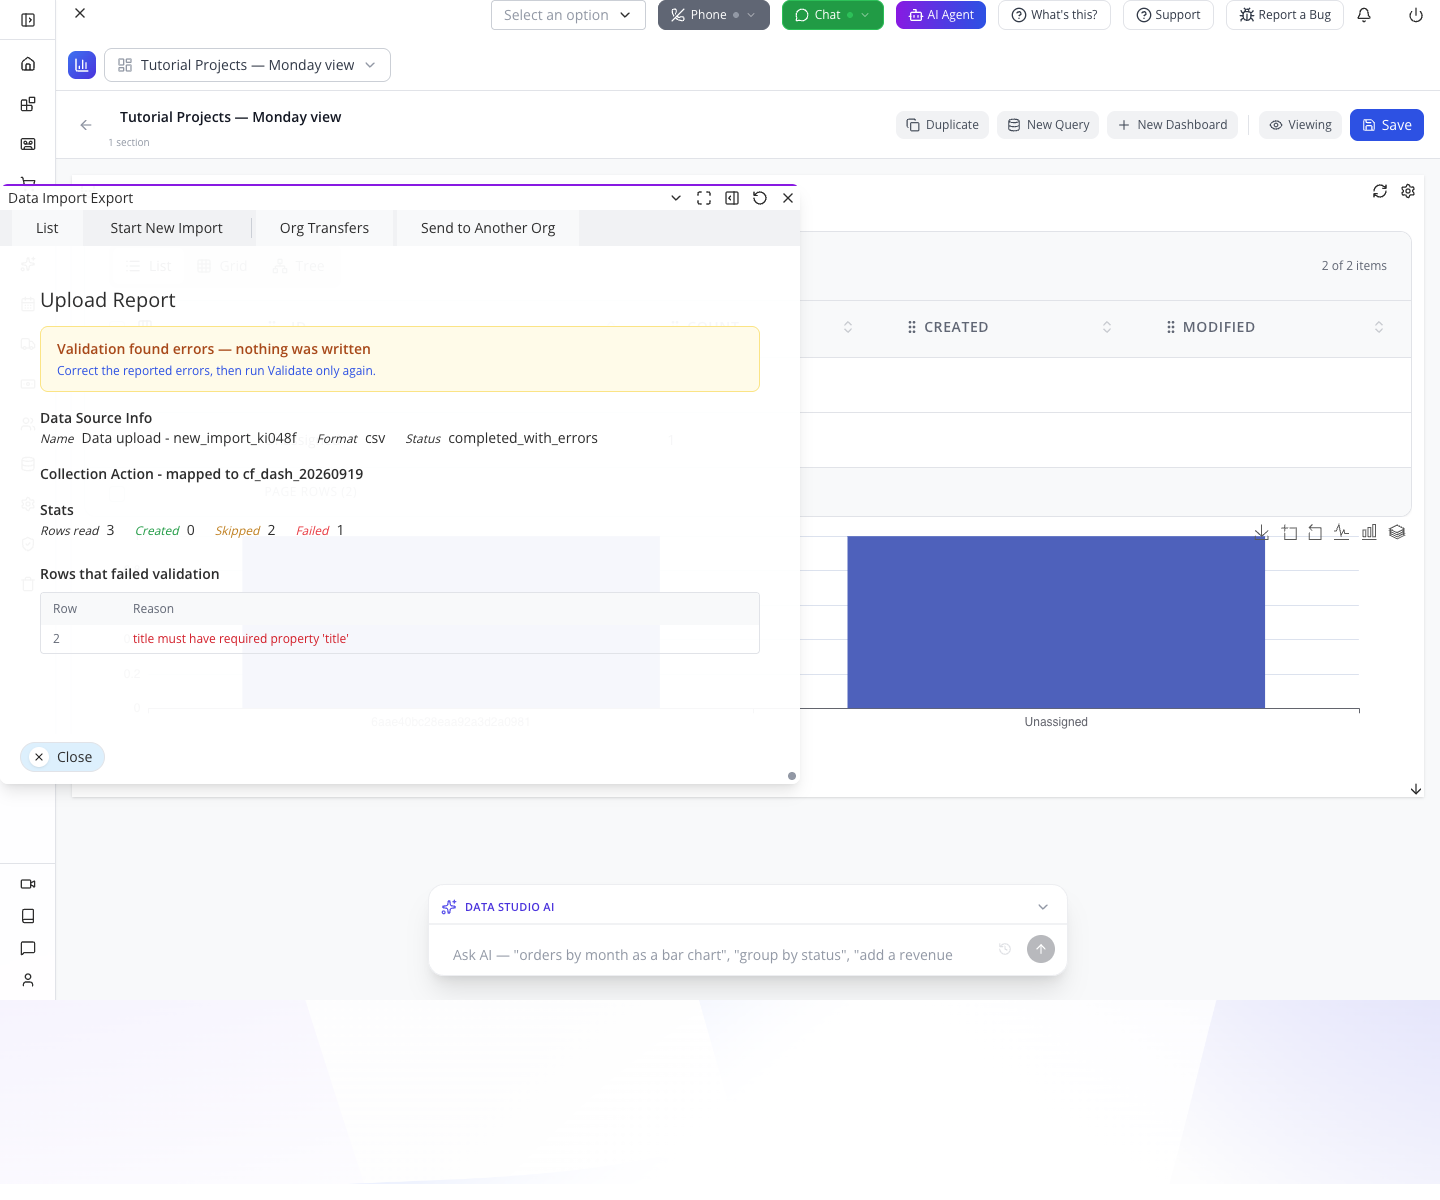
Keep Validate only enabled. Correct the missing title in a copy of the source file and validate that copy before considering a real import. For this exercise, stop after inspecting the error report and return to Data Explorer: the original five projects should still be the only records. The dashboard does not depend on batch import.
For a later real import, choose an update-match field only if it uniquely identifies a record in your organization. Matching on a repeated project title can update the wrong project; always adding rows on a retry can create duplicates. Inspect the resulting records as well as the job totals. This walkthrough did not execute the faulty batch or an update-in-place import.
Part 6 — Extend the model carefully
Make the dashboard current. Keep the fixed date for practice. For daily operation, define whether “overdue” means earlier than today's business date or earlier than the current instant. Update both queries together and test a decision due today, yesterday, tomorrow, and a completed project. A report's title should explain a fixed cutoff when one is used.
Connect clients. Create or locate the real customer through the CRM course, then use Client to select it. A lookup's stored ID is the link. It does not create a customer account, invite the customer, or grant access to every project.
Expose selected projects in a portal. Continue with Create a client dashboard. Showing all cf_project records on a customer-facing page would expose other clients' projects. Apply customer identity and server-side authorization deliberately; hiding a field on a form is a presentation choice, not access control.
Automate the next action. Continue with Automate a business handoff after the collection and records are reliable. Enabling the collection's workflow flag does not define the trigger, responsible person, retry behavior or completion rule.
Field rules and history. The builder's Magic panel is the place to explore field interactivity. If a date field is hidden when Stage becomes Complete, that does not imply the stored date has been cleared. Retain the explicit Complete exclusion in the query. A record-history restore, a field-visibility rule and a deleted-record restore require different checks; do not substitute one for another.
If something goes wrong
| Symptom | First check and next action |
|---|---|
| Dragging a field does nothing | A new schema may be {}. Paste the supplied object schema, wait, then return to Schema Builder. |
| Field rename or title disappears | Let the property update settle before changing fields or tabs. Confirm the result in JSON Schema. |
| Lookup Properties says No Schema Defined | Use the supplied lookup dataSource configuration; verify real results in Form Preview. |
Cannot find cf_project in collection search | Search Design, the display title. |
Project is rejected with missing title | Fill the Project field. |
| Owner shows a long identifier | This is the selected user's stored ID. Use the lookup to select a user; do not replace the ID with a guessed name in raw JSON. |
| Chart shows more than two projects | Check the review date, Complete exclusion and fixture values. A later cutoff legitimately includes more work. |
| Query says Invalid JSON | Replace the whole editor contents with the downloaded pipeline using paste. |
| Saved dashboard is absent from Home | Select Refresh in Data Studio before creating it again. |
| Dashboard card has no result | Reopen its saved query, select the intended collection and run it; then reopen the dashboard. |
| Sidebar Trash has confusing columns | Use the dedicated /app/trash route on your existing Studio host. |
| Import validation rejects row 2 | Expected for the supplied exercise CSV: its title is empty. Keep Validate only enabled while correcting a copy. |
| My Tasks is empty | Verify the task was assigned to your account, not merely created in a space you belong to. |
What happened behind the scenes
Developer notes and source pointers
Paths below are relative to the software repositories. They explain the observed implementation; the screenshots above establish the practiced interface.
websitemint/packages/ui/src/components/collection-builder/collection-store.tsx: new collections begin with an empty schema;updateSchemaItemperforms field renames.collection-editor-object.tsxin the same directory: an object withoutpropertiesreturns the empty-properties message before the usable drop area.collection-property-form.tsx: property updates are debounced; lookup controls have no corresponding property schema in the tested registry.websitemint/packages/ui/src/components/appmint-form/form-elements/data-lookup-combo.tsx: lookup collection, label and stored value come fromdataSource;skis the default stored value.select-single-element.tsxandselect-many-element.tsxin that directory: the former is a checkbox/radio/switch family; the latter supplies the choice list used with a string stage value.websitemint/packages/ui/src/components/data-view/data-explorer.tsx: collection search, record forms and table actions. Table/Grid/Kanban controls exist in this build; this course practices Table.websitemint/packages/ui/src/components/data-viz/workspace/index.tsx: saves query content, collection and chart mapping to adataviz_item.data-viz/layout/layout-card.tsx: loads the saved item and renders both table and chart. Configuration checks include saved item/query references as well as legacy table/chart fields.appengine/src/history/history.service.ts:shouldTrackhonors a collection's booleanenableVersioning;trashCreateretains the record andtrashRestorerestores its original datatype.appengine/src/repositories/repository.crud.service.ts: deletion also affects related history/tasks/schedules. Restoring the base record is not a promise to restore every related object.appengine/src/repositories/repository.bulk.service.ts: mapped CSV rows are coerced to schema types; valid dry-run rows are counted as skipped.src/util/validatorData.tsnormalizes Studio field-required metadata, validates standard rules/formats and reports schema compilation failures.data-import/step-report.tsxdistinguishes dry-run validation errors from actual import results. The local repair report records the reproduced defect and browser recheck.
Where next
Use the business handoff course to connect project changes to repeatable work. Use the client dashboard course for a customer-facing view. The permissions course explains how to control who can manage the underlying data.
Walkthrough evidence and production boundary
Executed independently on local Studio Manager 0.6.2 and AppEngine, 19 September 2026, using the newly created learner owner's account in a separate browser context. The fresh-run collection is cf_dash_20260919, titled Tutorial Design Projects 20260919; its different title/identifier explains the corresponding screenshots. No author account or historical storage was used.
The actual browser sequence created and reopened the collection, rejected a missing Project title, entered all five records through the form and Owner lookup, then read them back after reload. Both supplied pipelines ran against this collection: two owner groups with count 1 each, and Ahmed/Bennett as the two matching detail records. Two queries and the dashboard were saved and reopened; the fixed card shows both table and bar chart without the old configuration warning.
The private Workspace contained only the learner account. Its self-assigned task appeared in My Tasks after reload. The disposable Okonkwo record was deleted, located in dedicated Trash with the correct source datatype, restored and found again in the five-record table. The CSV exercise ran only in Validate only mode: after the reproduced validator defect was repaired, the actual report showed 3 read / 0 created / 2 skipped / 1 failed and row 2's missing-title error. Data Explorer still contained exactly the original five projects afterward.
Execution record and evidence index. The actual browser checks establish this lesson's required practical outcome. Optional Part 6 guidance and links do not claim execution of a dynamic-date implementation, customer portal access, workflows, second-member isolation, invitations or a real batch write. Those remain separate lessons or implementation choices. No external messages, providers or deployments were used. Historical 18 September captures remain only where the interface explanation is unchanged; companion-video instructions are in the production guide.