
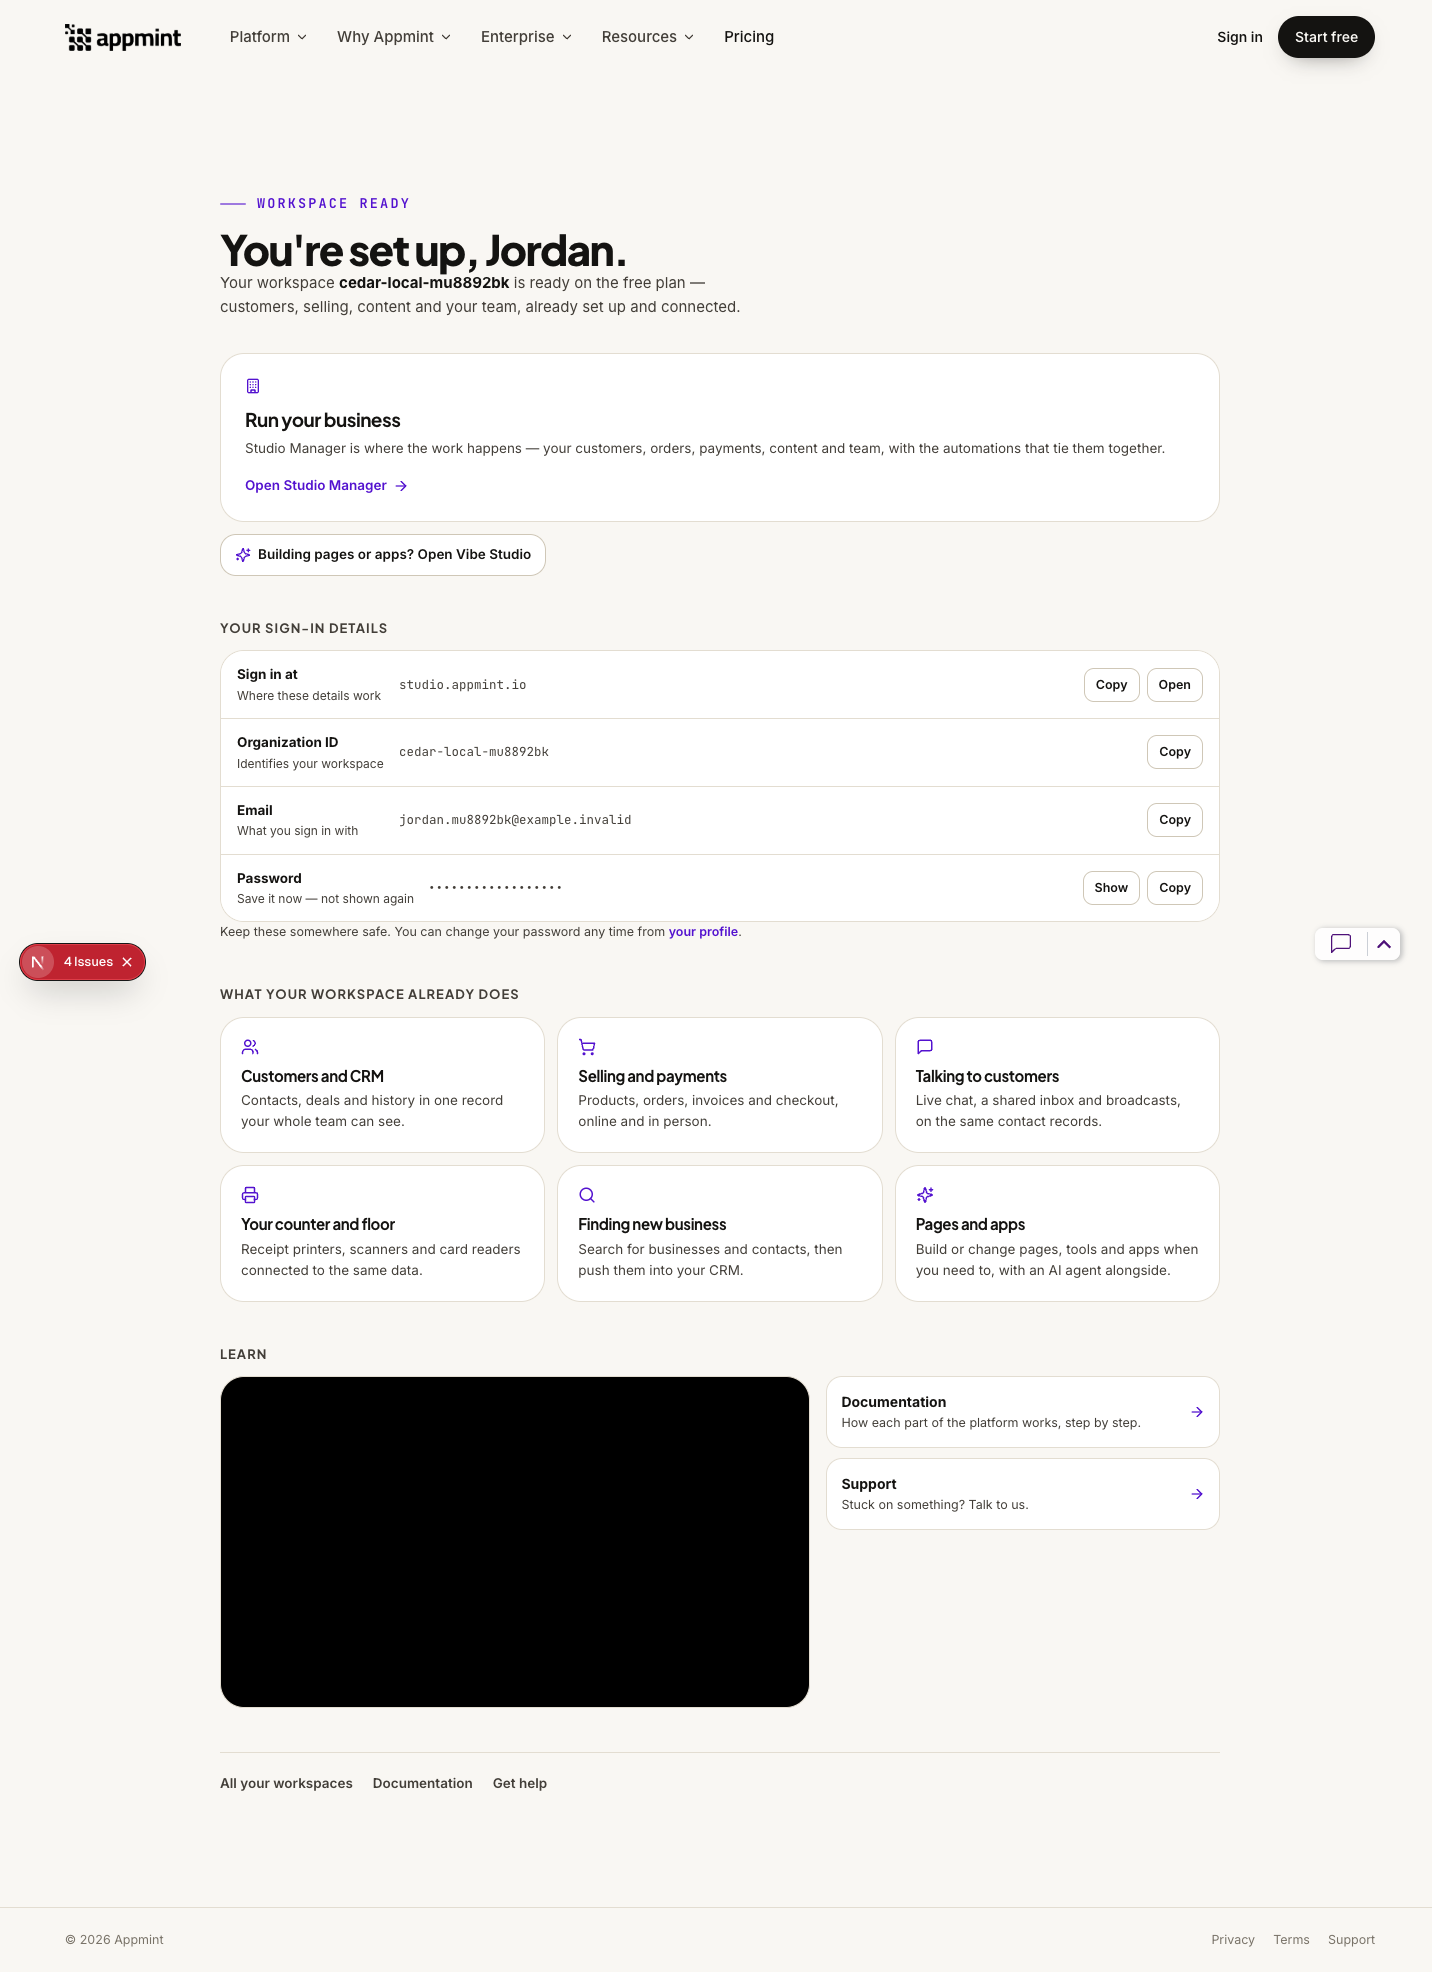
 Your organisation has been created. The next job is to understand its tools, save your business identity and know where to return.
Who: business owners and developers new to Appmint · Time: 30–40 minutes · Level: beginner, with a developer orientation at the end · Products: Appmint signup, Studio Manager and Vibe Studio · Checked: fresh local signup and Studio Manager 0.6.2, 19 September 2026; Vibe public sign-in inspected read-only. Earlier production Vibe captures are labelled below.
What you will have at the end
You will have your own organisation and sign-in details, a business name saved on its profile, the address of its first site, and a practical map of the tools you will use next. You will distinguish Studio Manager, Build Studio and Vibe Studio; know how Appmint Mobile and AppEngine fit; and have used the tour and task guides without turning on services you do not yet need.
What you need
Choose an email you control, a unique password and an available name for your organisation. Appmint apps and this course can be used without buying a plan. The public site also advertises optional paid platform tiers for additional capacity and services; those labels do not make purchasing a plan a step in this course. The fresh walkthrough completed signup, profile, site selection and return sign-in on the free plan without entering payment details.
The fictional business is Cedar & Form, an interior-design studio. Our fresh local training account belongs to Jordan Morgan, with organisation ID cedar-local-mu8892bk and initial site cedsite. Those deliberately distinct names make an important point: your organisation ID, your business display name and a website’s name are different values.
Choose your own available name. You do not have to copy our ID, add “workshop”, or use your exact legal business name in the address field. Never use the example login email as your own.
Local rehearsal: the fresh captures use the marketing app at localhost:4050, Studio at localhost:3100 and the local API. The repaired welcome page uses its configured Studio address: Open Studio Manager and Sign in at both target localhost:3100 here. Vibe remains a separate production link. A local account is not a production Vibe account. The public instructions below retain the normal public addresses.
The story
Jordan wants Cedar & Form’s enquiries, consultations and projects to live together. The first useful result is not a dashboard full of invented activity. It is a business identity Jordan can return to, a site to build on, and a clear route from “I need a website” to the tool that makes it.
The route
flowchart LR
  A[appmint.io → Start free] --> B[Email → account details]
  B --> C[Welcome: tools and sign-in details]
  C --> D[Studio Manager → tour and setup]
  D --> E[Business profile → save and reload]
  E --> F[Site address → help → return sign-in]
Part 1 — Create the company account
1. Start from the public website
Open appmint.io and select Start free in the upper-right navigation. The screen is headed Create your account and begins with Email.
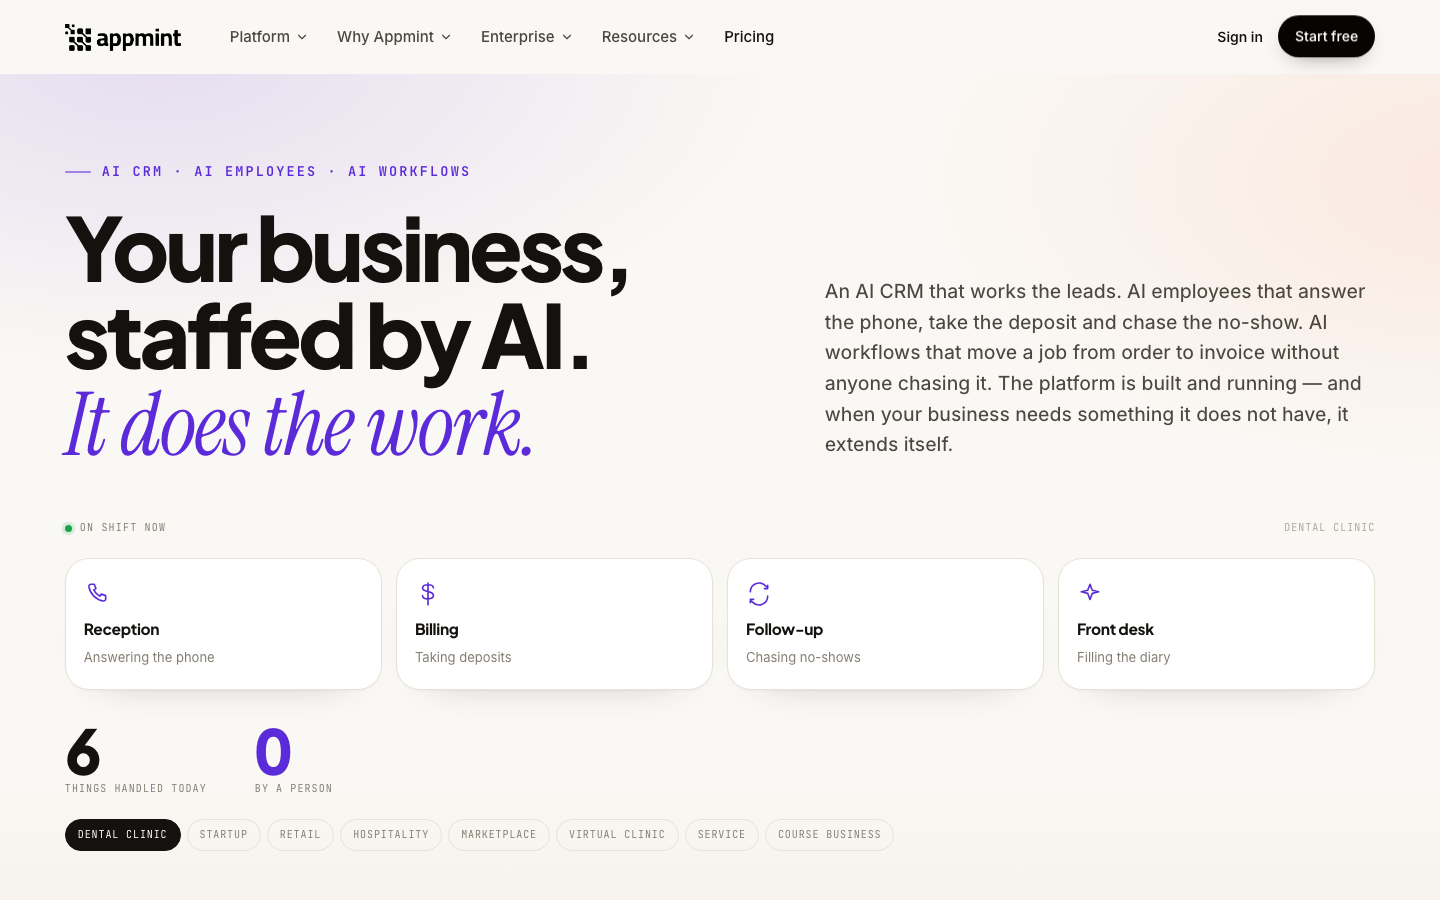
Enter the email you intend to use for Appmint and select Continue with Email. This walkthrough follows email signup. Continue with Google and Continue with GitHub are separate choices; their complete authentication flows are not demonstrated here.
You should reach Finish your account, with the address, name and password fields together.
 Earlier signup close-up of the same form. The information belongs in these fields, before account creation.
Existing email behaviour. The 17 September production recheck with an existing email still opened Finish your account. Do not expect signup to redirect you automatically to sign-in. If your purpose is to return to a company you already created, deliberately choose Sign In instead of creating it again.
2. Choose the organisation’s address name
In site-name, enter only your chosen name, such as cedar-and-form, without the .appmint.app suffix. The interface already supplies the suffix.
Use at least three characters, beginning with a letter, and use lowercase letters, numbers and hyphens. Move to the next field and wait for the availability result. Continue when the green line says your chosen address is available.
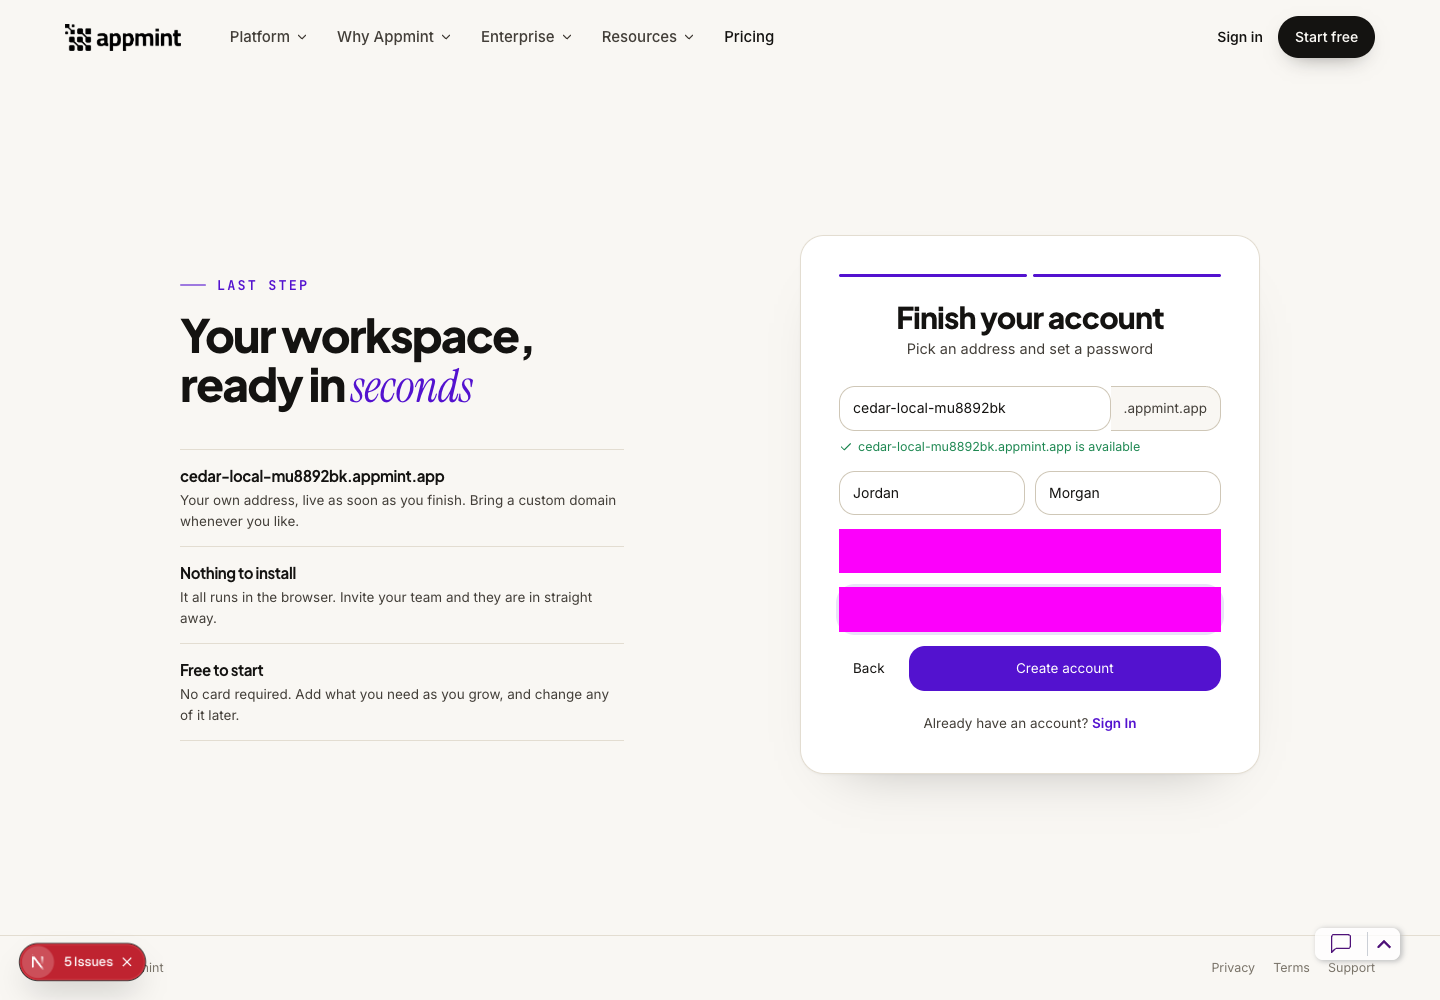
If the name is taken or reserved, choose another available name. Cedar & Form is suitable as the business display name later, but spaces and & do not belong in this address field. A company can keep its familiar public name while using a different available organisation ID.
3. Enter your personal name and password
Enter your first name in First name and surname in Last name. These identify you, the account owner. Do not put the company name in the surname field.
Enter a unique password of at least eight characters in Password, then the same value in Confirm password. Save it in your password manager. If the form reports Passwords do not match, correct the confirmation; if the password is too short, replace it in both fields.
Review the available address and your personal name, then select Create account once. Allow the request to finish. Our completed signup went directly to the welcome page; it did not present an email-confirmation step.
You have entered the email, organisation address name, owner’s name and password. You have not yet entered the business display name, logo, location or team permissions.
4. Read and retain the sign-in details
On the welcome page, find YOUR SIGN-IN DETAILS. Keep these four items together:
| Row | What to retain | Why it matters |
|---|---|---|
| Sign in at | The displayed Studio Manager address | Your return entry point |
| Organization ID | The exact ID you chose | Identifies the company at sign-in |
| The account email | Identifies your user | |
| Password | The password in your password manager | Completes password sign-in |
Use Copy beside the address and ID. The password row offers Show and Copy, and says Save it now — not shown again. Keep it concealed while screen sharing or recording.
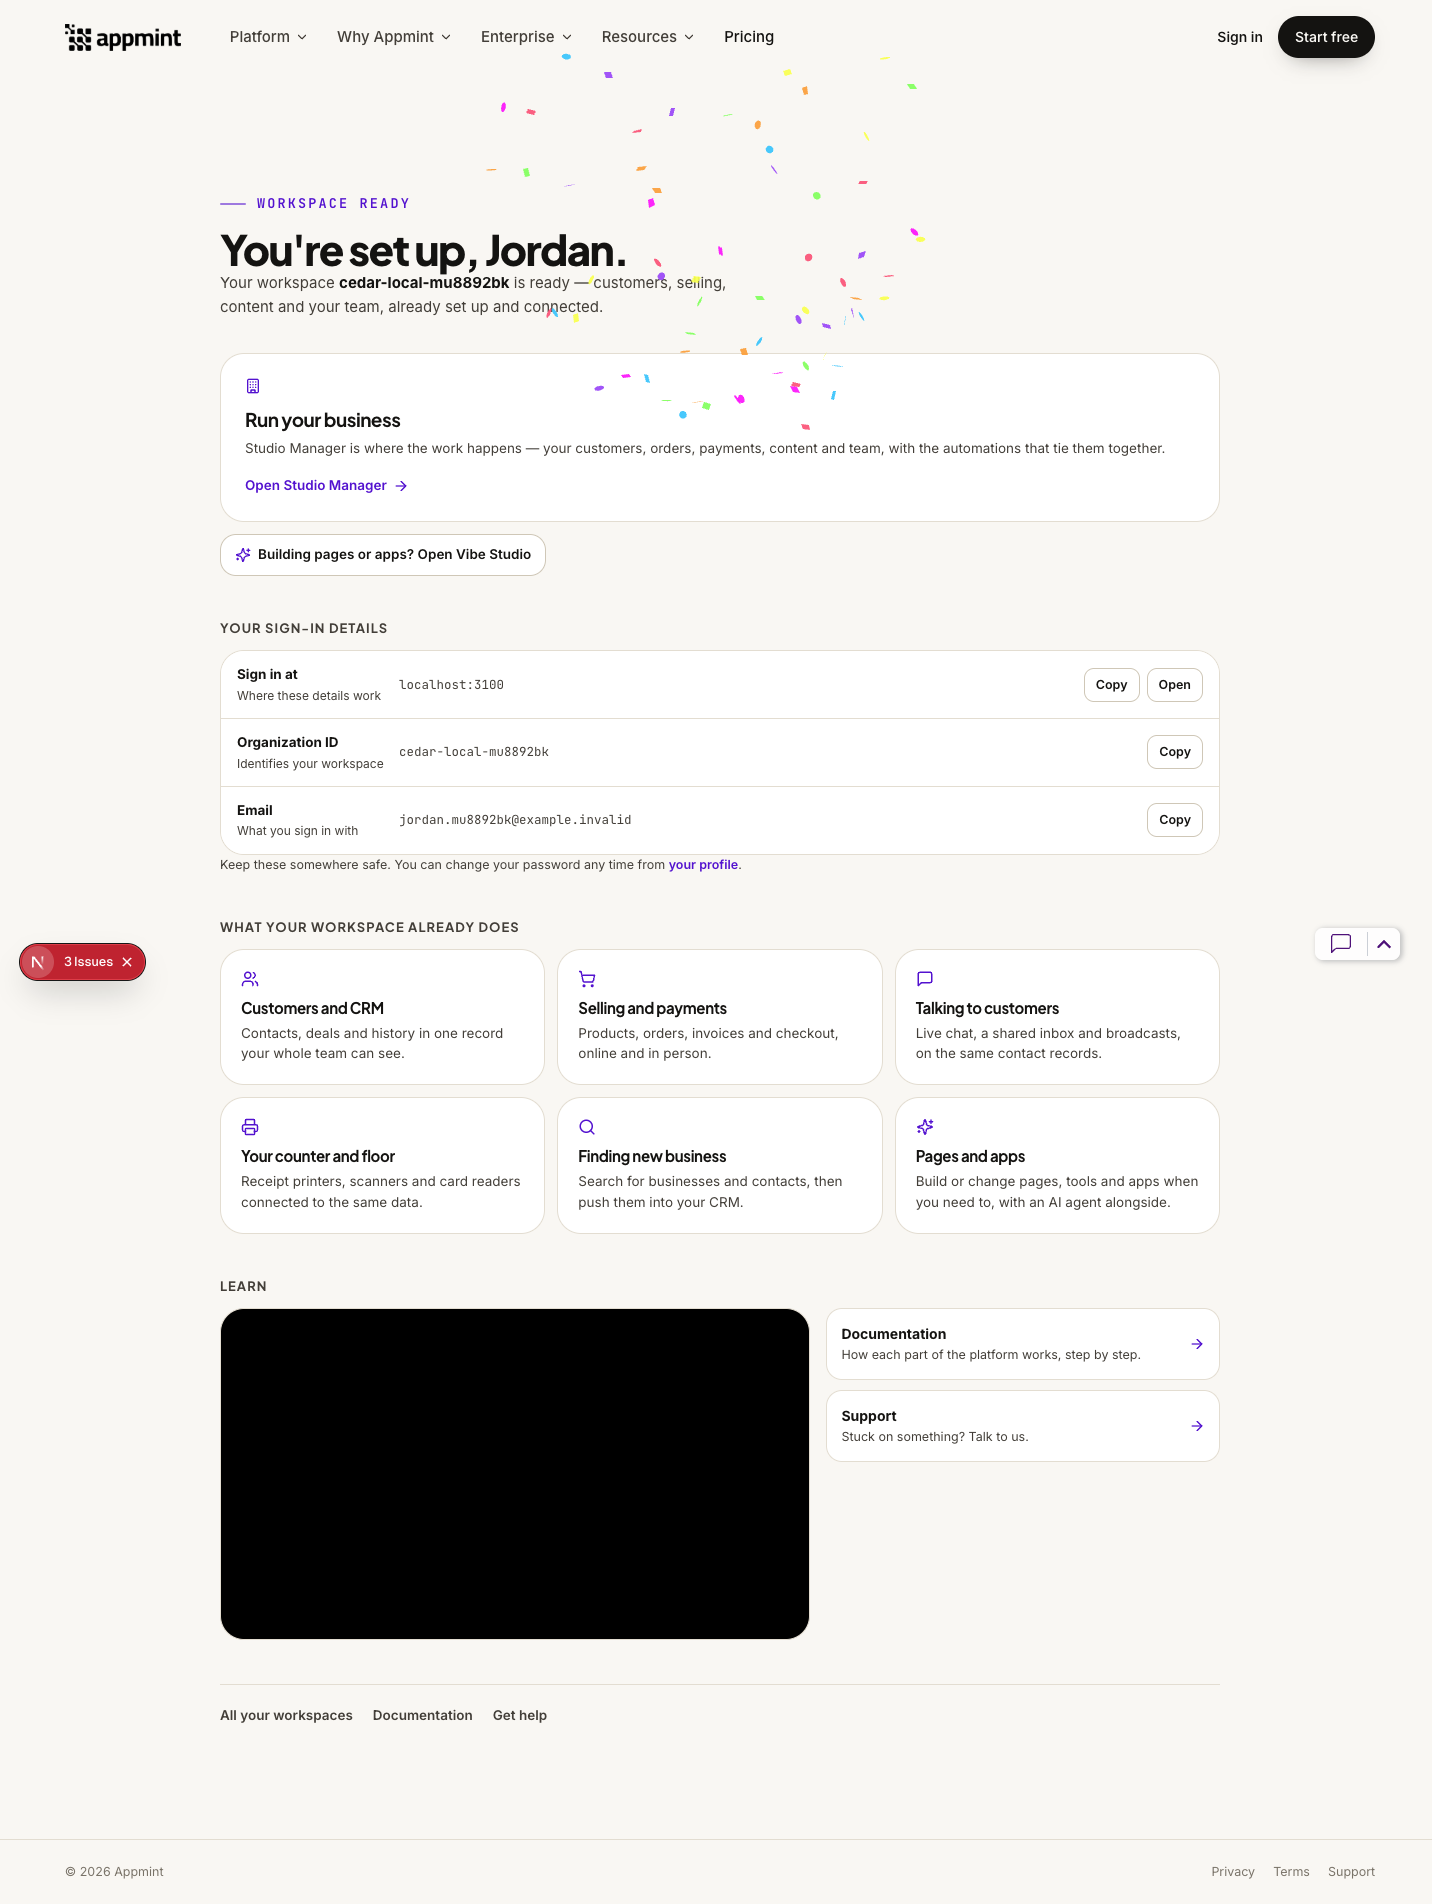 After the browser recovery, this link check restored the existing learner’s non-secret welcome session data; it did not create another account. The original signup capture remains in the execution record.
The welcome page uses the phrase Workspace ready. In this course, your organisation is the company account. Workspace also names a specific collaboration feature in Studio Manager; it is not a different company account you need to create.
Try it. Write down your organisation ID and business display name in separate fields in your password manager. Leave the business display name as the name you want customers to recognise.
Check yourself. Can you sign in using Cedar & Form wherever Appmint asks for Site Name? Only if that were the actual identifier—which it is not here. Use the organisation ID from the welcome page, without the suffix.
Part 2 — Understand what you have before choosing a tool
5. Start with the welcome page’s two main entries
Run your business → Open Studio Manager opens the management console. Use it for customer records, sales, content, operations, organisation settings and team access. This is where the course continues.
Building pages or apps? Open Vibe Studio opens the AI-assisted building environment. It is useful when you want to describe a page or application and work with its generated project. Opening Vibe is not required before using Studio Manager.
The third name, Build Studio, appears inside Studio Manager. It is the visual page builder. A lesson using Build Studio will tell you to open its sidebar menu; a Vibe lesson will take you to the separate Vibe application.
6. Read the six capability cards as a business map
Scroll below the sign-in details to What your workspace already does.
Fresh welcome-page capture. The cards explain capabilities; they do not confirm that every service has been configured.
| Welcome card | A concrete Cedar & Form use | Where that work continues |
|---|---|---|
| Customers and CRM | Keep a homeowner’s enquiry and project history | Studio Manager’s CRM area |
| Selling and payments | Invoice a consultation or track an order | Storefront and payment setup |
| Talking to customers | Respond to an enquiry and follow up | Customer inbox, chat and communications |
| Your counter and floor | Connect venue hardware for in-person service | BusinessMade and Device Hub setup |
| Finding new business | Gather prospects for a sales follow-up | LeadSearch and CRM |
| Pages and apps | Build the studio’s website or a client tool | Build Studio or Vibe Studio |
For example, the website is where an enquiry starts, CRM is where the team follows it up, and an invoice records the requested payment. They connect around a business workflow, but each still needs its own configuration and records.
7. Place the other Appmint components
| Component | What you use it for | First setup to expect |
|---|---|---|
| Studio Manager | Administer the business and operate its modules | Organisation identity and access |
| Build Studio | Visually create and edit pages inside Studio Manager | Select the site, create a page, save it |
| Vibe Studio | Build a page or application with an AI assistant | Same production login, then a project |
| Appmint Mobile | Work with CRM, chat, softphone, POS and event tools on a phone or tablet | Install, sign in to your company, receive the relevant access |
| Appmint Chat | Let customers converse with your team or assistant | Configure the site’s chat and agent access |
| BusinessMade | Run venue and business operations such as POS, staff, time, payroll and books | Its own BusinessMade onboarding course |
| Device Hub | Connect a business location to printers and other supported devices | Download/install the agent, connect the hub, configure devices |
| EventOxygen | Event attendance, tickets and event interactions | Install the appropriate event app and connect to its event context |
| LeadSearch | Capture prospects for CRM follow-up | Its browser extension and CRM connection |
| AppEngine | Provide the backend APIs and data for the platform and custom clients | Authentication, organisation context and the required API access |
Installing a mobile app does not assign an employee a business phone number. A Device Hub card does not install the agent. A chat feature label does not place a working chat widget on your website. The later courses take those workflows from setup to their actual checks.
8. Locate the learning material before leaving the welcome page
Continue to Learn. Documentation opens the written guides and Support opens the support entry. The embedded walkthrough introduces Vibe. Its video did not load in the fresh local capture, but the documentation and support links were visible. Watching it is not required for the Studio steps below.
Now return to Run your business and select Open Studio Manager. You do not need to create another account for it.
Part 3 — Learn the interface and save the business identity
9. Acknowledge the interface tour
On the fresh local first visit, Studio Manager opened the Getting around tour. The first card is Welcome — let me show you the whole thing, 1 of 44.
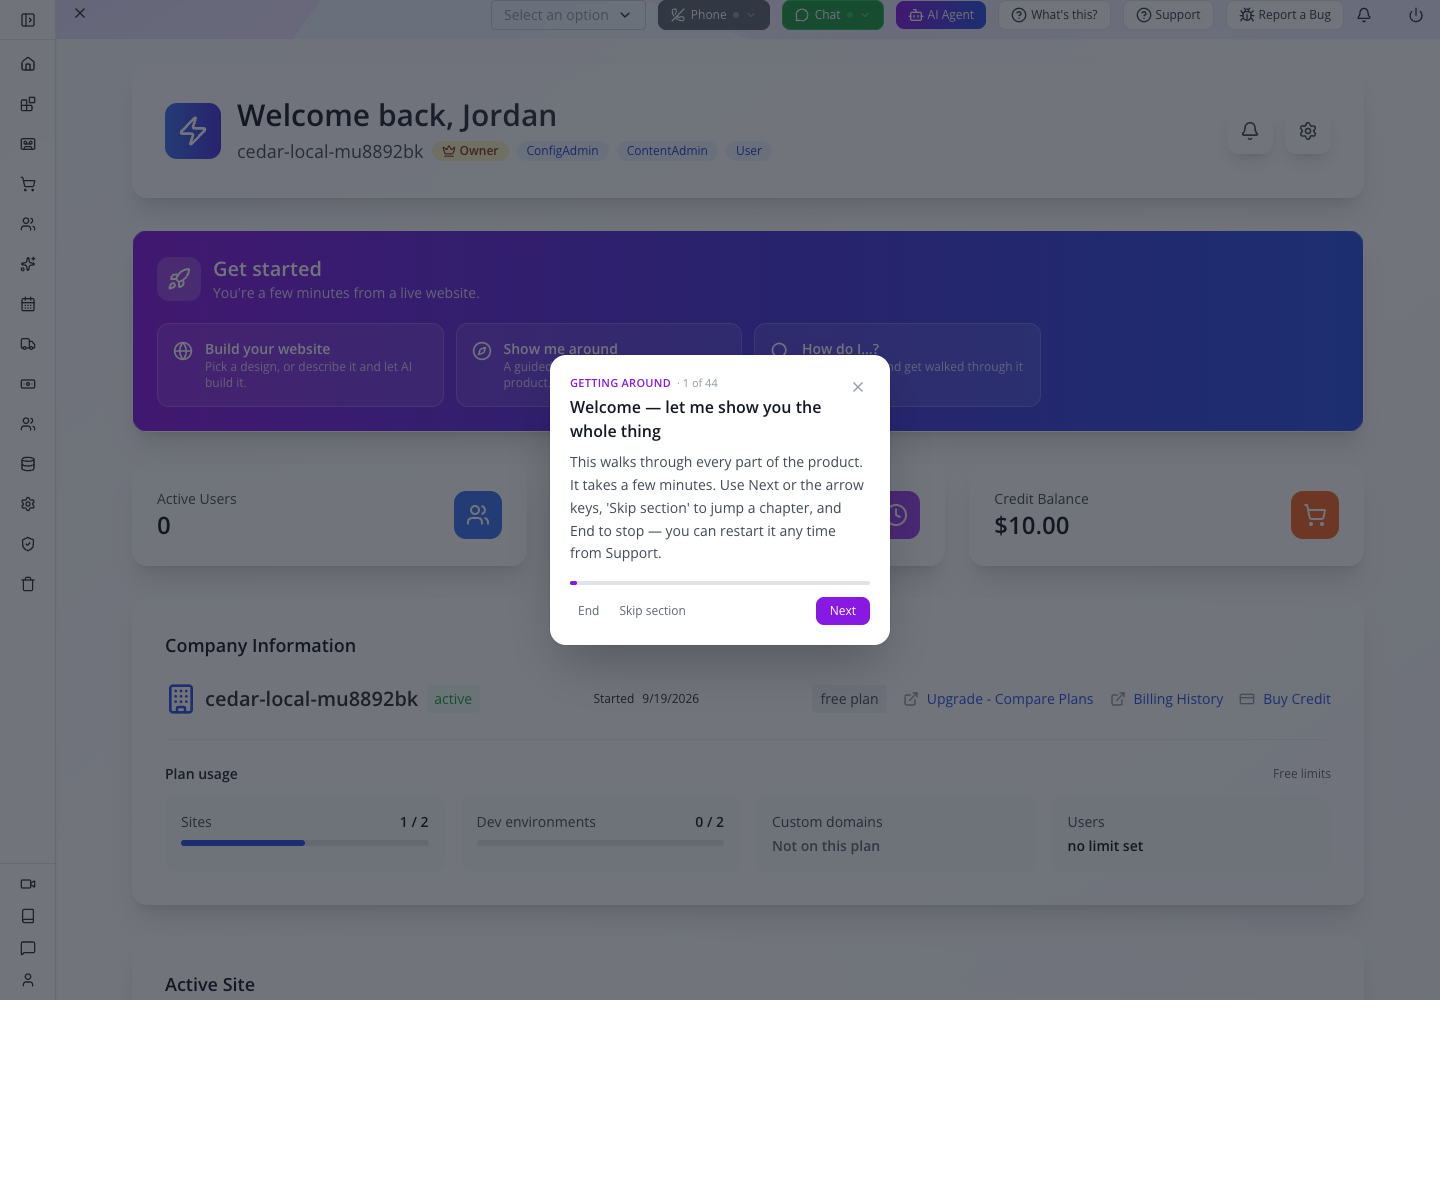
Use Next to advance, Back to revisit a card, Skip section to move beyond a chapter, or End to return to your task. Take the tour now if useful; the illustrated tour reference covers its chapters. You can reopen it through Support → Interface tour or Show me around.
For this setup exercise, select End after inspecting the controls. Ending the tour does not delete your company or undo configuration.
10. Read the Setup Wizard without treating every row as mandatory
The fresh local sign-in opened Home’s Welcome back page. Open App Root → Setup Wizard for New here? Start with your website and Let’s get you set up. Some builds also offer Finish setting up on Home.
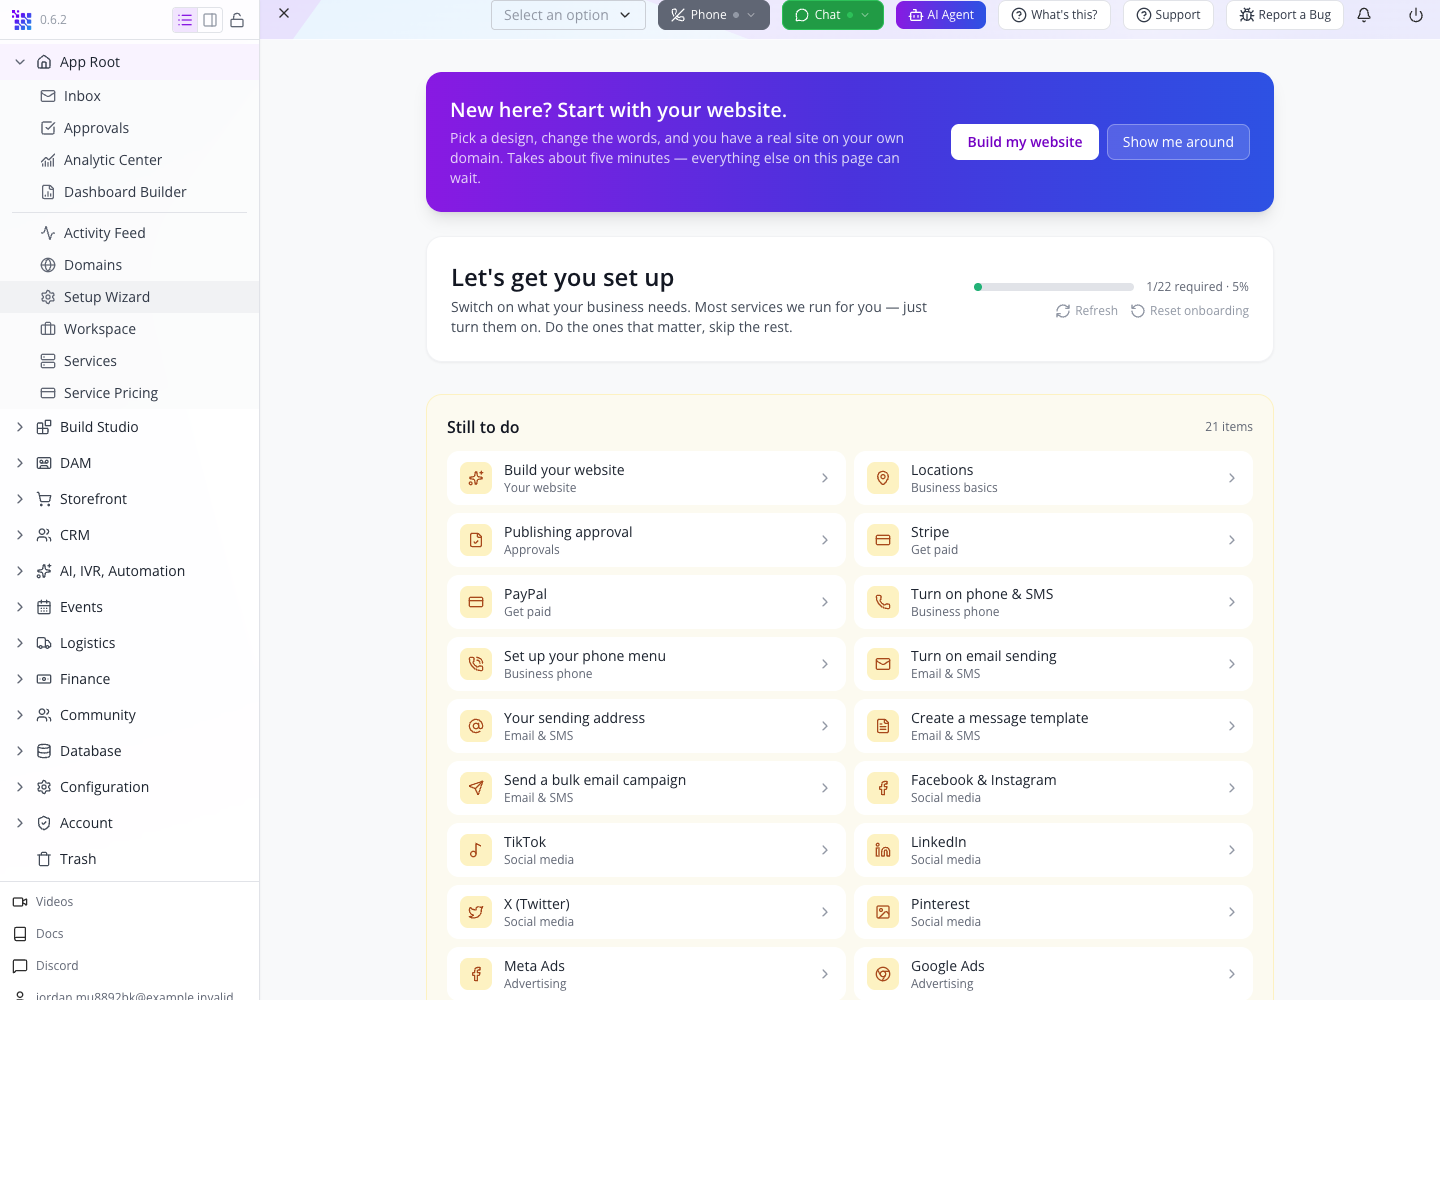
Your website leads to building pages and using your domain. Business basics contains profile, locations and team access. Later sections cover payments, phone, email, social, shipping and AI.
Choose the setup related to your first workflow. For Cedar & Form that is the business profile, followed by a website. You do not have to connect every listed social network or service to begin.
Replay is different from reset. Support → How do I…? → Replay the welcome describes a replay affecting you. The Setup Wizard’s Reset onboarding is a broader reset with a confirmation for the organisation. Leave that reset alone when all you want is to reread guidance.
11. Learn the sidebar and toolbar
If the sidebar shows icons only, select Expand sidebar at its top. In the captured Tree menu layout, the chevron beside a group expands its children; the group’s name opens the group overview. In Flyout menu layout, the chevron opens a floating submenu. Both expose the module labels used in these courses.
The main groups on this account include App Root, Build Studio, DAM, Storefront, CRM, AI, IVR, Automation, Events, Logistics, Finance, Community, Database, Configuration and Account.
The toolbar is available across modules: Phone, Chat, AI Agent, What’s this?, Support and Report a Bug. The sidebar footer has Videos, Docs, Discord and your email. Your company may show additional menus as its configuration and access change.
App Root is the home and organisation-level starting area. Account → Profile is the company profile. The email entry at the bottom opens your user profile; it is not the company profile or the sign-out menu assumed by the old topic.
12. Open the organisation profile through Account
Expand Account using its chevron, then select Profile.
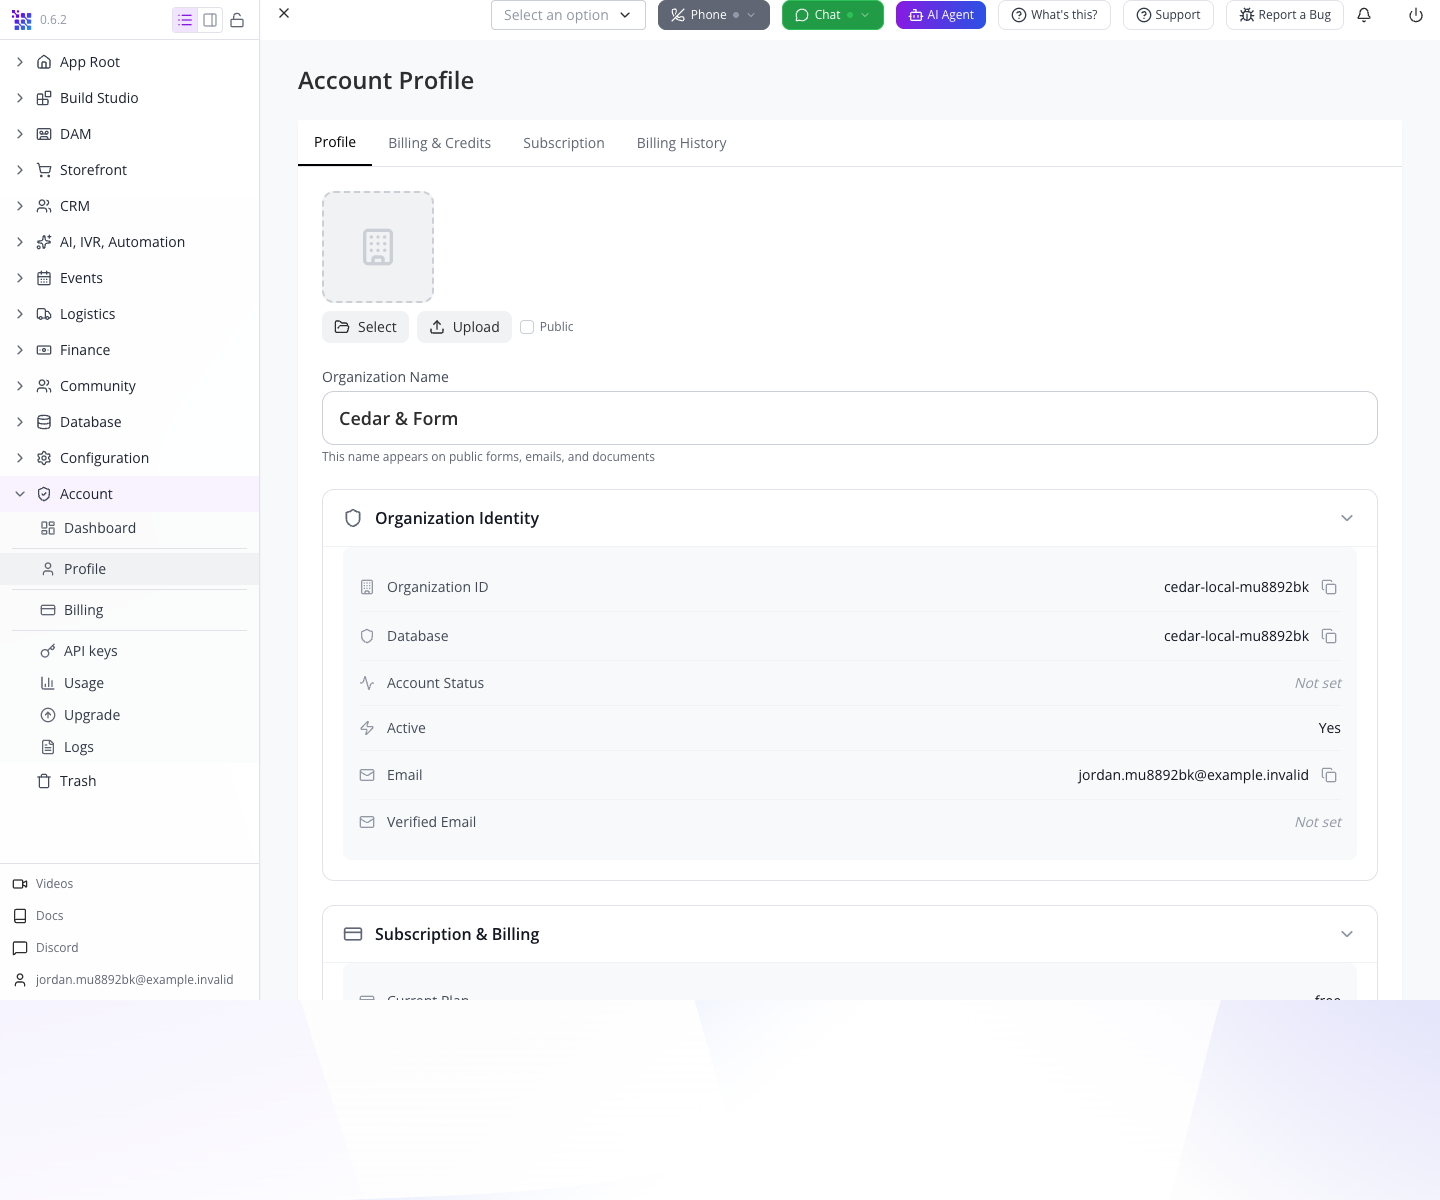
The heading is Account Profile. Stay on the Profile tab. In Organization Name, enter Cedar & Form, or your own business display name.
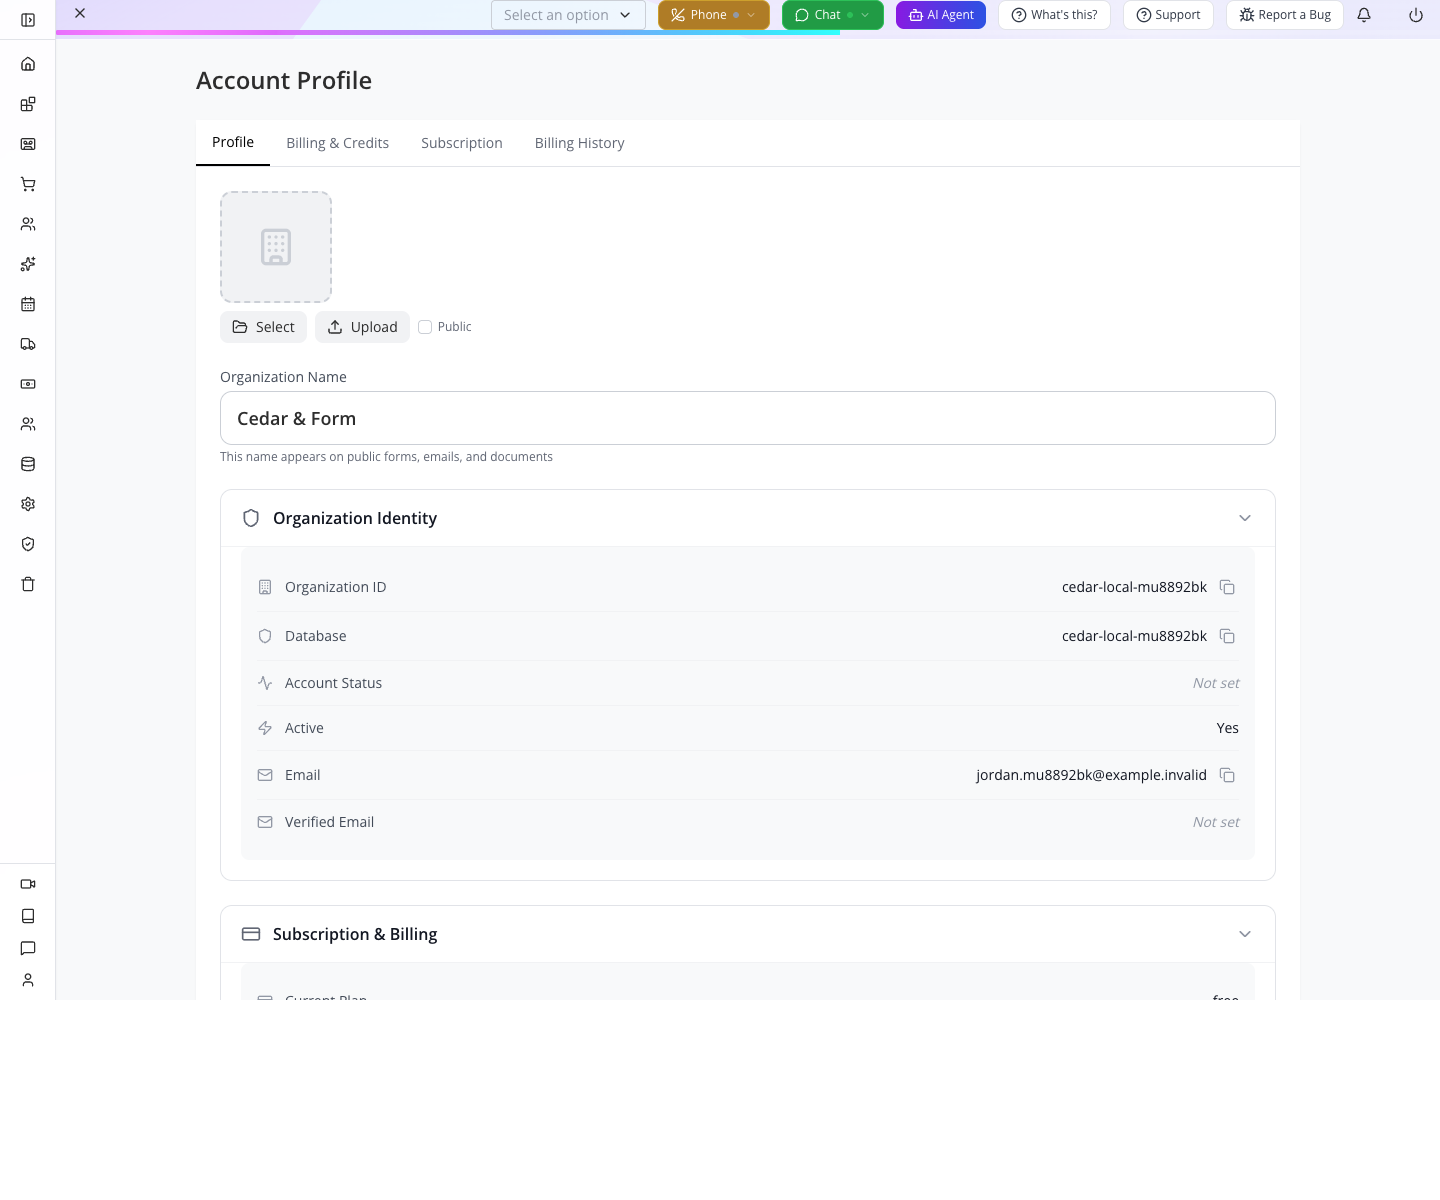
The hint below the field says this name appears on public forms, emails and documents. Under Organization Identity, read the organisation ID and account email. The ID remains the one from signup; saving the display name does not rename it.
The logo area offers Select for an existing file and Upload for a new one. You may leave it empty for this first exercise. Address, phone and location details are not fields in this organisation profile. Configuration → Business Locations is the separate operating-location area.
Use the submenu route. The Edit Profile shortcut on Account’s overview has previously opened a different user-profile page with User ID is required. Account → Profile reaches the company form shown here.
13. Select interests, then save
Scroll to Organization Details → Interests. For the Cedar & Form story, select:
- Website, blog, etc
- CRM, Sales, Leads & Ticket Support
- Booking, Event, Reservation
- Live Chat & AI Chatbot
Selected pills are filled blue. These describe your intended use; choosing Live Chat here does not provision a website chat widget.
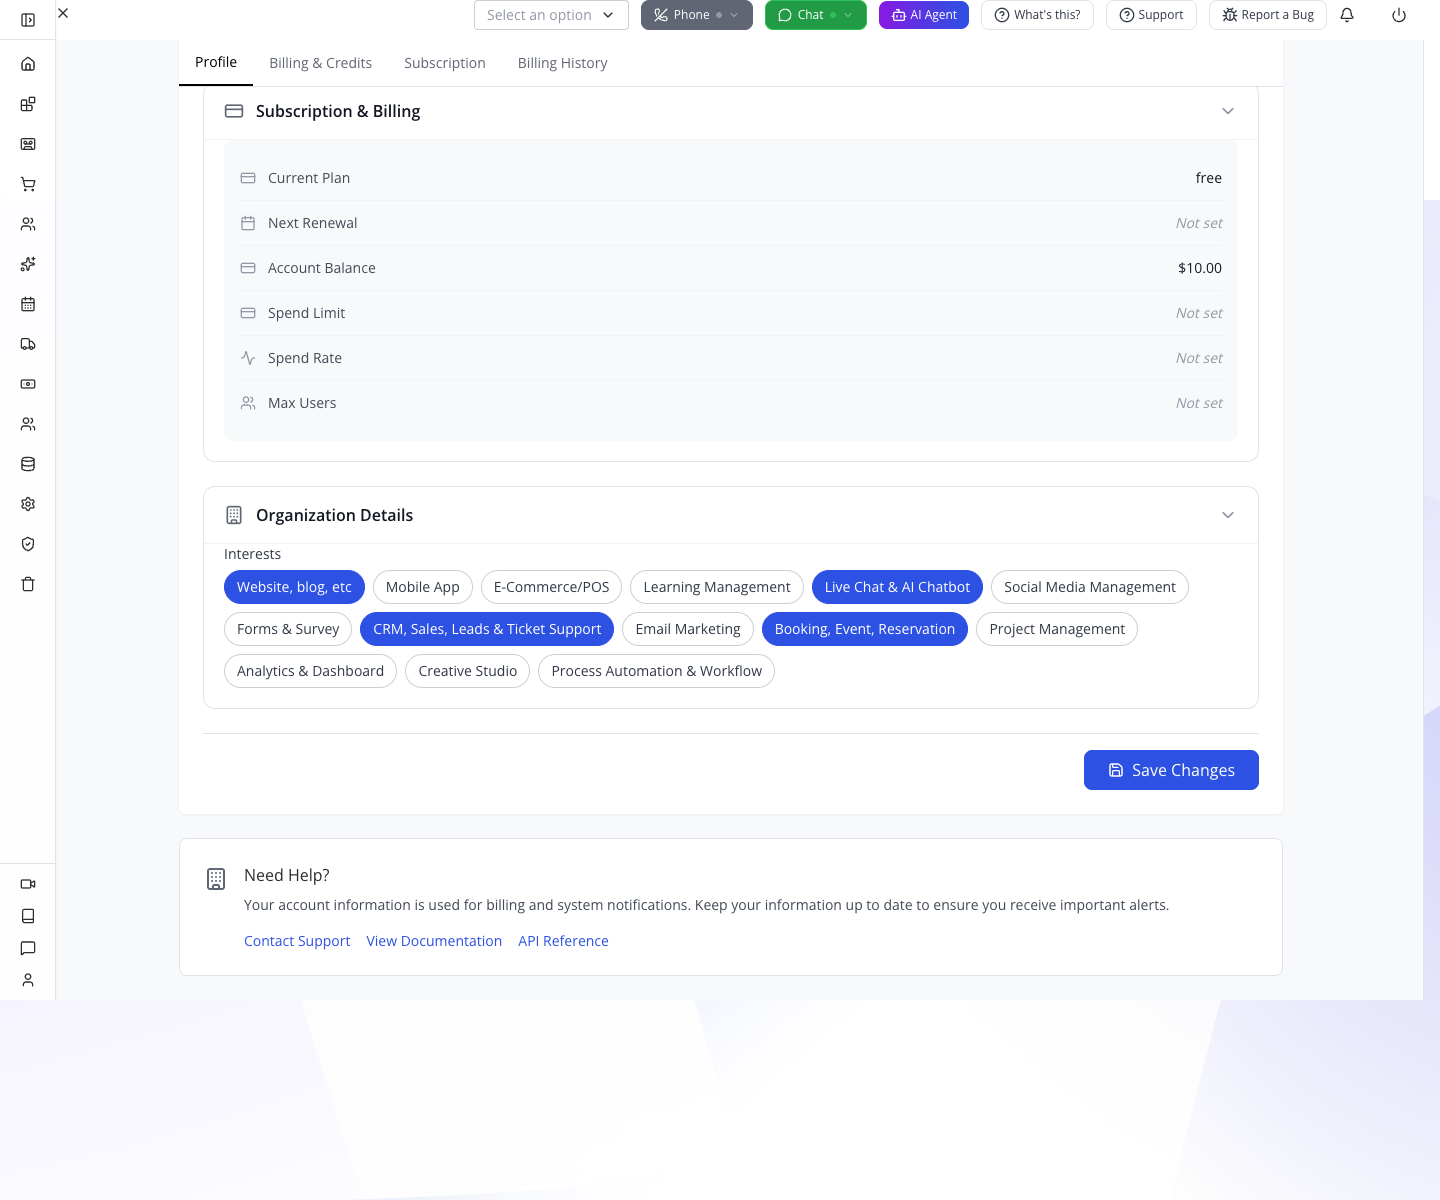
Select Save Changes. Wait until the button reads No Changes. Reload the page and check both the name and the selected interests.
The fresh profile saved and reloaded without the older capture’s toolbar-presence error. The name and four blue interest pills also survived sign-in in a new private browser context.
14. Find the site’s actual address
Select the App Root group name. Scroll to Active Site. If Nothing is loaded appears, press Choose a site, then select the site created at signup. Our only site was cedsite. This selects a website within the company. Find View public site beneath its name.
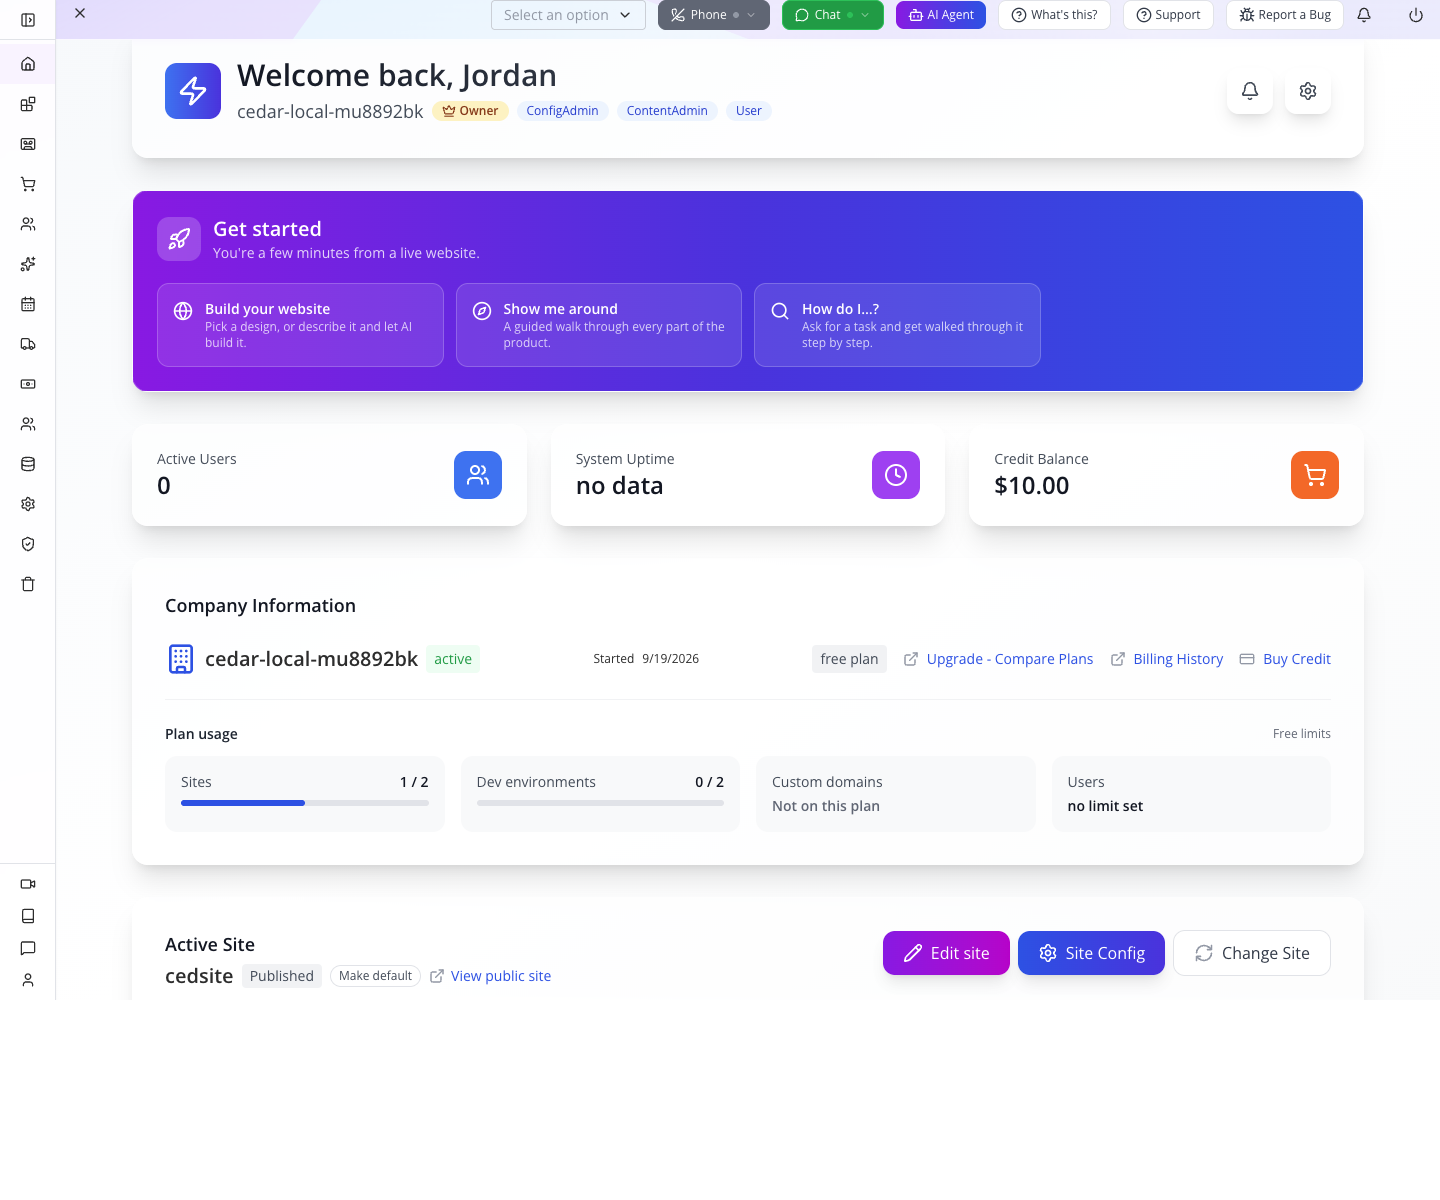
Use that supplied link. In this training organisation it points to https://cedsite-cedar-local-mu8892bk.site.appmint.app. Your own link will use your own site and organisation; do not construct it by copying our names.
Site Config edits the website’s settings. My Account chooses the customer-account layout and sections. Site Features lists capabilities such as Blog, Storefront, Live Chat, Support Tickets and Reservations. The feature list is configuration, not a to-do list you must turn on in full.
The card’s Published badge is not a check that your new page is visible. The website course saves a real page and opens it as a signed-out visitor. At this point you have identified the site and link; you have not built the Cedar & Form homepage yet.
Try it. Return to Account → Profile without using the browser Back button. Confirm the name, then use App Root to find the site again.
Check yourself. Did saving the display name change cedar-local-mu8892bk to cedar-and-form? No. The organisation ID stays the same. The display name tells people which business they are dealing with.
Part 4 — Get help and return with confidence
15. Use a short guide for a specific task
Open Support → How do I…?. The drawer groups tasks under Website, Selling, Customers, Messaging, Money & Plan and Setup. Its search field accepts the task you are trying to accomplish.
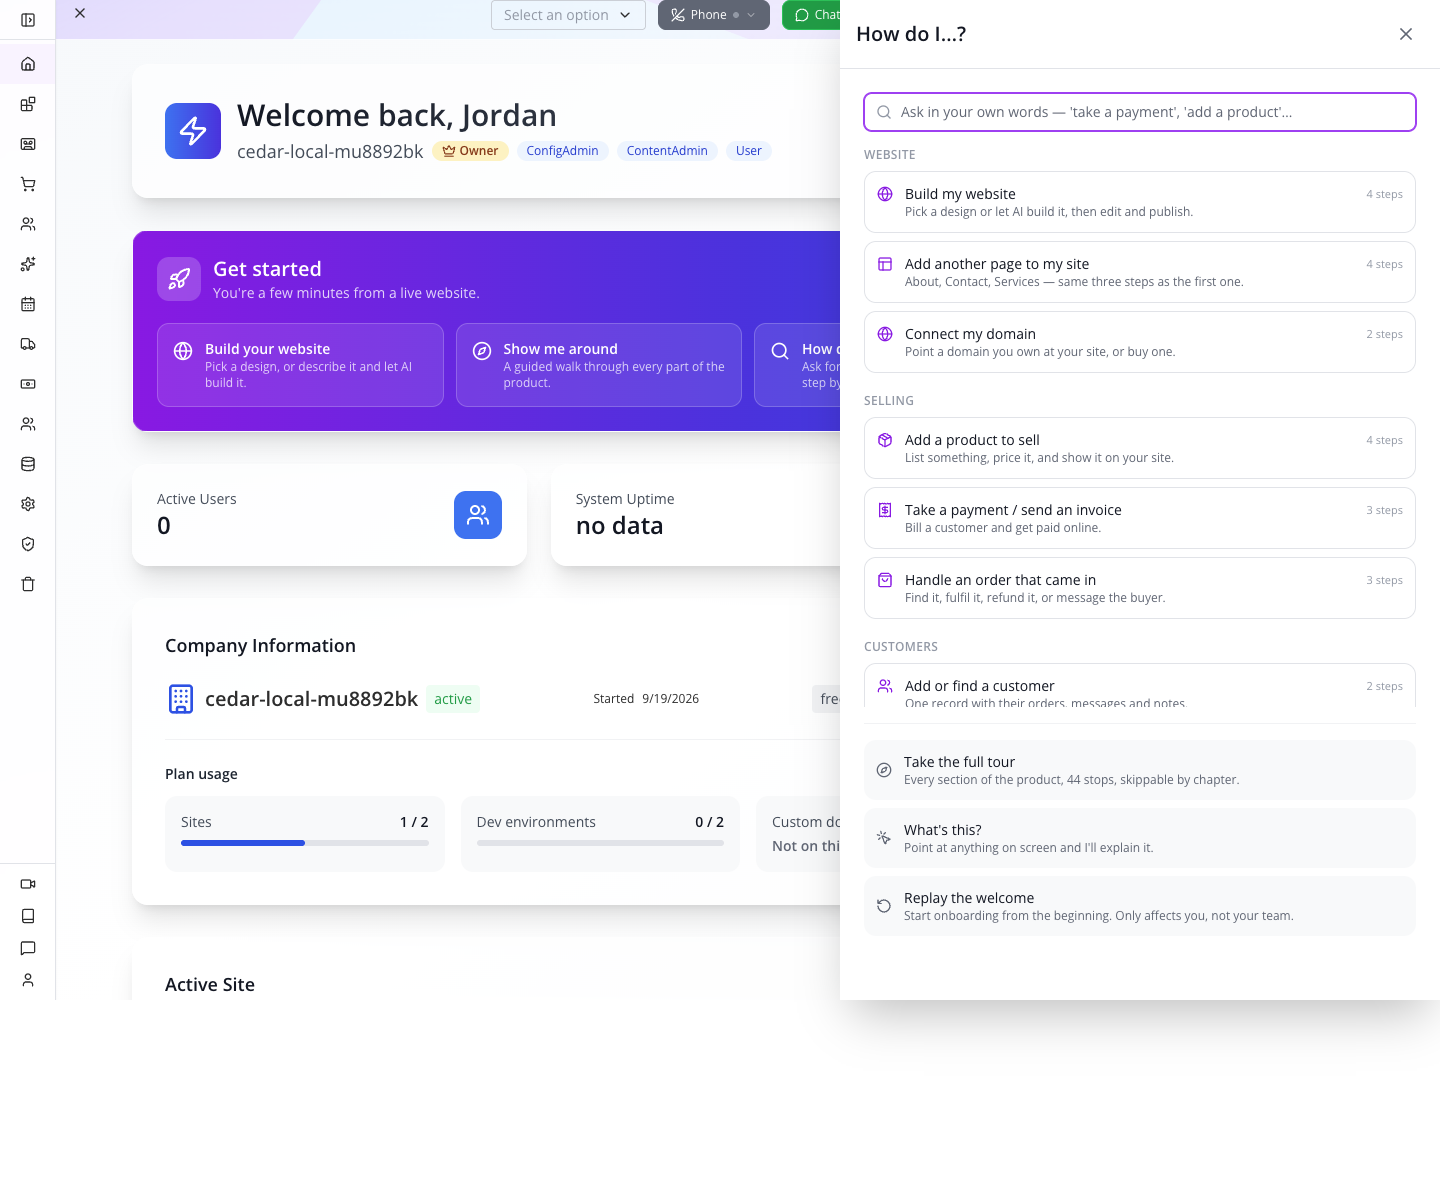
Select Invite my team under Setup. The short guide highlights the relevant interface controls. Select End after reading it; opening this guide does not send an invitation.
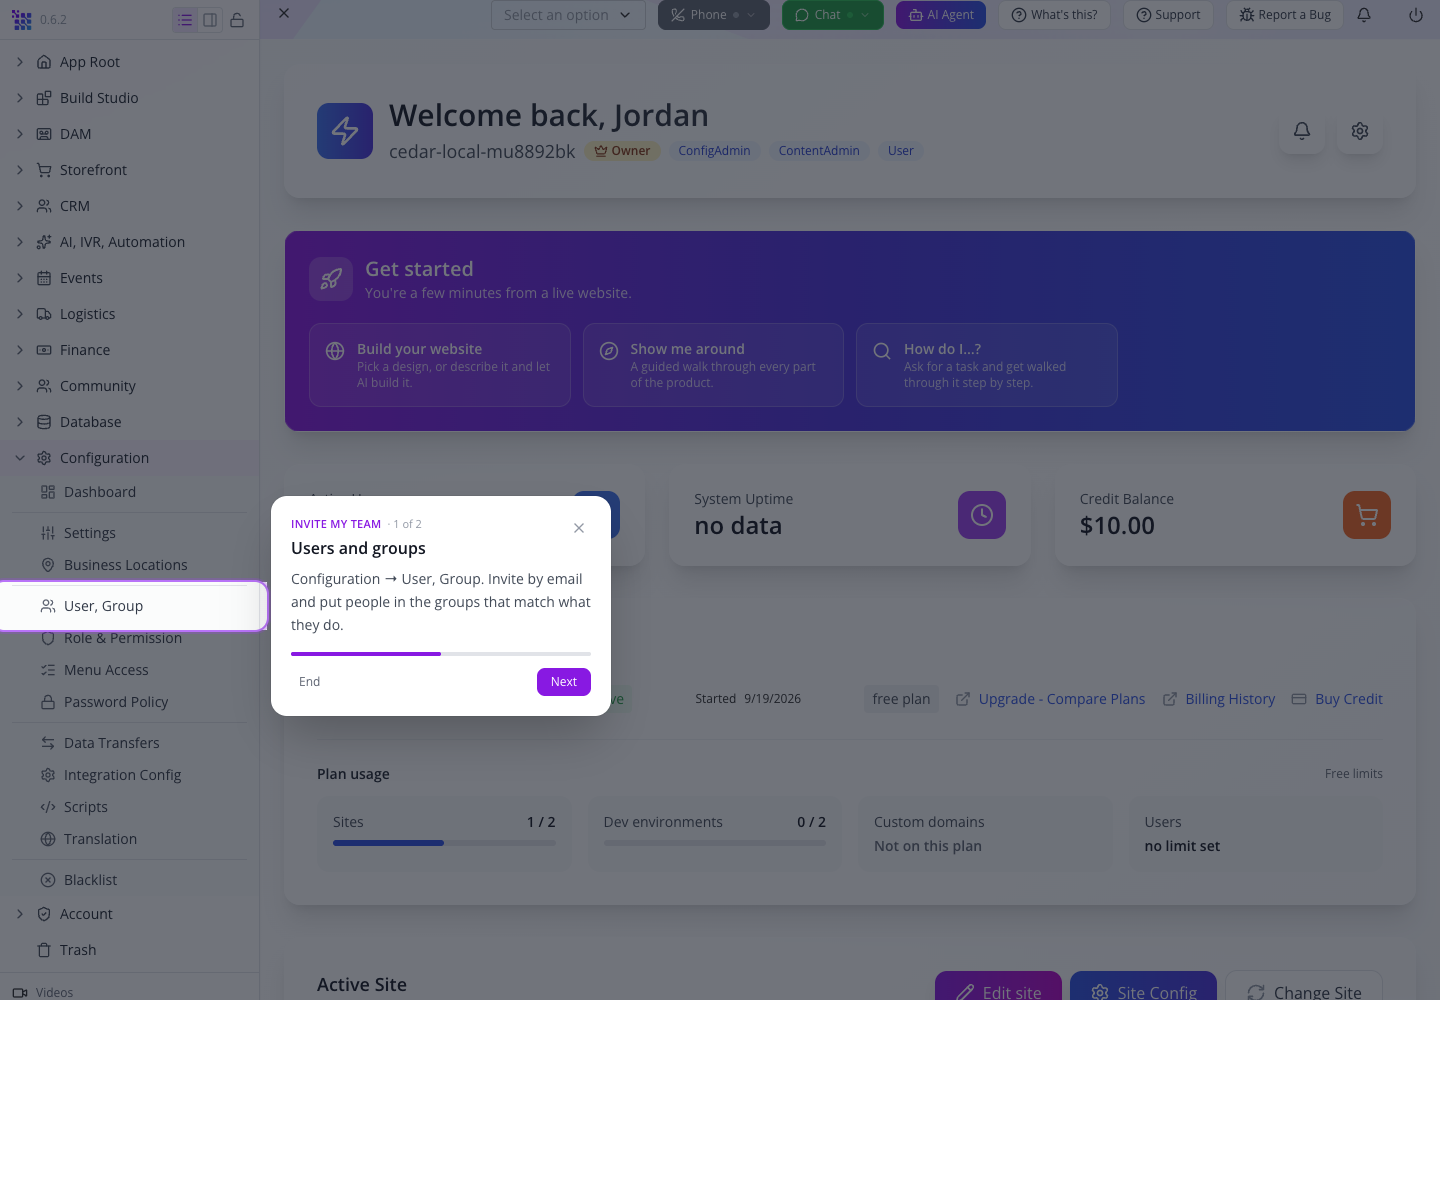
These short guides are separate from the 44-stop interface tour. Use one to reach the task at hand without replaying the entire product introduction. For an unfamiliar control, the toolbar’s What’s this? is the contextual-help entry.
16. Find the written documentation
Select Support → Documentation. In this rehearsal it opened Appmint documentation in a new tab.
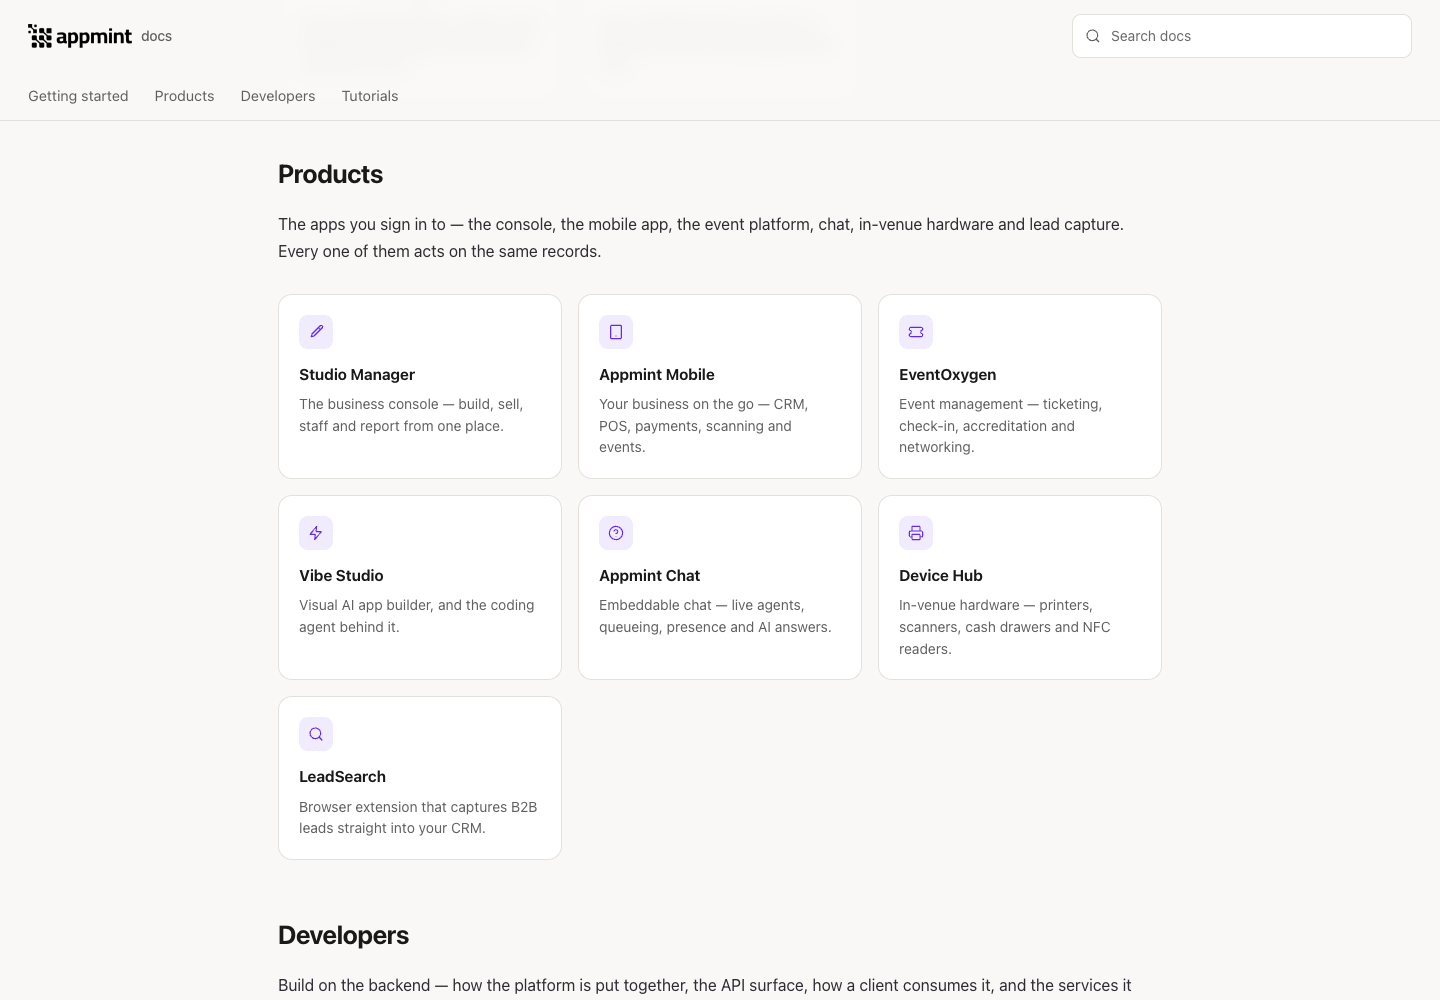
Use Getting started for platform concepts, Products for the application you are working in, Developers for APIs and integration details, and Tutorials for complete tasks. If you are connecting a custom client, begin with Developers; if you are configuring the mobile app, begin with Products.
17. Ask the team for help with a support ticket
Open Support → Submit Ticket.
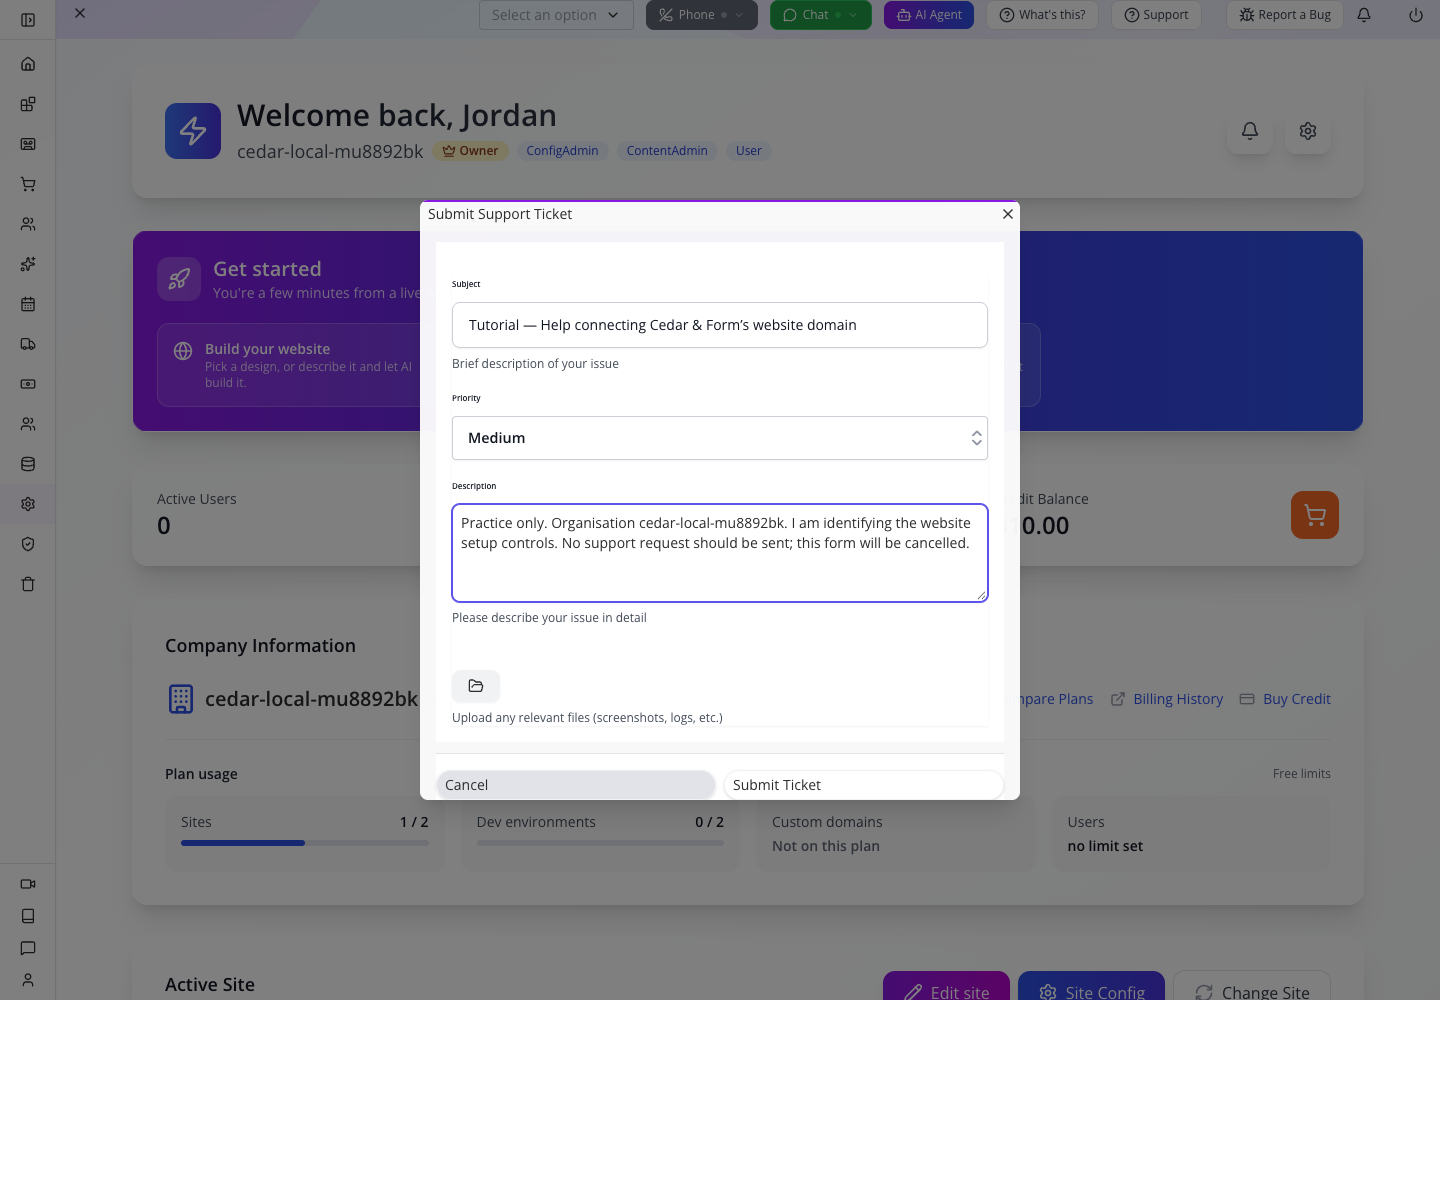
In Subject, state the task and obstacle, such as Help connecting Cedar & Form’s website domain. Keep Priority at the appropriate level. In Description, include your organisation ID, the screen, what you want to achieve, the action you tried and the result. Use Attachments for a screenshot if it helps; exclude passwords, API keys and customer secrets.
For this rehearsal, select Cancel. When you have a real request ready, Submit Ticket sends it to the team.
Select Support → Live Chat to open its separate support panel. For this rehearsal, inspect the panel and close it with × without starting or sending a conversation. If it reports Live chat is unavailable, close and retry later, or use Submit Ticket for a real request. The toolbar’s separate Chat control belongs to your business’s customer conversations.
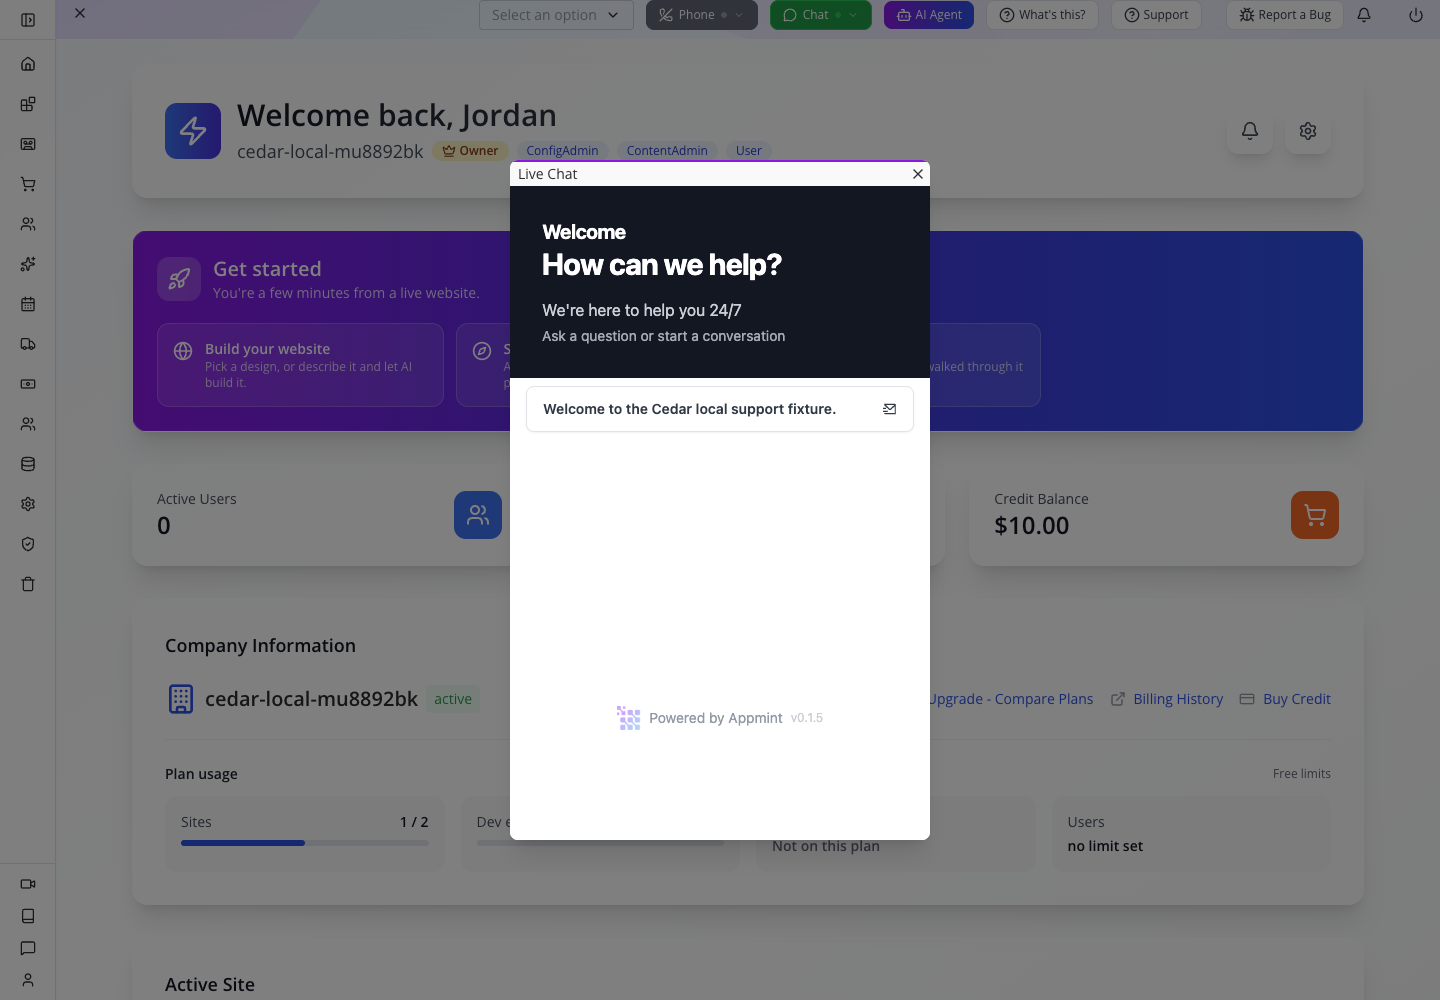 Local verification uses Cedar’s own chat configuration, clearly labelled as a fixture. This proves the repaired entry opens the widget; it is not an Appmint-team conversation or a delivery test.
18. Report a defect with enough information to reproduce it
Select Report a Bug in the top toolbar. This is separate from the Support menu.
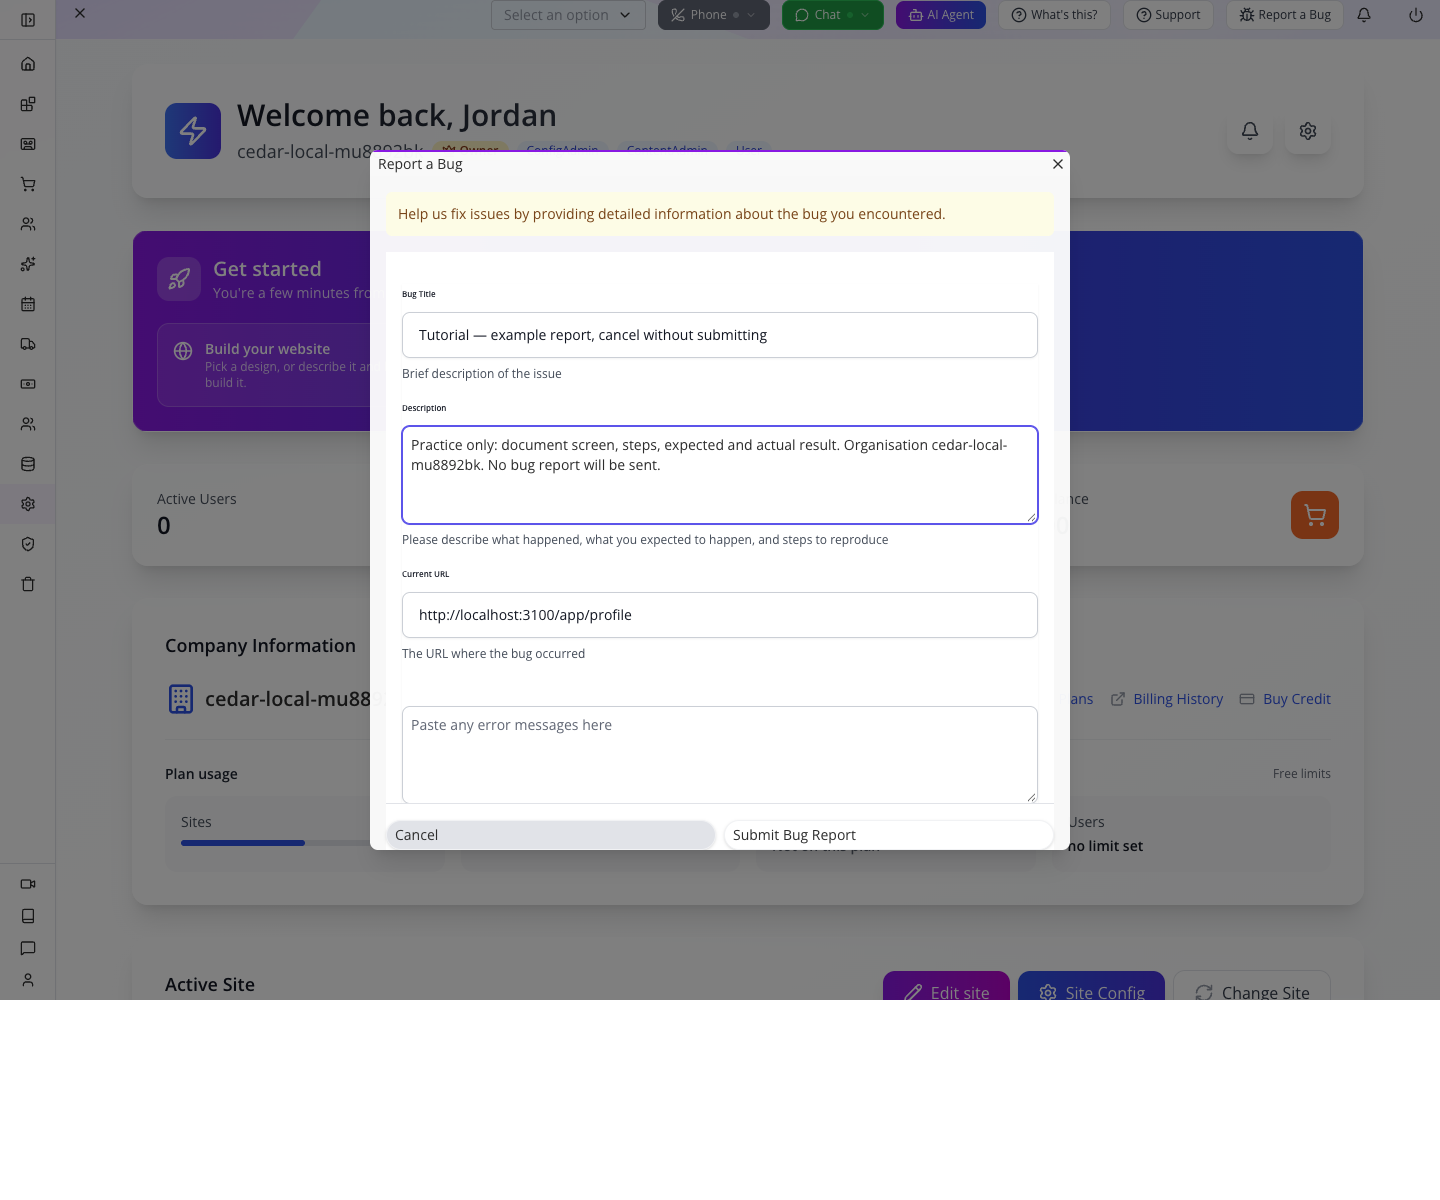
Use Bug Title for the exact problem, for example A button does not respond on the screen I am using. In Description, give the screen, steps, expected result and actual result. Include the organisation ID and any exact error text. Attach a relevant screenshot when useful. Cancel the training report; submit only the report you intend the team to receive.
If you need a capability Appmint does not have, tell the team through Support → Submit Ticket, or Support → Live Chat. We’re ready to build it for you at no extra cost. Describe who needs it, the work they need to finish and the desired result. An example of your current process helps the team discuss requirements and delivery.
19. Practise returning without the welcome page
Open a fresh private browser window and visit Studio Manager. Enter the email from signup and select Continue with Password.
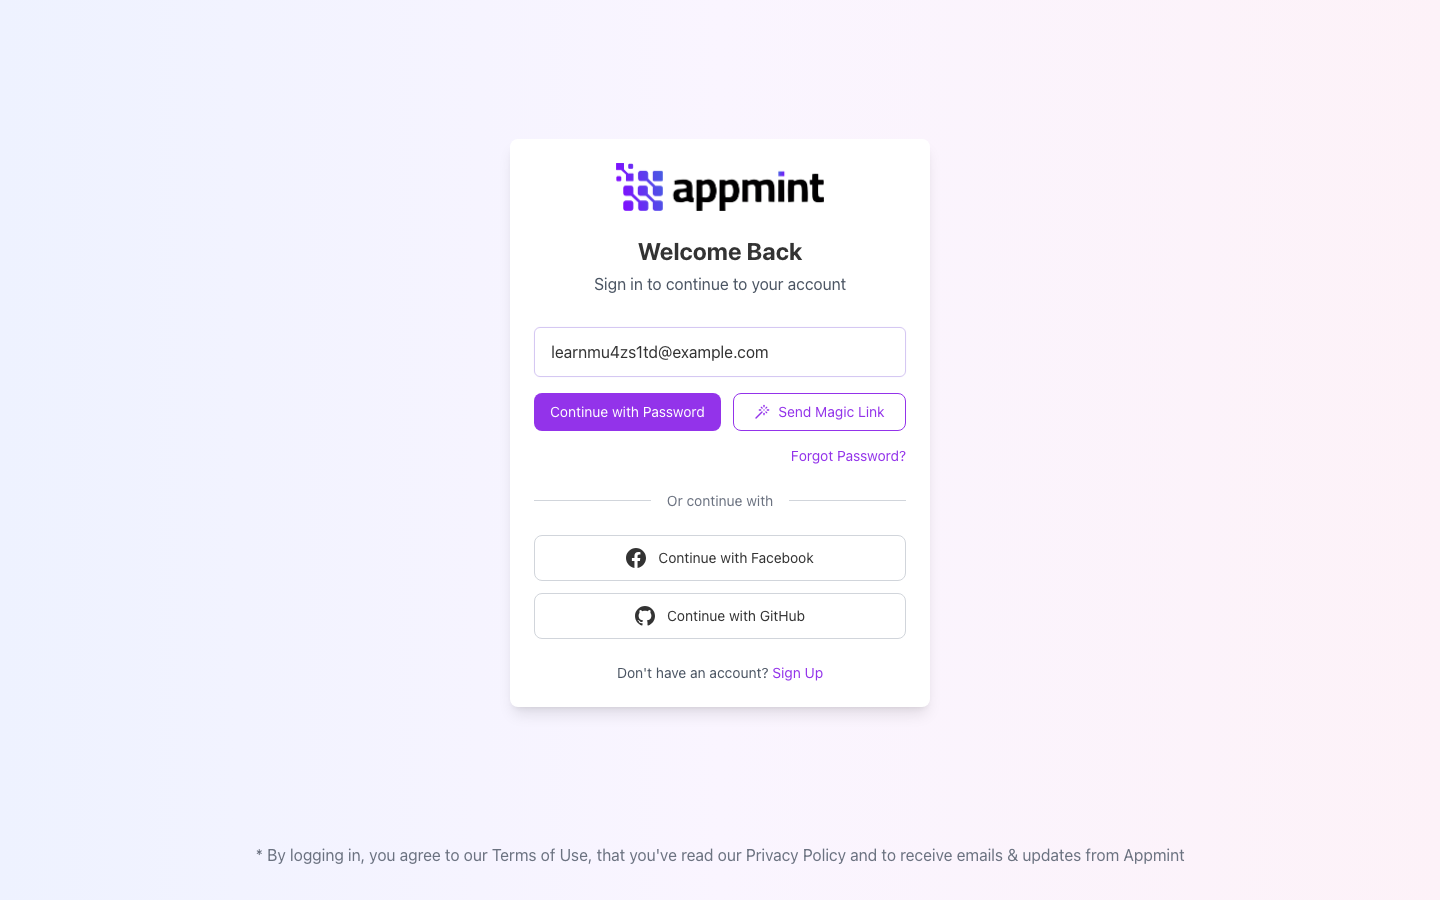
If Site Name is shown, enter your organisation ID without .appmint.app. On the fresh local run, the email identified one organisation and the password step displayed Signing in to cedar-local-mu8892bk automatically. Check that identity, enter your password and select Sign In.
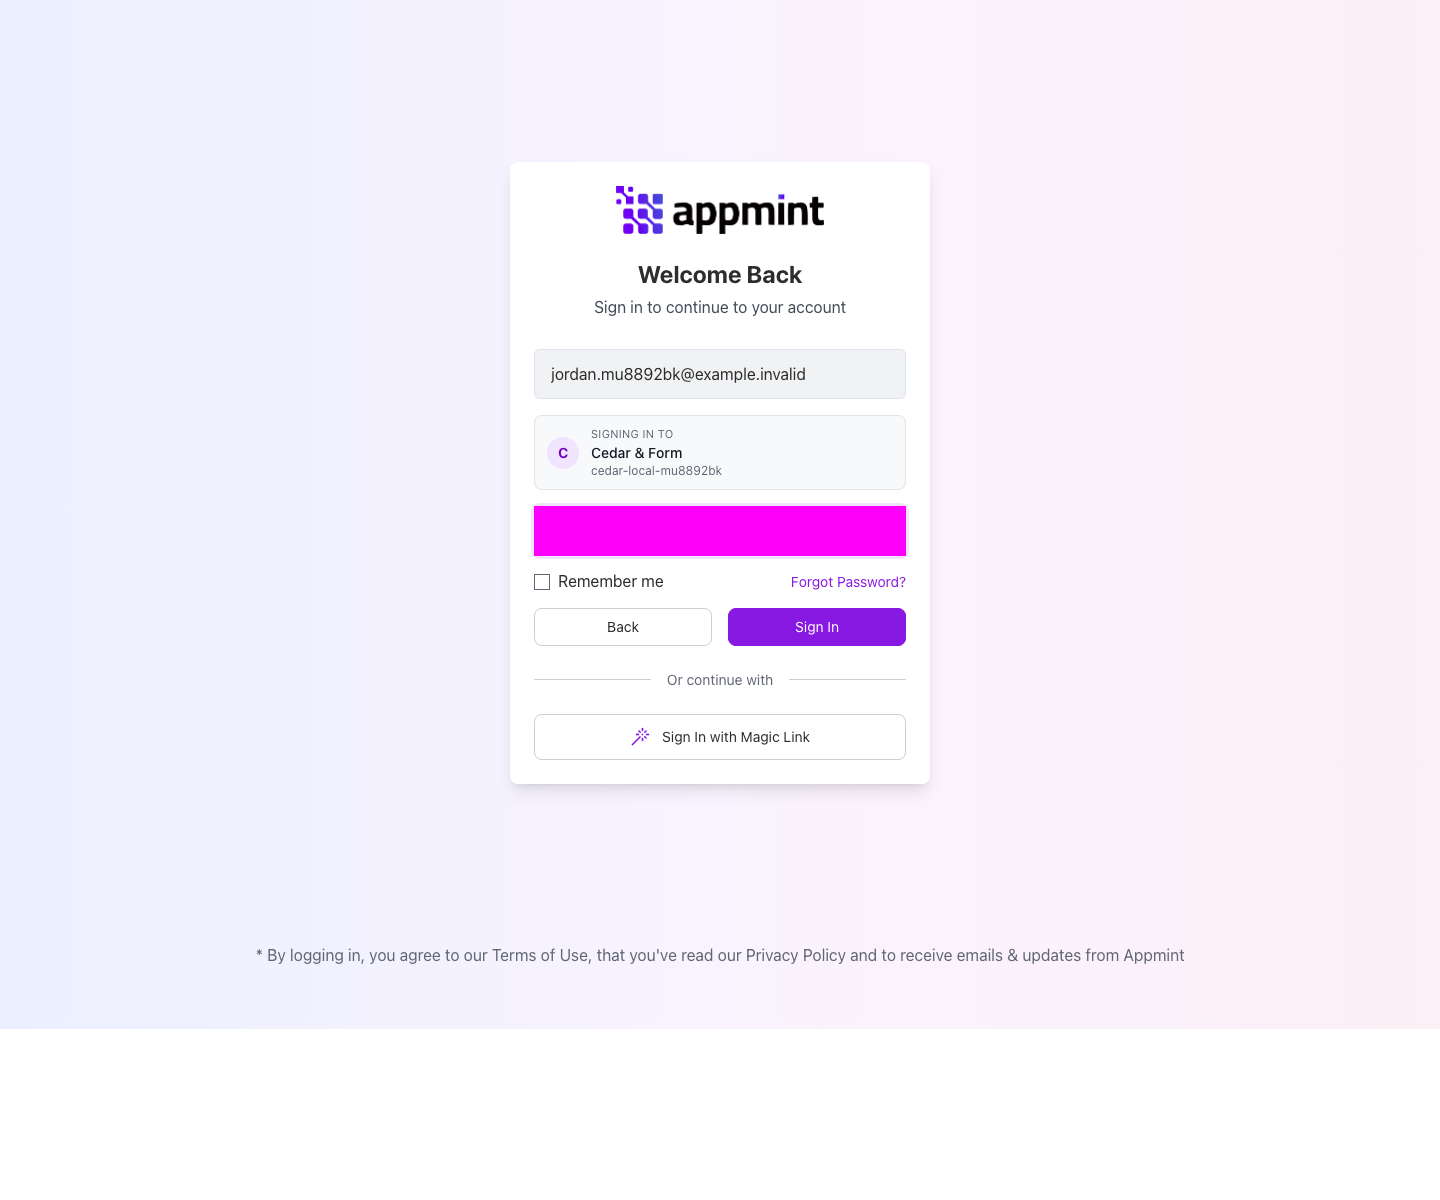
You should return to Studio Manager. Our fresh local account opened Home. Navigate to Account → Profile and check the business name you saved. You now know how to return even after closing the welcome tab.
A browser with remembered accounts can show an account chooser first. Select your company’s entry, or use the alternative sign-in route to enter its ID. If the company requires an additional verification challenge, complete the challenge displayed for your account; the password-only rehearsal shown here did not exercise that branch.
Part 5 — PRO orientation: Vibe, team access and custom clients
20. Understand the separate Vibe entry
Vibe Studio is the separate production building environment. This section is an orientation, not a required application-building step. If you created your account in production, its sign-in uses that production identity. A local tutorial account belongs to the local backend; do not submit it to production Vibe. The fresh local walkthrough inspected only Vibe’s public login page.
The following screenshots preserve the earlier production rehearsal: the same production email, organisation ID and password were used there.
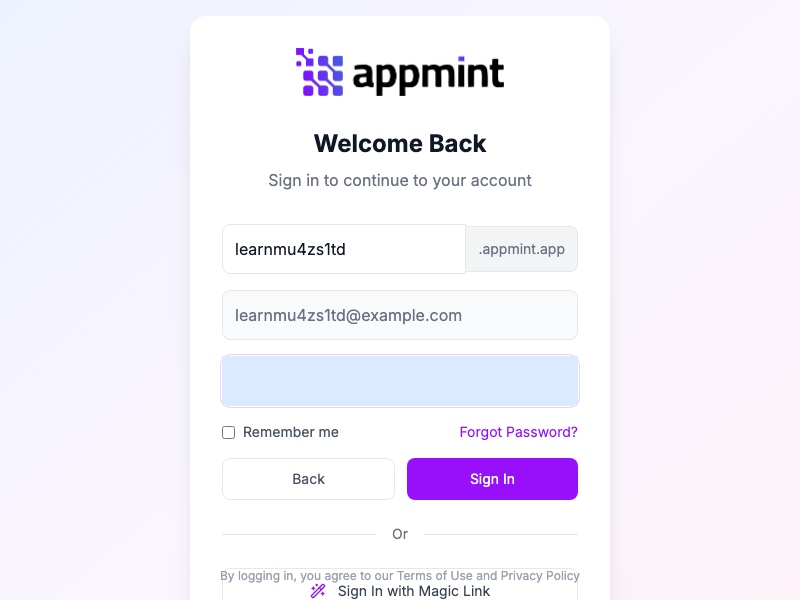
In that earlier production rehearsal, Sign In opened a Start screen headed Build your ideas with Vibe.
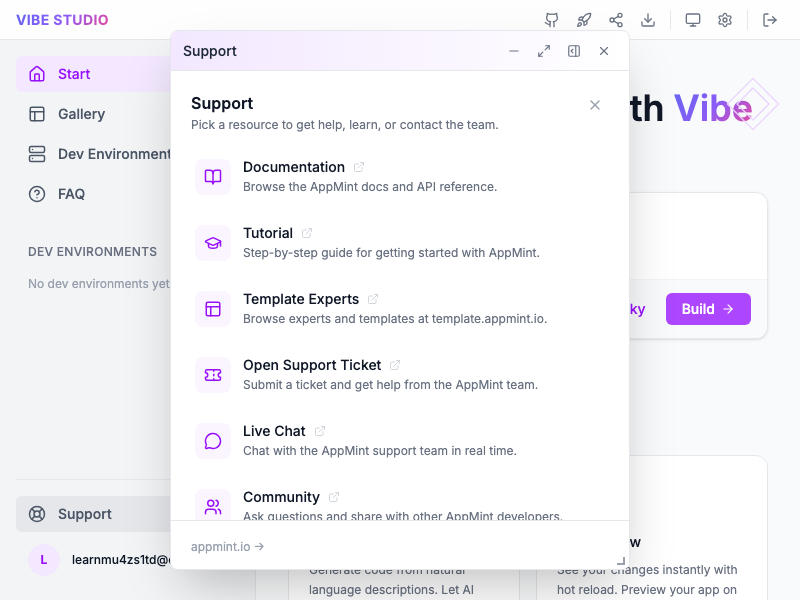
That captured Start screen contains Describe your idea… and Build. Below it are template starting points, including SaaS Landing Page, Creative Portfolio, Restaurant & Dining and E-Commerce Store. Its sidebar contains Start, Gallery, Dev Environments, FAQ and Support.
That earlier account showed No dev environments yet. That means sign-in worked; it does not mean an application has been generated. Leave Build for the Vibe course, which creates and inspects a deliberate project.
Choose the next setup by the job
| Your next job | Continue with |
|---|---|
| Give the business a useful public website | Build a business website |
| Follow an enquiry through sales and project work | Turn an enquiry into a project |
| Invite staff with appropriate access | Roles, groups and permissions |
| Work on a phone or tablet | Appmint Mobile welcome |
| Give employees a mobile softphone | Employee phones and mobile CRM |
| Build a custom API client | Connected web or mobile client |
Team access uses invitations and groups. The company profile is not where you grant permissions. A custom client needs the AppEngine authentication and organisation context appropriate to its users; do not put your staff credentials into a customer-facing website.
If something goes wrong
| Symptom | Check | Next action |
|---|---|---|
| Create account remains disabled | Address availability and required fields | Choose a valid available name, complete names and matching passwords |
| An existing email still enters signup | Whether you meant to register or return | Deliberately use Sign In for the company you already created |
| Sidebar shows only icons | Expand control at its top | Expand it to read the group labels |
| Clicking Account shows an overview, not the profile | Group name versus chevron | Expand Account and select Profile |
| Profile shortcut says User ID is required | Which profile route you used | Use Account → Profile for the company form |
| Name is saved but a status toast appears | Reloaded profile and selected interests | Confirm the profile separately from the toolbar-presence error |
| Live Chat reports unavailable | The message in the support panel | Close and retry later, or use Submit Ticket for a real request |
| Wrong company appears after sign-in | Organisation ID used in Site Name | Return to sign-in with your company’s exact ID |
| Active Site says Nothing is loaded | Whether the signup site is listed | Press Choose a site and select it. If the chooser is empty, give support the organisation ID and screenshot. |
| You only want the tour again | Replay versus organisation reset | Use Interface tour or How do I; leave Reset onboarding alone |
What happened behind the scenes
For developers: why the distinctions matter
Signup UI: appmint.io/src/components/signup/Register.tsx. Fresh local email signup proceeded through availability, account creation and welcome without an email-confirmation challenge. The existing-email note preserves an earlier production observation; this local run created a new owner.
Company profile: websitemint/packages/ui/src/account/org-profile-form.tsx. It saves business name, logo and interests separately from the signup ID. Navigation: packages/ui/src/ui/sidebars/links.ts and left-sidebar.tsx. Tree and flyout modes place the expansion control differently; the footer email opens user profile.
Support: packages/ui/src/ui/header/support-menu.tsx. Short guides and the personal replay are in components/onboarding/help-center.tsx; broad setup reset is in components/setup-wizard/getting-started.tsx. Do not assume two controls named around onboarding have the same scope.
Where next
Continue with Build the Cedar & Form website. Keep this account and site: the next course gives the website a useful page and checks what a visitor actually sees.
For filming, use the companion-video production guide.
Capture evidence and limits
Fresh local browser walkthrough, 19 September 2026: actual marketing signup at localhost:4050, Studio Manager 0.6.2 at localhost:3100, and local AppEngine. The learner created cedar-local-mu8892bk through the visible signup form with its own reserved local test email, Jordan Morgan identity and a new password. Signup opened welcome directly; no email challenge occurred. This establishes local account creation and password sign-in, not external inbox ownership or email verification.
Completed: copy sign-in address/organisation ID; read six capability cards and Learn links; tour Next/Back/End; Setup Wizard and sidebar; save Cedar & Form and four interests, then reload; choose the provisioned cedsite and inspect its supplied address; navigate back to profile and site; open/end Invite my team guide; open documentation; fill/cancel support and bug forms; open the repaired Live Chat panel without sending, and verify its unavailable/retry state using a controlled local failure. A second empty browser context signed in and read back the saved name and four interests. No payment details or paid plan were required.
The welcome Studio address and Open link now honor the environment configuration; a fresh browser check clicked through from local marketing to local Studio. The check restored non-secret welcome data after the browser crash without repeating signup. Vibe remains a separate production address. Vibe's public login was inspected without credentials; its authenticated screenshots above are explicitly historical production evidence, not a fresh local pass. The earlier production account was learnmu4zs1td, with its original capture ledger in assets/appmint-welcome-verified/evidence.json.
No service activation, invitation, support ticket, bug report, Vibe build or production authentication was submitted in the fresh run. The site address was inspected; a signed-out visitor page is the website course's separate task. No OAuth, MFA, email delivery or public-site publication was tested. Fresh execution record and evidence.