
Who: owners and administrators onboarding colleagues. Time: 45–60 minutes, plus a separate colleague test. Level: beginner configuration, then permission checks. Product: Appmint Studio Manager. Checked: local Studio 0.6.2, 19 September 2026. Example: Copper Kettle, owner Ada Okafor and colleagues Nora Ellis and Maya Ito.
Verification: role/group creation, invitation acceptance, allowed operations, visible Delete refusal, approval and fresh-session revocation have passed locally. Account lock/unlock, fresh sign-in refusal, existing-session refusal and local socket disconnection/recovery have also passed. Locked-user list status, active counts, reload persistence and recovered CRM access have also passed. All required course actions are locally verified.
What you will have at the end
You will understand the difference between permission verbs, visible screens and group membership; create an explicit role definition; save two job groups; invite a colleague into Sales; and know how to test a grant, a refusal and a later change.
You will also learn why an administrator’s broad access is unsuitable for testing a colleague’s restrictions, why a saved group card can disagree with the user record, and how to report the exact failed action without repeatedly resubmitting it.
Configuration, membership addition/removal and Nora’s actual invitation acceptance have been recorded. A restricted session opens Leads. An allowed save, direct-address refusals, an approval decision and a fresh-session access revocation have also passed. The repaired server and browser now refuse Delete and keep the practice record visible.
What you need
- Your owner account from Welcome to Appmint. Keep that account in its normal browser.
- A second browser profile and an accessible email inbox controlled by the colleague or your test team.
- A harmless enquiry record from the CRM course for a later edit test.
- A short description of the job. In this example: “Follow up enquiries; read, create and update lead records; do not administer the team.”
The primary screenshots below use 0.6.2. The earlier 17 September production rehearsal used 0.6.1, with older forms. The differences are explained near the relevant steps; do not combine the two interfaces into one click sequence.
The story
Ada wants Nora to work the enquiry pipeline. An owner login would also let Nora administer unrelated parts of the company. Ada defines the job, puts that definition in a Sales group and tests Nora’s own account before relying on the access.
flowchart LR
    A[Job: follow up enquiries] --> B[Role: actions and screens]
    B --> C[Group: Sales]
    C --> D[Named colleague]
    D --> E[Test permitted work]
    D --> F[Test refused work]
    E --> G[Recheck after any access change]
    F --> G
There are three different questions to answer:
| Question | Control | Example |
|---|---|---|
| What actions are intended? | Role content/component permissions | Read, Create, Update |
| Which screens should be offered? | Role Menu access | CRM → Leads |
| Who holds that job? | Group membership | Maya belongs to Sales |
A menu restriction is not a per-collection security rule. A role name such as LeadEditor is only a name; it does not automatically scope every server request to lead records.
Part 1 — Define the role before adding people
1. Open Role & Permission
Expand the chevron beside Configuration, then select Role & Permission. Selecting the group name itself opens the Configuration dashboard; the chevron exposes its child links.
The Role & Permission Manager lists system roles and custom roles. Select New Role.
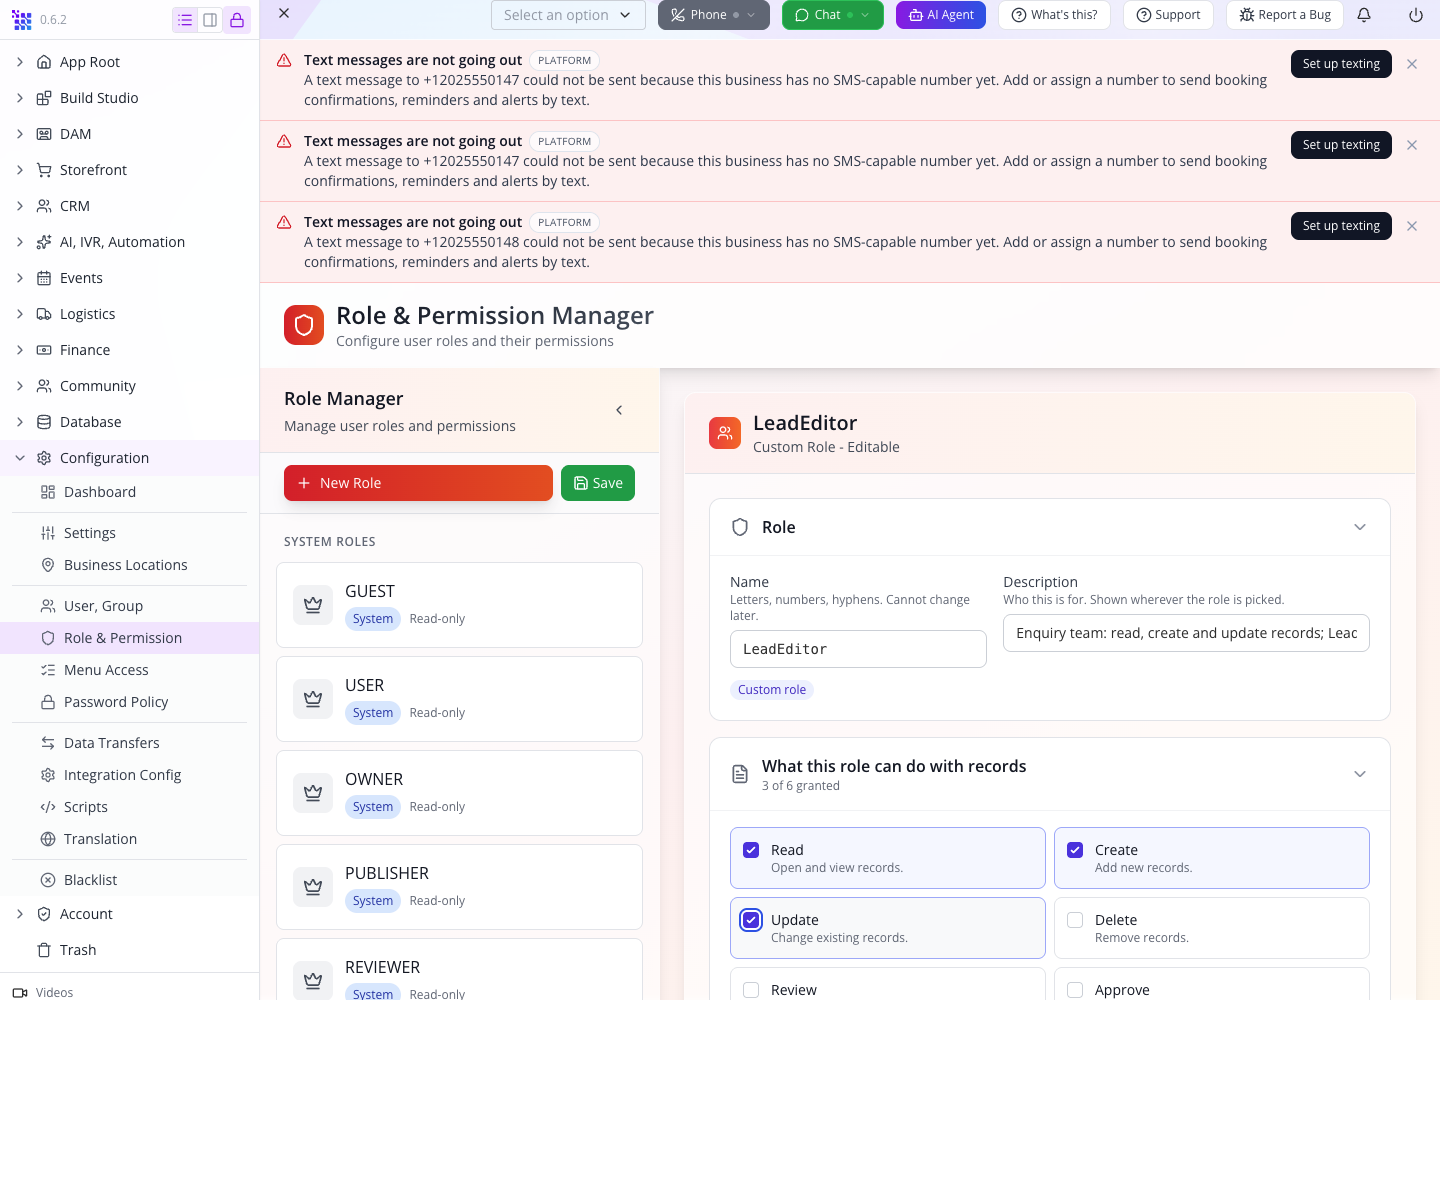
If the sidebar is reduced to icons, select its Expand sidebar control first. The course’s local session initially used a narrow window and this collapsed view; it was not a missing Configuration module.
2. Give the role a stable name and a useful description
Enter:
| Field | Value |
|---|---|
| Name | LeadEditor |
| Description | Enquiry team: read, create and update records; Leads screen only. |
The name is an identifier. Use letters, numbers, hyphens or underscores, and avoid spaces. The description tells a future administrator why the role exists. Changing the description is easier than discovering later that two similarly named roles mean different things.
3. Select the record actions
Under What this role can do with records, select Read, Create and Update. Leave Delete, Review and Approve unselected.
- Read supports opening records.
- Create supports adding a new enquiry.
- Update supports correcting or progressing an existing enquiry.
Leave What this role can do on pages clear for this example. Page component actions are a different responsibility from following up an enquiry.
You should see: 3 of 6 granted for record actions. The permission verbs and visible screens are separate controls; choose both deliberately.
4. Select the Leads screen explicitly
In Menu access, keep the Appmint tab selected. Find the CRM section and select Leads, whose displayed route is /leads.
Some section headings and common dashboards remain visible in a narrow colleague session. A heading is not proof that the colleague can open every destination beneath it; test the actual destination in Part 4.
Do not select the whole CRM group when the intention is one screen. The panel also has a Business Made tab because a role record can carry menus for both applications. Leave BusinessMade choices out of this Appmint example unless the job needs them.
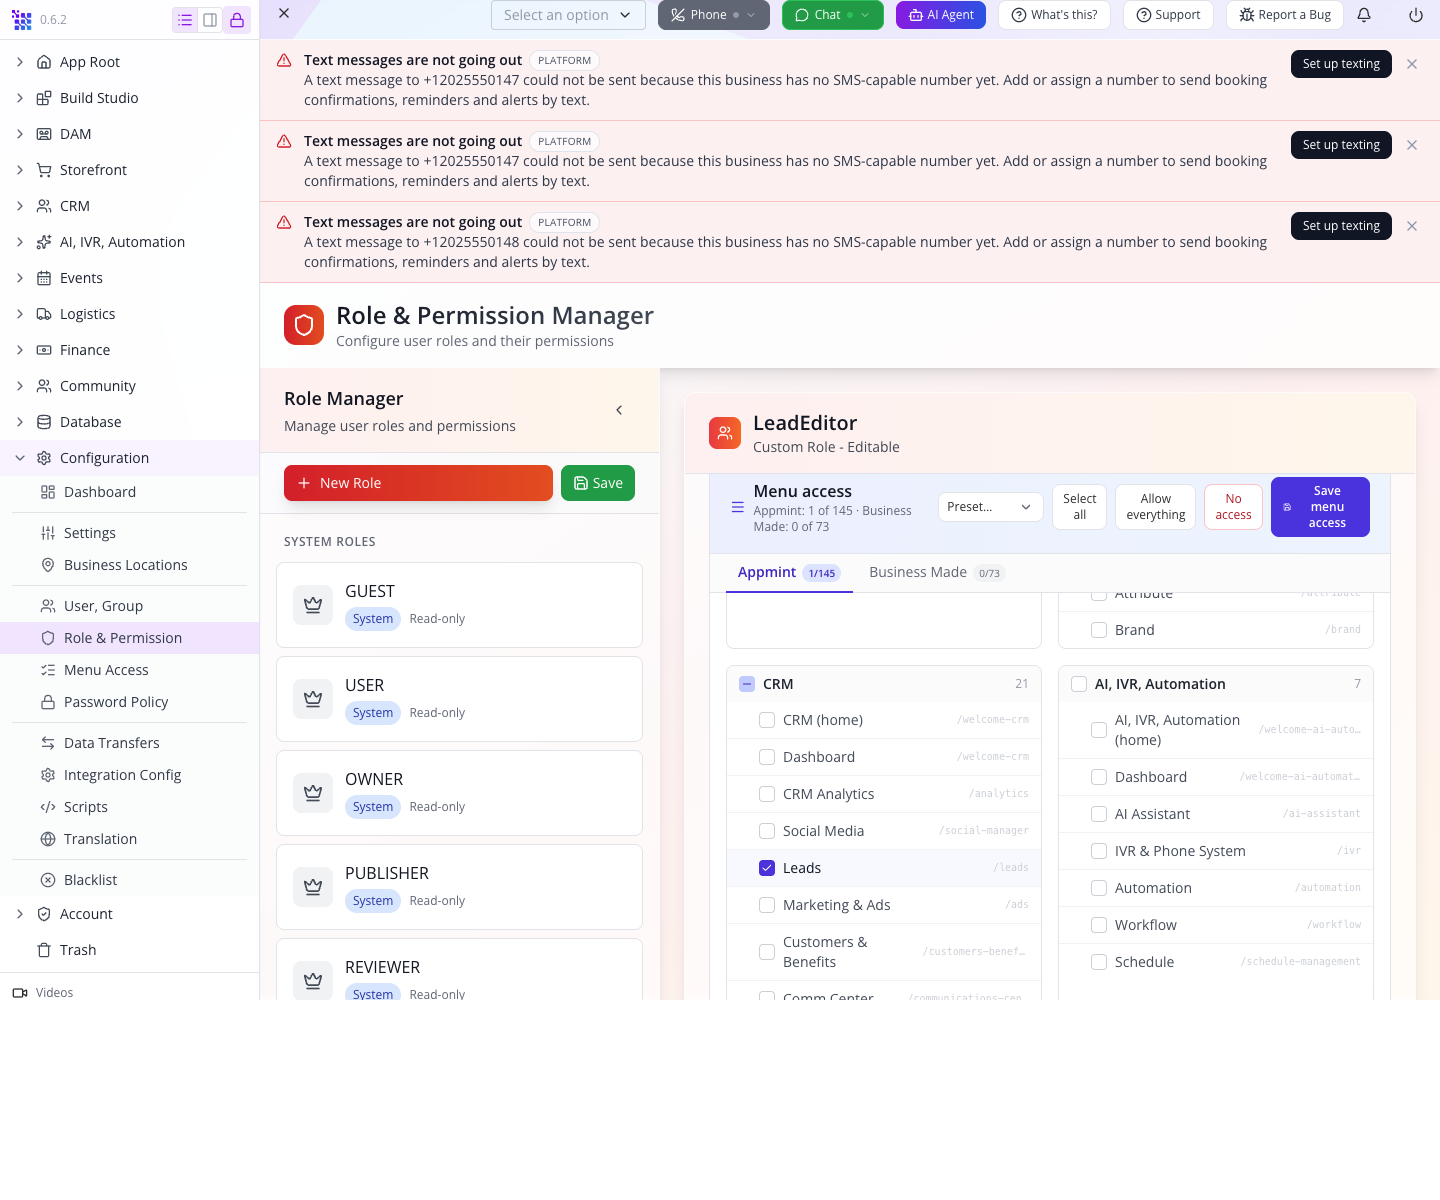
Three different menu states: Allow everything means unrestricted menus; selecting specific entries creates an allow-list; No access is the explicit no-screen choice. Clearing every selected link is not a reliable way to mean “deny everything”. Read the panel’s summary before saving.
5. Save the role, then reopen it
Select Create role at the bottom. After saving, reload the page and select LEADEDITOR under CUSTOM ROLES. Read back its name, record actions and menu selection.
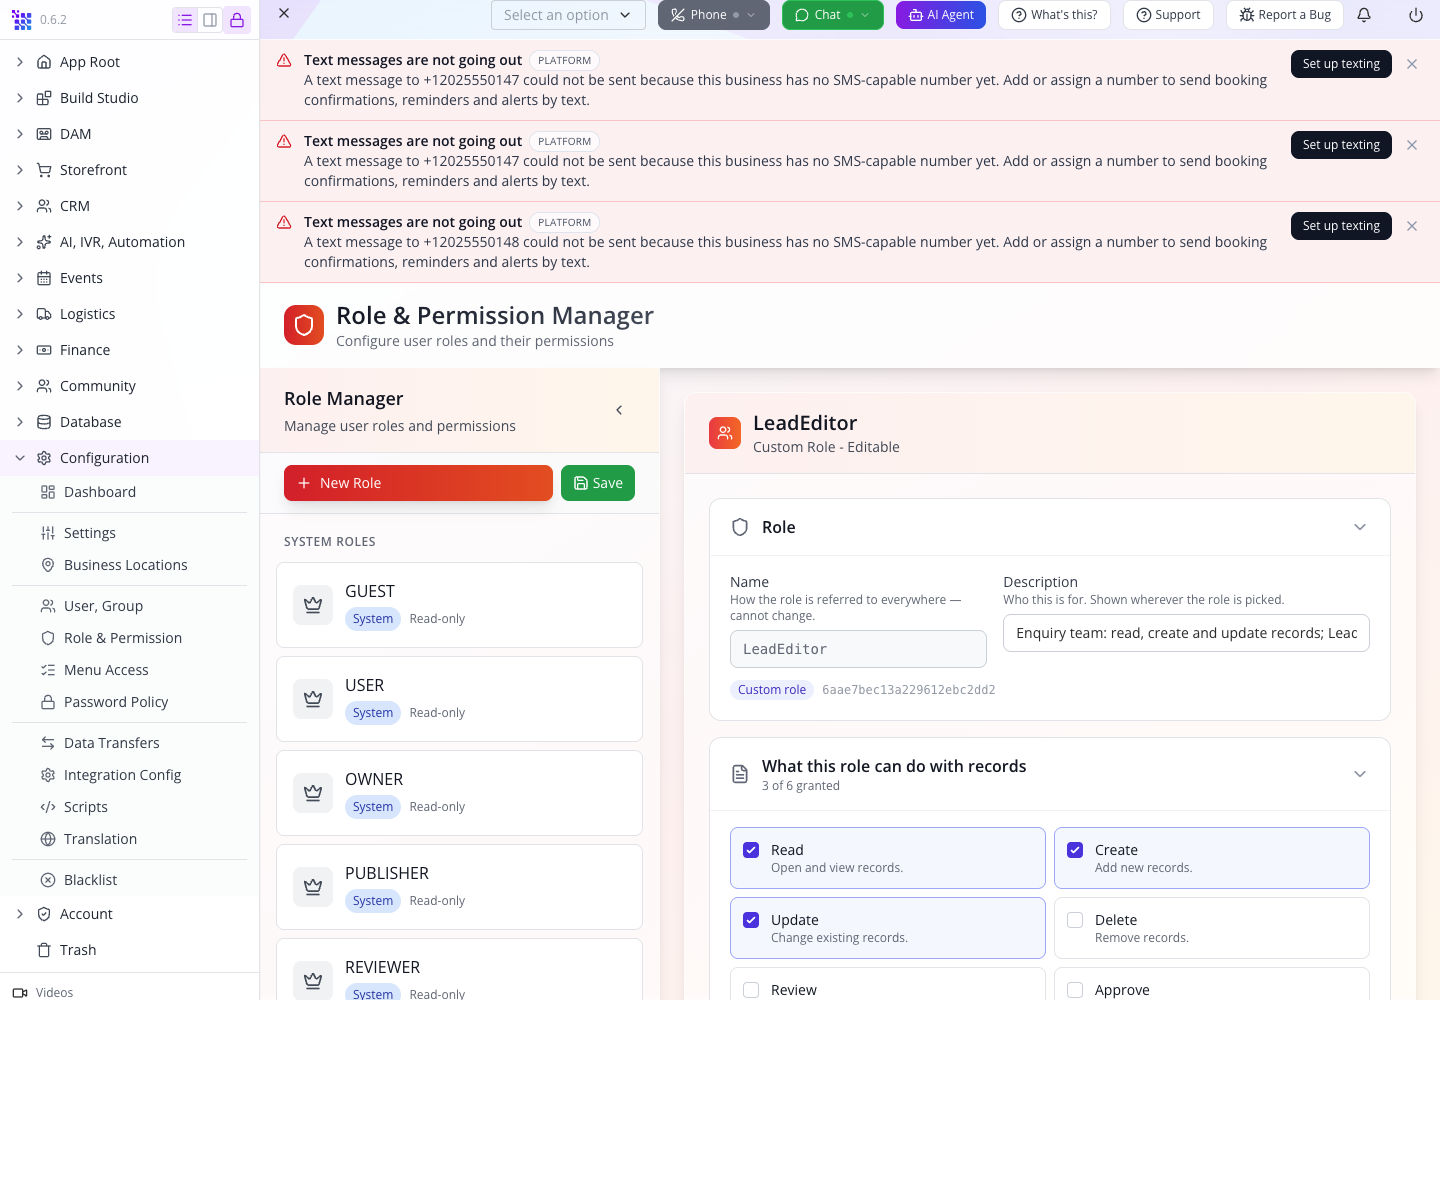
You should see: an editable custom role with the saved choices. Reopening verifies the saved definition before you connect it to a group.
Historical interface reference: 0.6.1 opened a floating User Role form with Name, Description, Type, Content, Component, Menu Include and Menu Exclude. Its menu options were older categories such as CRM, not the current /leads entry. The production rehearsal saved read/create/update with CRM, then reopened it. That broader category is not equivalent to a Leads-only menu.
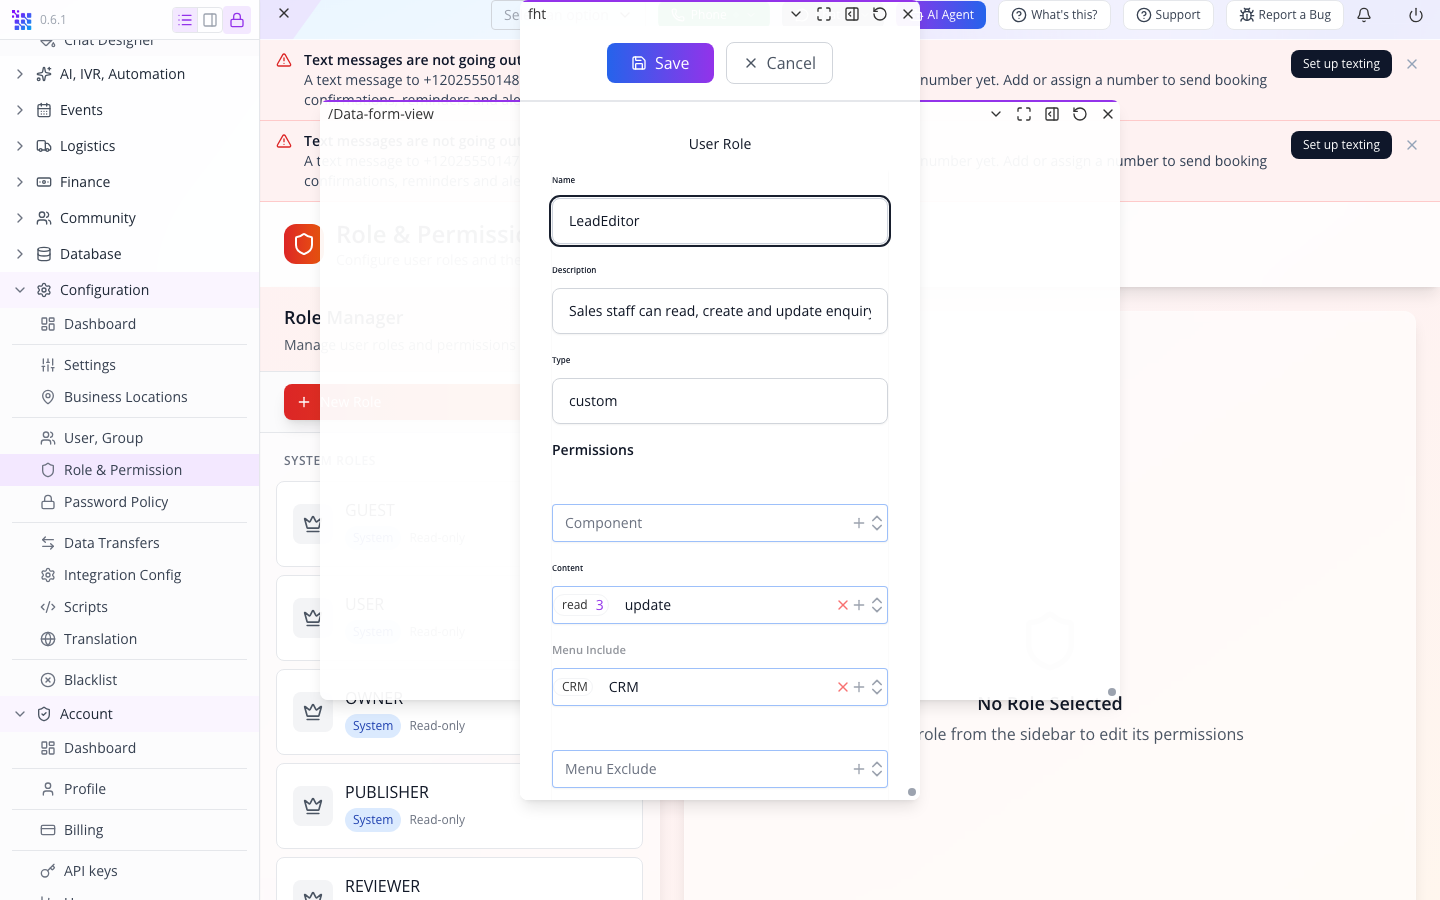
Use the instructions matching your build. If precise menu selection is unavailable, do not silently substitute a broader category while telling the colleague that only Leads is exposed.
Try it: explain the difference between Update and Delete using a real task: correcting a phone number versus removing a lead record.
Check yourself: if the role says LeadEditor but its menus include every CRM screen, is it Leads-only? No. Read the stored actions and menu entries, not the name.
Part 2 — Put the job in a group
1. Create Sales
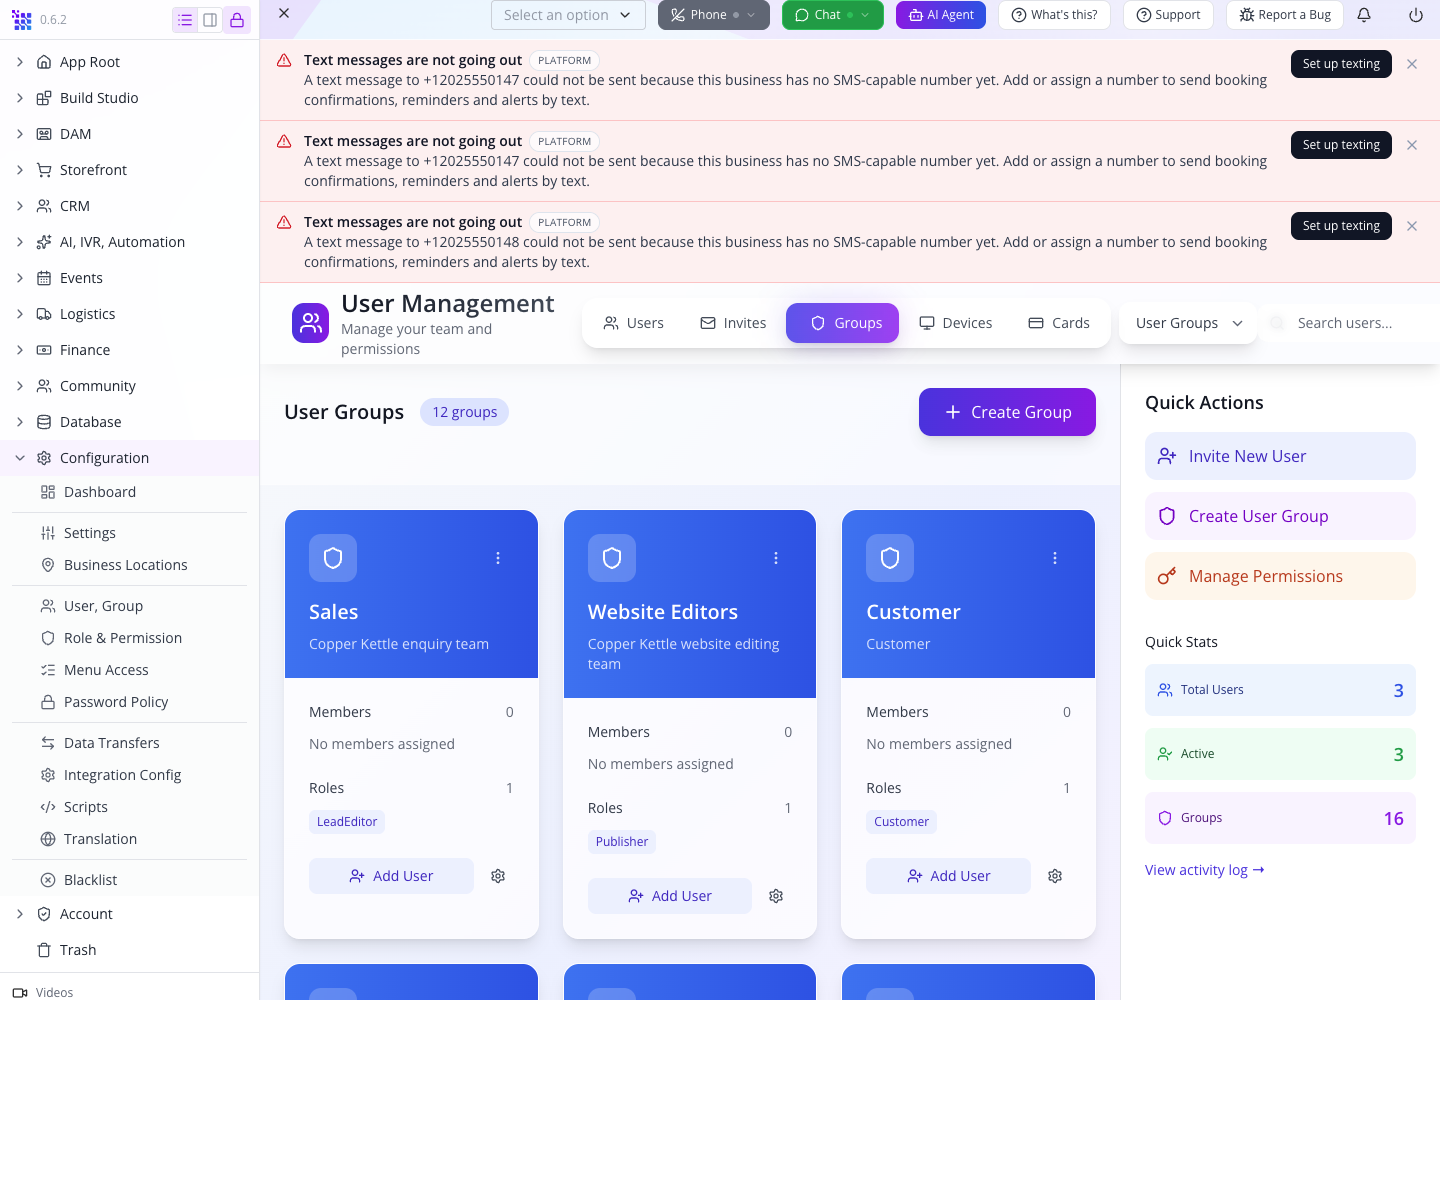
Open Configuration → User, Group. Select Groups in the page header to reach User Groups, then Create Group.
In New group, enter:
| Field | Value |
|---|---|
| Name | Sales |
| Description | Copper Kettle enquiry team |
| Password policy | Org default |
Expand Roles this group grants if necessary and select LeadEditor only. Leave Members empty for now. Select Create group.
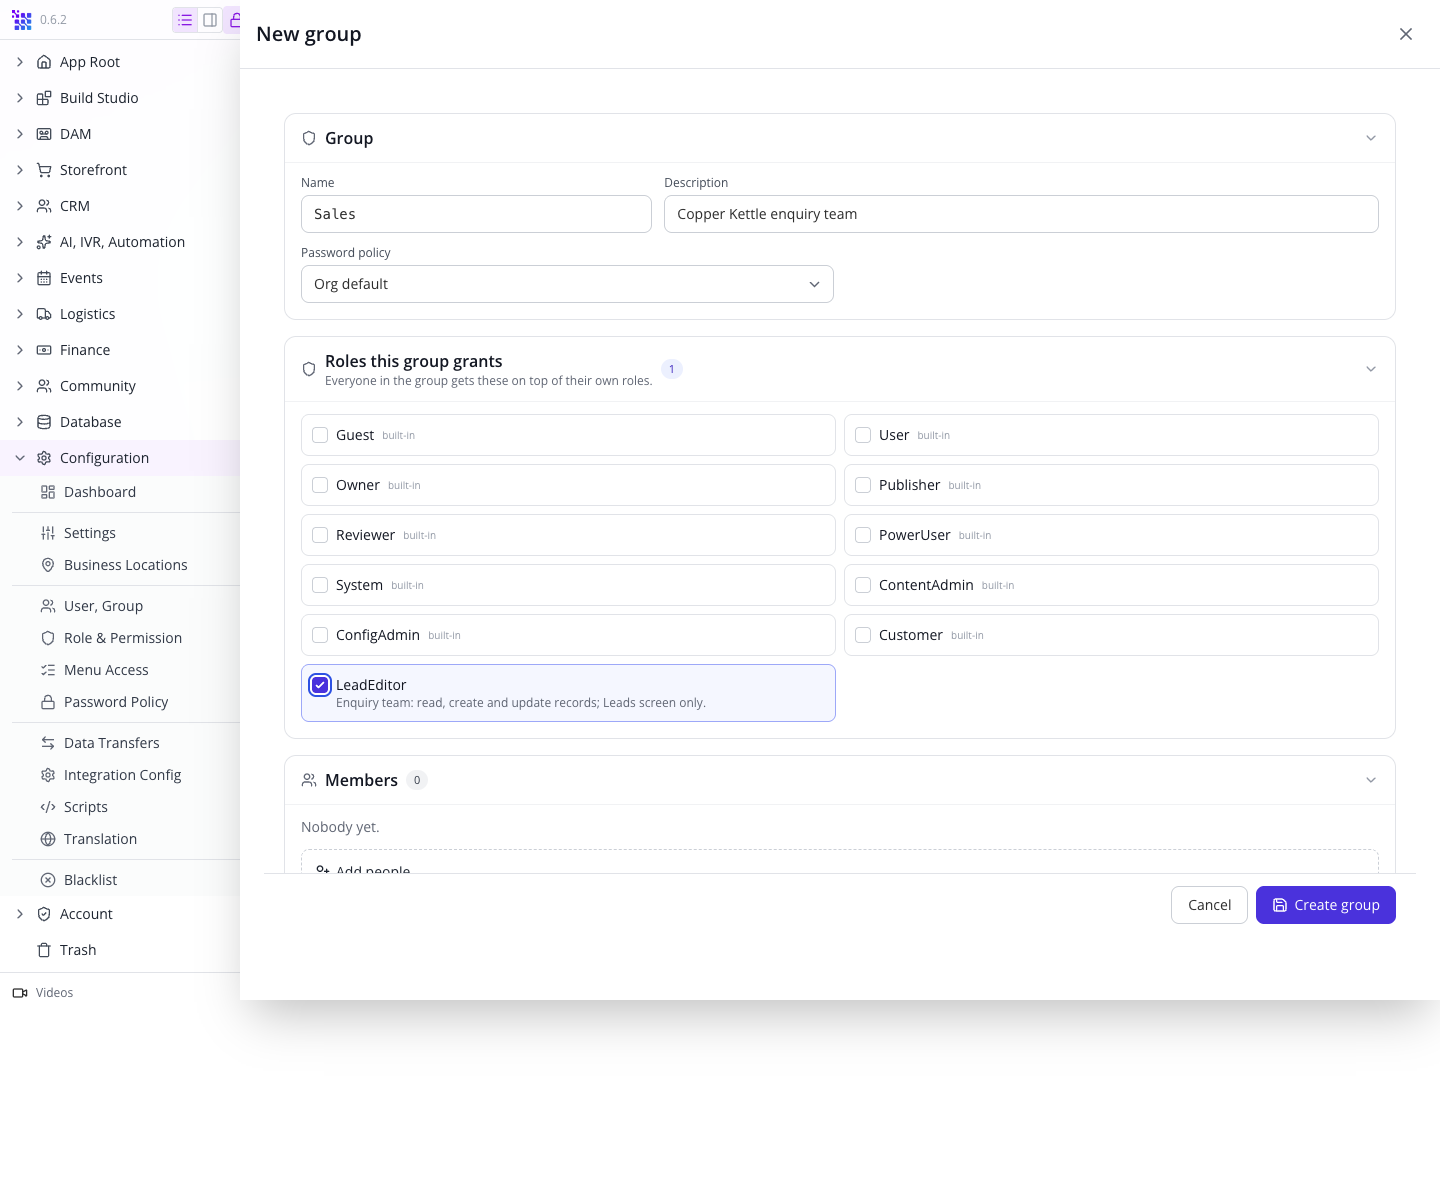
Do not add Owner, ConfigAdmin or another broad role to make a failing custom role “work”. That changes the access you are trying to establish.
2. Reload and inspect the group
Reload Studio, return to Groups and locate Sales. The card should show Roles 1, LeadEditor, and no members.
The current card shows the description you saved. If a card looks out of date, reopen the group and inspect it before creating another.
Once created, the current editor disables the group name and explains Users are linked by this name — it cannot change. Choose a durable job name such as Sales rather than a person’s name.
3. Prepare a separate website group
Create a second empty group:
- Name:
Website Editors - Description:
Copper Kettle website editing team - Roles this group grants: Publisher
- Password policy: Org default
Save and reload. The card should show Publisher and zero members.
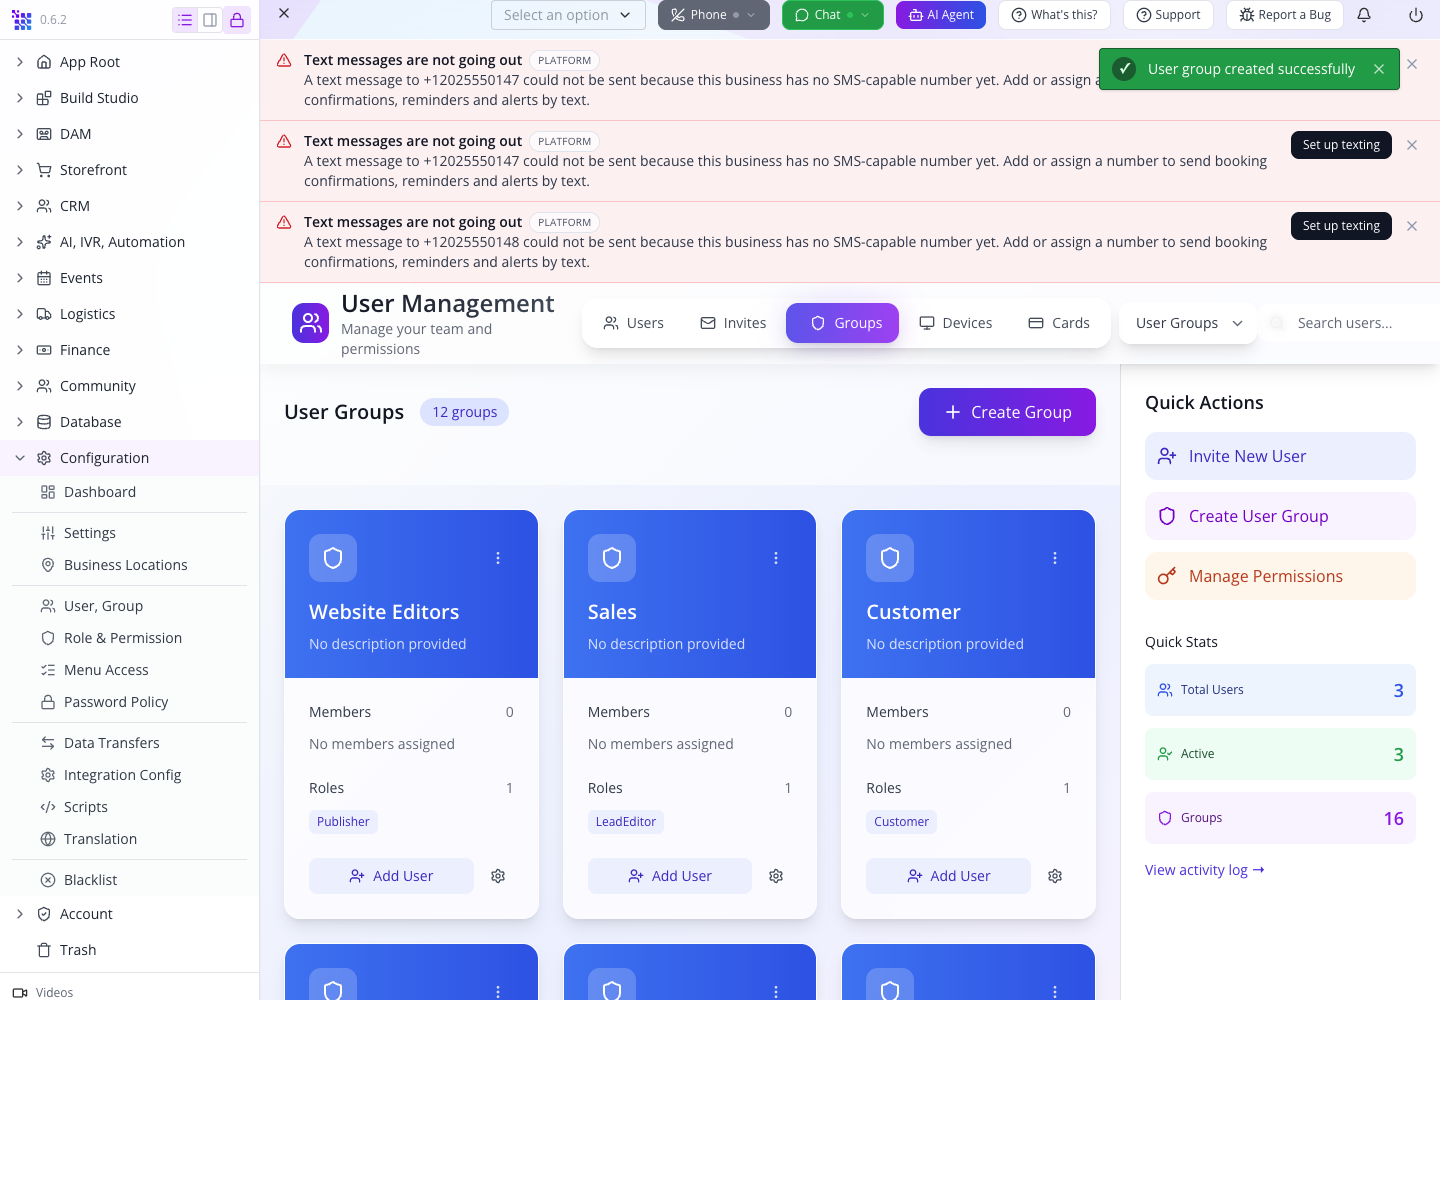
Publisher is broad. The installed permission resolver gives it read, create, update, review and delete actions. Its built-in menu coverage extends beyond a single website page. This group illustrates a distinct responsibility; it is not a narrowly scoped “may edit one homepage” grant. Review that scope before assigning a colleague.
Historical interface difference: the older Create/Edit Group dialog showed name, description, colour and icon, without this role picker. Its separate Permissions action offered direct verb checkboxes. Do not treat that older panel as proof that the current server has linked the intended role to the group.
4. Add an existing colleague
On Sales, select Add User. Edit Sales opens with Members and Add people. Search for the existing user by name or email, select their checkbox, then select Add 1. The person is now staged in Members; select Save group to persist it.
If a newly created colleague is missing from the picker, close the editor and use User Management’s Refresh, then reopen the group. Do not create another account to make it appear.
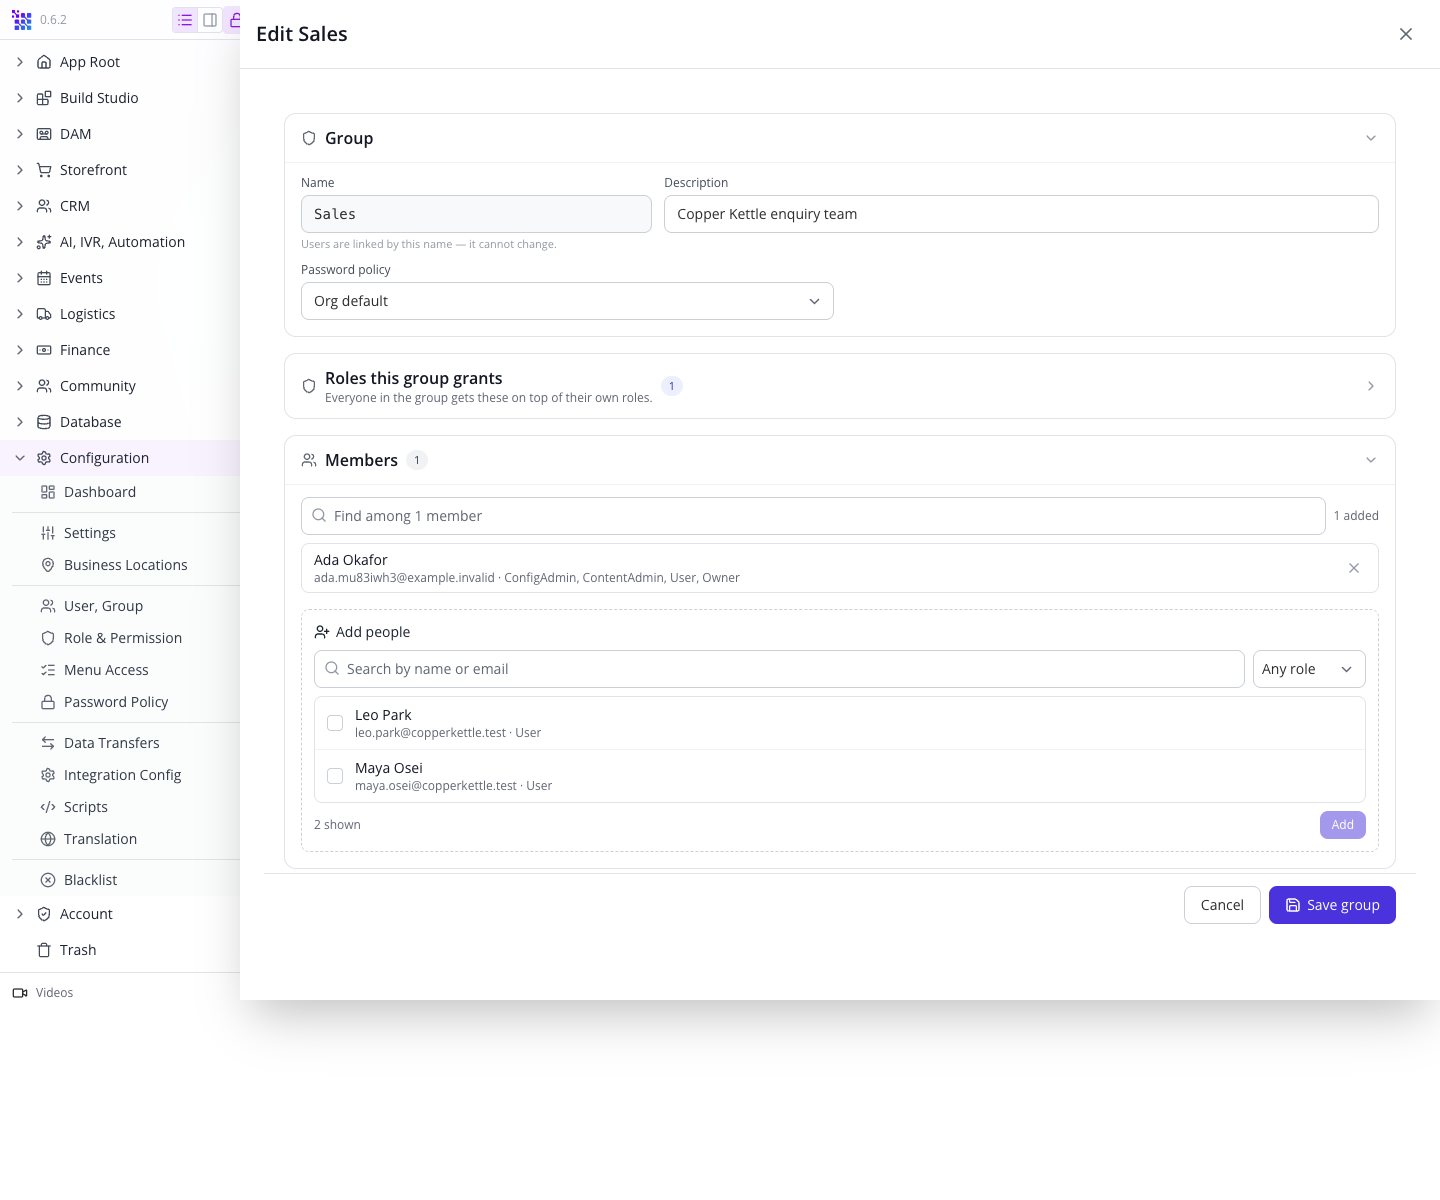
Reload, return to Groups, and reopen Sales. Confirm the person appears in Members and LeadEditor remains selected. The local membership rehearsal used Ada’s own test account and then removed it; this checked persistence, not restrictions, because Ada retained Owner access.
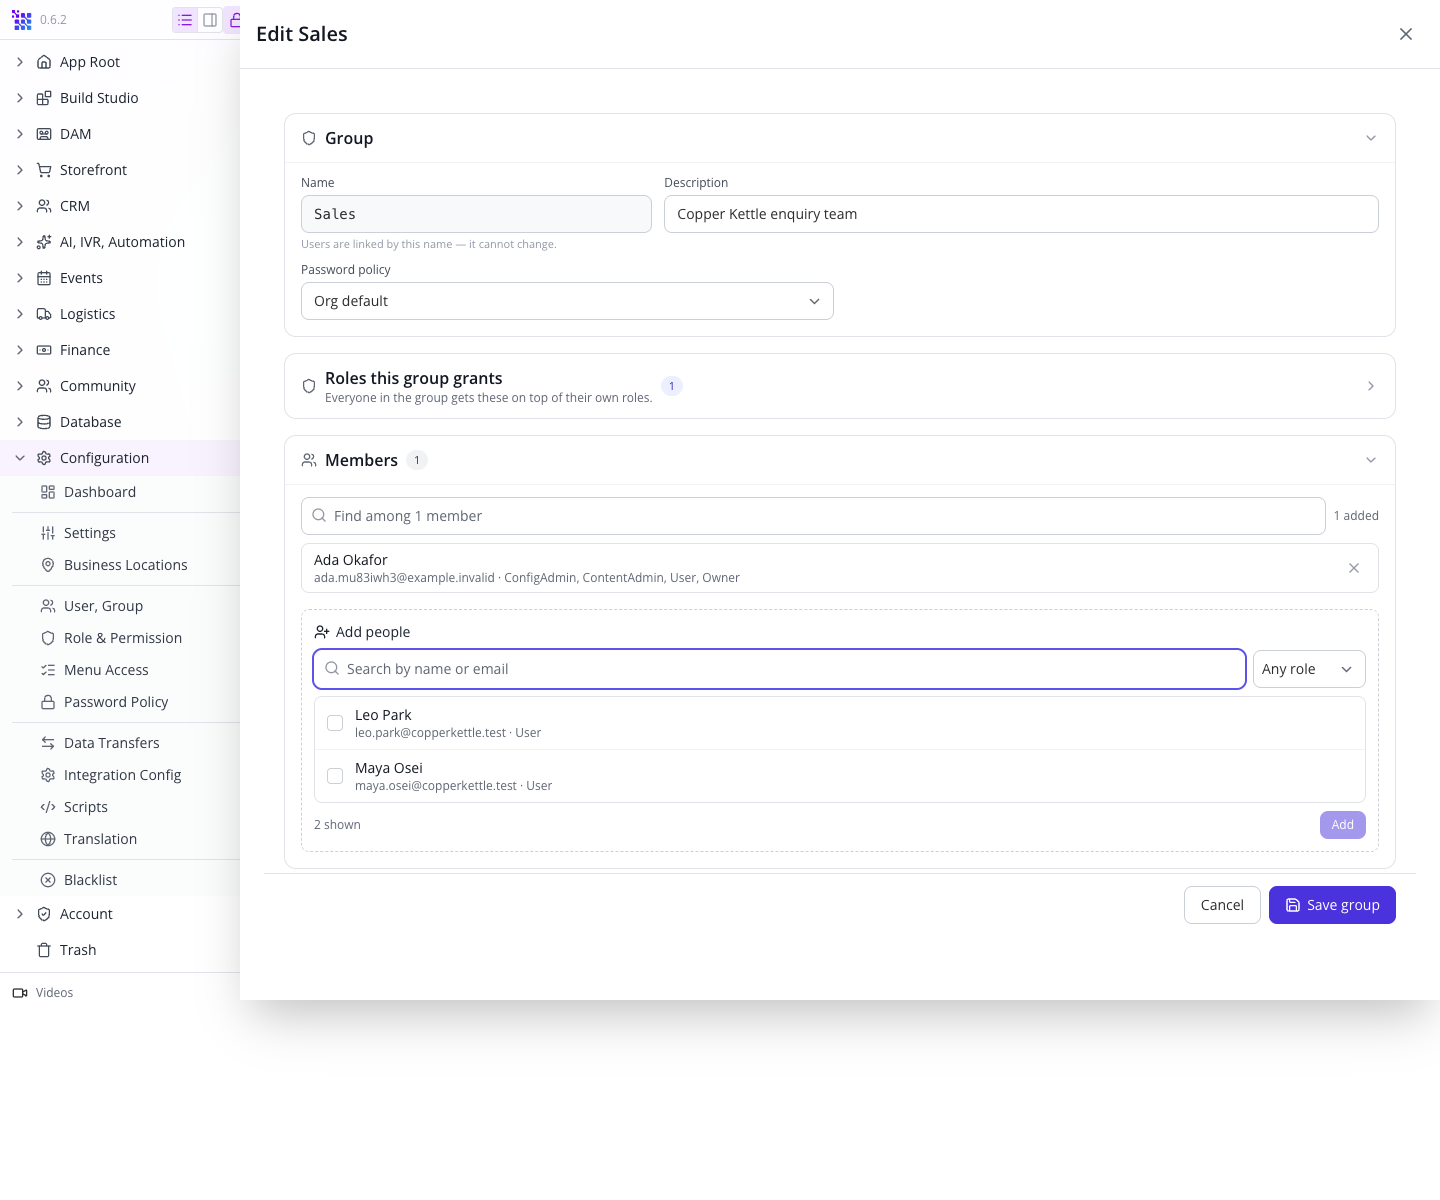
5. Remove a rehearsal membership
In Edit Sales → Members, use Remove from group beside the person, then Save group. Reload and inspect the group again. The verified rehearsal returned Sales to zero members while retaining LeadEditor.
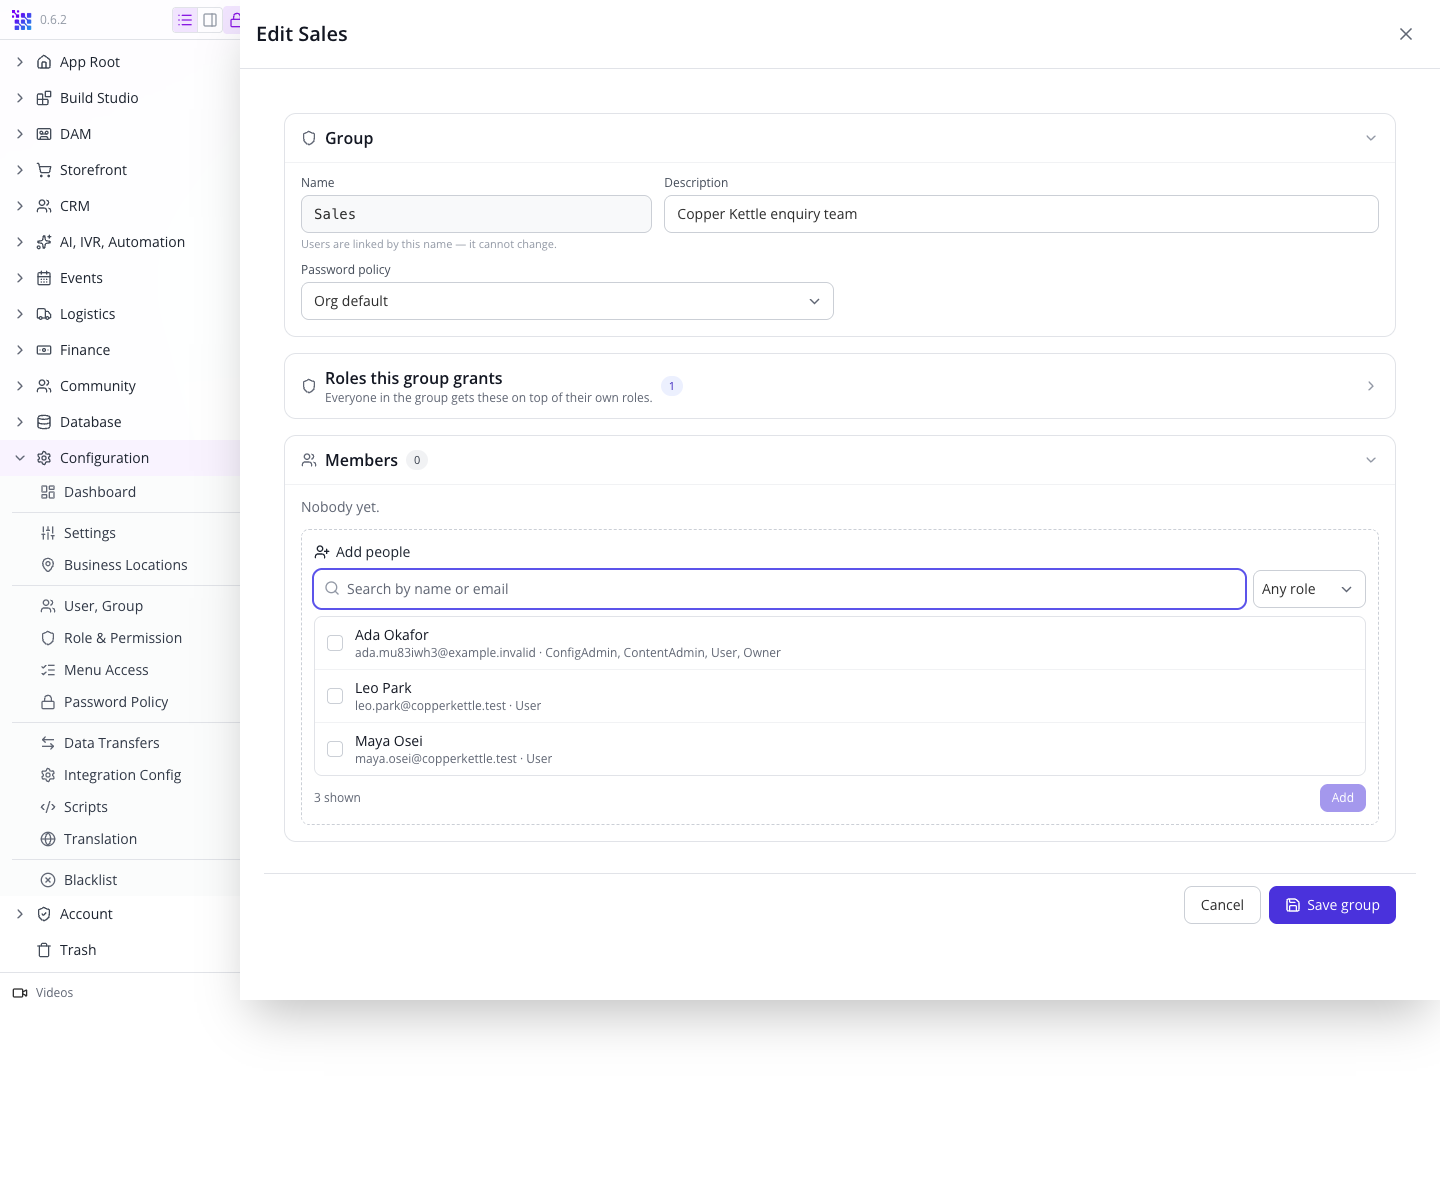
Remove only the membership you intend to change. A person may hold other groups and direct roles; removing Sales does not cancel those separate grants. An entry marked via a role is an inferred membership, not the same as someone explicitly added to the group.
For a new colleague who does not yet have an account, continue with the invitation below instead of using Add User.
Try it: inspect an empty group and an administrator group without changing either. Identify the role and why each listed person belongs.
Check yourself: did Ada’s successful membership save prove Nora will be restricted? No. Ada retained her administrator grants; Nora needs her own session.
Part 3 — Invite a colleague into the job you prepared
1. Enter the colleague’s identity and select the job group
Open Configuration → User, Group → Invites → Send Invitation. In Send Team Invitation, enter the person’s First Name, Last Name and Email Address. Use the address the colleague will use to sign in.
The successful local rehearsal uses Nora Ellis in Copper Kettle, with the existing Sales group granting LeadEditor. Nora is a separate test colleague from Maya Ito, whose earlier invitation exposed the repaired application defect.
Under Assign to Groups, select Sales. Clear User if selected. This example needs Sales alone: adding another group combines its grants with Sales and changes the restriction you are testing. Leave Website Editors and administrator groups unselected.
Enter a short Personal Message, such as “Join the enquiry team. You will follow up incoming enquiries.” Keep Send welcome email with login instructions selected.
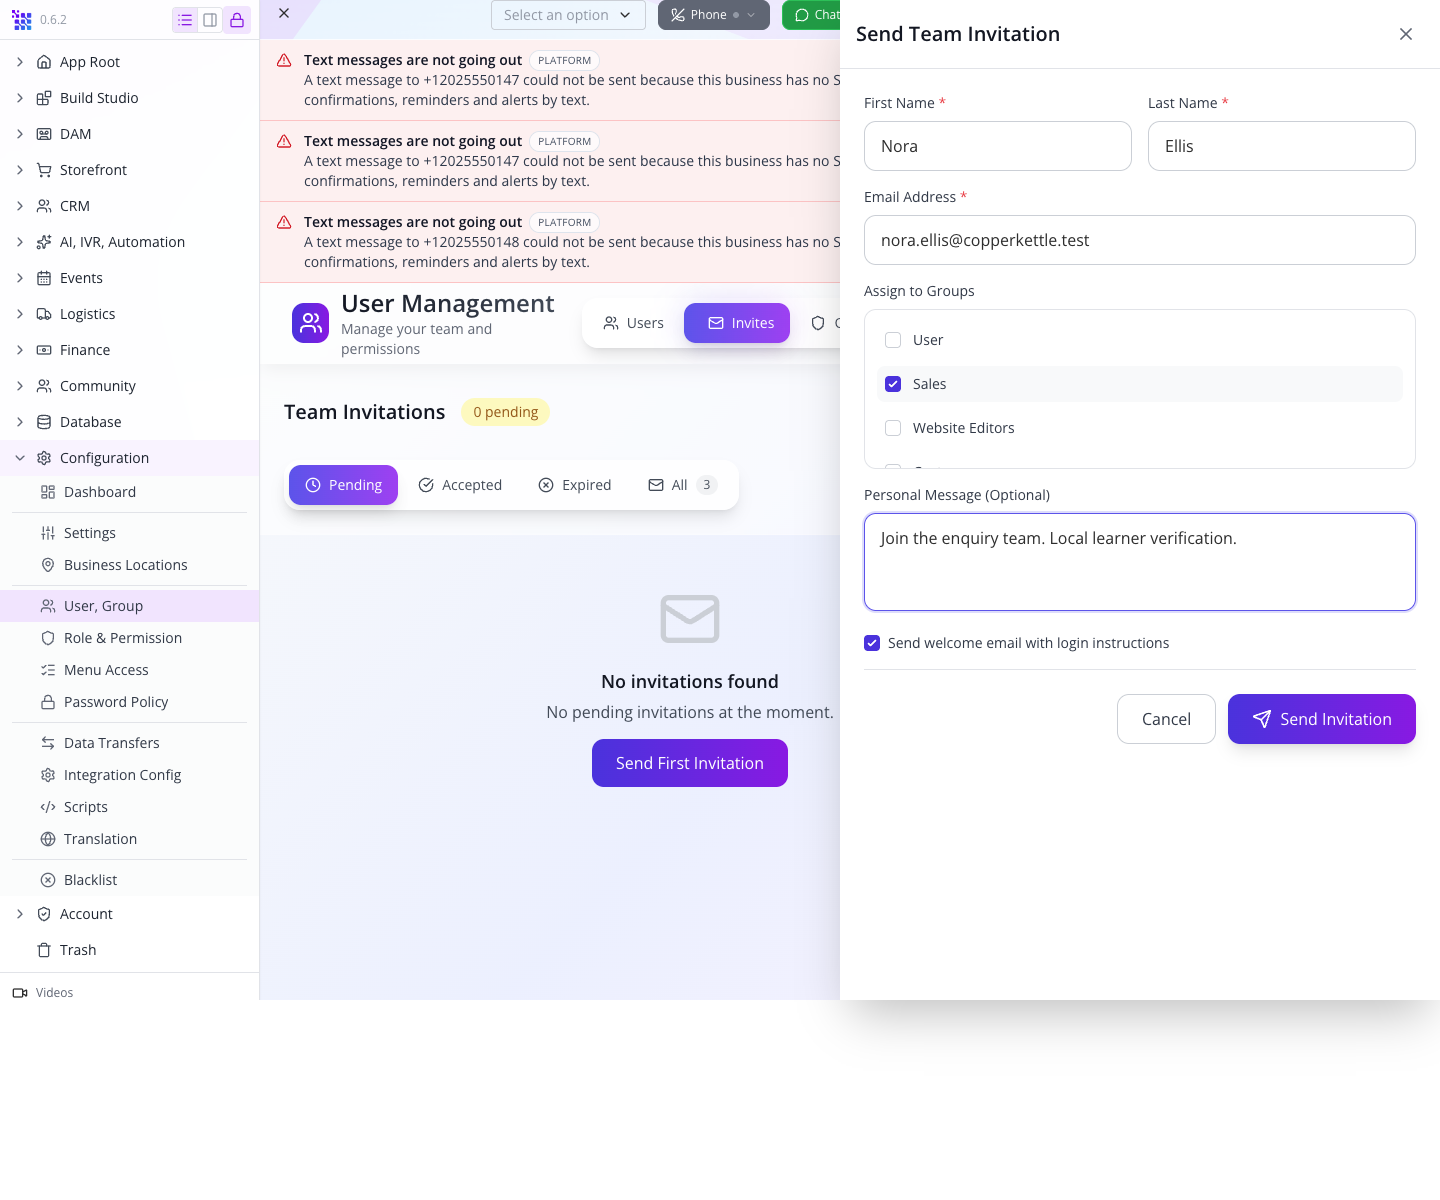
The message explains the job; the selected group grants access. Check both before continuing.
2. Send once and inspect the pending invitation
Select Send Invitation at the bottom of the drawer. The drawer closes and Invites → Pending shows the colleague, Sales, inviter, sent date and expiry. The verified invitation appeared immediately without reloading.
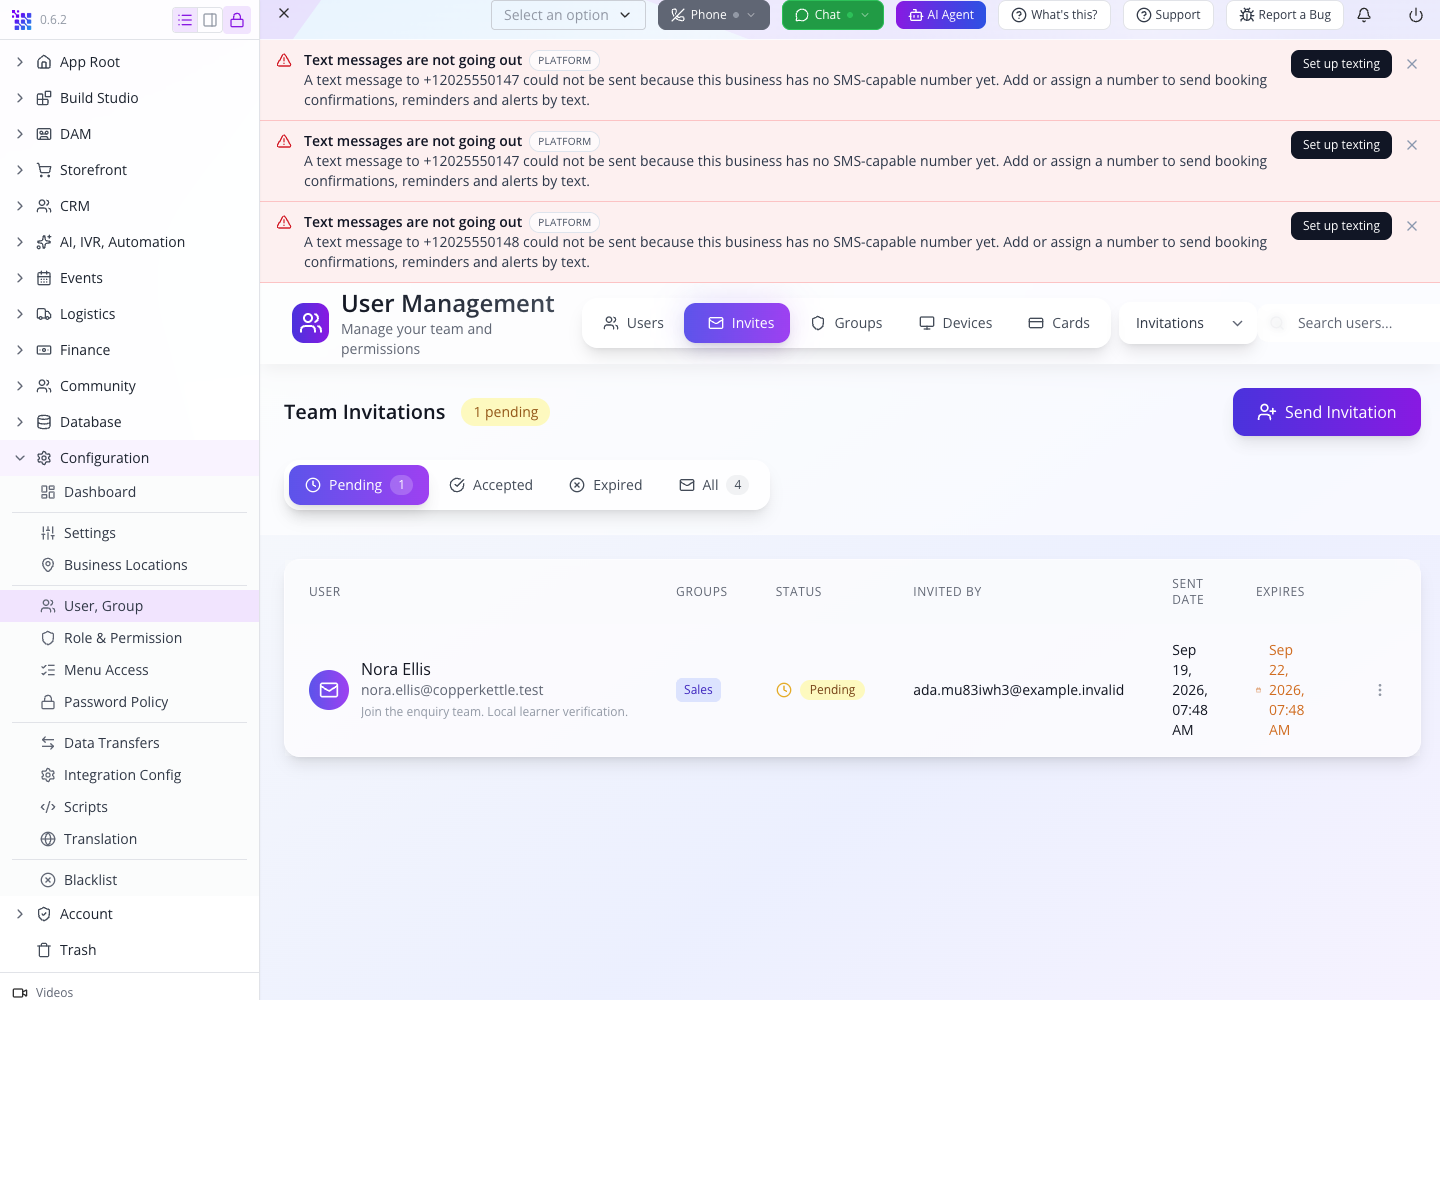
If a response is slow, inspect Pending before sending again. Email delivery may be queued. In this local rehearsal, mail was captured by the organisation’s test email service; no external colleague was contacted.
The row’s three-dot menu includes Copy Link, Resend Invitation, View Details and Cancel Invitation. Copy Link copies this invitation’s actual acceptance link. It is useful when handing the invitation directly to the intended colleague. Treat that link as private; do not paste it into documentation or a public chat. Use Resend Invitation only after checking the address and delivery status.
3. Complete the invitation in the colleague’s own browser
Keep your owner session open. In a separate browser profile, have the colleague open their actual email link or the link copied from their invitation row. The page is Finish signing up and names the inviter and organisation, followed by the personal message.
Check that the organisation is correct. The form shows Email, First name, Last name, Password and Confirm password. Enter the colleague’s first and last name, choose their password, and repeat that same password in Confirm password. They should set their own password; the owner does not need to know it.
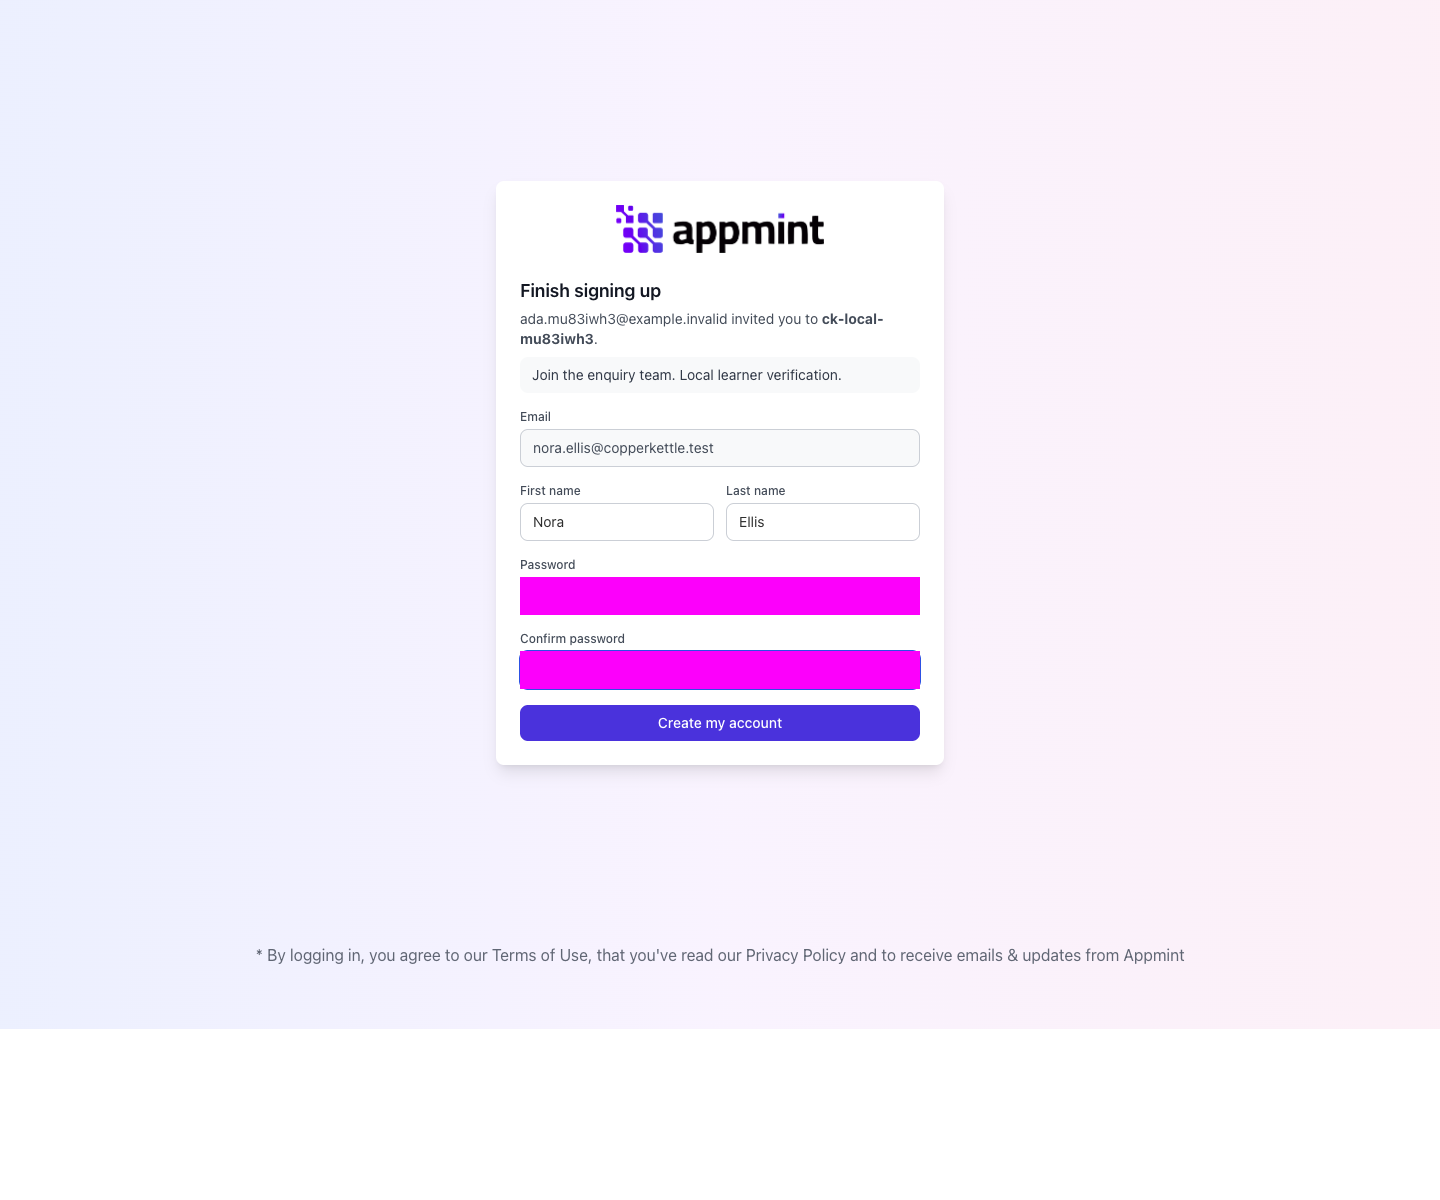
Select Create my account once. In the verified flow, Studio opened automatically under Nora’s identity. Its welcome screen showed LeadEditor, inherited from Sales, without the additional User role.
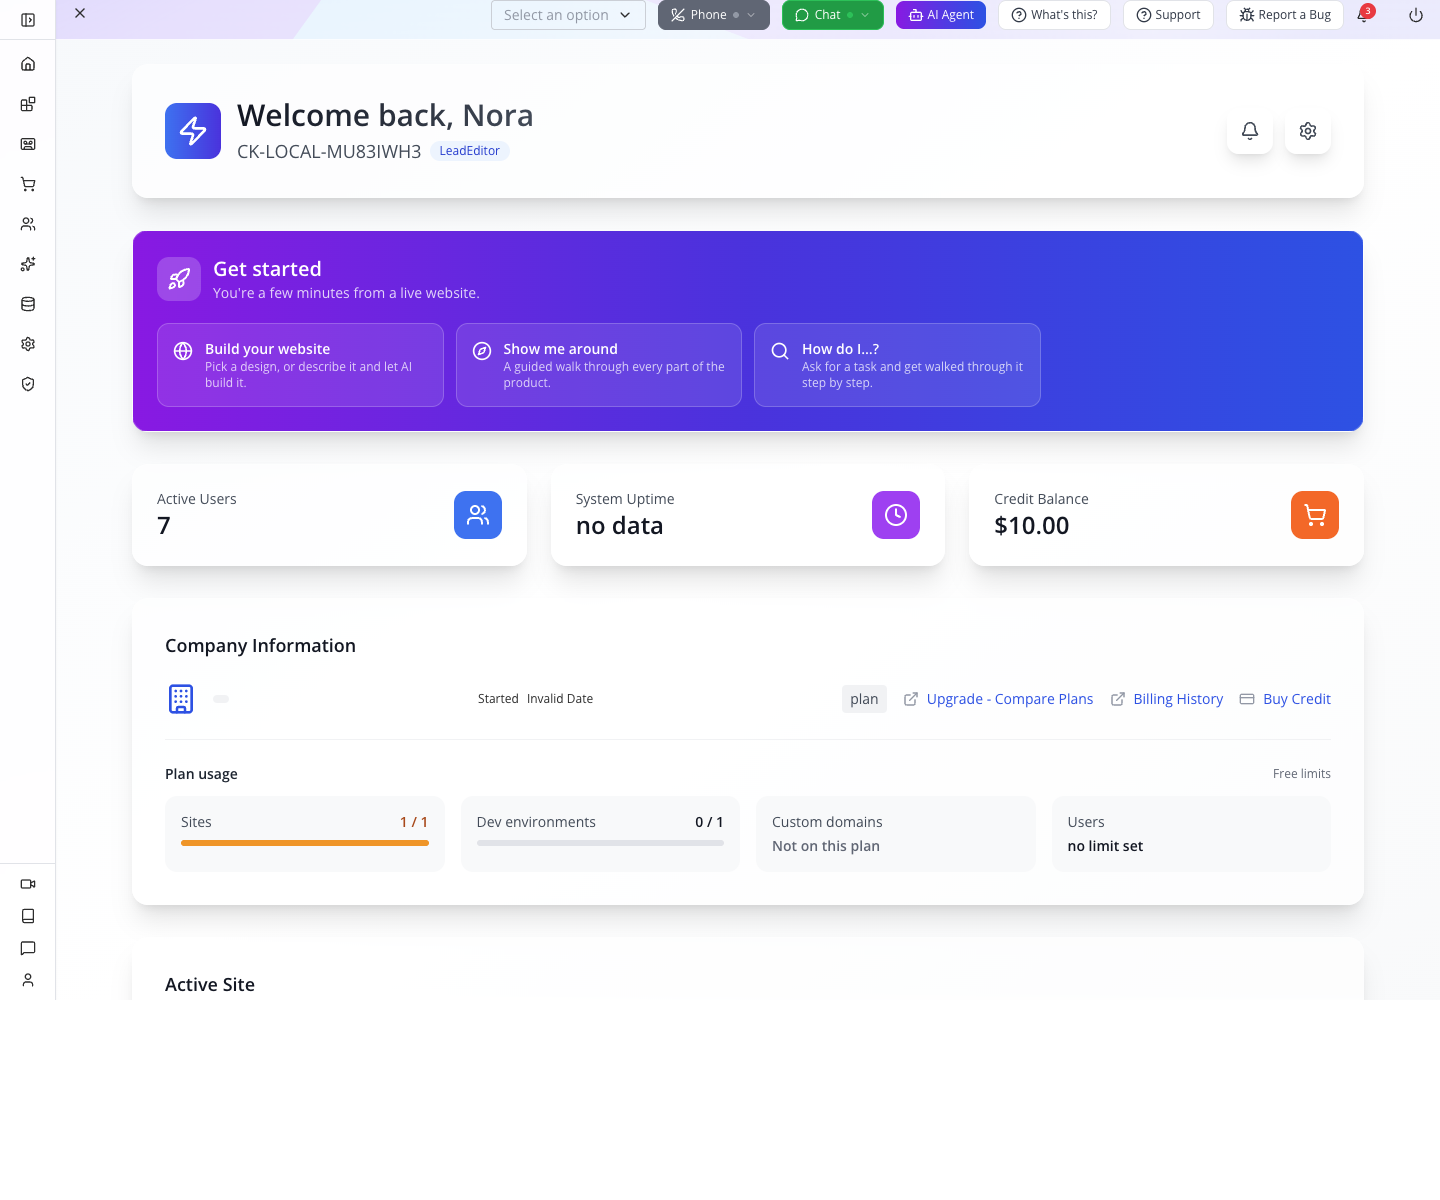
The first visit also starts the 44-stop interface tour. Use Next and Back if the colleague needs that introduction, or End to continue this focused permissions exercise. The tour is an introduction; it does not change the colleague’s grants.
Expand the sidebar if it shows icons. Expand CRM, then select Leads. Nora reached the Lead Command Center successfully. An empty Unassigned Leads board does not mean the organisation has no leads: use Show Pipelines to display the pipeline containing your training enquiry.
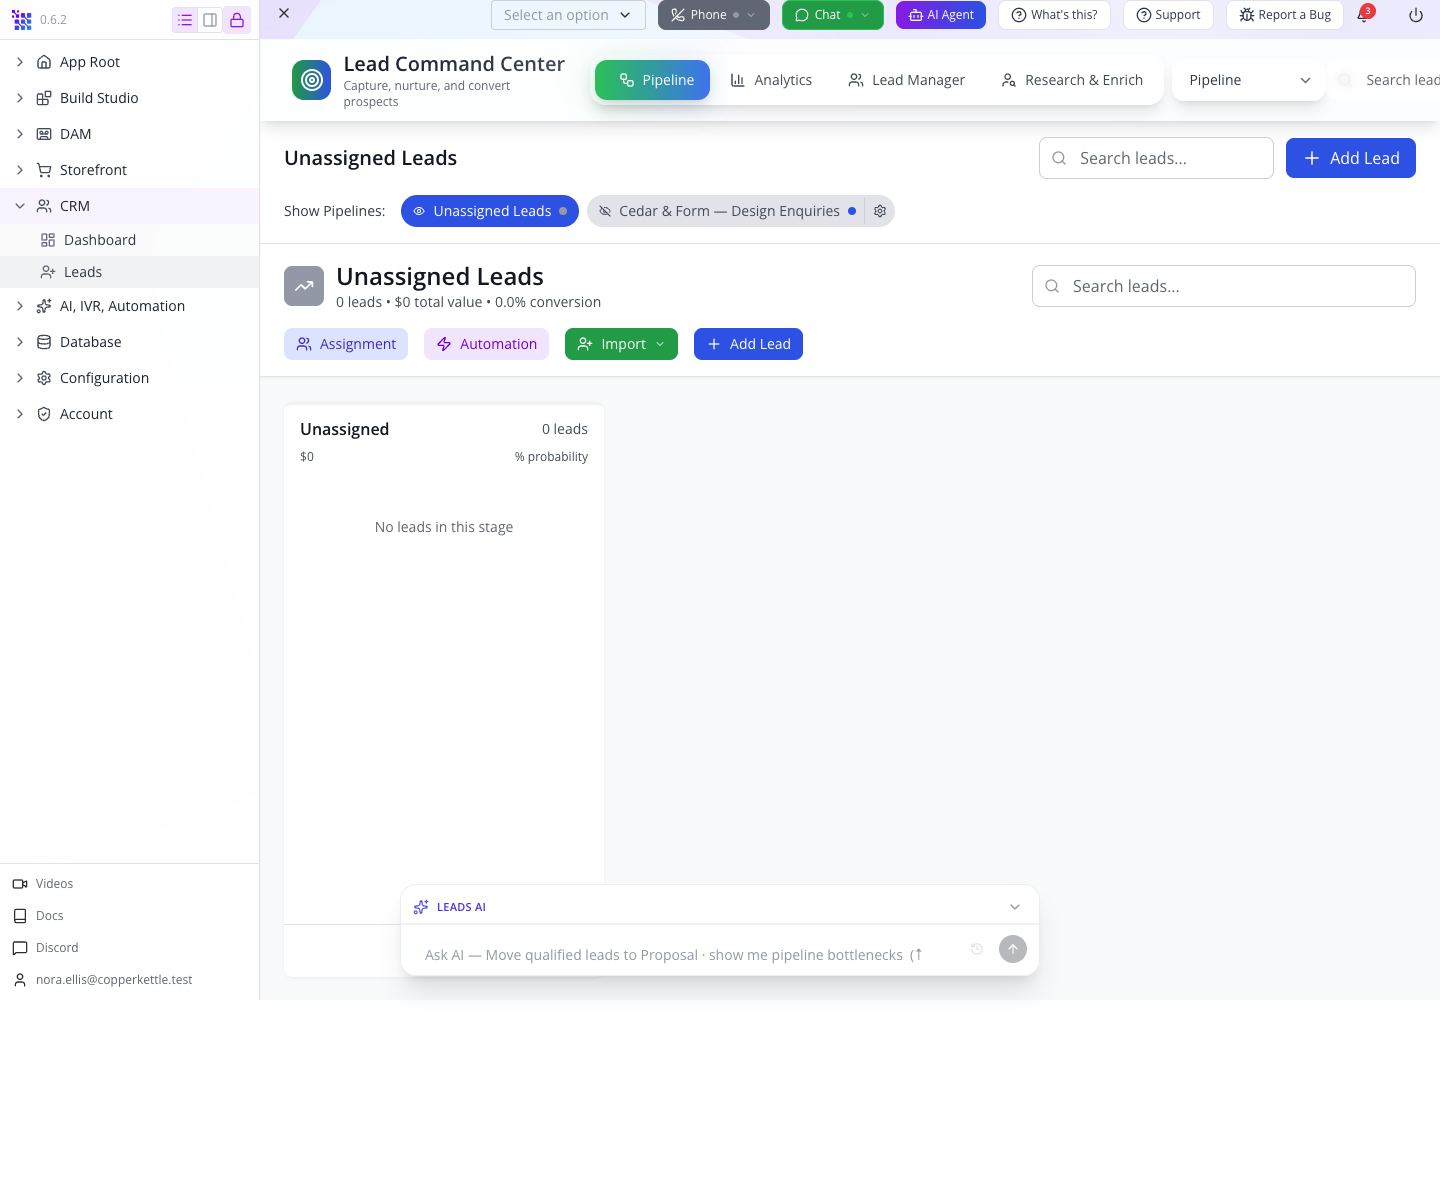
Try it: compare the identity in the lower-left sidebar with the owner’s separate browser. Then identify which group grants the job and which role supplies its actions. Do not use the owner’s broad session to judge the colleague’s restrictions.
Check yourself: does opening Leads prove that Update and Delete are correctly enforced? No. The next part tests an actual saved change and a refused action.
Part 4 — Test the grant before relying on it
1. Create a disposable practice lead
Use the colleague's account while it holds Sales / LeadEditor only. The website grant in Part 5 includes Publisher and therefore changes what Delete should do; complete this narrow-role check before granting it, or after removing it and signing in again.
Open CRM → Leads. Under Show Pipelines, turn on the pipeline you will use. The rehearsal reused Cedar & Form — Design Enquiries, the training pipeline from the CRM walkthrough. Use the equivalent pipeline in your organisation; its name is not a permission setting.
Select Add Lead. Enter:
| Field | Practice value and purpose |
|---|---|
| First Name | Permissions |
| Last Name | Verified |
| An address reserved for your controlled training record | |
| Title/Position | Training record |
| Pipeline | Your training enquiry pipeline |
| Stage | New |
| Deal Value | 0, so the practice record adds no sales value |
| Notes | Disposable permission check. Do not contact. |
Select Create Lead once. If you are still looking at Unassigned Leads, enable the selected pipeline under Show Pipelines; a lead saved to that pipeline will not appear in Unassigned Leads. Confirm the name before opening it. Do not use a real prospect for the deletion test below.
2. Save a permitted change and read it back
Open the practice lead, select Edit, and change Title/Position to Update verified. Select Update Lead.
The detail view should show the new title immediately. Close it, reload, show the same pipeline and reopen the lead. Read the title again. This tests Create and Update as real server operations, not just visible buttons.
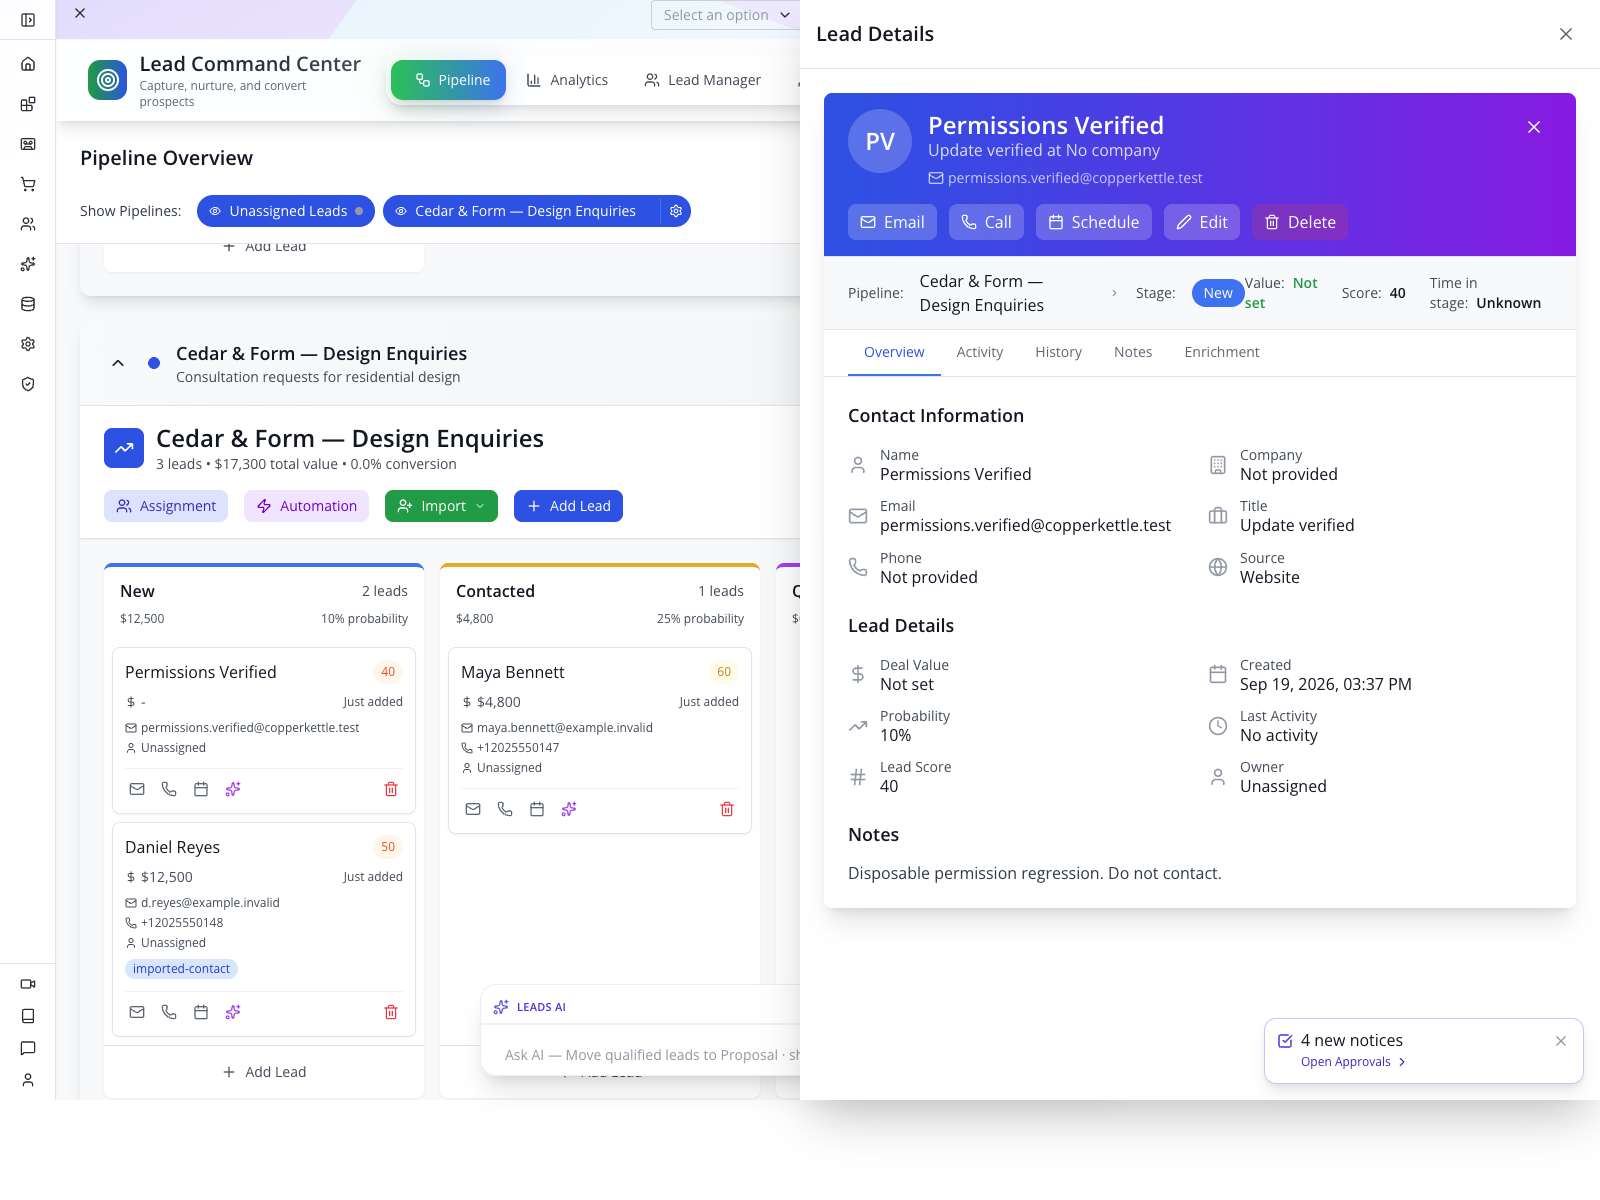
The earlier rehearsal also changed Maya Bennett's existing title, reloaded to verify it, then restored the original. The disposable record is a cleaner choice for your own exercise because it keeps the entire permission test separate from customer work.
3. Verify that Delete is refused
On the disposable practice lead only, select Delete, then read the confirmation. Confirm Delete to exercise the actual server restriction.
Under the tested Sales/LeadEditor role, the server returned 403 Forbidden. The confirmation remained open with Forbidden visible, and the lead remained in both the detail view and pipeline. Select Cancel, reload, and verify the practice lead still exists.
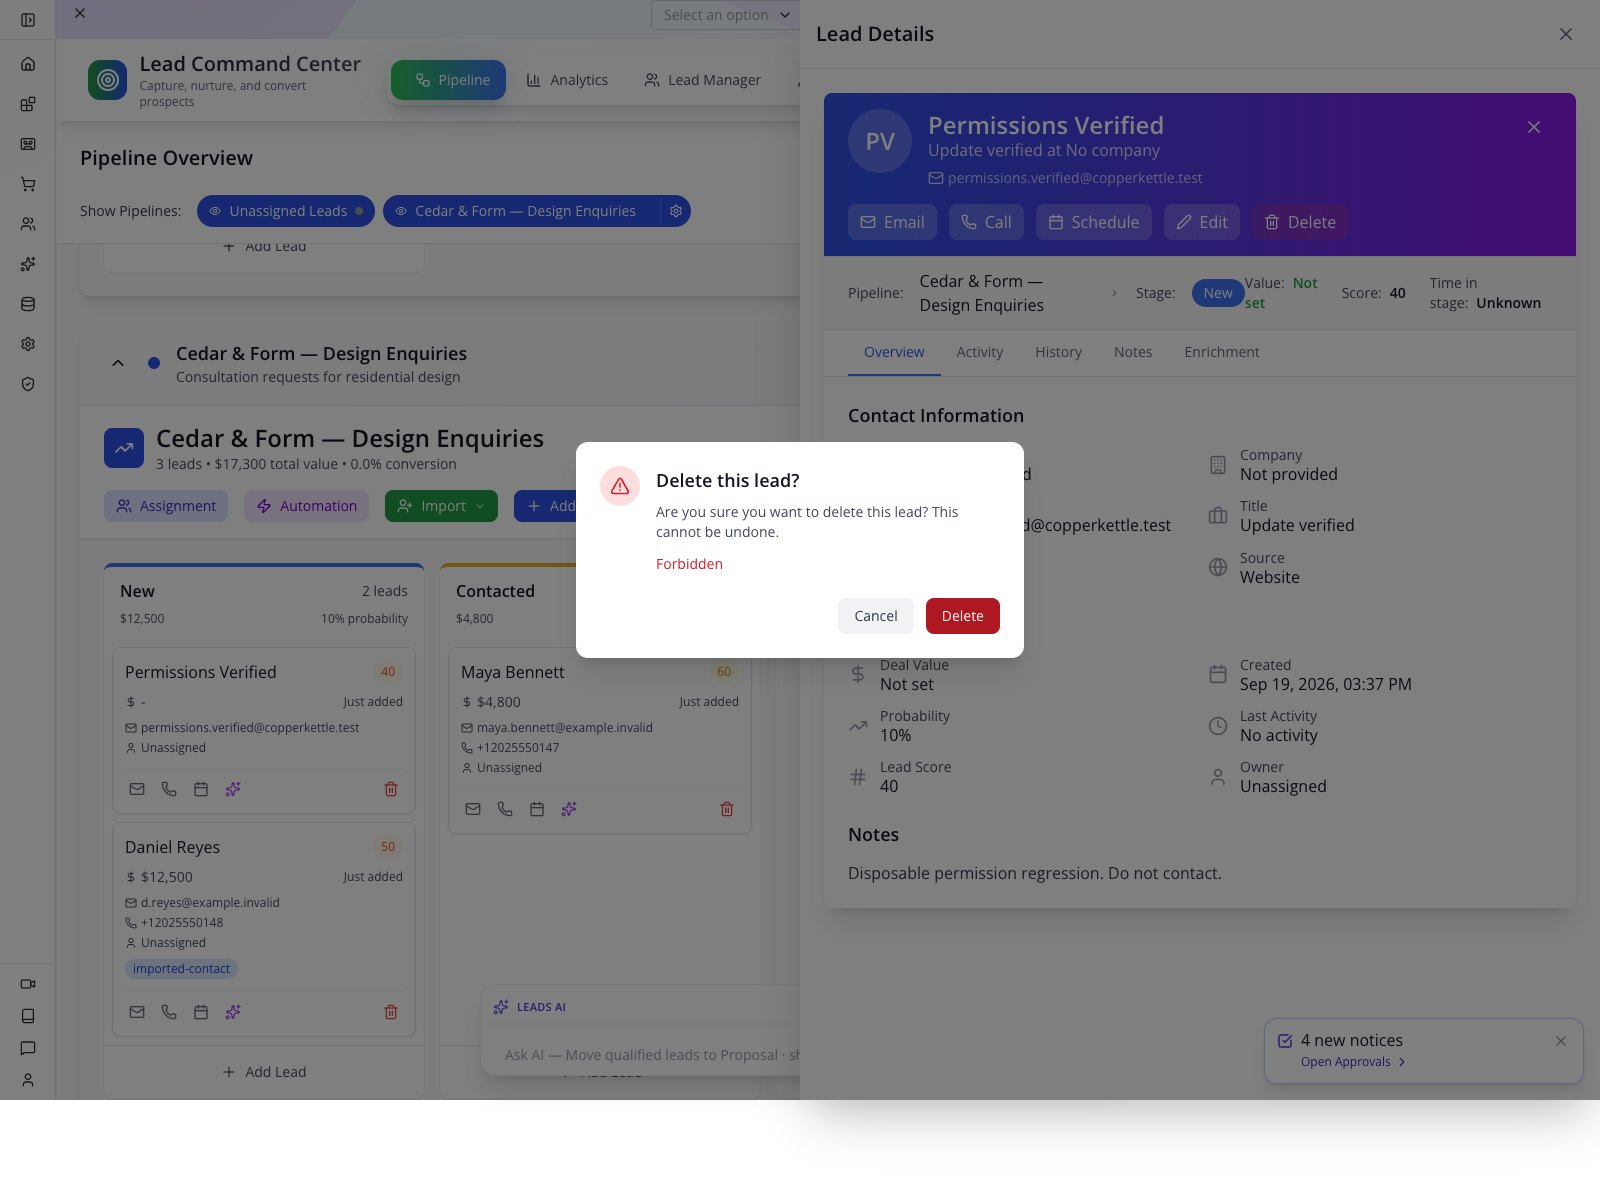
A visible Delete button does not mean the role has Delete permission. Conversely, hiding a button alone would not prove enforcement. This check tests the operation itself. The original rehearsal found a missing server check and a misleading browser removal; both were repaired and this sequence was repeated.
If the practice record is deleted, stop the restriction test and report the organisation, role, record identifier and action through Support → Submit Ticket. Do not test again on a real customer. Check whether the colleague has another role or group that grants Delete before concluding that the intended restriction is in effect.
4. Try an unrelated screen directly
As owner, open Configuration → Role & Permission and copy that page's address. Open the copied address in the colleague's browser. The tested colleague received Not available for your role, naming /role-permission.
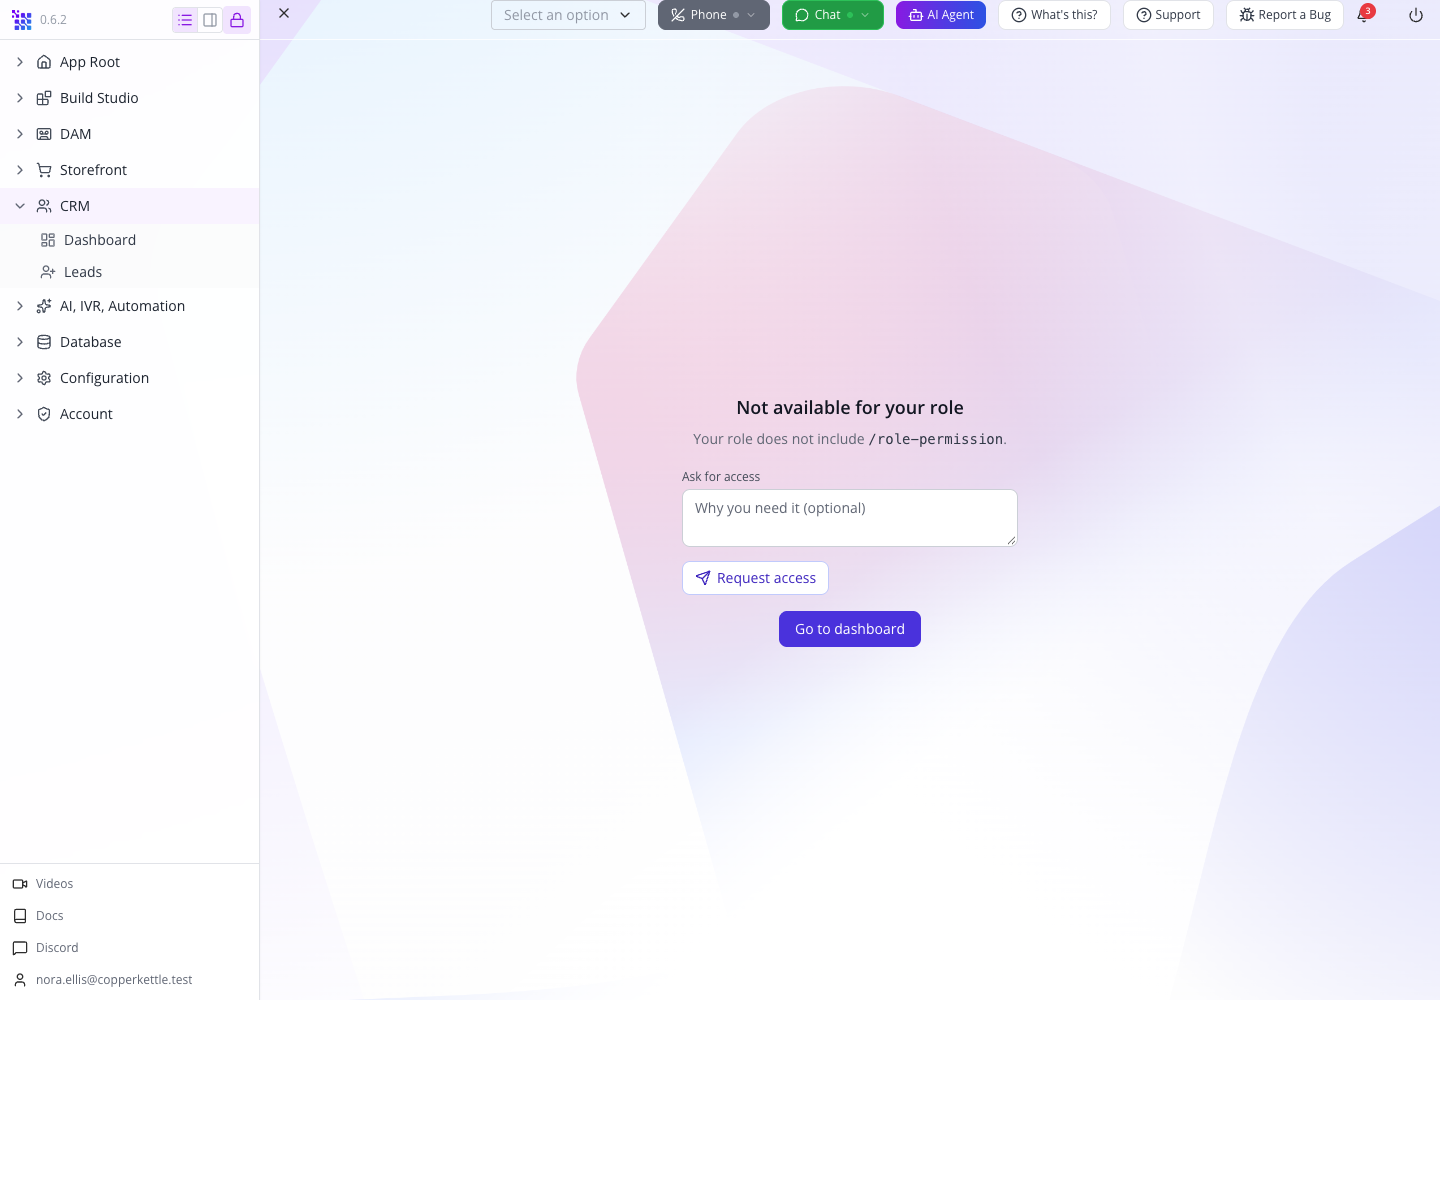
This checks the screen gate separately from the lead operation. A developer can retain the request statuses alongside the UI evidence: the repaired rehearsal returned 201 for Create, 200 for Update and 403 for Delete. The sanitized operation evidence contains no credentials.
5. Clean up through the owner
After recording the refusal, have the owner remove the disposable practice lead. Confirm its exact name and email before Delete. The owner may delete it because that account has the corresponding permission; the colleague's refusal is still a valid result.
Keep real enquiries unchanged. If you used a reversible existing-record edit, restore the original value and read it back.
Check yourself: why test a direct URL, a saved edit and a refused Delete? They test different boundaries: a screen, a permitted operation and a forbidden operation.
Part 5 — Handle requests and ongoing access
Ask for the task you need, then review the actual grant
First, as owner, open Build Studio, select the training website and choose New Web Page. Copy the editor address from the browser and share it privately with the colleague. This permission exercise needs no page content or Save action; use an existing training site from the website course.
As the colleague, open that website editor address. Under the Leads-only role, the page displays Not available for your role and names /build-studio. The same account also received a refusal when opening the owner's Role & Permission address directly.
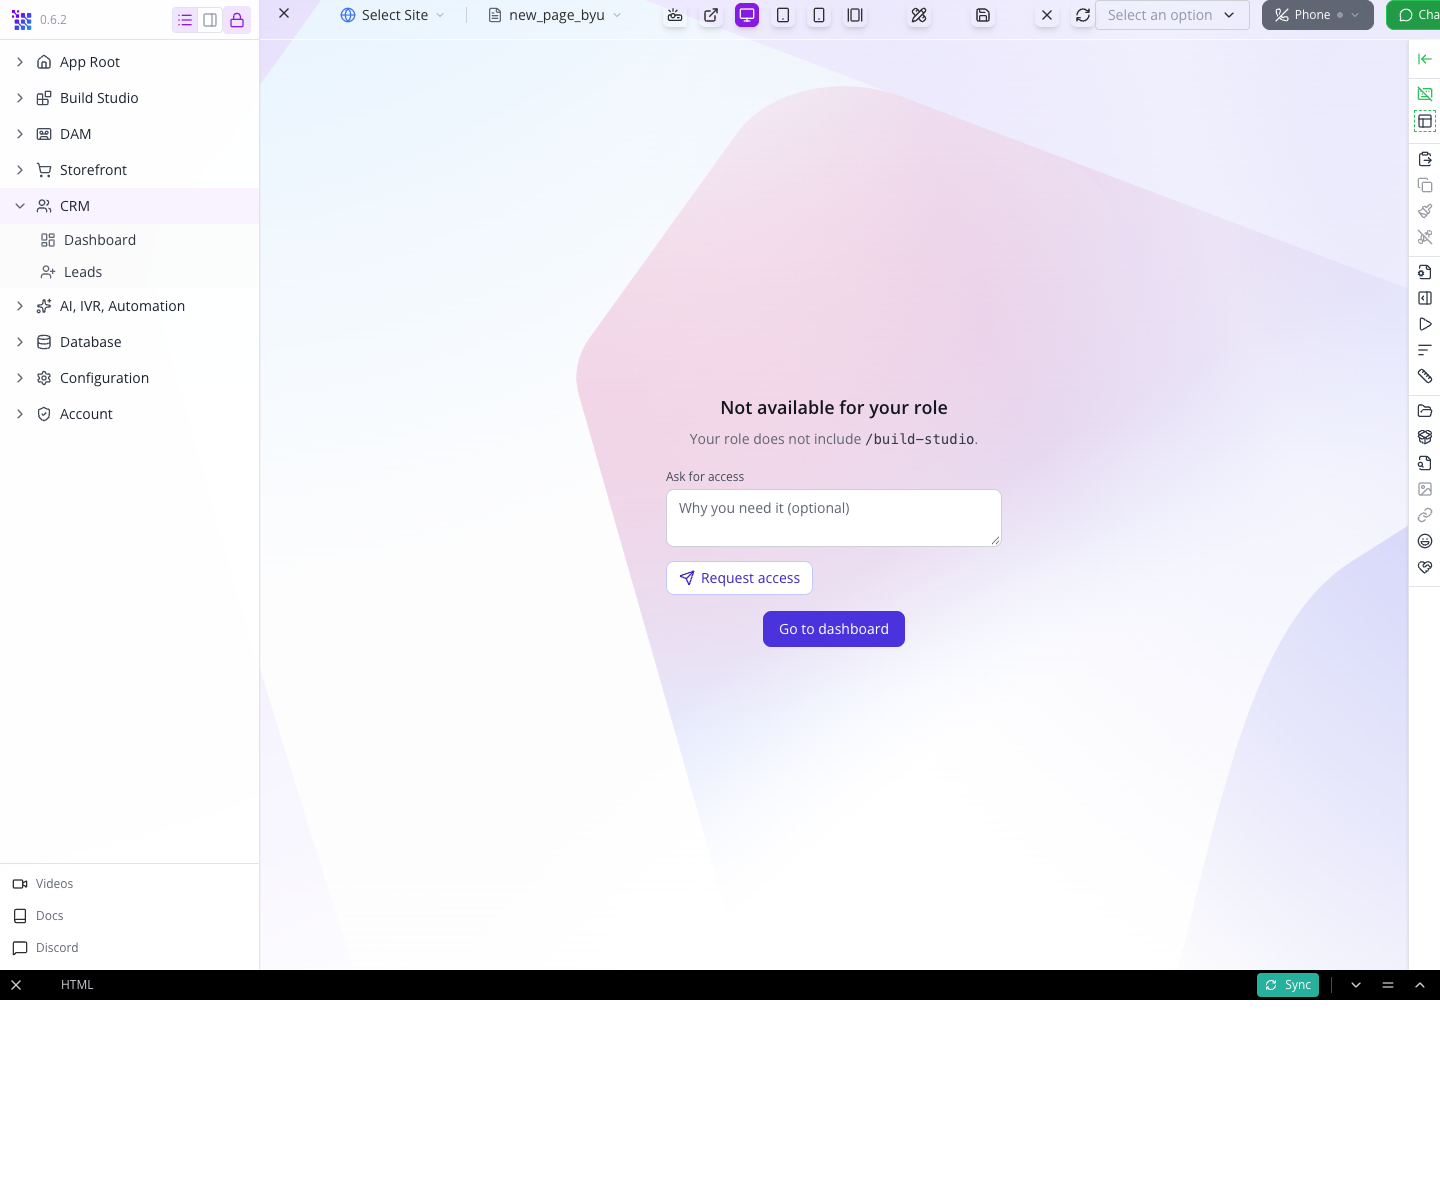
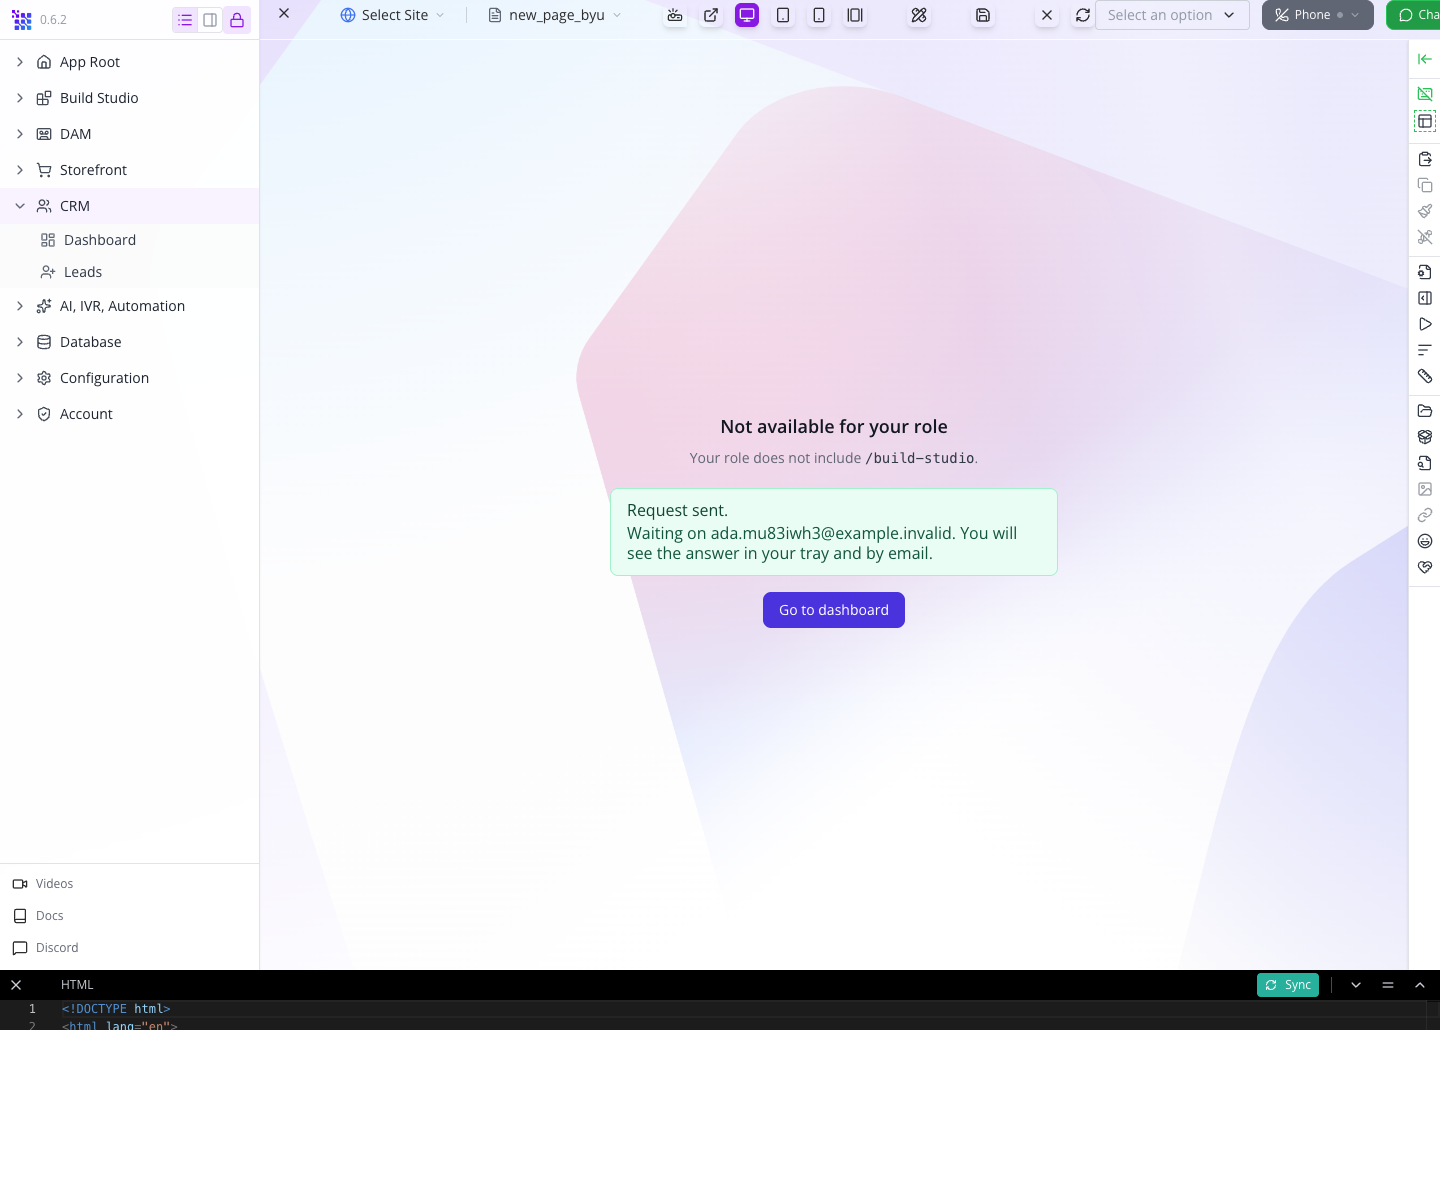
In Ask for access, enter the work you need to do. For this exercise: “I need to edit our website pages for the enquiry team. Please grant Website Editors for this training exercise.” Select Request access once.
The page confirms Request sent and names the person it is waiting on. Keep your current access while the request is reviewed; sending a request does not grant it.
In the owner's separate browser, expand App Root → Approvals. Open Waiting on you, then Access to /build-studio. Read the requester, reason and screen. Grant through offers roles and groups that can provide access to that screen.
Choose Website Editors, the group you prepared earlier. Review its Publisher scope before approving: Publisher includes Delete and more than one page. This is suitable only if the colleague's website responsibilities justify that wider grant. Do not choose it as a shortcut to solve a Configuration administration request.
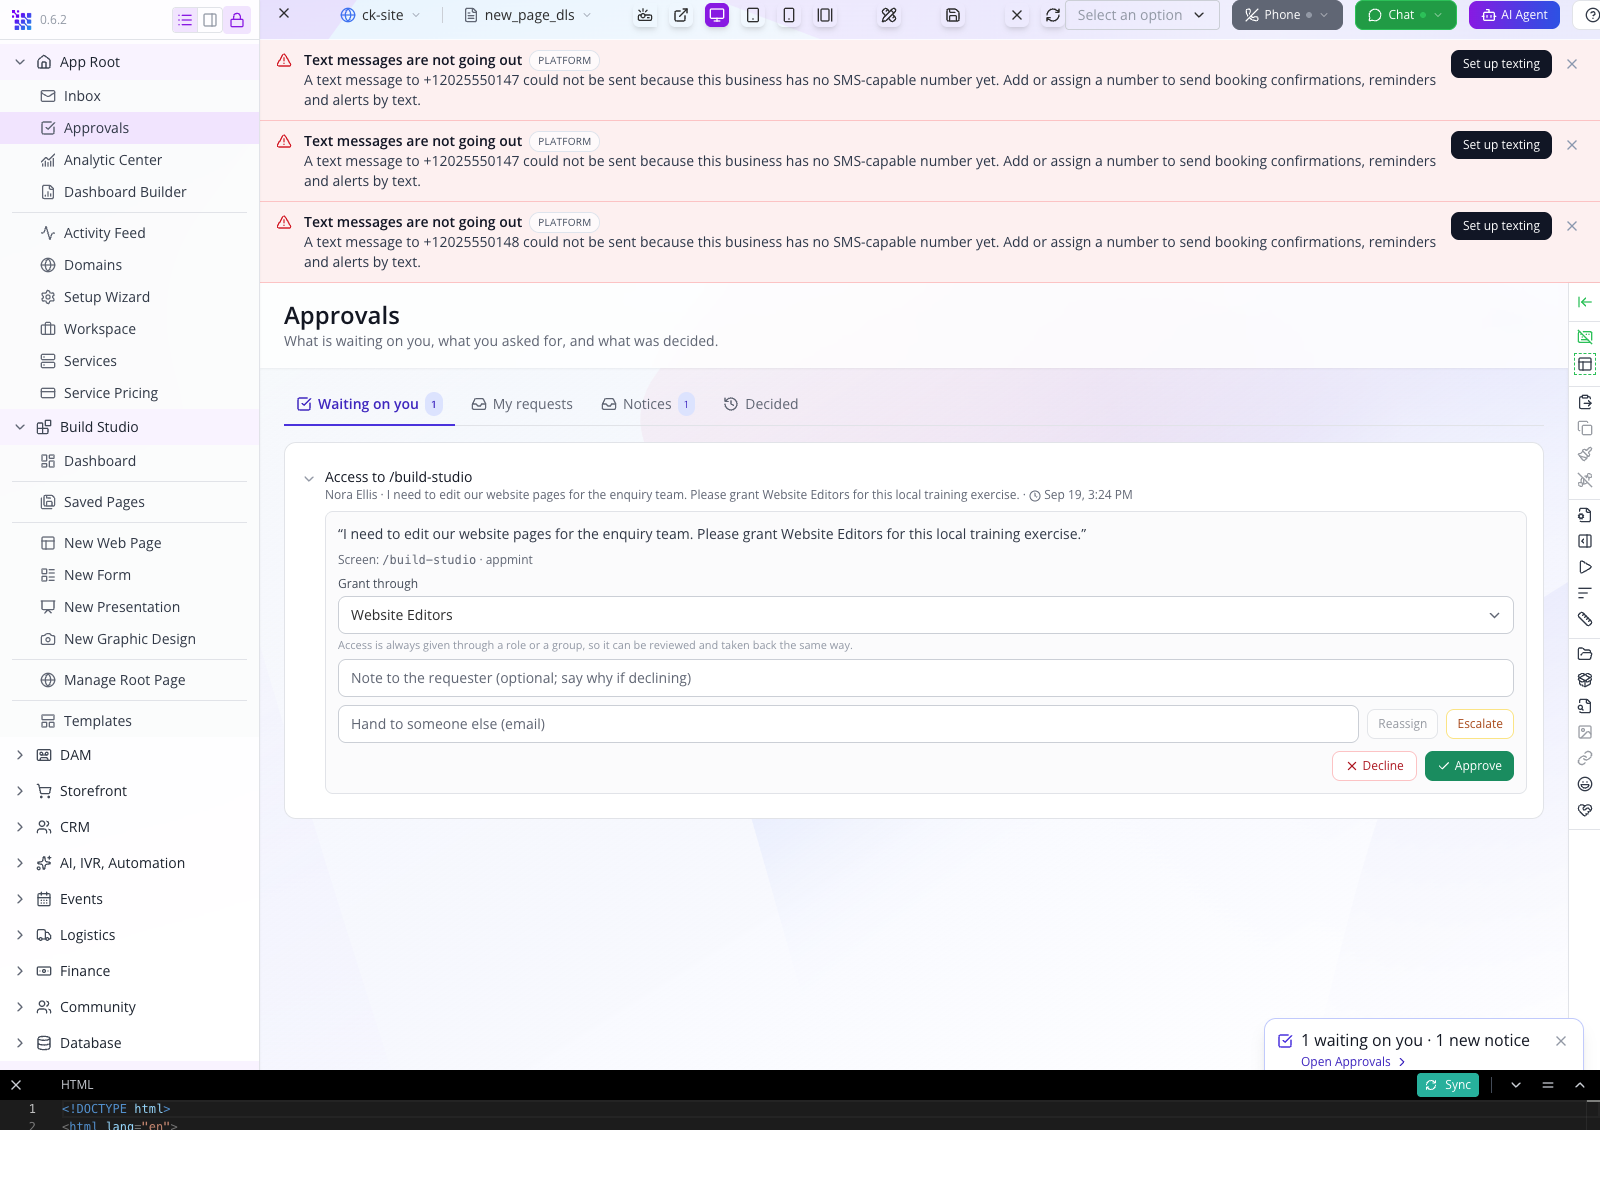
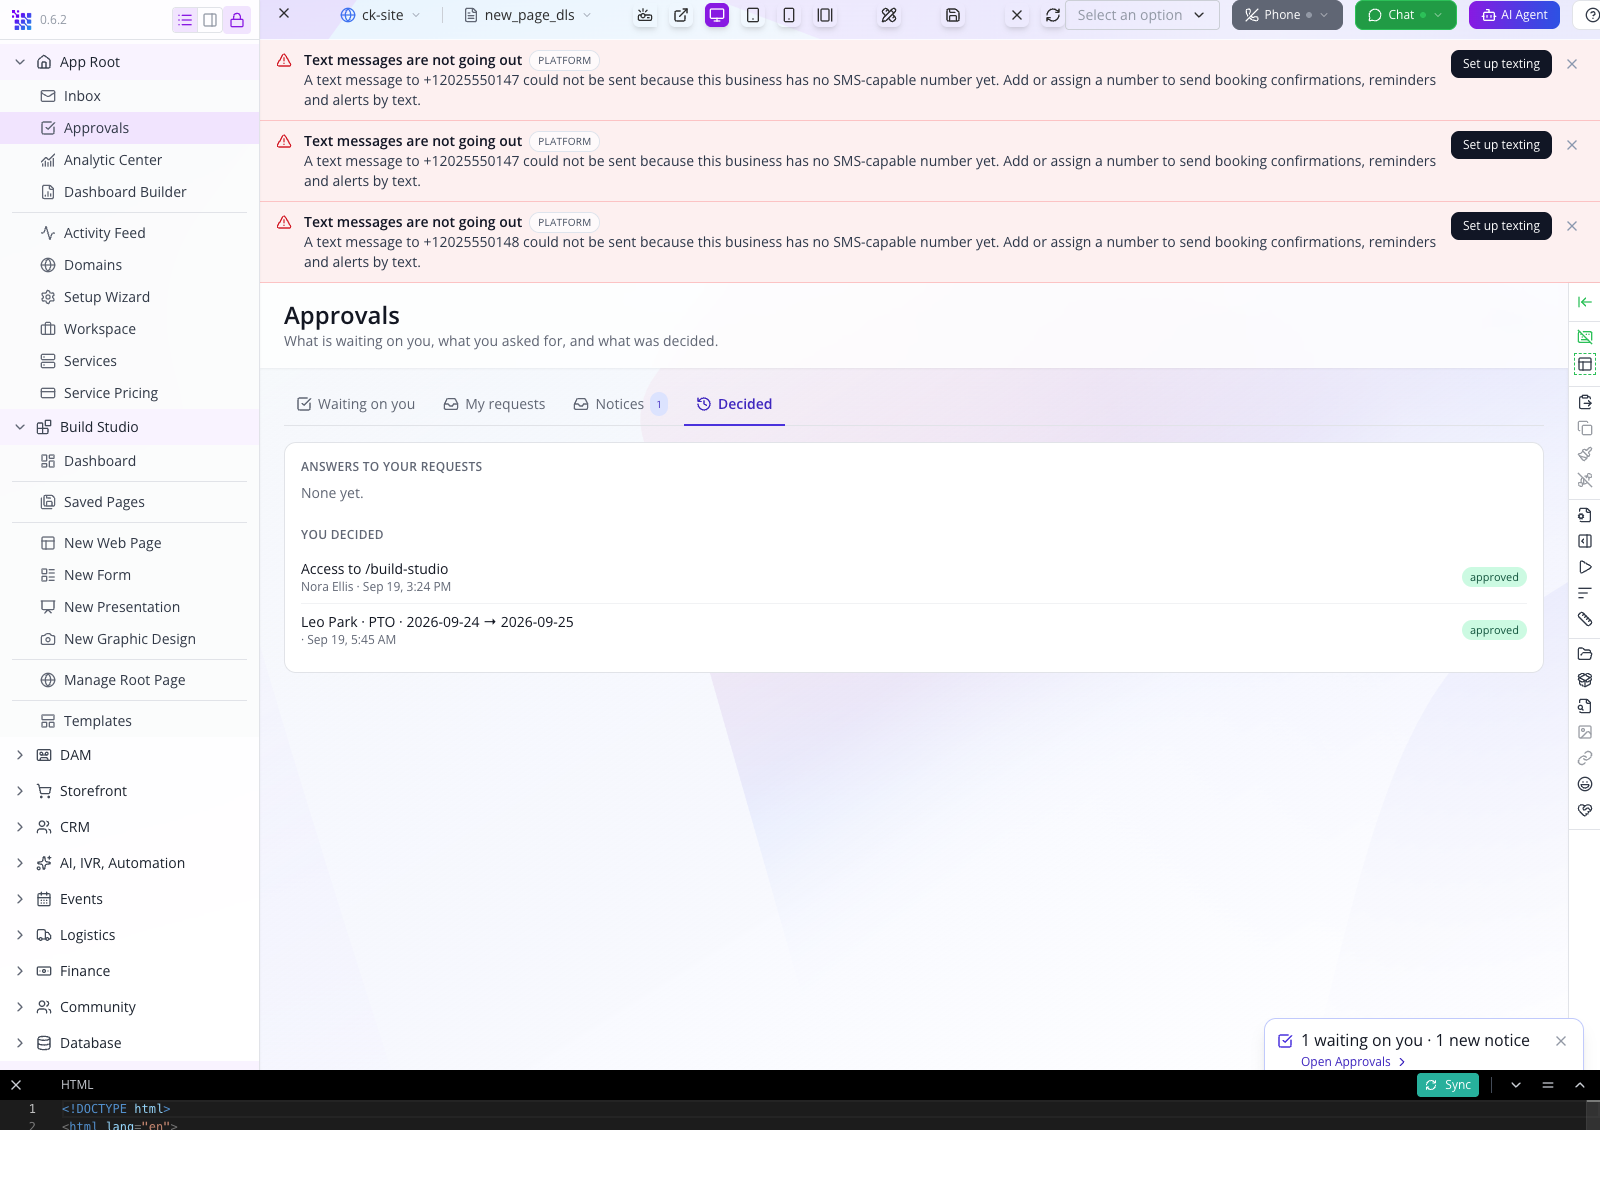
Select Approve. Decided now lists the website request as approved. The page also offers Decline, Reassign and Escalate; those are distinct decisions, not required steps in granting this request.
Have the colleague sign in again in a fresh session. Nora's new session showed Sales and Website Editors, with effective roles LeadEditor and Publisher. Opening the same website editor address then displayed the canvas instead of the refusal.
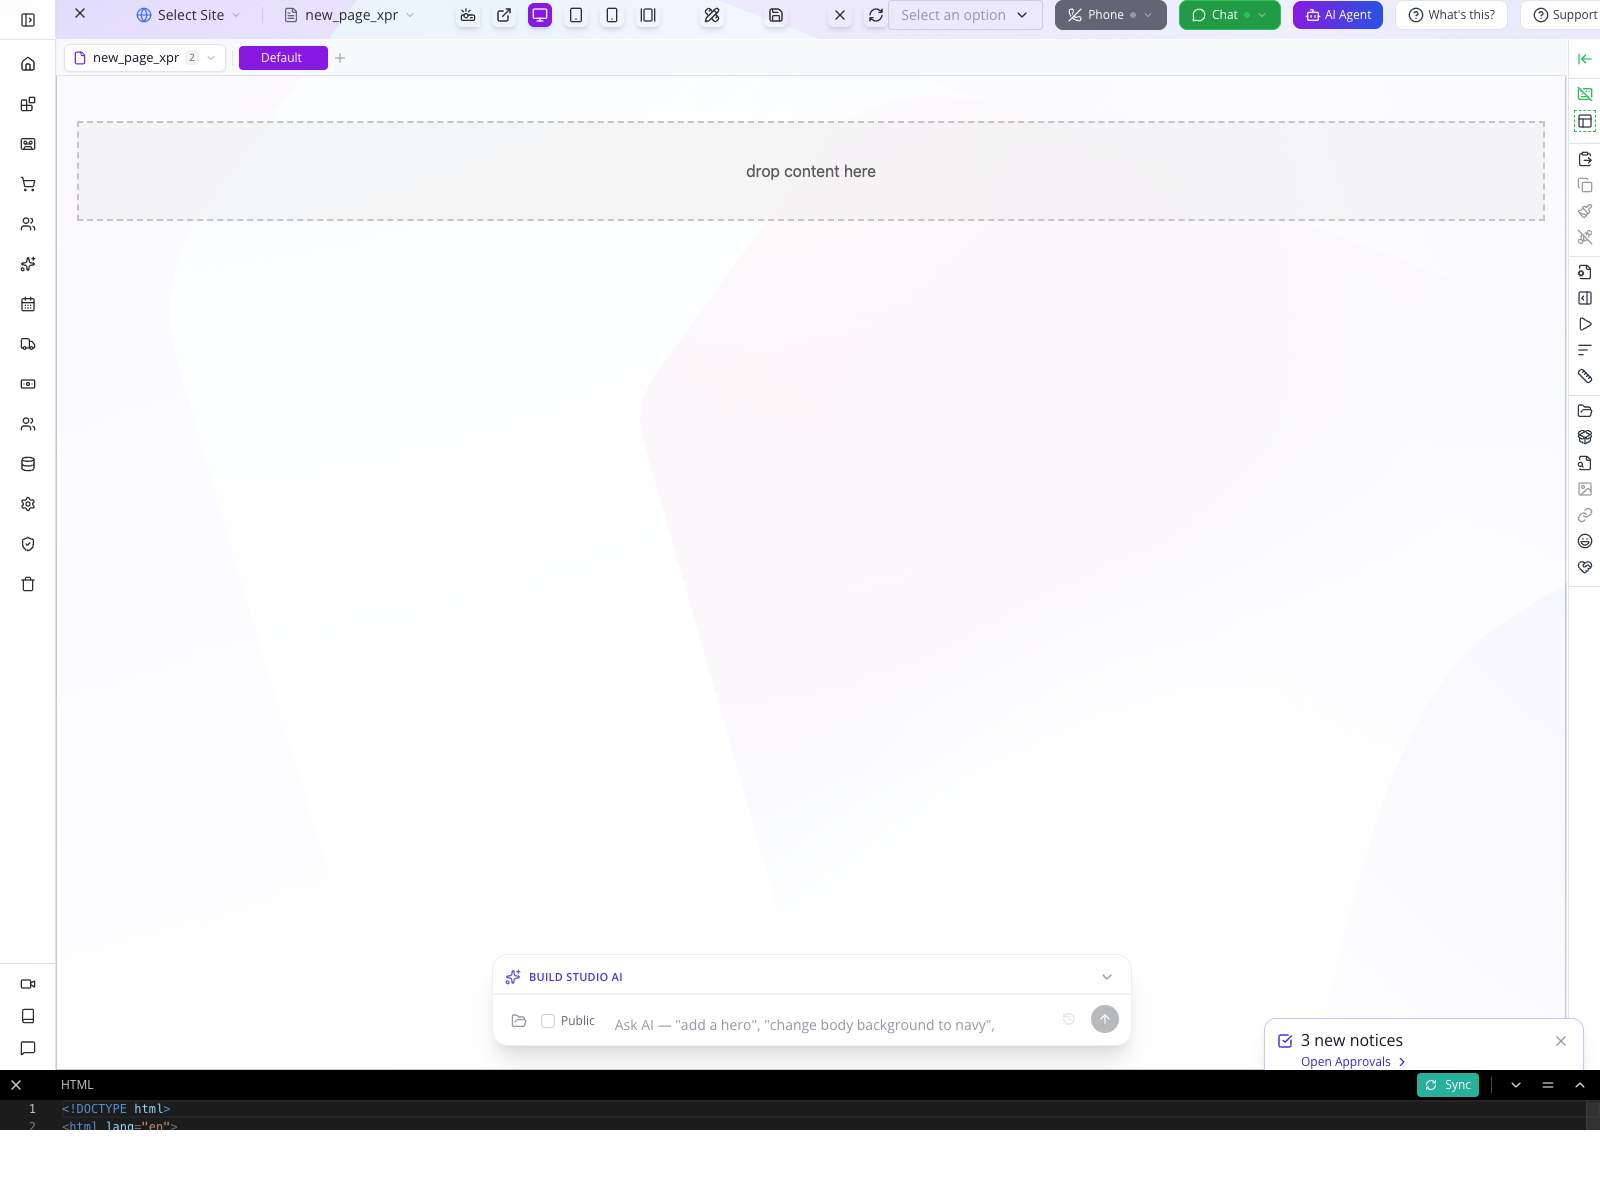
No website content was saved for this permission test. The check was that the requested editor became accessible through the selected group. Page creation and publishing are covered by the website course.
Take back the extra group and verify the result
As owner, return to Configuration → User, Group → Groups. On Website Editors, select Add User to open its member editor. Under Members, find the colleague and choose Remove from group, then Save group.
Reload and check the Website Editors card. In this exercise it returned to zero members, retaining Publisher. Sales still contained Nora and Maya; their enquiry job was not removed.
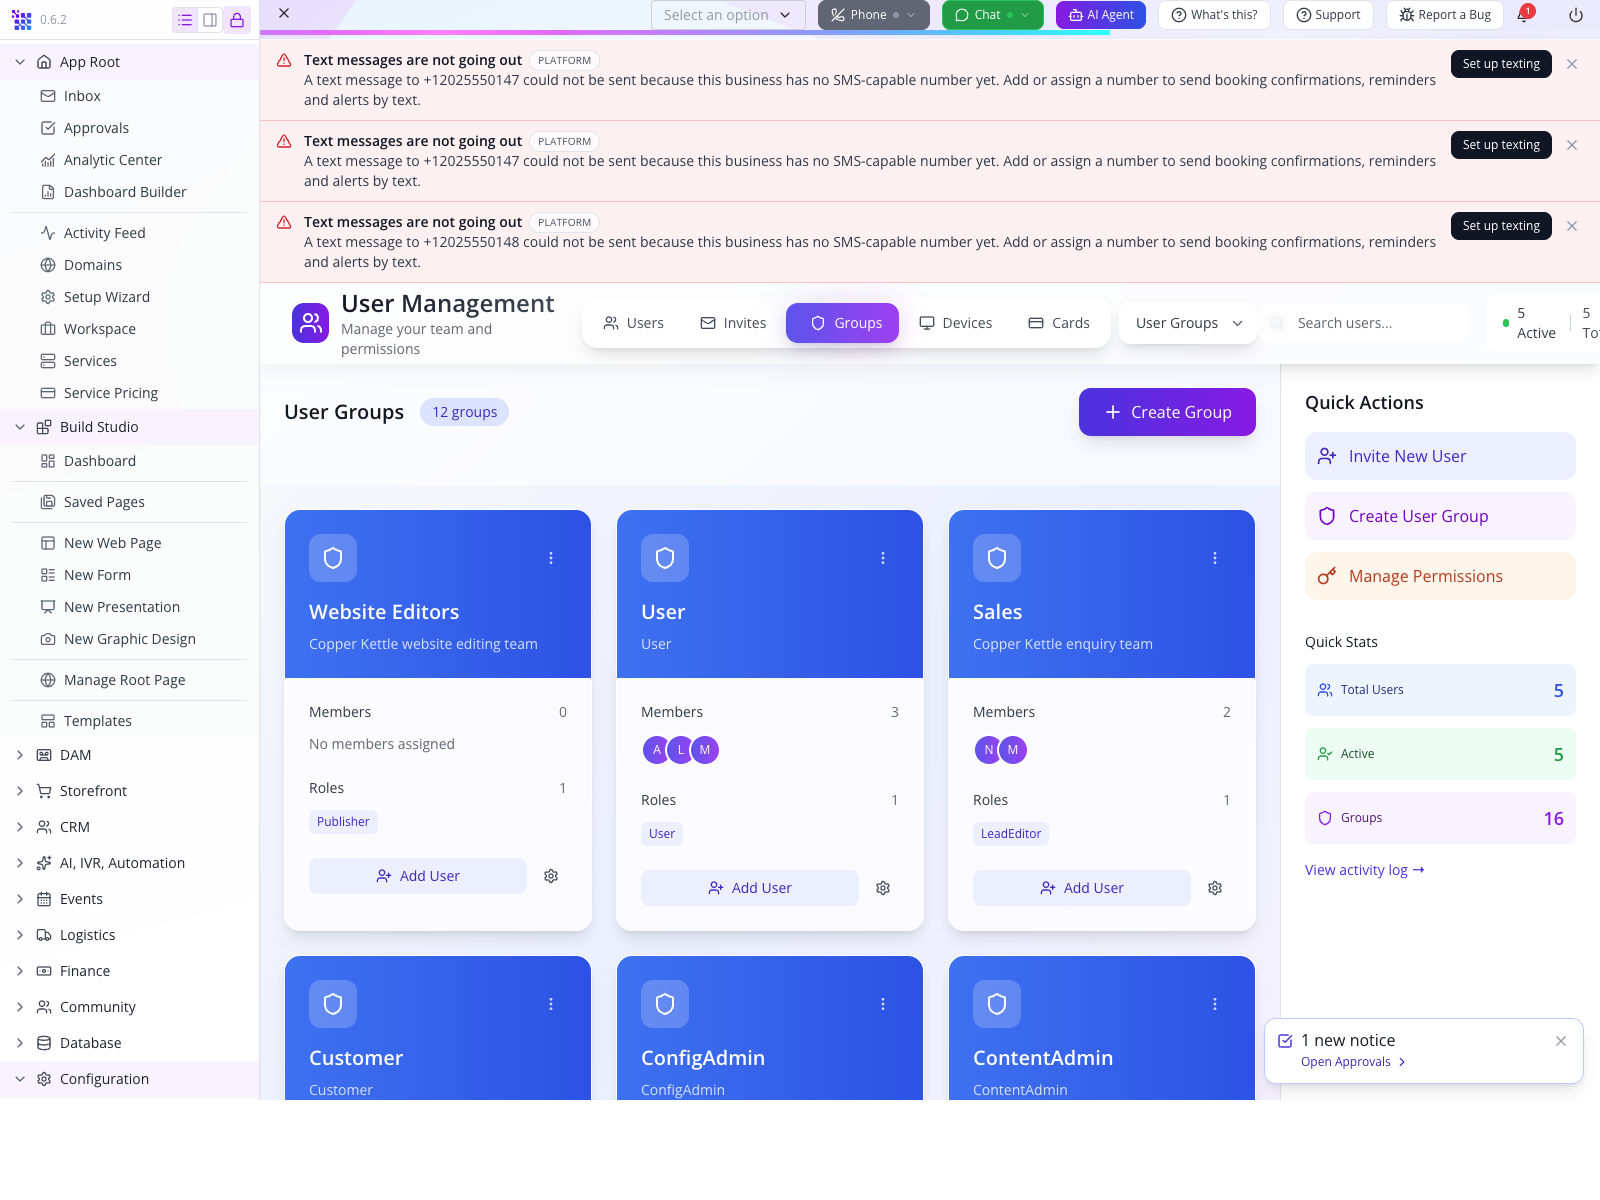
Have the colleague sign in again. Nora's effective access returned to Sales / LeadEditor, and the same website editor URL again displayed Not available for your role.
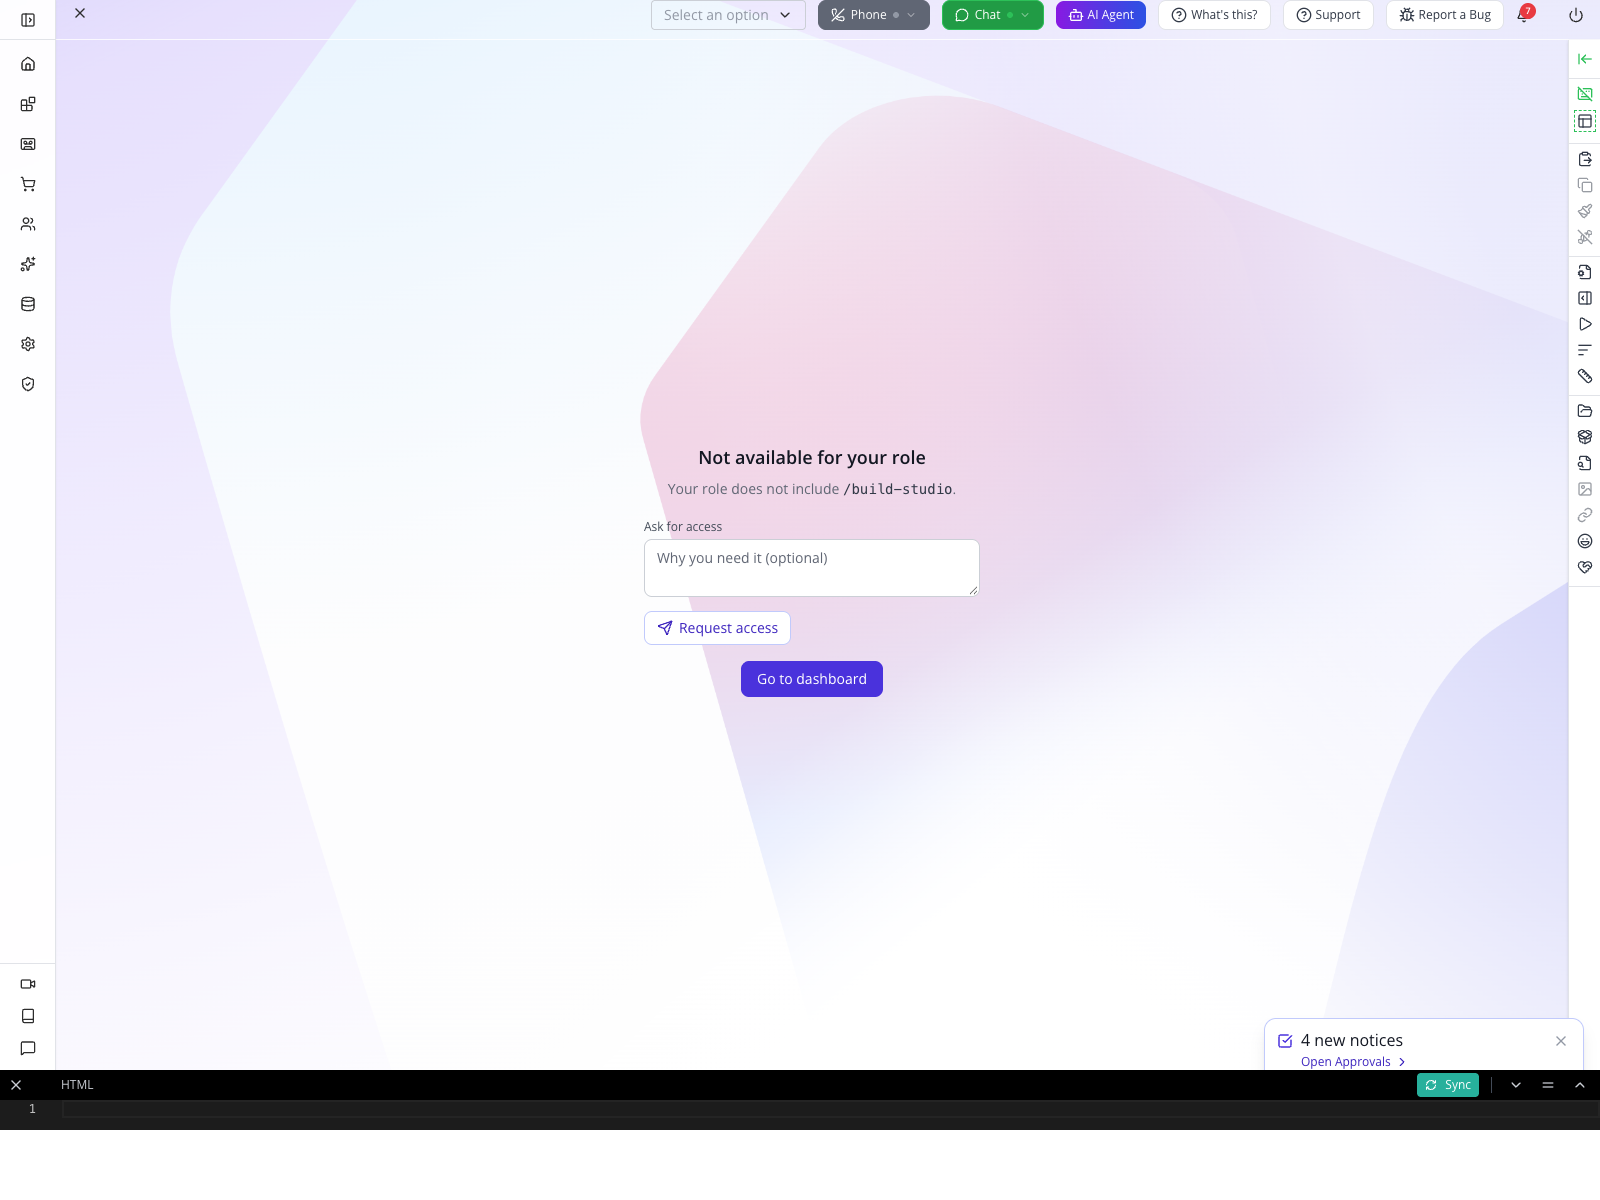
This verifies the changed grant in a new session. It does not prove immediate invalidation of every previously issued token. Review active sessions separately when an access change must take effect immediately.
Distinguish direct roles from inherited roles
In User Management → Users, open the colleague's row menu and select View Profile. Access & Permissions separates Groups from Direct roles. A person can have no direct roles and still inherit LeadEditor from Sales.
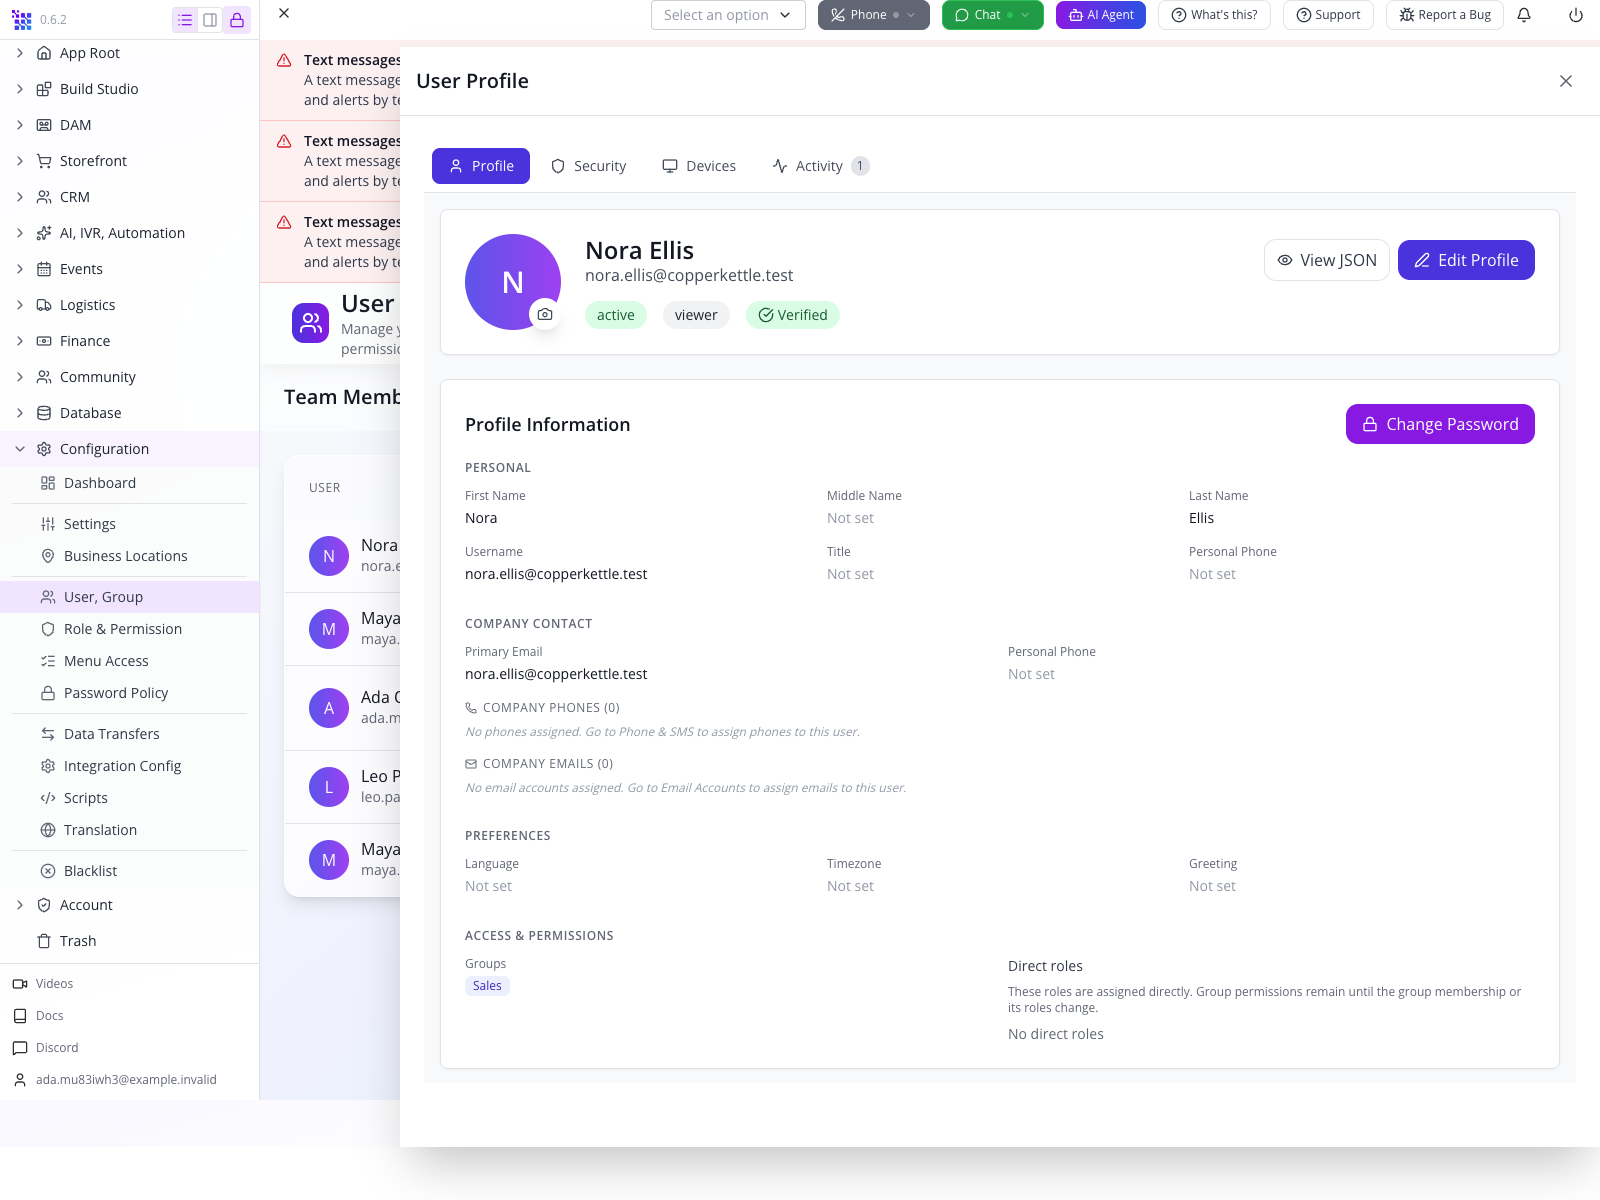
For an unwanted direct role, use Remove beside that role. Read Remove direct role? carefully: it identifies both the role and the person and explains that group access remains unchanged. Select Remove role to confirm, then reload and reopen the profile.
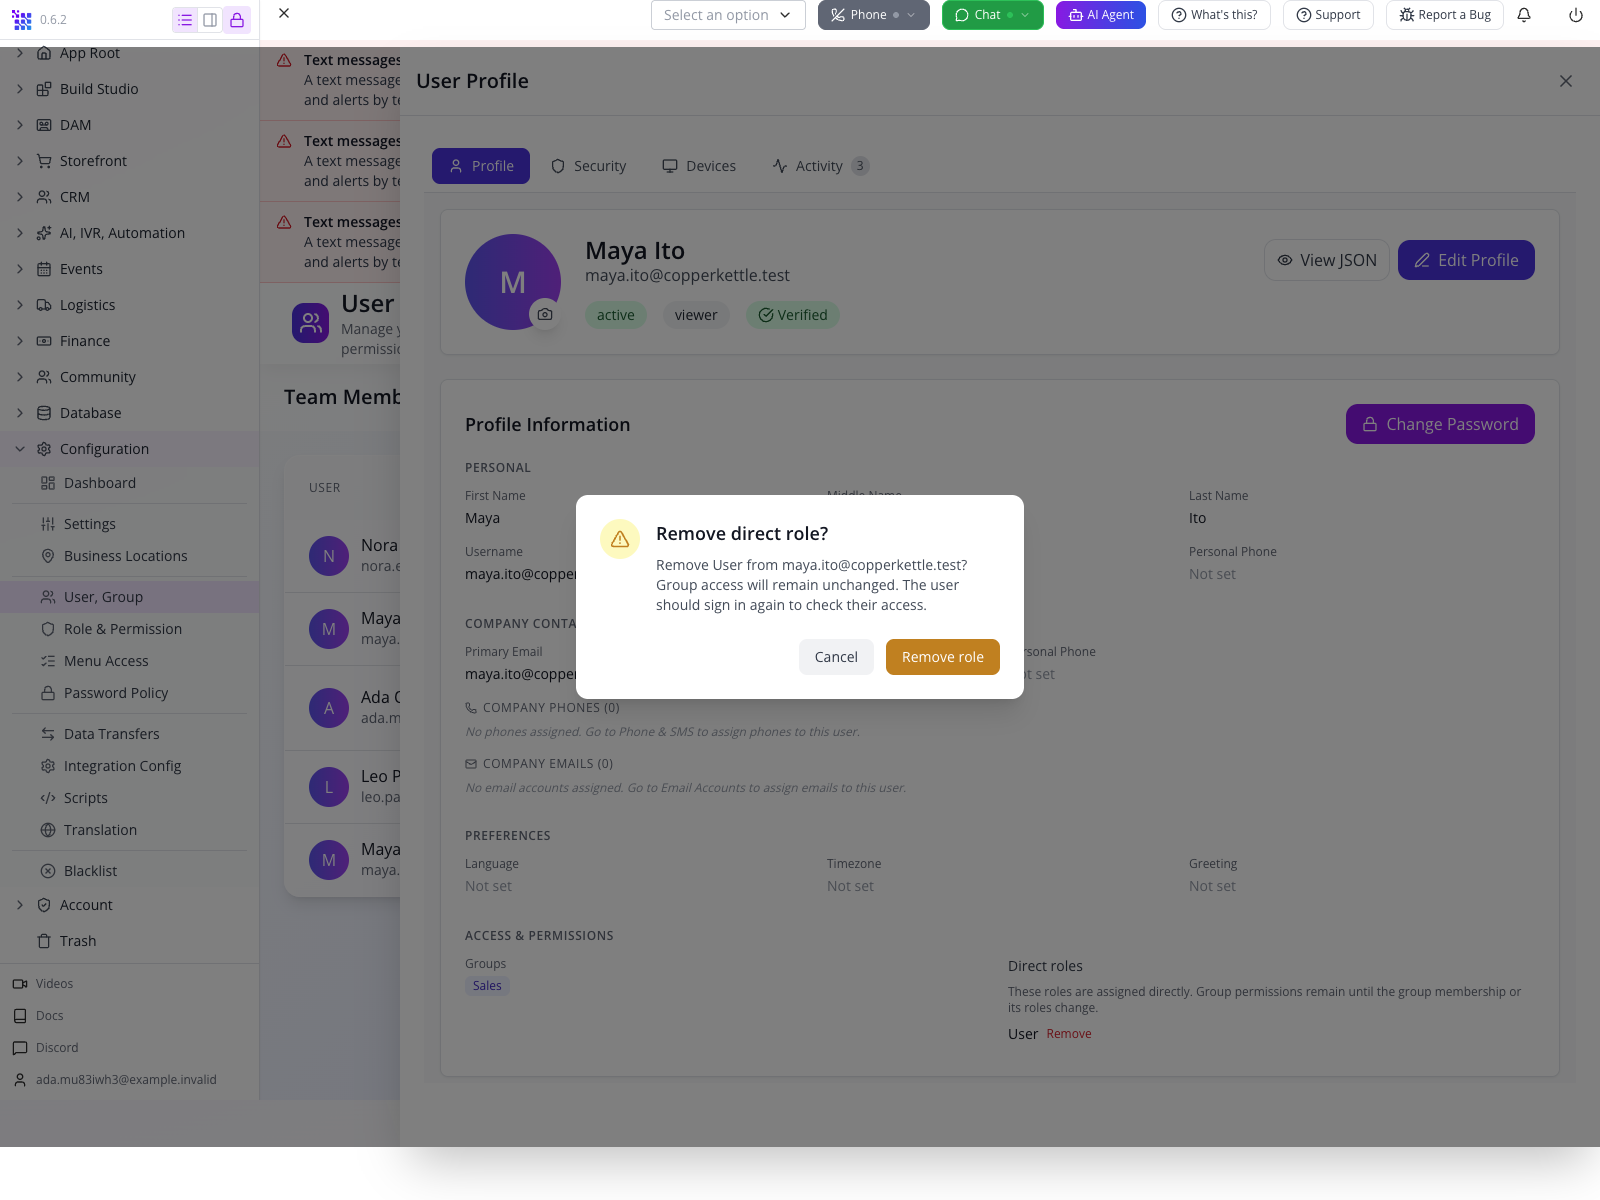
The repaired local flow removed Maya Ito's historical direct User role and kept Sales. After reload, her profile showed Sales and No direct roles. It did not convert inherited LeadEditor into a permanent direct role. Maya then signed in again: the new session inherited LeadEditor only and opened Leads successfully.
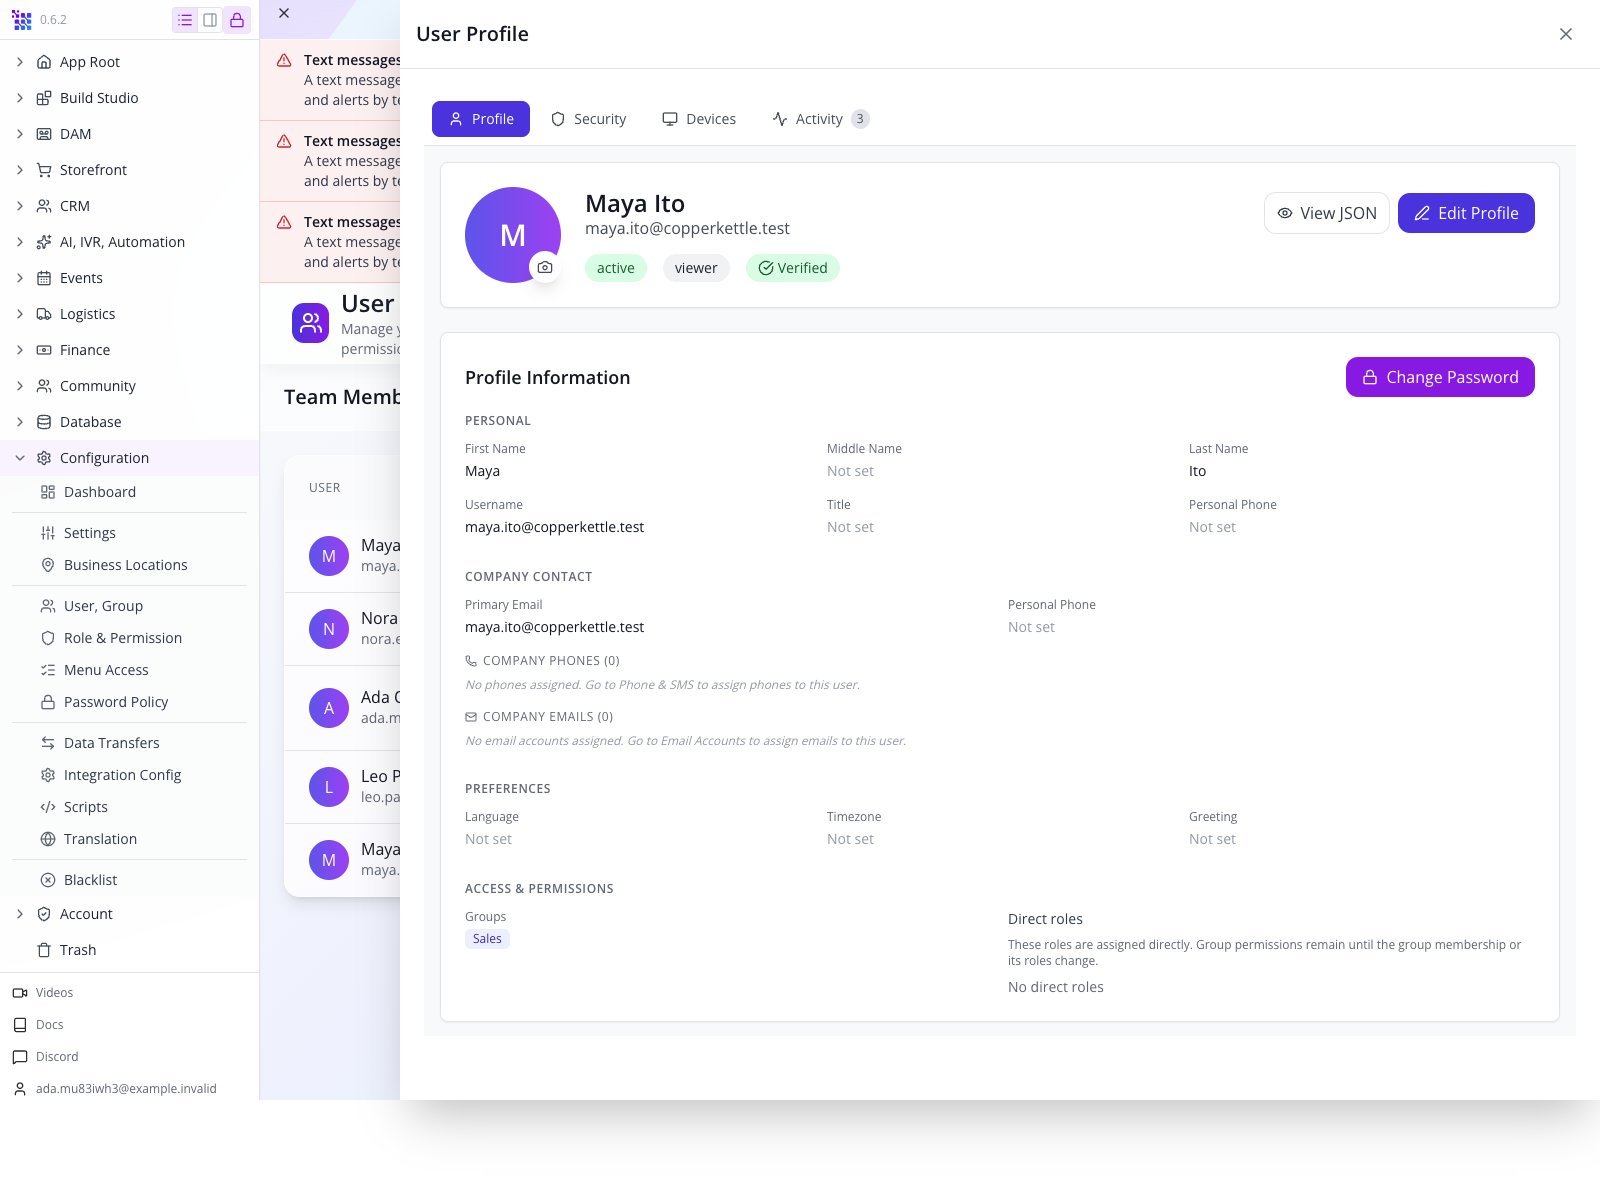
Use this control for a direct grant you intend to remove. To change an inherited grant, edit the group or its membership instead. Protected administrator roles are not offered for removal by this ordinary profile control.
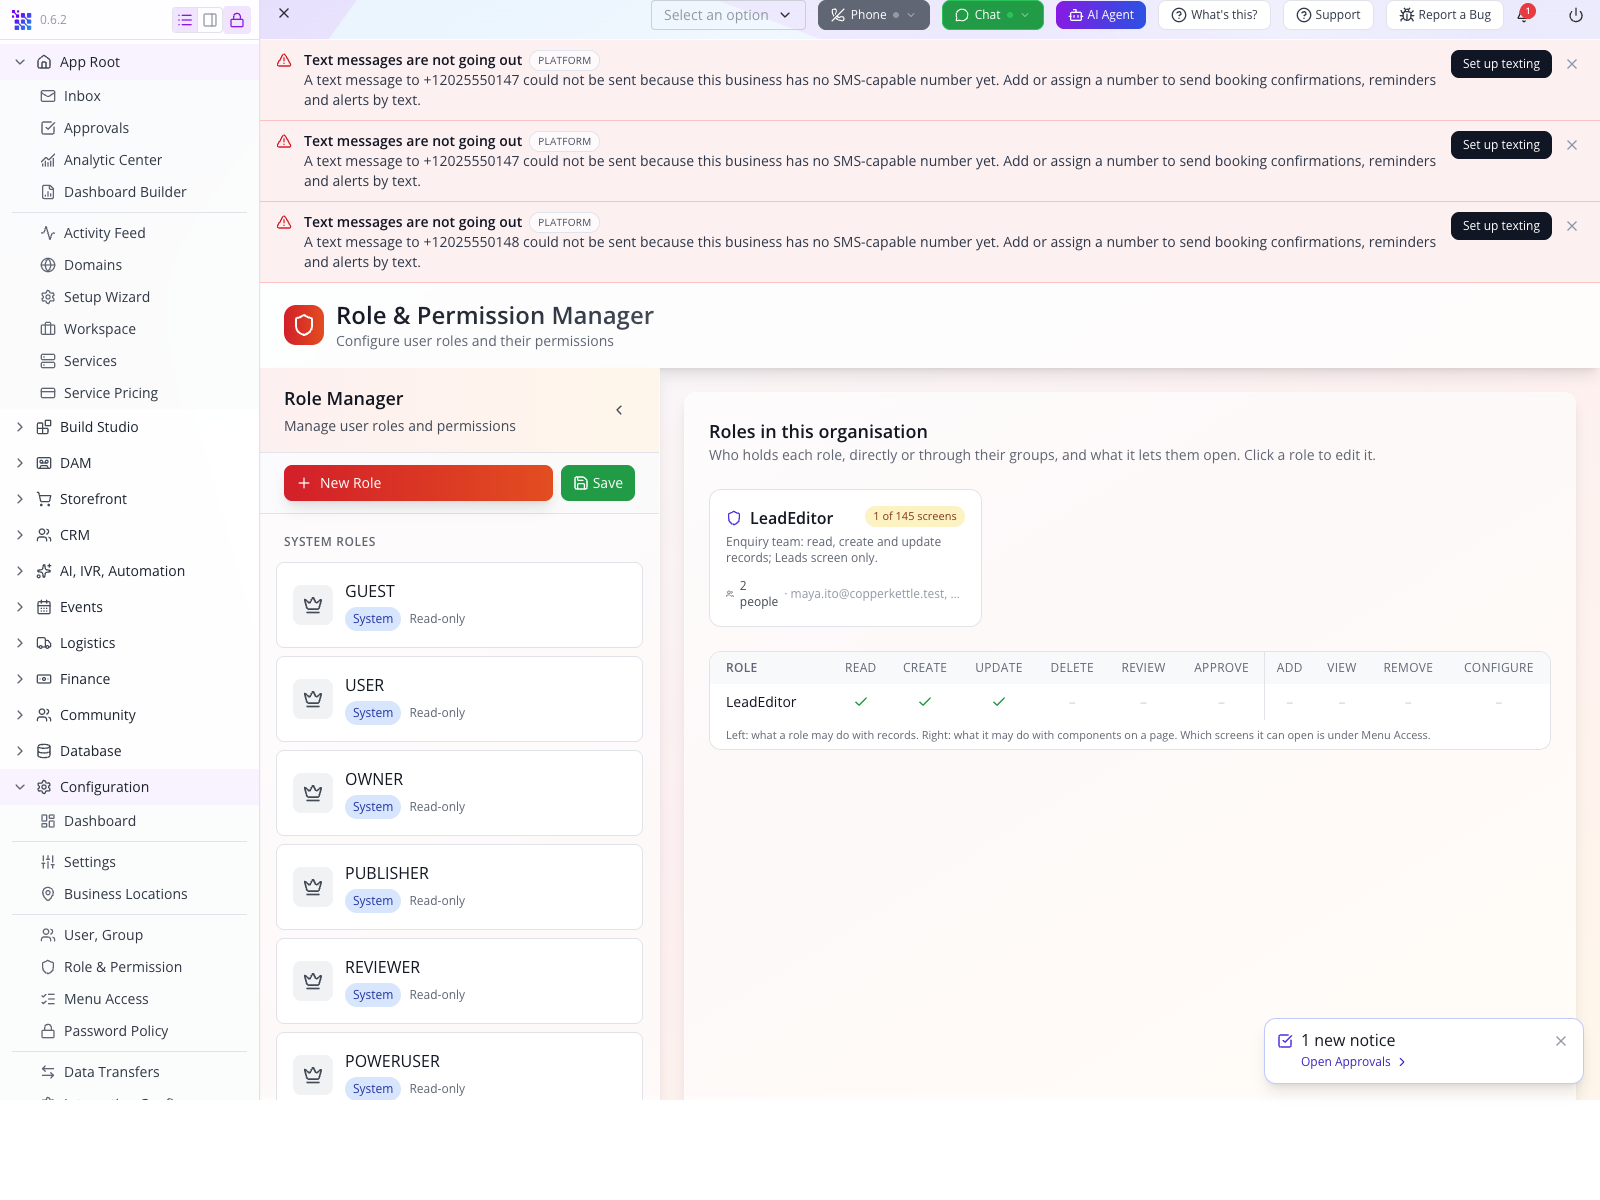
Return to Configuration → Role & Permission and inspect LeadEditor’s holder summary. It counts people with direct assignments and people inheriting the role from a group. In this example, it shows 2 people: Maya Ito and Nora Ellis. Reload and check again. A person who holds the role both ways should still count once.
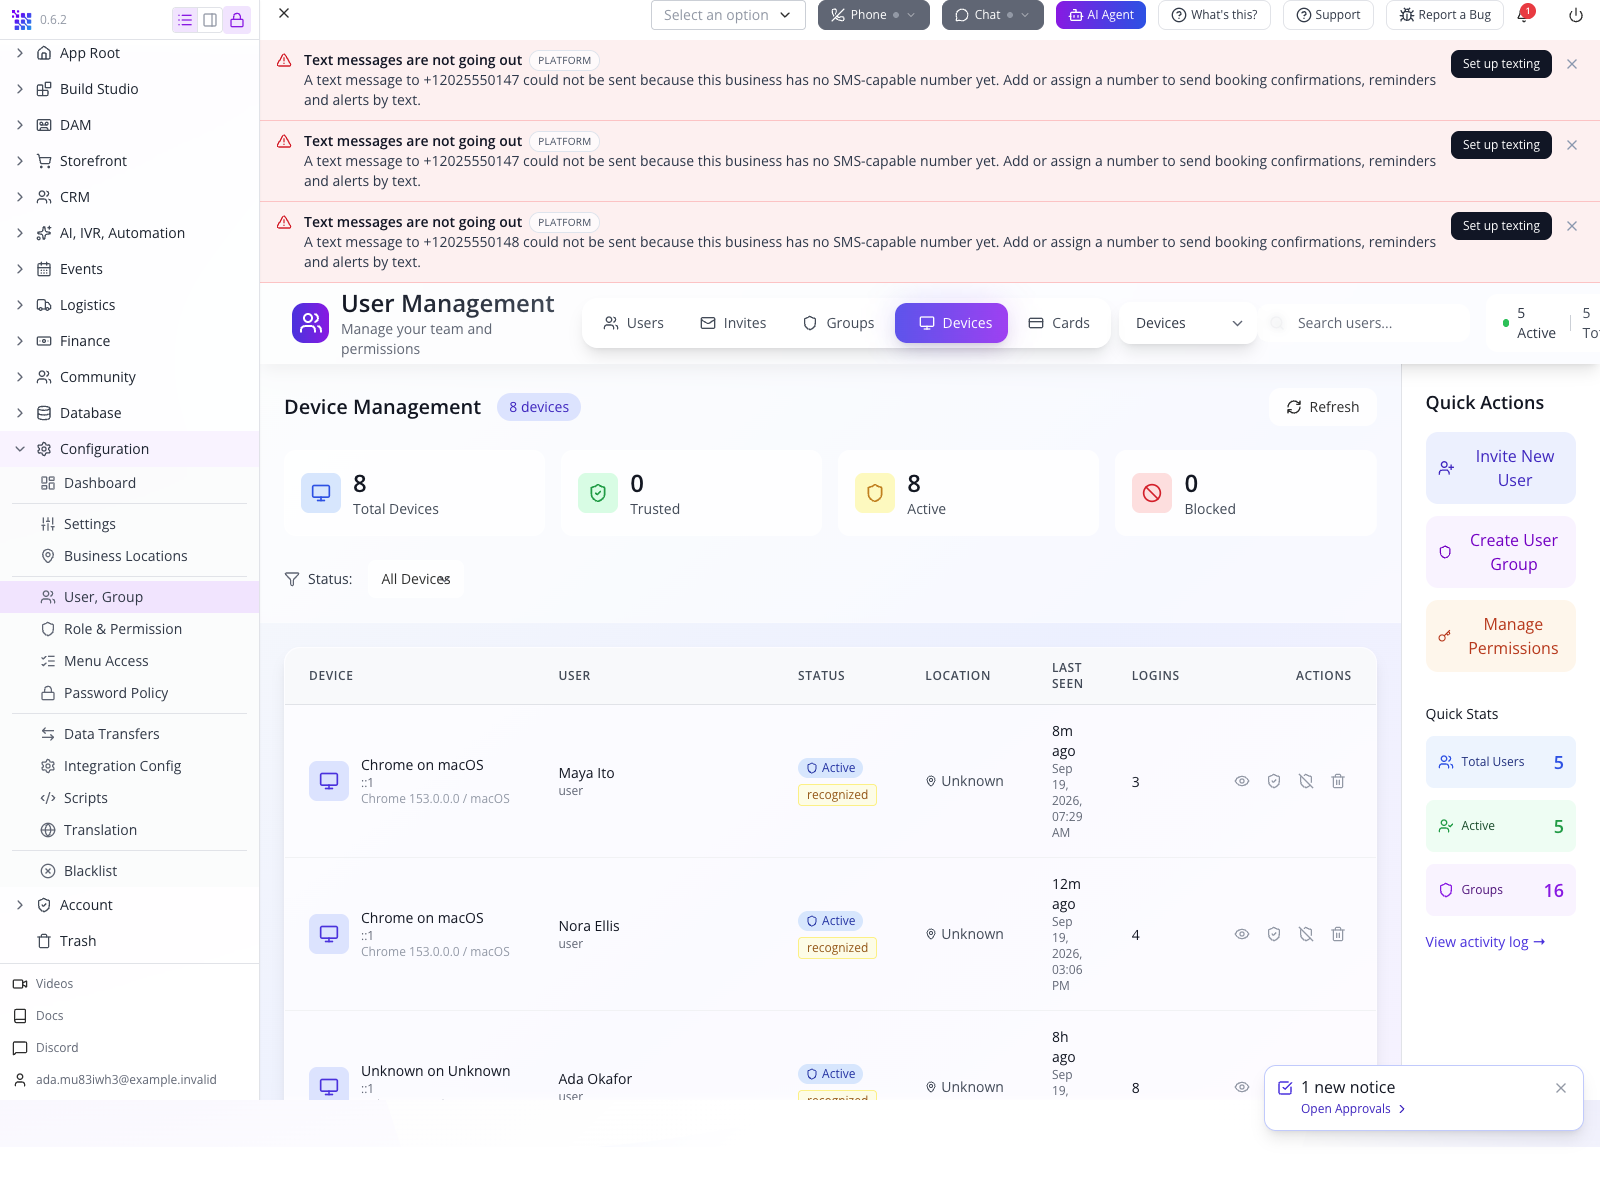
Recognise devices and access cards
In User Management → Devices, compare the device, person, status and recent activity before using any trust or block action. The local page showed eight devices, including recognised Chrome sessions for Nora and Maya. Compare the user, status and last-seen information; a browser session is not automatically a trusted device. No trust or block setting was changed.
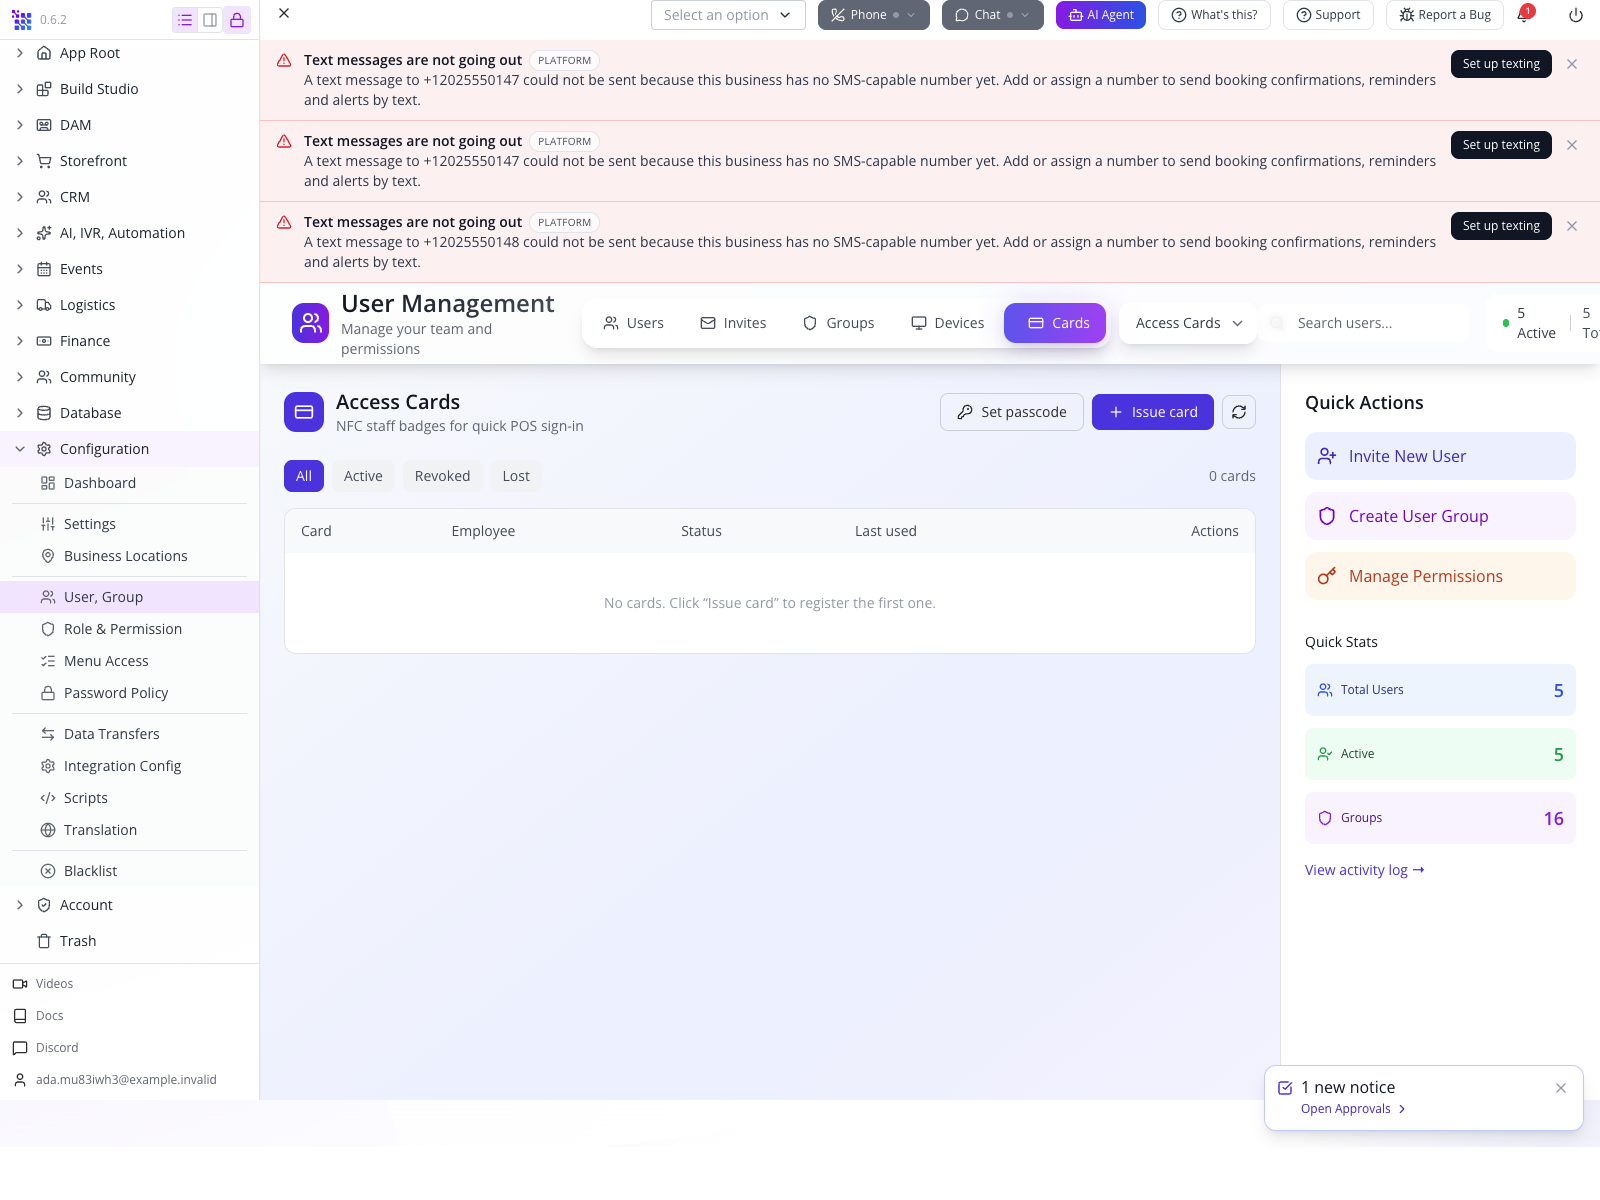
Use Cards to open Access Cards. The page identifies these as NFC staff badges for quick POS sign-in and offers Set passcode, Issue card and status filters. The training organisation had no cards. Issuance and revocation affect a physical login route; use the employee/device course when setting them up. No card was issued or written in this permissions lesson.
Keep password policy separate from job permissions
Open Configuration → Password Policy to inspect the available policies. The current screen is a data table, including the label MIN LENGHT. The training company had no custom policy records.

A group’s Password policy selector controls which policy it references; it does not add CRM or website permissions. Leave Org default while learning the access model, then define company requirements deliberately.
Lock a colleague’s account and verify the result
Use a controlled colleague for this rehearsal. Keep the owner signed in separately so you can restore the account. Removing Sales or hiding a menu changes permissions; it does not by itself stop sign-in.
- As owner, open Configuration → User, Group → Users. On the colleague’s row, open the menu, choose View Profile, then Security.
- Read Account status. An unlocked account shows Active — can sign in normally and Lock account.
- Select Lock account. The confirmation names the colleague’s email. Check it before confirming; do not lock your administrator account or an unrelated colleague.
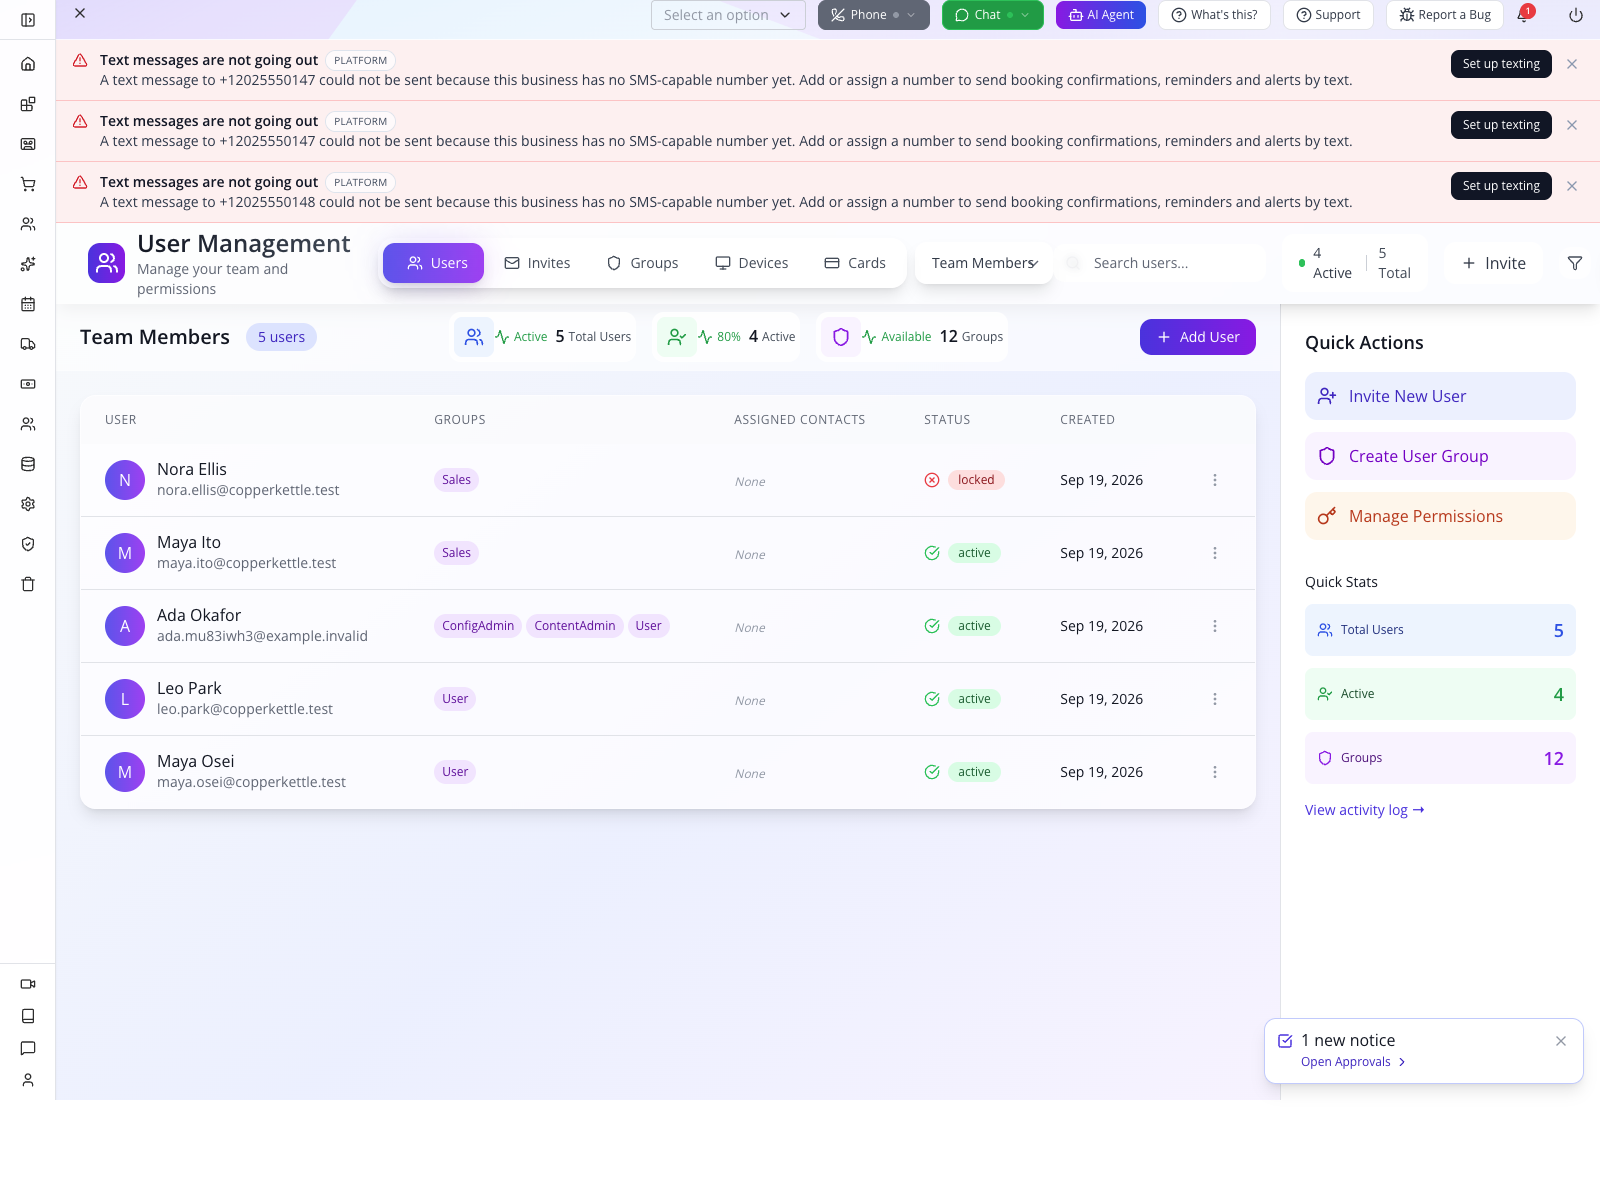
- Confirm Lock account once. Wait for Locked out — cannot sign in and the replacement Unlock account control. Return to Users: the colleague’s row should say Locked and the active count should fall by one. Reload to confirm the saved state. In the rehearsal, total users stayed five and active users changed from five to four.
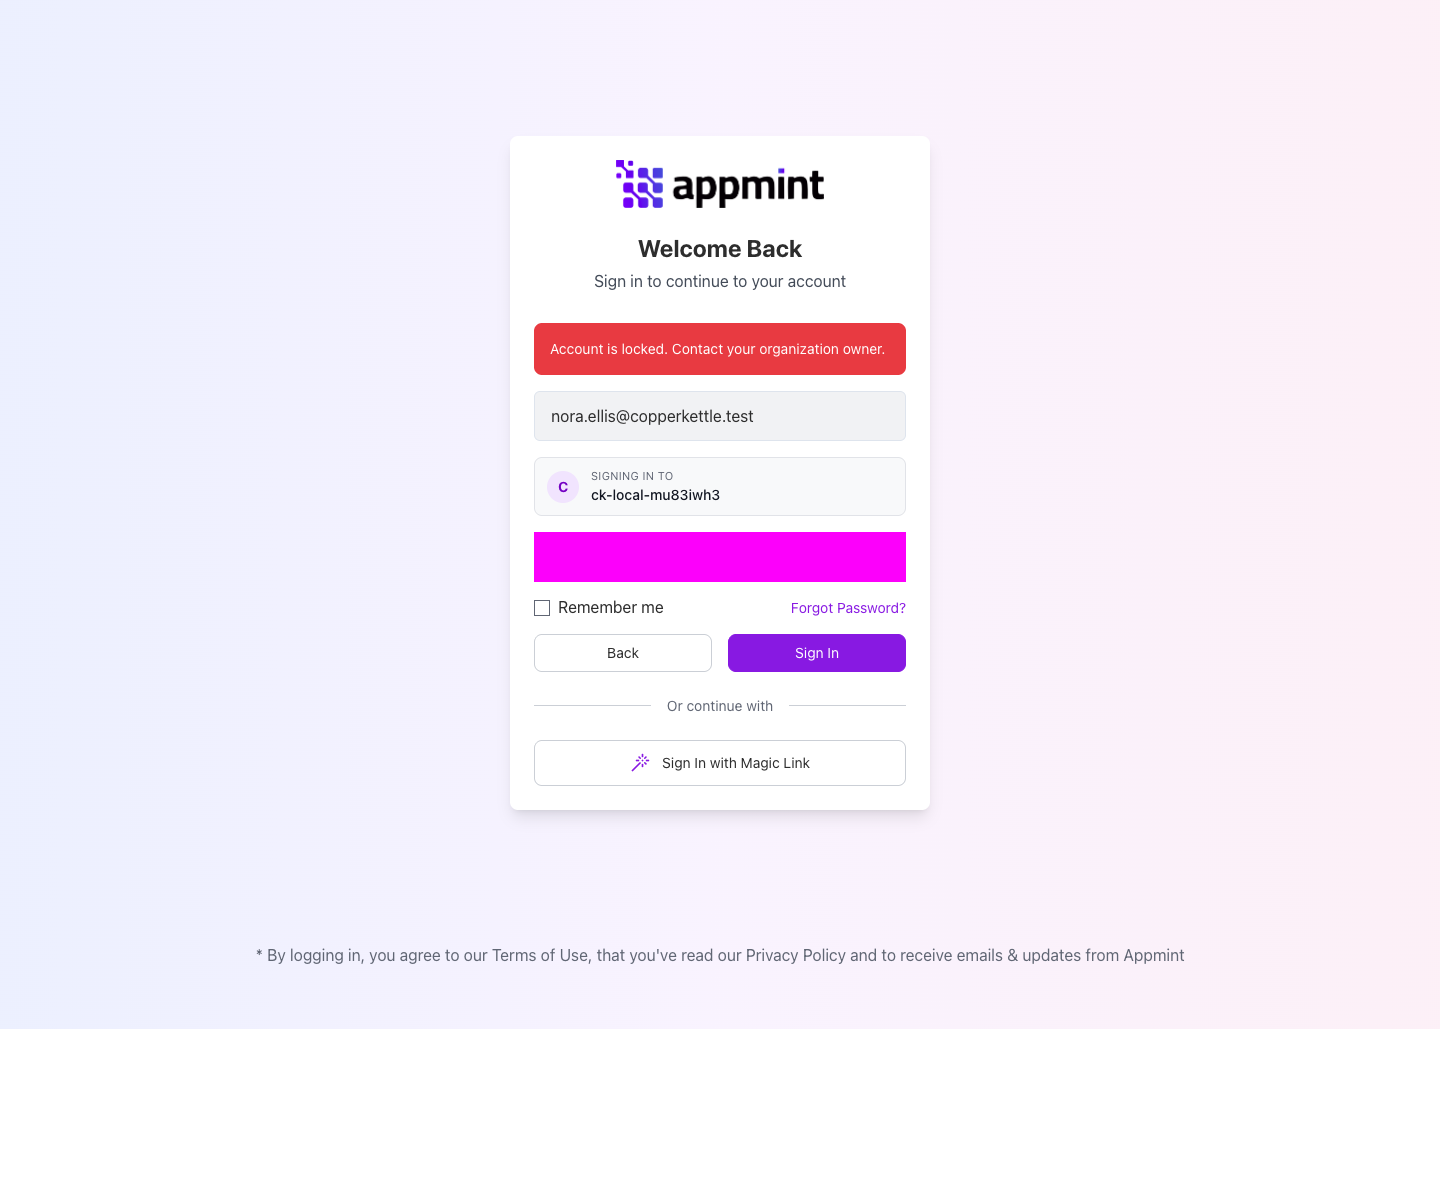
- In a separate colleague browser, try normal password sign-in. The tested account received Account is locked. Contact your organization owner. Existing authenticated HTTP requests also returned403. Live chat disconnected. Separate live checks verified that device-event and workspace connections disconnected and refused reconnection while locked.
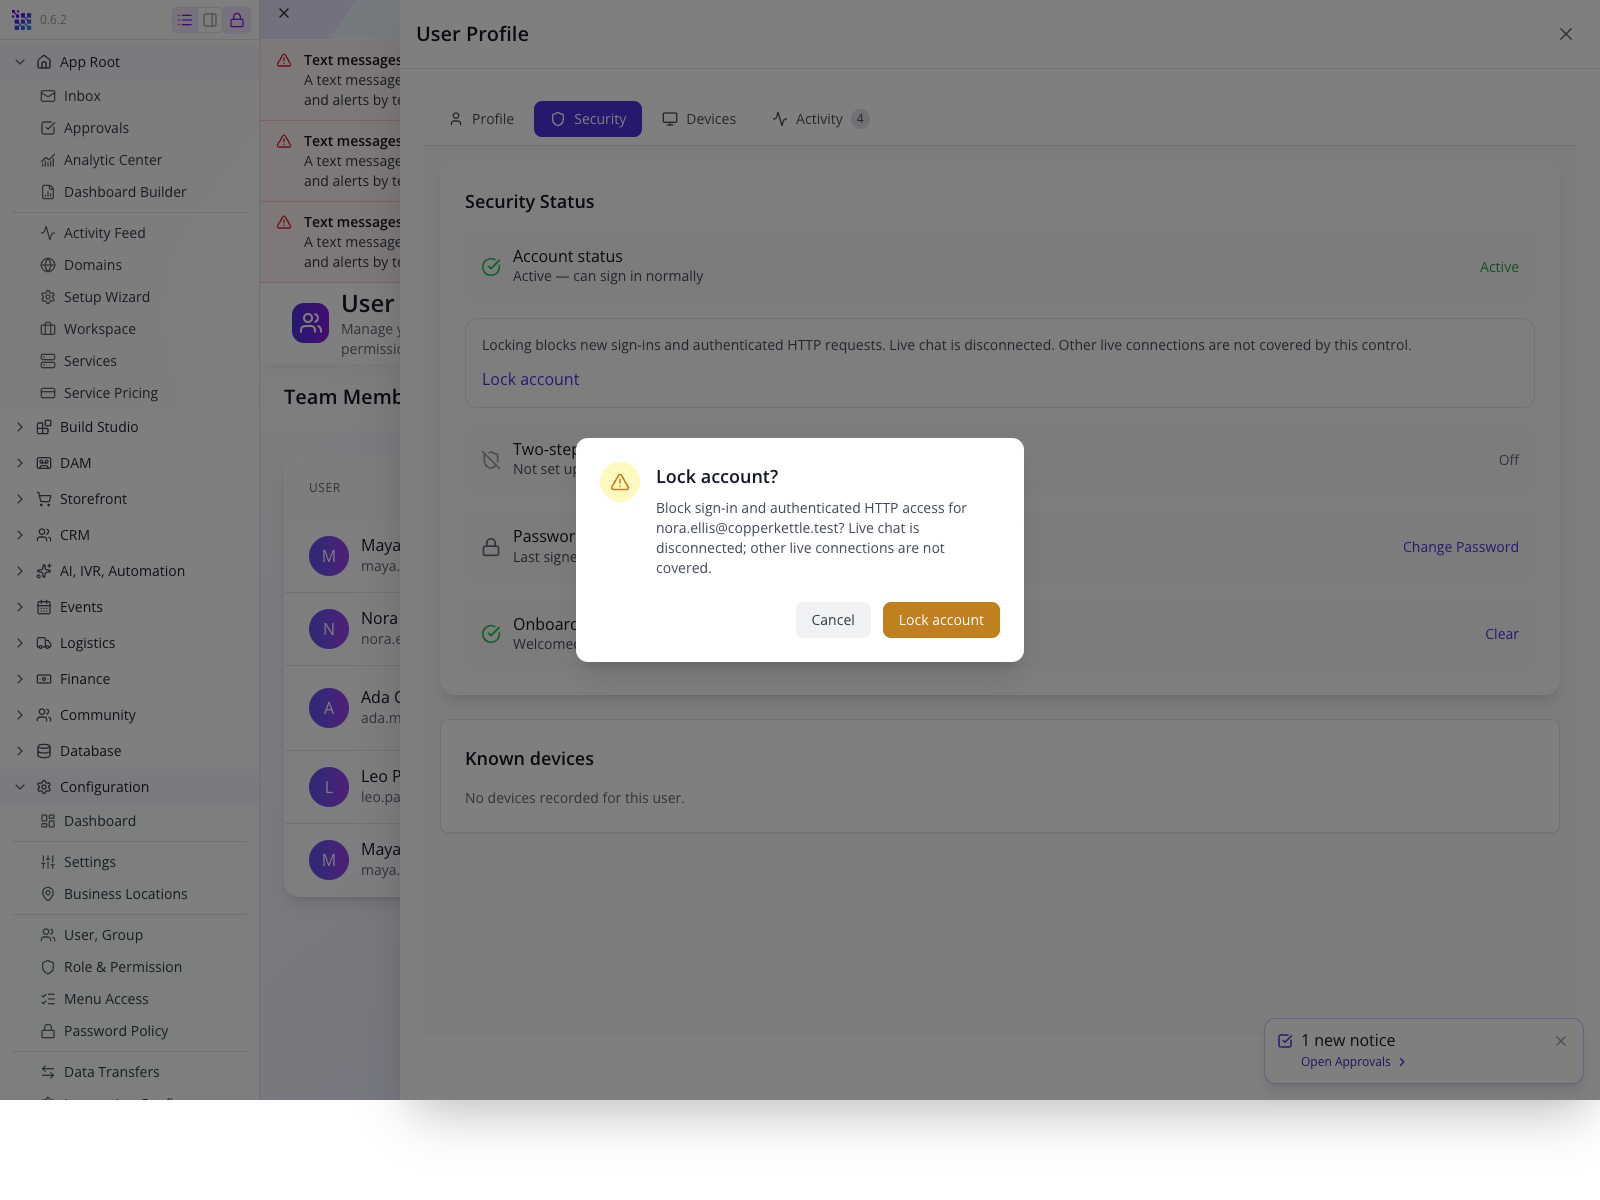
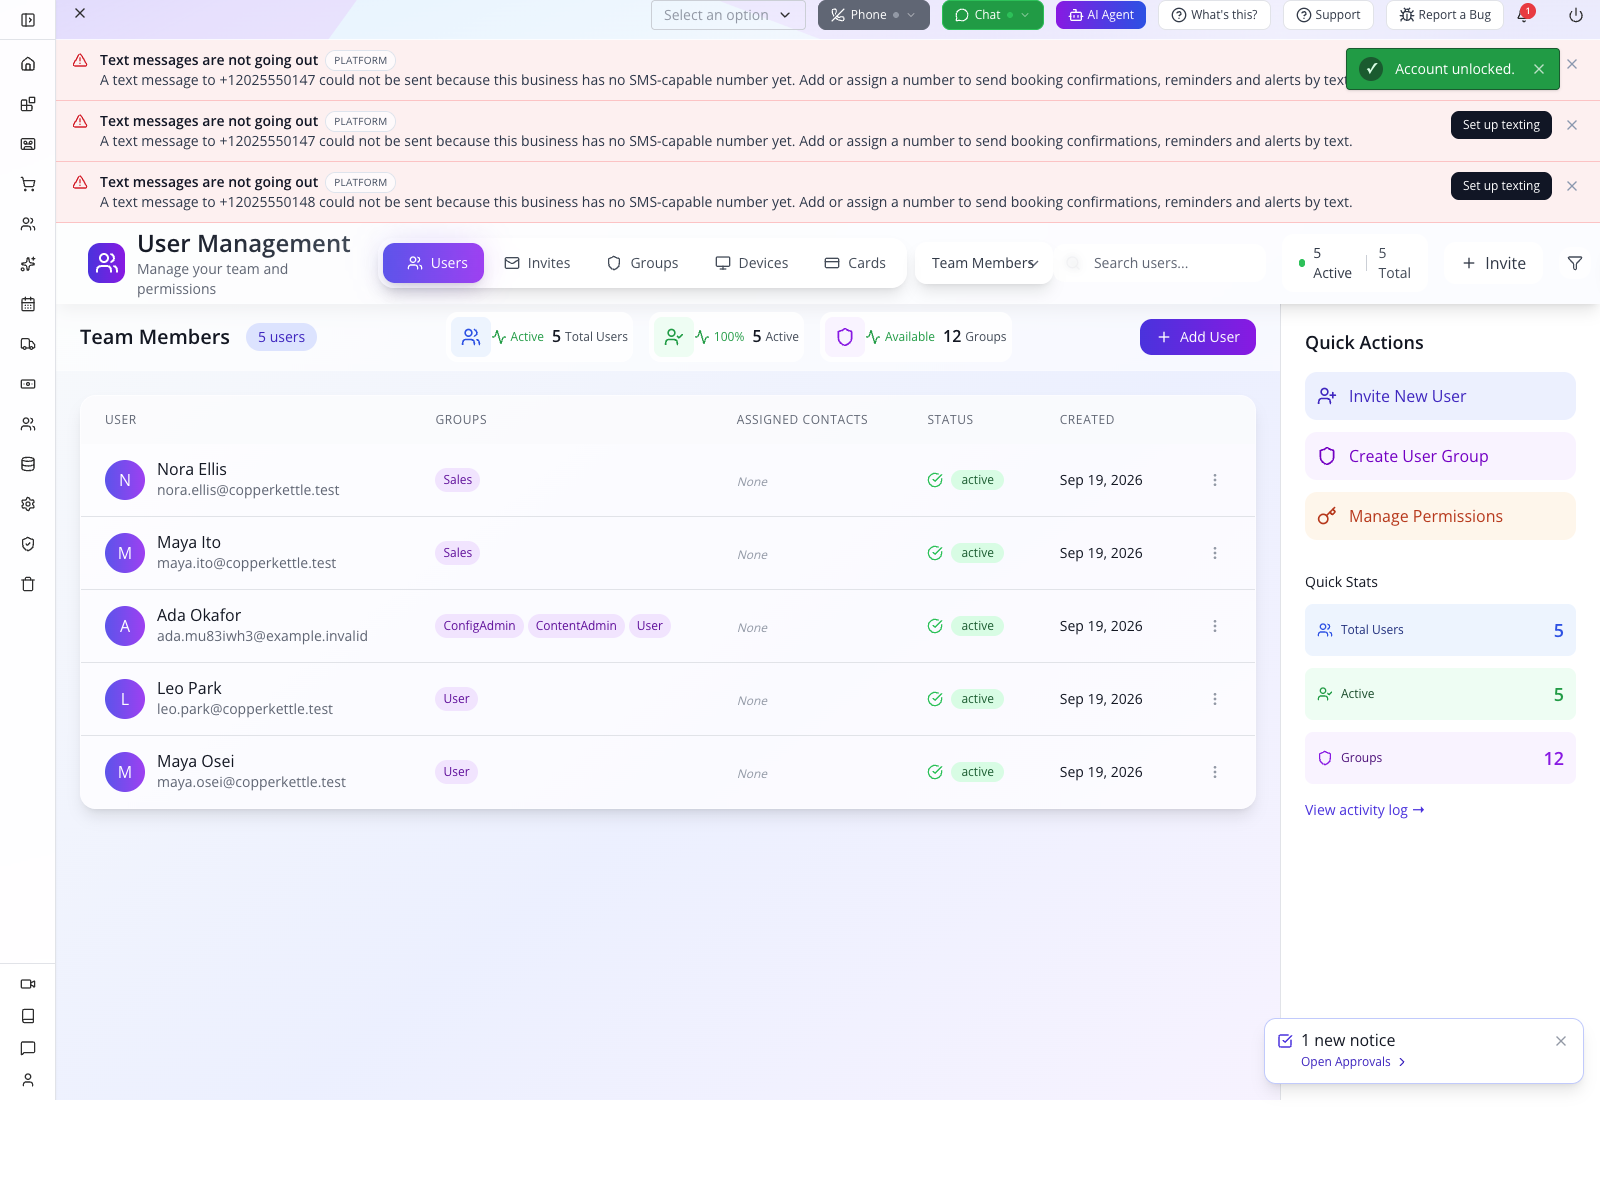
For this rehearsal, restore the colleague: return to their Security tab, select Unlock account, check the email in the confirmation and confirm. Wait for Active again, then have the colleague sign in normally. Nora’s recovered session retained Sales / LeadEditor; the lock did not replace her groups or roles. An account’s saved data also remains in place.
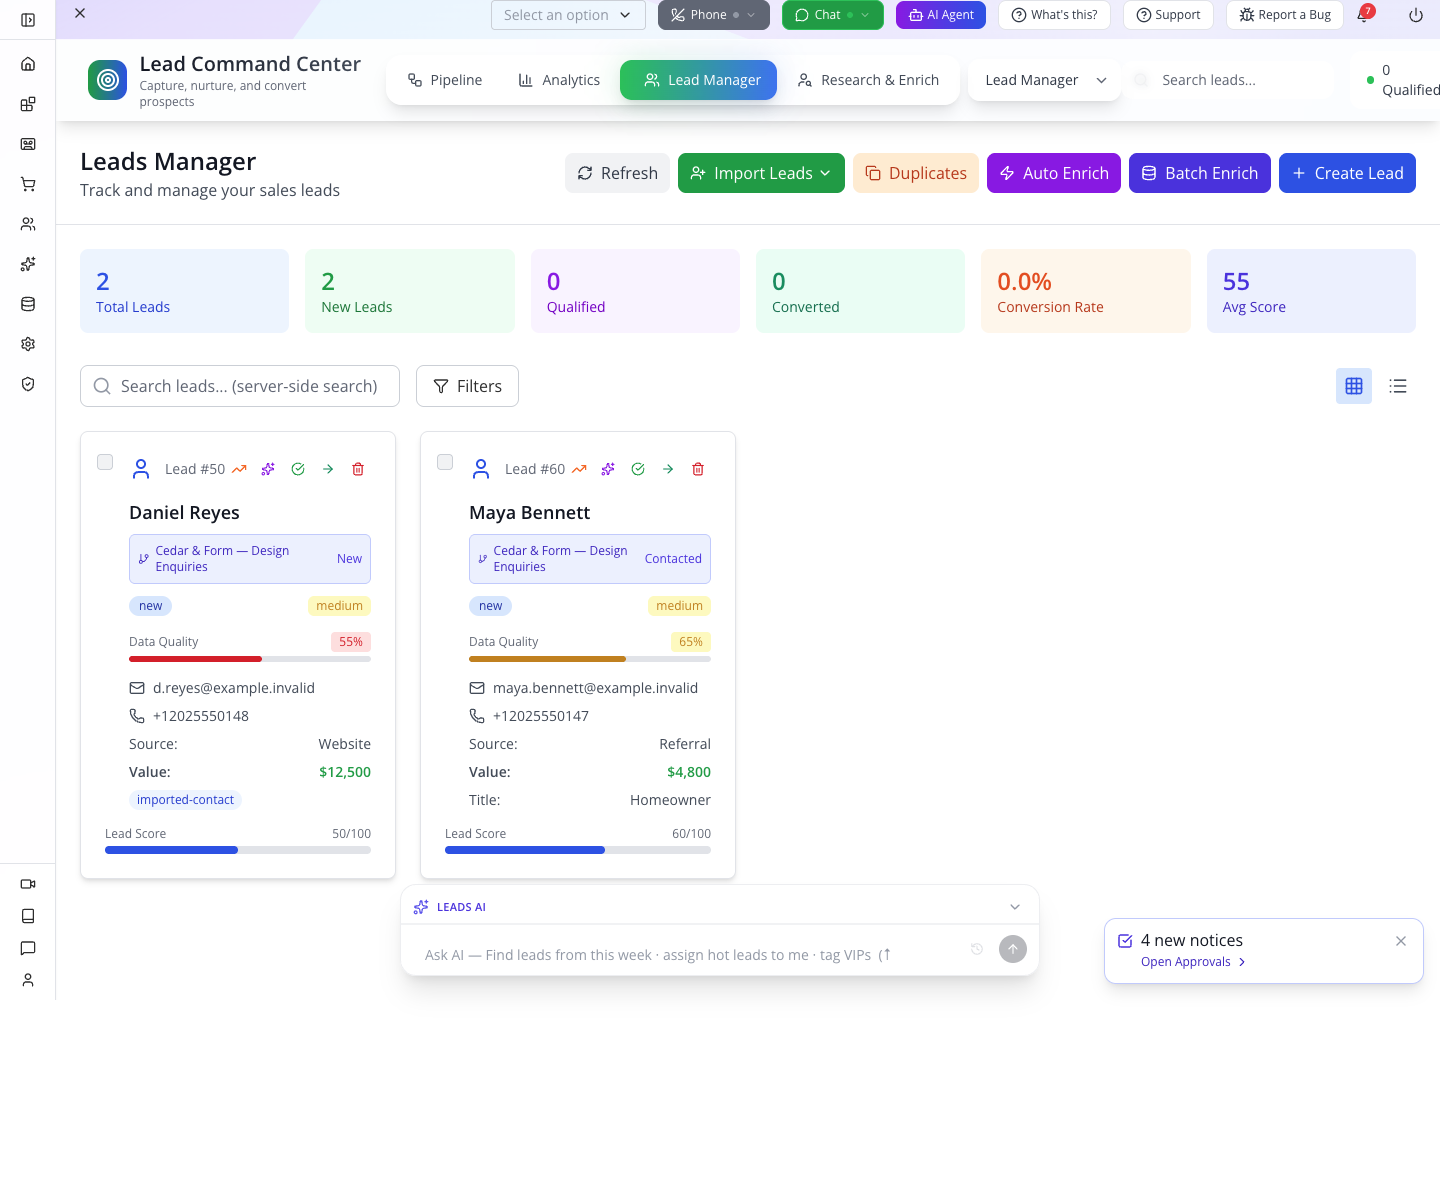
After signing in again, open CRM → Leads. Use Show Pipelines to include the existing practice pipeline, or choose Lead Manager to read the saved cards. Confirm the original enquiries remain. If a connection failure shows Could not load leads and pipelines, restore the connection and select the top Refresh button. Do not create a replacement pipeline because data failed to load.
Phone access needs its own follow-through. This control does not revoke a previously issued phone-provider token or end an ongoing call. Do not treat it as confirmation that every phone endpoint has stopped. Review the employee’s phone assignment and registration in employee phones and mobile CRM; that course’s provider/handset verification remains separate. Likewise, staff account access and customer website accounts are distinct identities.
For an actual departure, inspect the person’s job groups, direct grants and physical access routes as well as locking the account. Keep the rehearsal account unlocked afterwards unless you intentionally mean to suspend it.
For API work, use the AppEngine client course. Do not assume a key’s displayed scope chips provide stricter enforcement than its creator’s effective permissions.
If something goes wrong
| Symptom | Check and next action |
|---|---|
| Sidebar shows only icons | Use Expand sidebar; then expand Configuration with its chevron. |
| Role form looks like a generic data editor | You may be on production 0.6.1. Do not substitute its broad CRM category for the current Leads path. |
| A role shows every menu | Inspect Allow everything versus explicit entries. Use No access for a deliberate no-screen role. |
| New group is missing immediately after create | Reload and search by name before creating another. |
| Group card appears out of date | Reopen Edit and check the saved description. Refresh before creating another group. |
| Membership save reports an error | Reload the group and the person’s profile. Report the group, colleague and exact error through Support → Submit Ticket; do not repeatedly resubmit or assume the displayed avatar proves a working grant. |
| Custom role fails during sign-in | Check the saved role and group names. Report the role, organisation and exact error through Support → Submit Ticket; do not add an administrator grant as a workaround. |
| Owner still sees everything | Owner is an all-access role; use a separate colleague session for restriction tests. |
| Changed access behaves inconsistently | Use a fresh sign-in, then inspect every applicable group/role and the actual server operation. |
| Leads cannot load | Read the error, restore the connection and use the top Refresh button. Previously loaded data may be stale; an unavailable result is not an empty organisation. |
| No invitation arrives | Check the exact recipient and pending record. Do not repeatedly resend or expose the invitation token in a report. |
| Approval did not enable the requested task | Check whether the chosen group actually grants that task, then verify the colleague’s session. |
What happened behind the scenes
Developer evidence and implementation pointers
The role editor saves userrole.data.permissions, including record/component verbs and menu paths. Current AppEngine resolves custom role definitions within the organisation and combines direct and inherited grants. Group membership changes use field-scoped user updates.
Invitation acceptance validates its stored organisation, groups and roles before creating the account. A Sales-only invitation creates explicit Sales membership with no default direct User role. Authentication enriches the session with inherited LeadEditor but does not persist that inherited role back as a direct grant. Direct-role changes update only the stored roles field and verify readback.
The menu layer and server action guards are separate. A visible screen is not proof of permission to perform every operation it contains. The live Delete defect and its verified repair demonstrate why both sides need testing.
Relevant source paths relative to projects:
websitemint/packages/ui/src/components/configuration/role-permission/role-form.tsx,menu-access-panel.tsx,use-allowed-menu.tswebsitemint/packages/ui/src/components/user-management/group-editor.tsx,modern-invitations.tsx,user-management-store.tswebsitemint/packages/ui/src/components/approval/request-access.tsxappengine/src/users/users.service.tsandusers/auth/jwt.auth.guard.ts- Installed
appengine/node_modules/@jaclight/dbsdk/src/types/role-type.ts appengine/src/approval/approval.service.ts
Application source repairs and local verification are recorded in permissions, invitation grants, direct-role changes, group/invitation feedback and lead operation permissions. Each report distinguishes completed browser evidence from checks still pending.
Where next
Continue with Appmint Mobile daily work and employee phones and mobile CRM. For the HR side of the same person, use BusinessMade employee onboarding.
Evidence: current local Studio 0.6.2, own Copper Kettle organisation ck-local-mu83iwh3, Ada Okafor, Nora Ellis and Maya Ito. Actual role/group save/readback, membership addition/removal, invitation acceptance, allowed enquiry update, direct-screen refusals, website approval and fresh-session revocation are captured in local roles evidence. The original disposable probe exposed a Delete defect; the repaired test now returns403 and keeps the record visible. Earlier rehearsal evidence is preserved in the historical manuscript. Companion-video guide.