
 The result: a visitor asks about a small apartment and receives a human reply without leaving the website.
Who: business owners and the people answering enquiries. Time: 60–75 minutes, including the optional external-site exercise. Level: beginner, with advanced configuration afterwards. Product: Appmint Studio Manager and the website chat widget. Checked: local Studio 0.6.2 and widget 0.1.5, 19 September 2026, with actual separate agent and visitor sessions. Example: Cedar & Form, agent Jordan Morgan, visitor Priya Nair.
What you will have at the end
Your website will have a chat launcher, a greeting written for your business and an agent who can receive and answer an enquiry. You will recognise a waiting chat, end an active conversation and preserve unfinished work as a ticket. You will also configure an away message and understand why an agent going offline is different from setting the widget to Offline.
You will test both ways to preserve a request: the visitor submits the away form and you find its automatic ticket, or an agent creates a follow-up after a live conversation. The two examples are separate practice records. In day-to-day work, search for an existing request before creating another ticket for it.
What you need
- An isolated practice site that is not advertised to real visitors. Complete staffing and the two-browser rehearsal there before enabling chat on an existing customer-facing site.
- A Studio Manager account and the public site from Build a business website. The example site is
cedsite; your site will have its own name. - Two browser sessions: your normal browser for the agent and a private window for the visitor. Do not sign the visitor into Studio.
- A fictional visitor for rehearsal:
[email protected]. For your own delivery tests, use an address you control. - A working contact route on the site for times when chat is unavailable. Check the destination of your contact link before advertising it in an away message.
For a later transfer exercise, first add another colleague through Roles, groups and permissions. You can complete the conversation and ticket exercises alone.
The story
Priya likes Cedar & Form’s approach but has a practical question: does the studio work on small apartments? Jordan answers that question, asks which room matters most and learns that she wants to keep her sofa while improving storage. That context should survive the chat window. A useful ticket gives the next colleague the customer’s objective and the next action, rather than simply saying “follow up”.
The route
flowchart LR
    A[Enable the site widget] --> B[Visitor asks a question]
    B --> C[Agent picks the queue entry]
    C --> D[Reply and confirm delivery]
    D --> E[End the chat]
    D --> F[Record unfinished work as a ticket]
    A --> G[Configure a separate away experience]
Part 1 — Put a human conversation on your site
1. Find the feature for the correct site
In the sidebar, open App Root. Find Active Site, then Site Features. Read the site name before changing a feature: this setup connects a widget to that website.
Locate Live Chat and select its Set up button. If it already says Configure, inspect the existing setup instead of creating another widget.
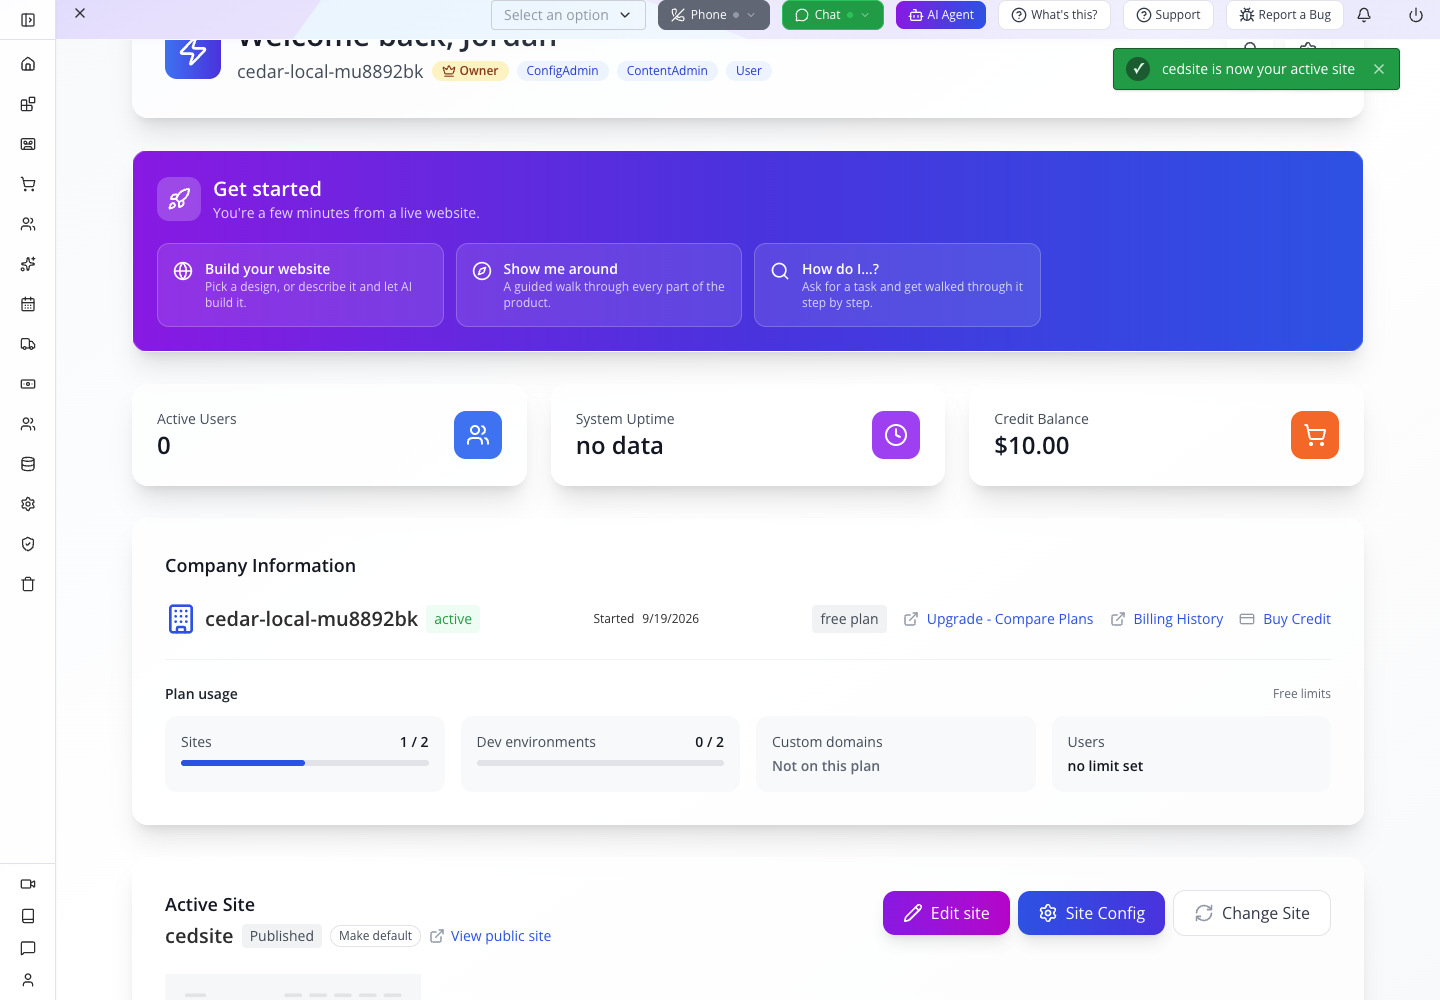 The saved feature shows Configure after setup. Customer-facing chat is separate from the Support menu used to contact Appmint.
2. Name the widget
The drawer is Set up Live Chat. Its four steps are Widget, AI replies, App user and Finish. In The chat widget, keep the suggested name or choose a recognisable one. The example uses cedsite-chat, derived from the site name.
If the organisation already has another widget, Use an existing widget appears first. To create a separate widget for this practice site, choose Create a new one in that selector, then enter the name. Do not reuse an unrelated support widget just because it is offered.
Select Next. A useful widget name helps you find the correct configuration when you later edit its greeting or availability.

3. Choose who answers
At Should the chat answer on its own?, select Agents only, then Next. This exercise establishes a conversation with a person before adding any automated answers.
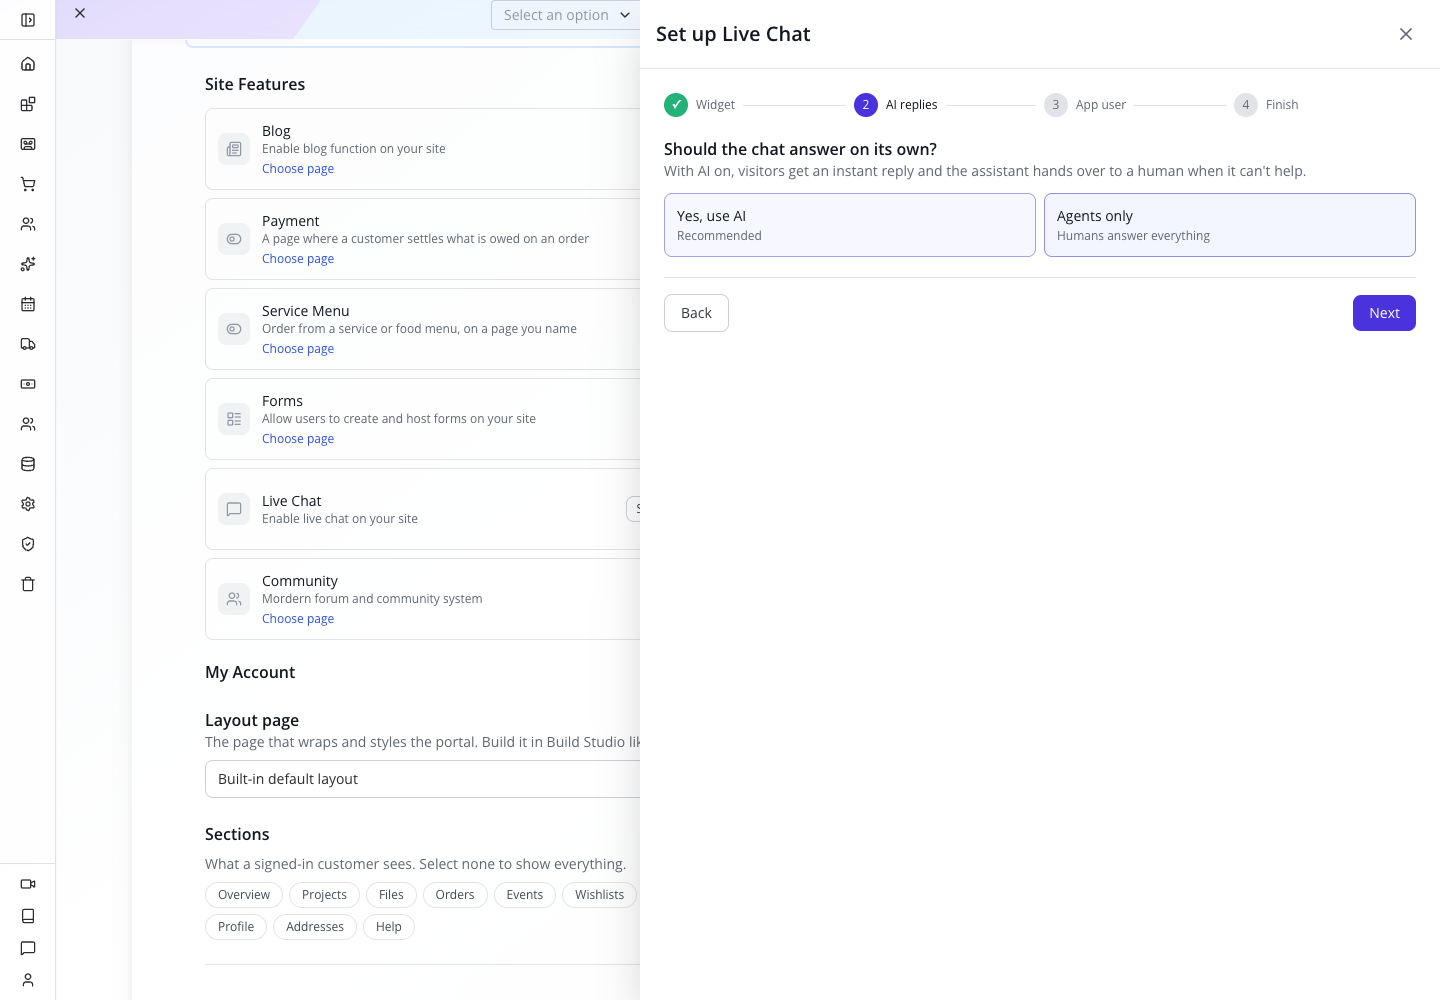
You should see: the App user step. Choosing Agents only does not staff the desk for you; somebody still needs to watch the queue and answer.
4. Keep the app user distinct from an employee
The App user lets the website widget identify itself. It is not Jordan’s employee account. If Use an existing app user is shown, select Create a new one for this exercise; keep it separate from an app credential used for a different integration. Keep the example name cedsite-chat, or your corresponding site-based name, then select Next.
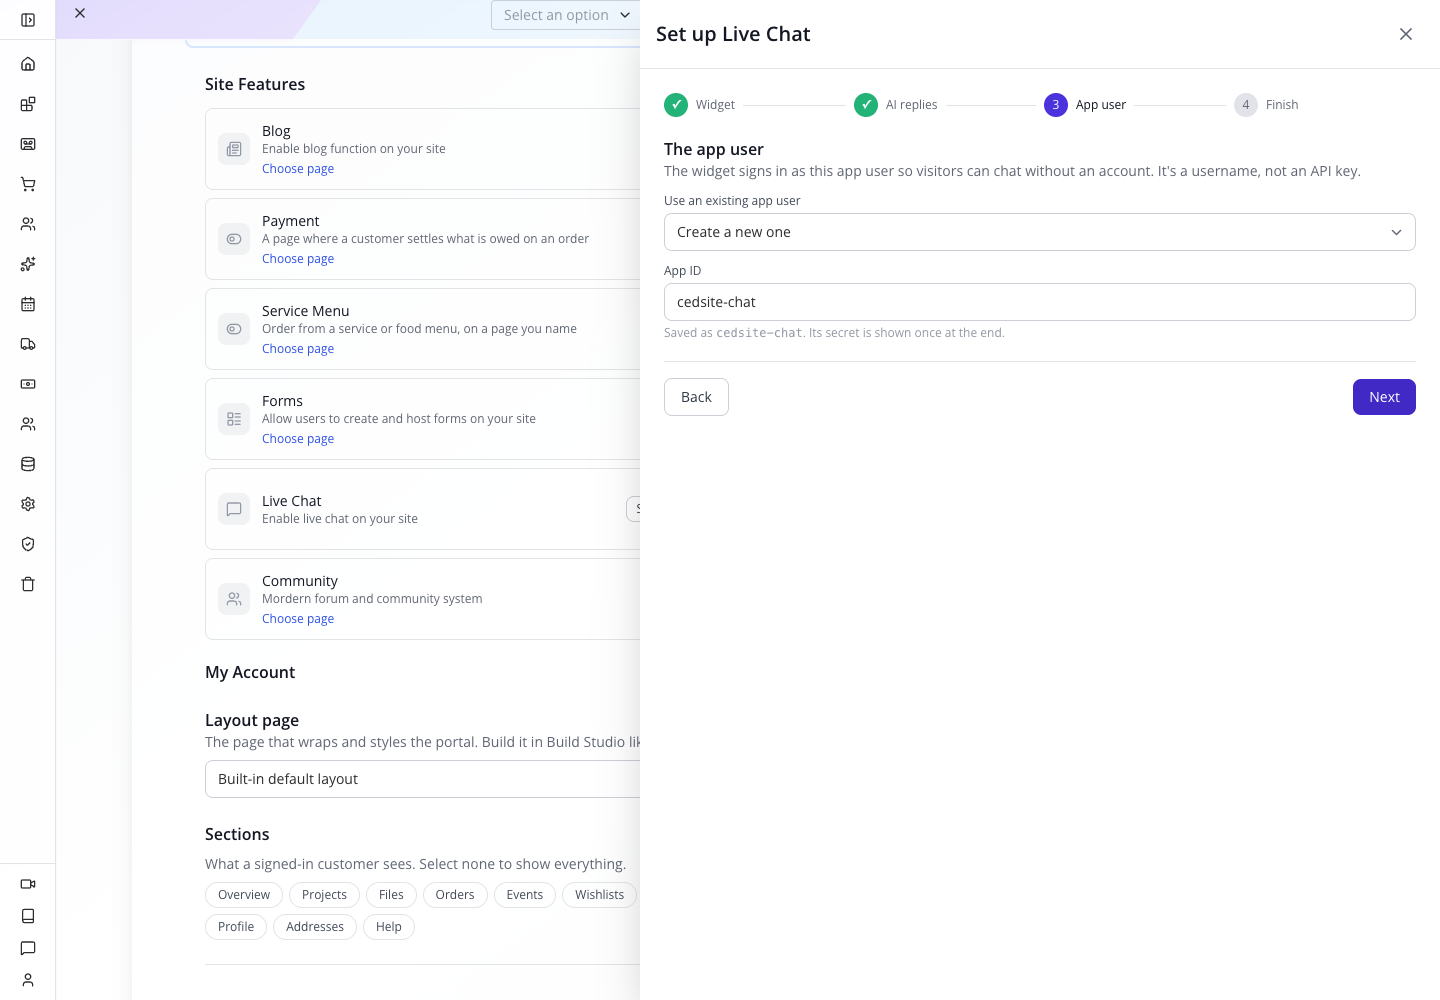
At Ready to switch on, read the summary. Nothing has been created by these choices until you select Finish.

5. Finish and handle the one-time secret
Select Finish once and wait for Live chat is on. When a new app user is created, the result includes App secret — shown once. Save that secret privately if you need it for server-to-server work. It does not belong in website HTML, screenshots, support messages or a video.
The widget uses the app user name; it does not need you to expose that secret. Select Done when you have finished reviewing the result.
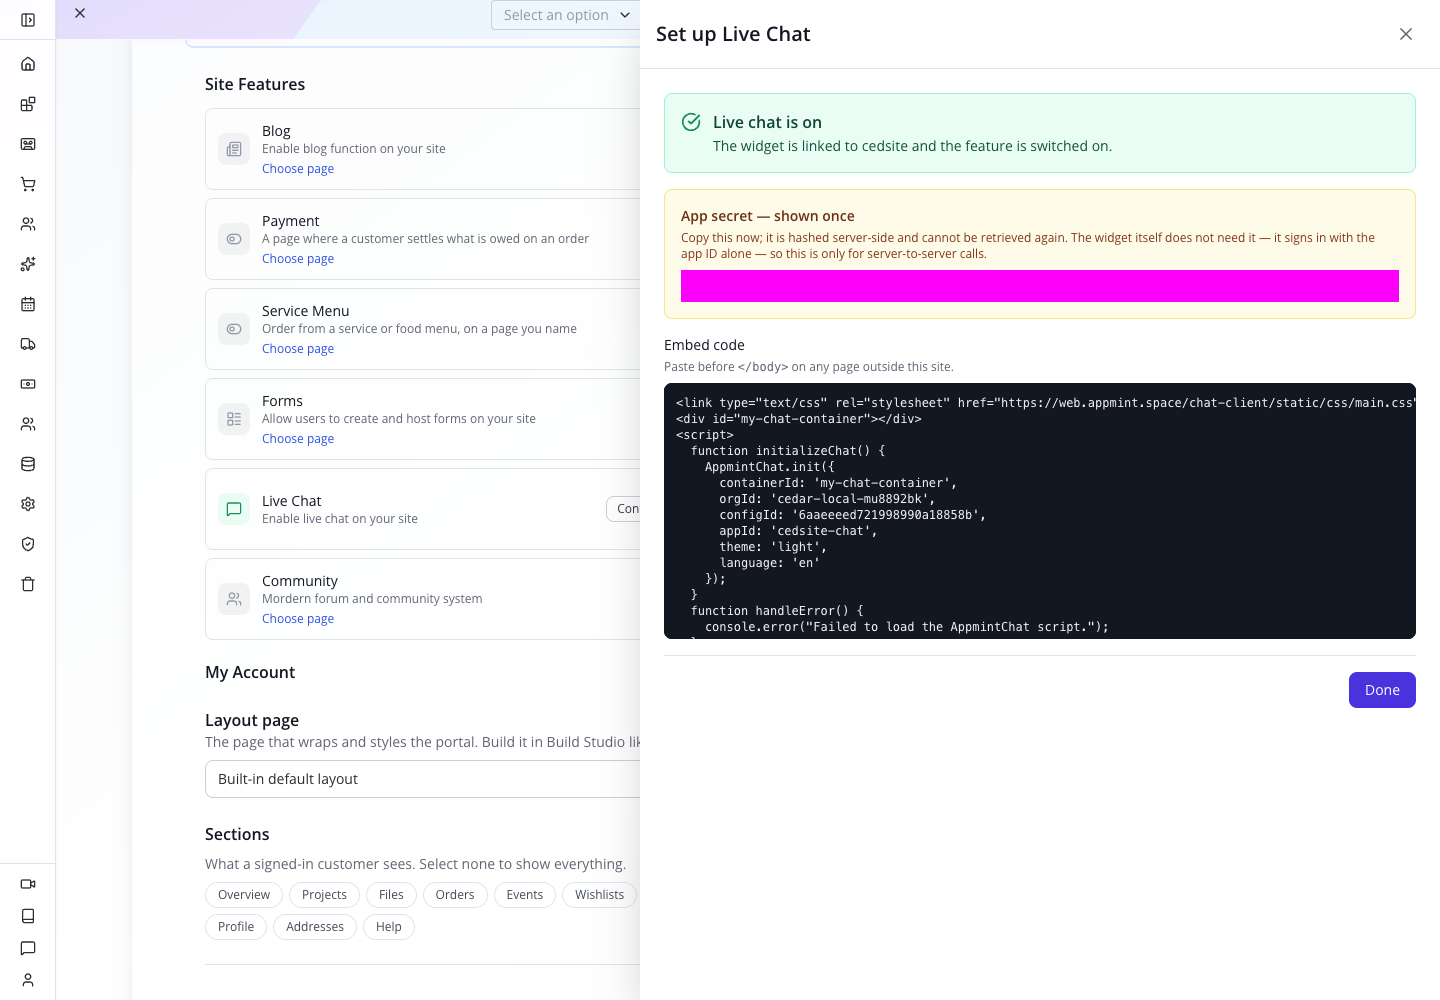 The secret was redacted before this screenshot was taken. The identifiers in the embed example are different from that secret.
6. Reload and check the saved setup
Reload Studio and return to App Root → Active Site → Site Features. Live Chat should now have Configure in place of Set up. In this example the feature counter became 1 of 12 on.
Open View public site in the visitor’s private window. Look for the chat launcher at the lower right. An Appmint-hosted page uses the site configuration; you do not paste the external embed snippet into that page as a second widget.

Try it: close the visitor window, open another private window and find the launcher again.
Check yourself: what connects this chat to the website? The saved site feature links the chat configuration and app user. Your employee login is the identity answering at the desk.
Part 2 — Receive, answer and close an enquiry
1. Check the agent connection
In Studio’s top toolbar, open Chat. If the menu offers Connect chat, select it. If it already offers Go offline, you are connected; do not disconnect just to repeat a setup step.
The menu also contains Open chat and Open conversations. For this exercise, use sidebar CRM → Chat to open the full-page desk. Open chat can open a floating window over your current page, which is less convenient when learning the layout.
The desk has Agent Desk, Activity, Logs and Broadcast tabs. Within Agent Desk, Queue is where you look for waiting support chats; Chats gives access to conversations; Customers lists customer entries. Start with Queue.
Check the connection and the delivery. Wait for the Chat menu to show Online, then use the two-browser exercise below. The sent message in your desk and the received message in the visitor’s browser are two separate checks.
2. Enter as Priya
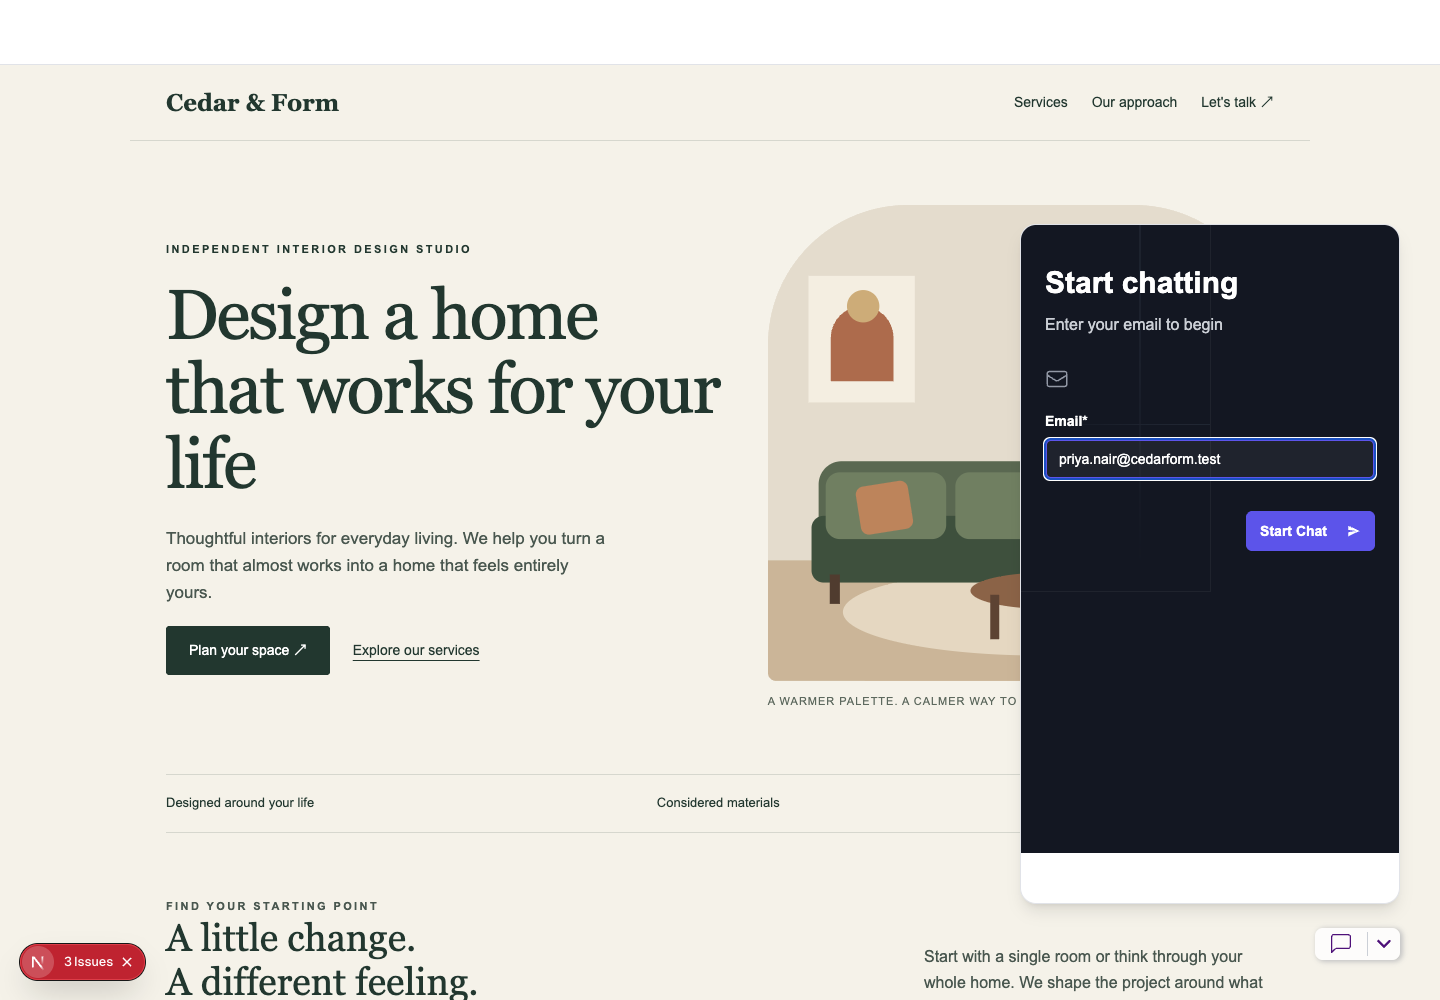
In the visitor window, open the launcher. On the welcome panel, select the opener Hi! How can I help you today?. You will reach Start chatting, with Enter your email to begin.
Enter [email protected] in Email, then select Start Chat. This configuration asks for an email; it does not ask for a separate name here.
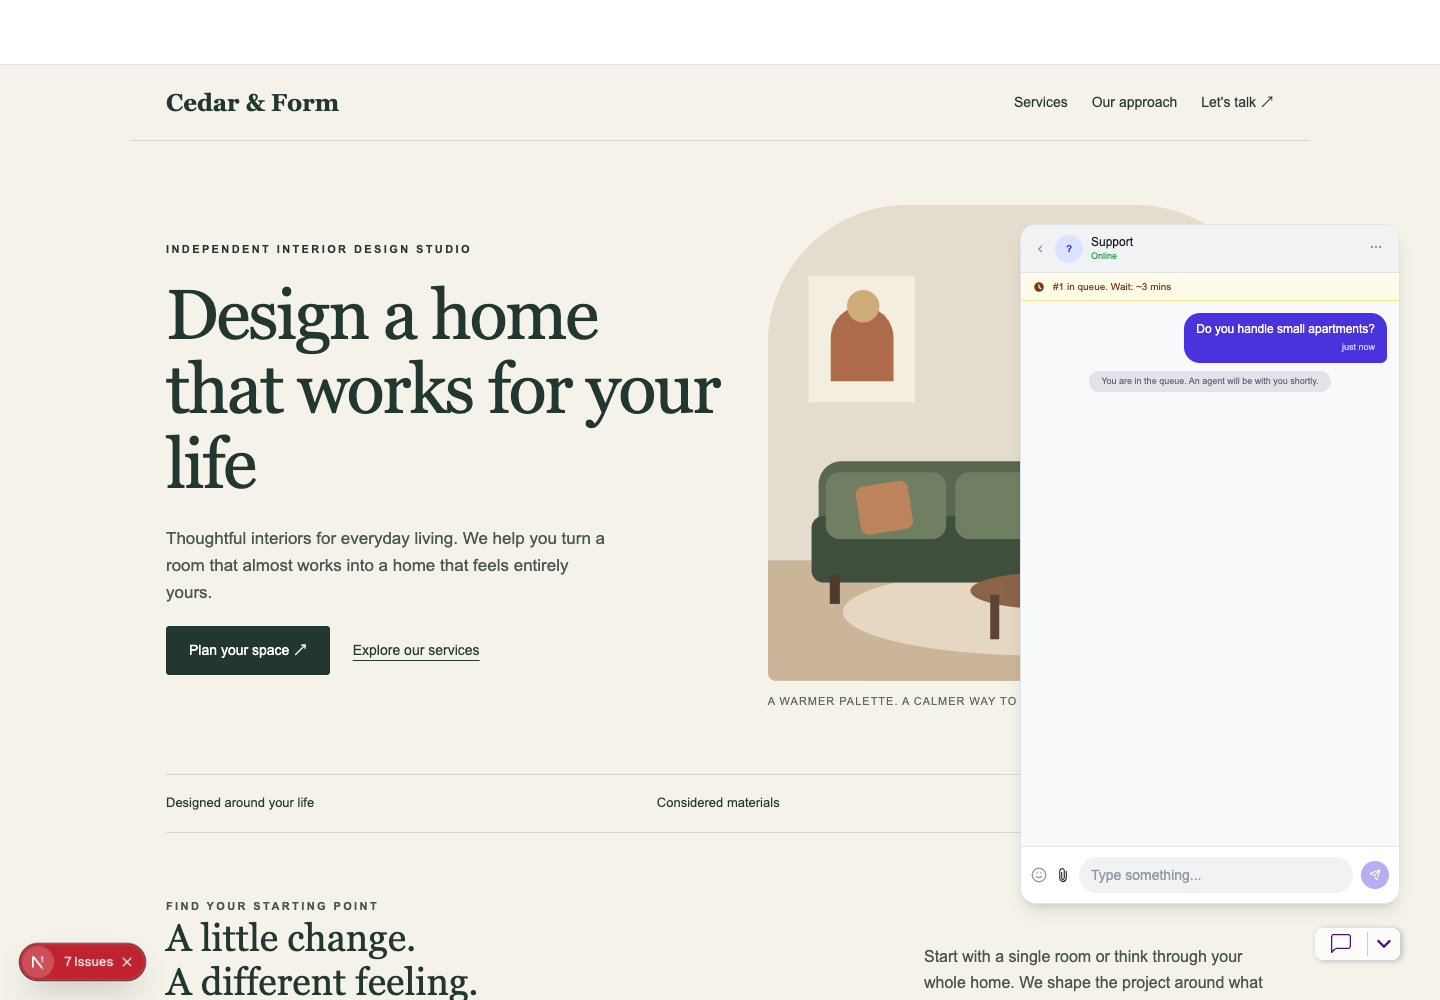
In Type something..., enter:
Do you handle small apartments?
Press Enter to send. Leave this window open while you return to the agent desk.
3. Pick the waiting chat
At the agent desk, open Queue. A waiting entry should appear. Select Pick next to accept the next visitor.
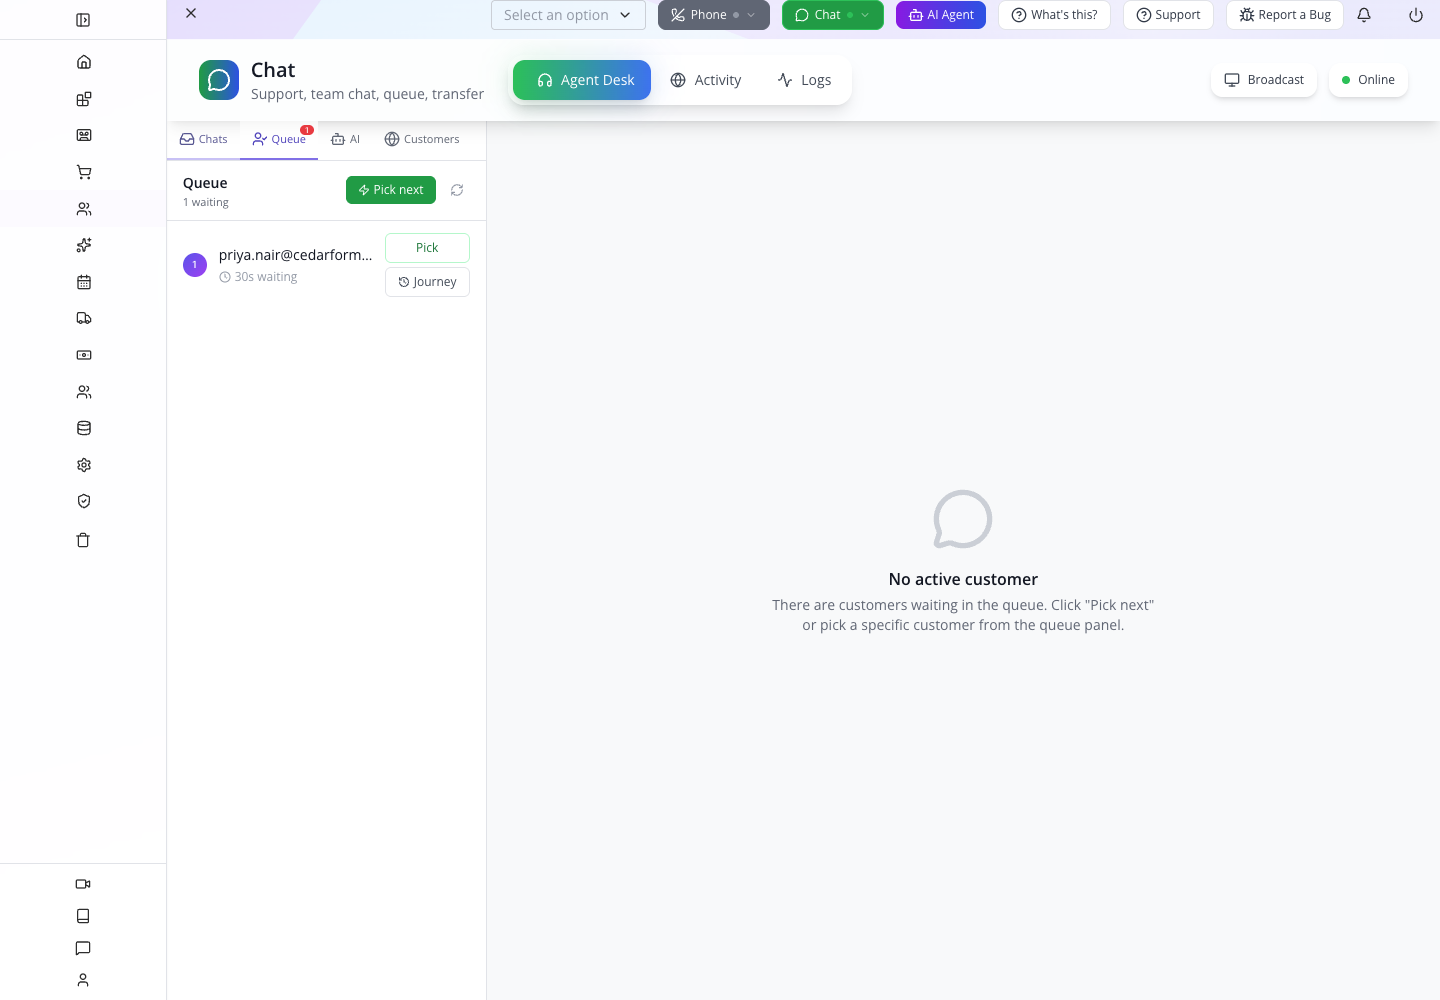
The support thread opens with the visitor’s message and the controls Transfer and End chat. In this rehearsal the customer appeared by email address, not as the friendly name Priya Nair. Use that address to distinguish the visitor from other entries.
4. Answer the actual question
In Type a reply... (Enter to send), enter:
Yes — we can help with small apartments. Which room would you like to start with?
Select Send. Now switch to the visitor window and read the reply there. It should appear under Jordan Morgan’s name.
Reply as Priya:
The living room. I would like to keep the sofa and improve storage.
Return to the agent desk and read that message. This completes a two-way test: a visitor question reached the agent, an answer reached the visitor, and the follow-up returned to the desk.
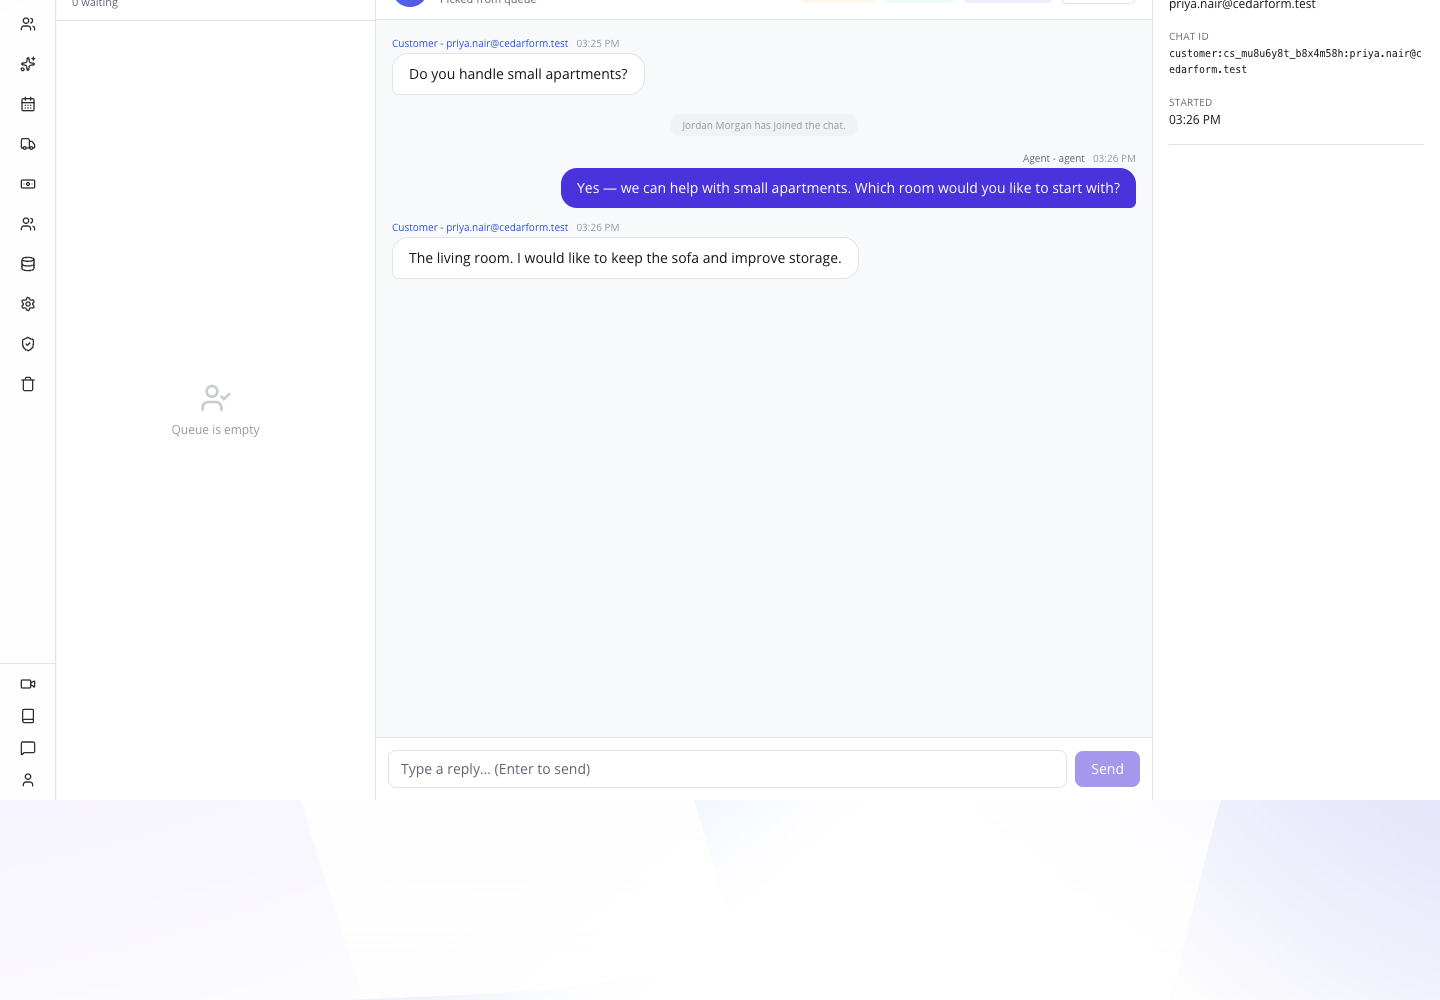
Why this reply works: it answers “can you help?” before asking for the information needed to decide a next step. Avoid requesting the whole project brief as the first response.
5. Keep the conversation through a reload
Reload Studio while the visitor keeps their window open. Wait for the Chat connection to return to Online, then open CRM → Chat if you are looking at another management screen.
Your assigned conversation returns in the active customer area with its saved messages, Transfer and End chat. If you have several assigned chats, select the appropriate customer tab by its email. Read the last question before replying; you should not need to ask the visitor to begin again.
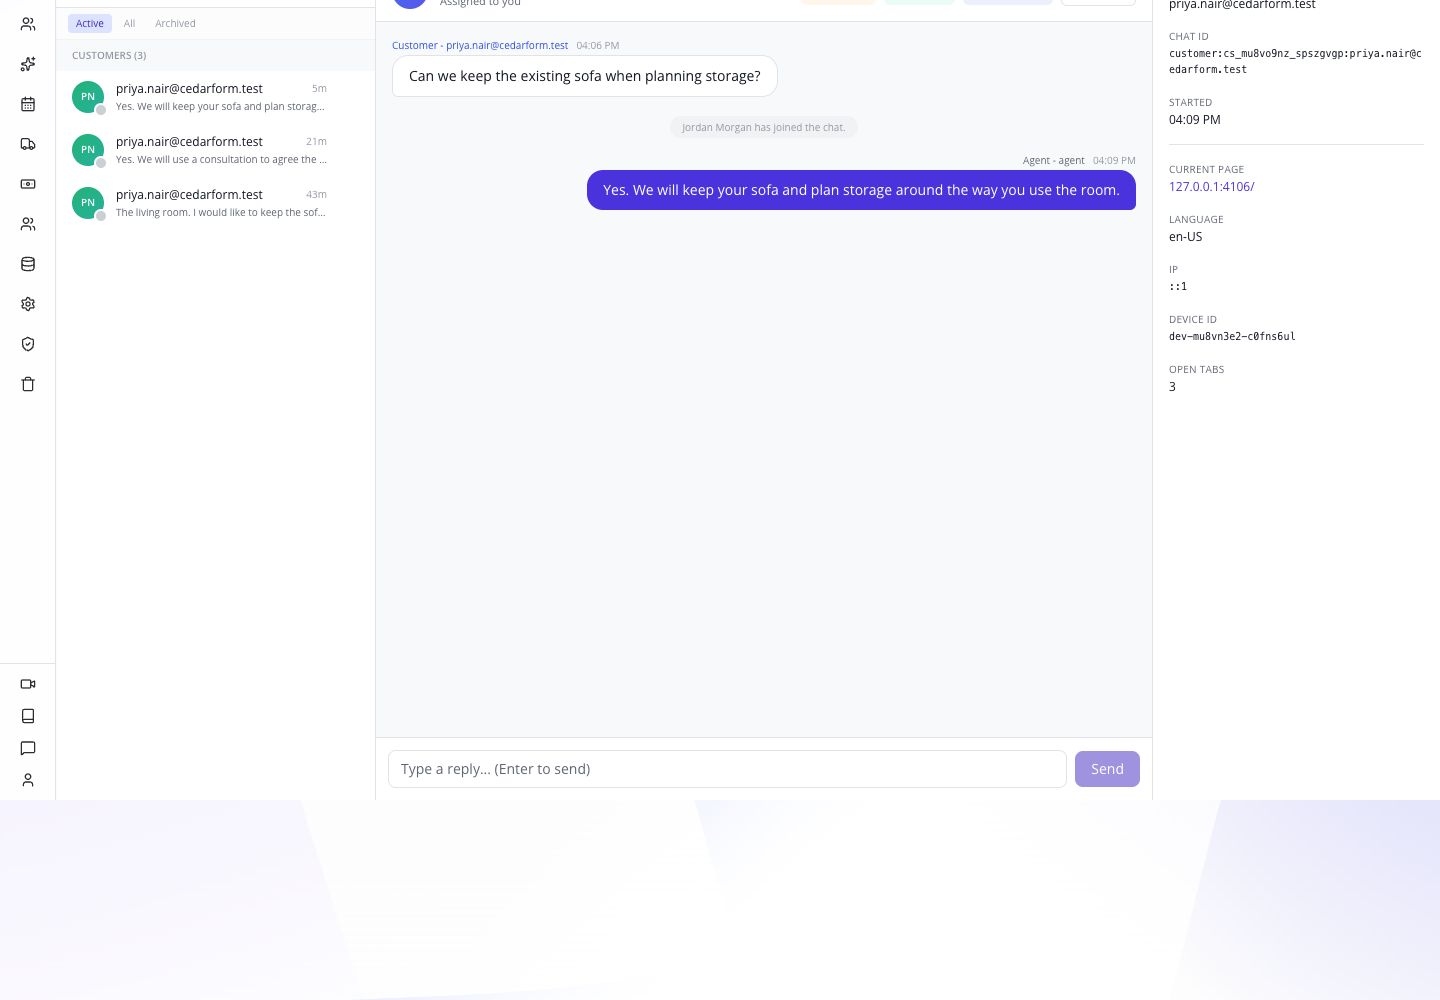 This separate repetition used “Can we keep the existing sofa when planning storage?” After the reload, Jordan’s answer reached the same visitor.
There is also a historical conversation viewer under Chats. Selecting an older saved conversation opens its message history; its composer is different from the active support desk. Use the active assigned customer tab to continue a current support conversation. Use historical conversations to look up what was discussed.
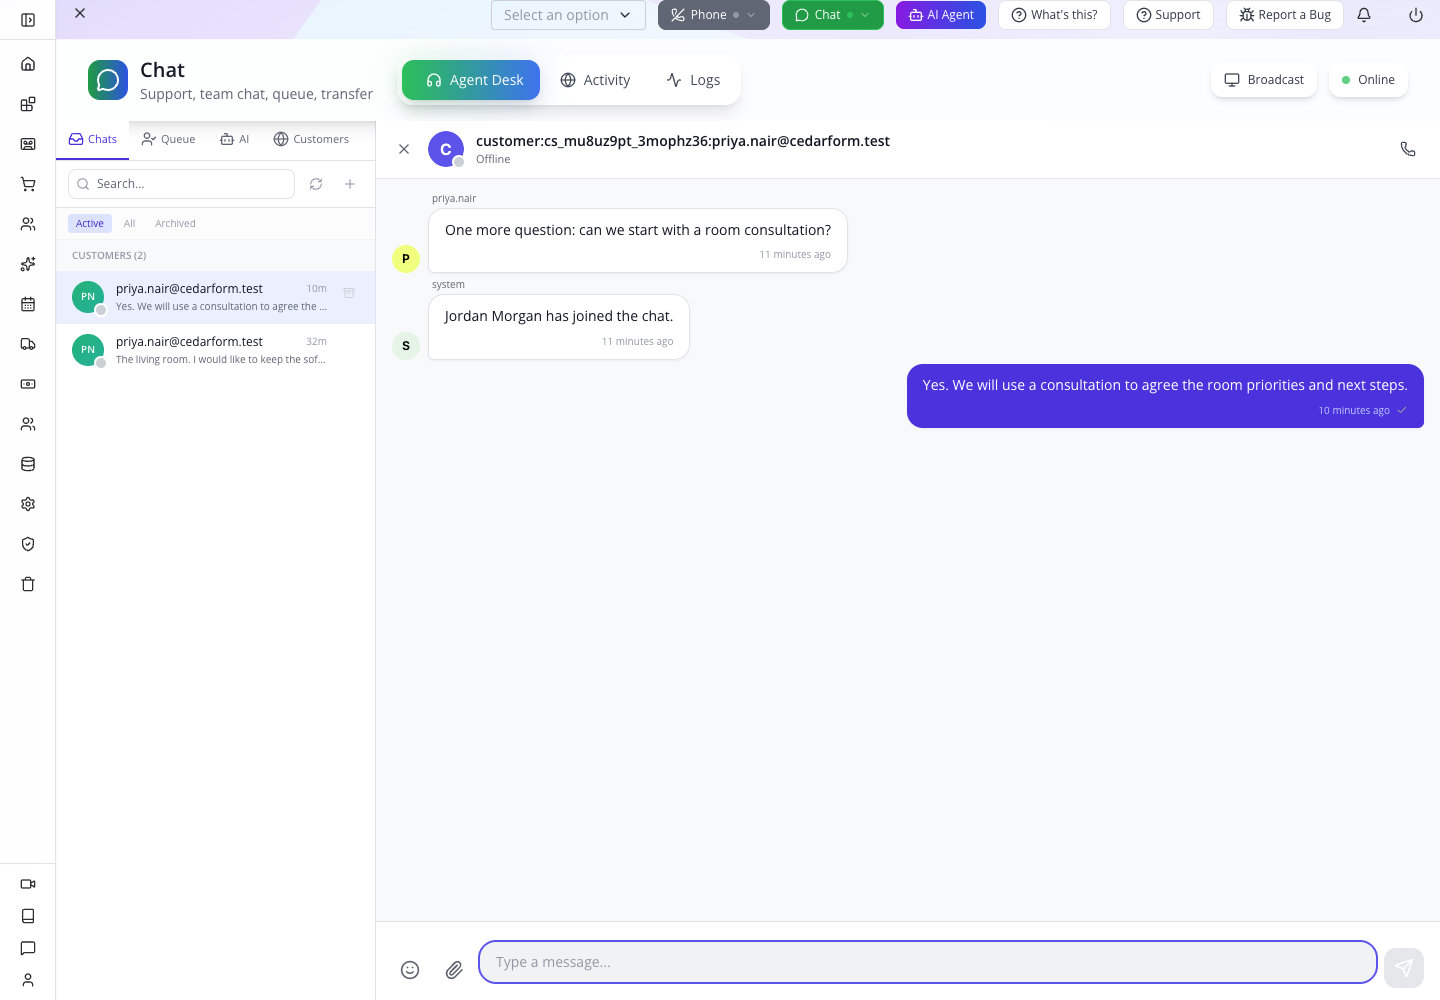
Try it: after the reload, send one useful answer and read it in the visitor window. The repeated test answered: “Yes. We will keep your sofa and plan storage around the way you use the room.”
6. Check whether a colleague is available before transferring
Select Transfer. The drawer lists other available agents and includes Transfer note (optional). In a company with only Jordan online, it showed No other agents are online. Select Cancel in that case and continue helping the customer yourself.

When you have a second colleague ready, use a note that carries the work forward: “Small living room; keep existing sofa; improve storage; arrange initial consultation.” A useful transfer rehearsal needs that colleague’s separate session and a check that they receive the same context. Do not assume that seeing a name in a selector means the handoff is complete.
7. End deliberately
In the visitor window, ask whether an initial consultation is the next step. Read that question at the desk, then send a closing answer that confirms the agreed action:
Yes. We will use a consultation to agree the room priorities and next steps.
When the conversation is finished, select End chat. The agent sees Chat closed. Check the visitor window: it should say This chat has ended. and offer Start New Chat.
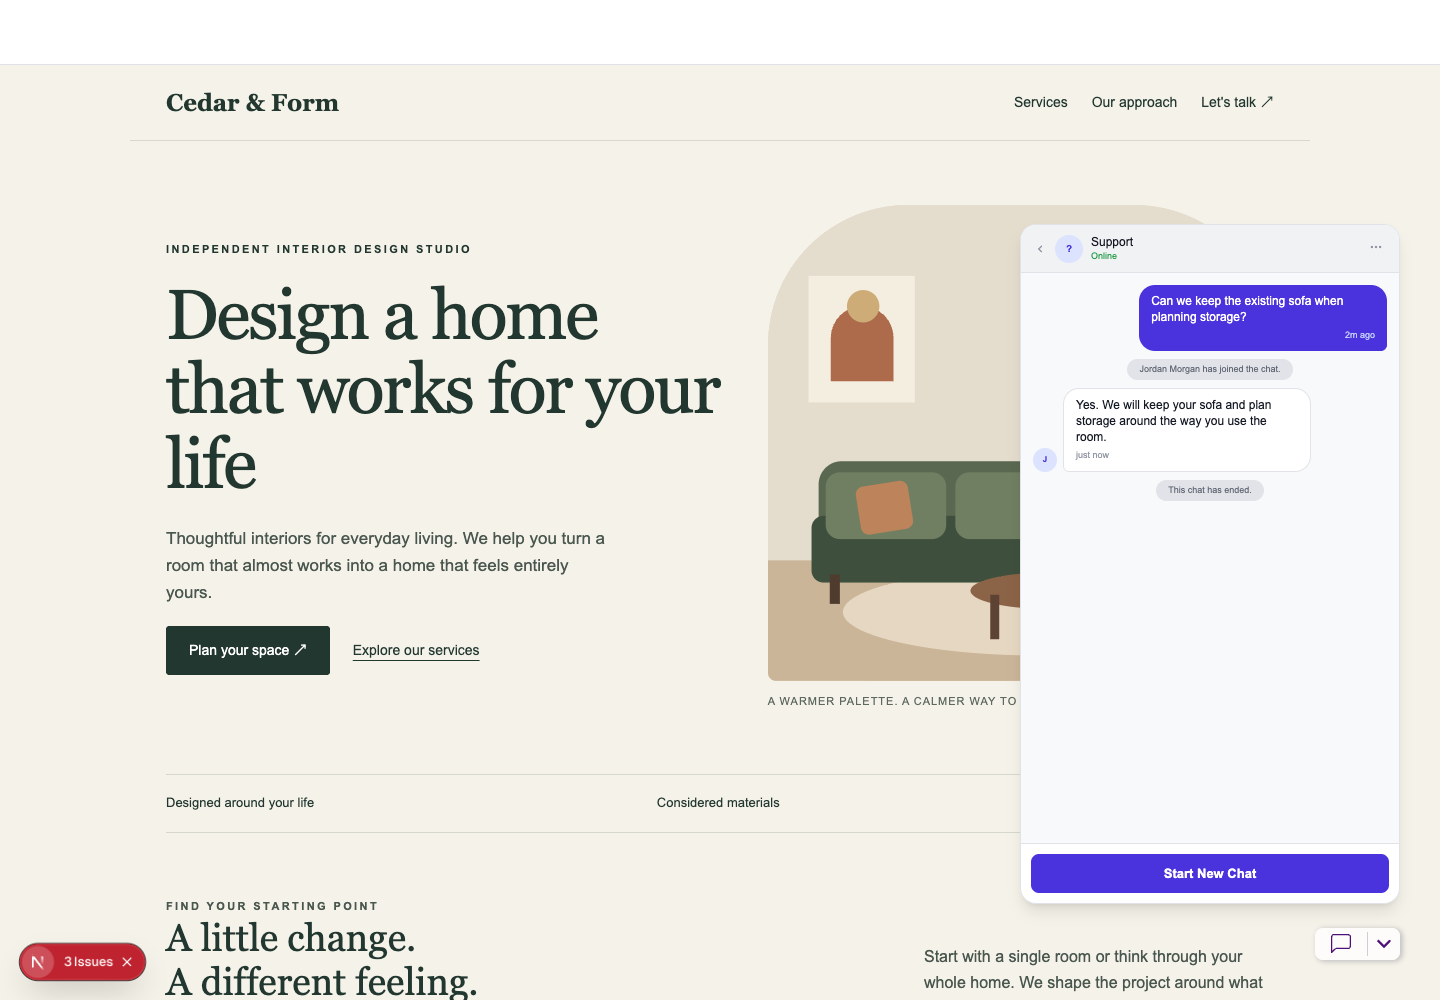 This capture ends the separate sofa-and-storage reload rehearsal shown above; it demonstrates the same End chat result.
The visitor should see one ended notice and Start New Chat. Select Start New Chat when you want to rehearse another enquiry; it starts a separate conversation. Closing a chat does not itself create the follow-up ticket described in Part 4.
Try it: rehearse one concise answer and one follow-up question in your second browser, or ask a colleague to act as the visitor. Read each message in the other browser before moving on.
Check yourself: which screen confirms the customer received your answer? The visitor’s thread. Your own sent bubble confirms what you sent, not what the customer currently sees.
Part 3 — Make the welcome useful and the away state honest
1. Select the widget you already created
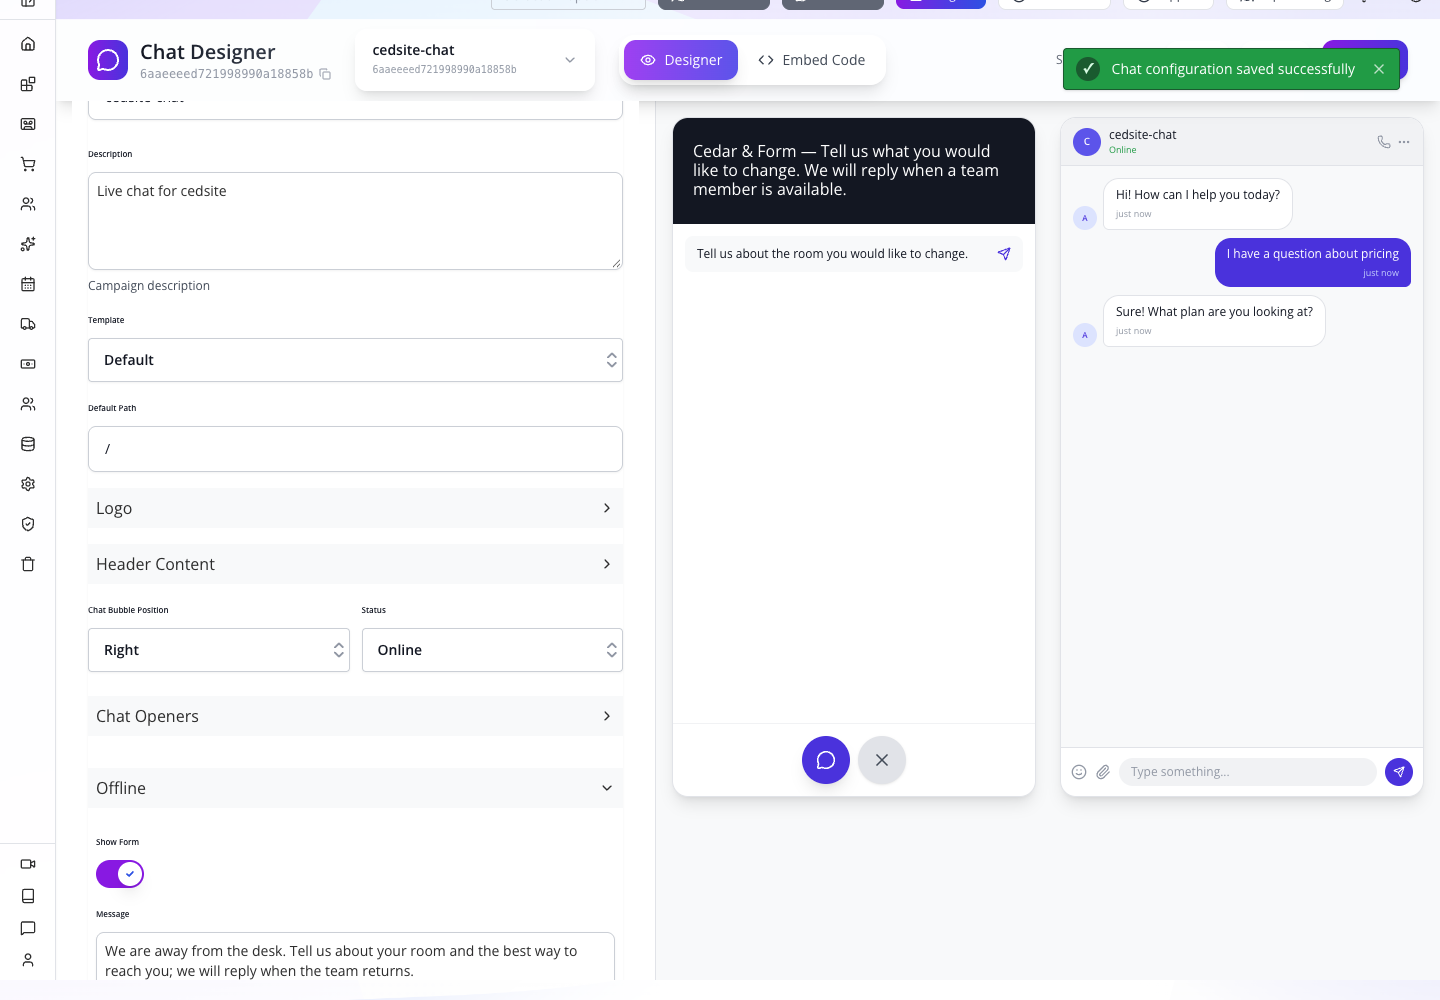
Open CRM → Chat Designer. It can initially show Untitled, which represents a new configuration. Open that selector and choose cedsite-chat, or the name you gave your own site widget. Check the selected name before editing.
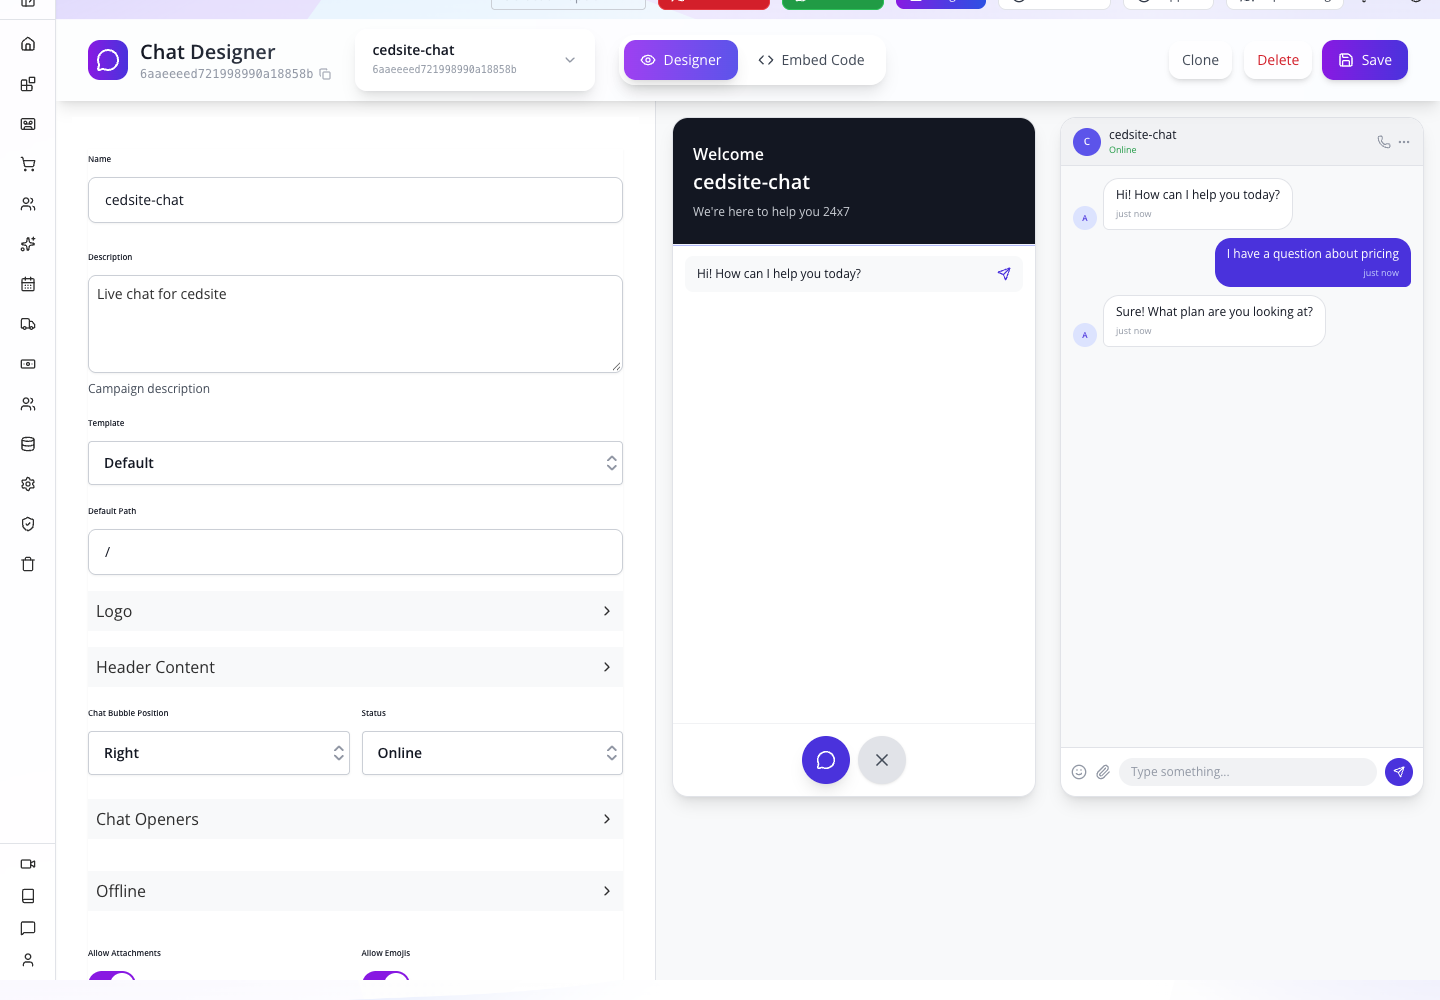
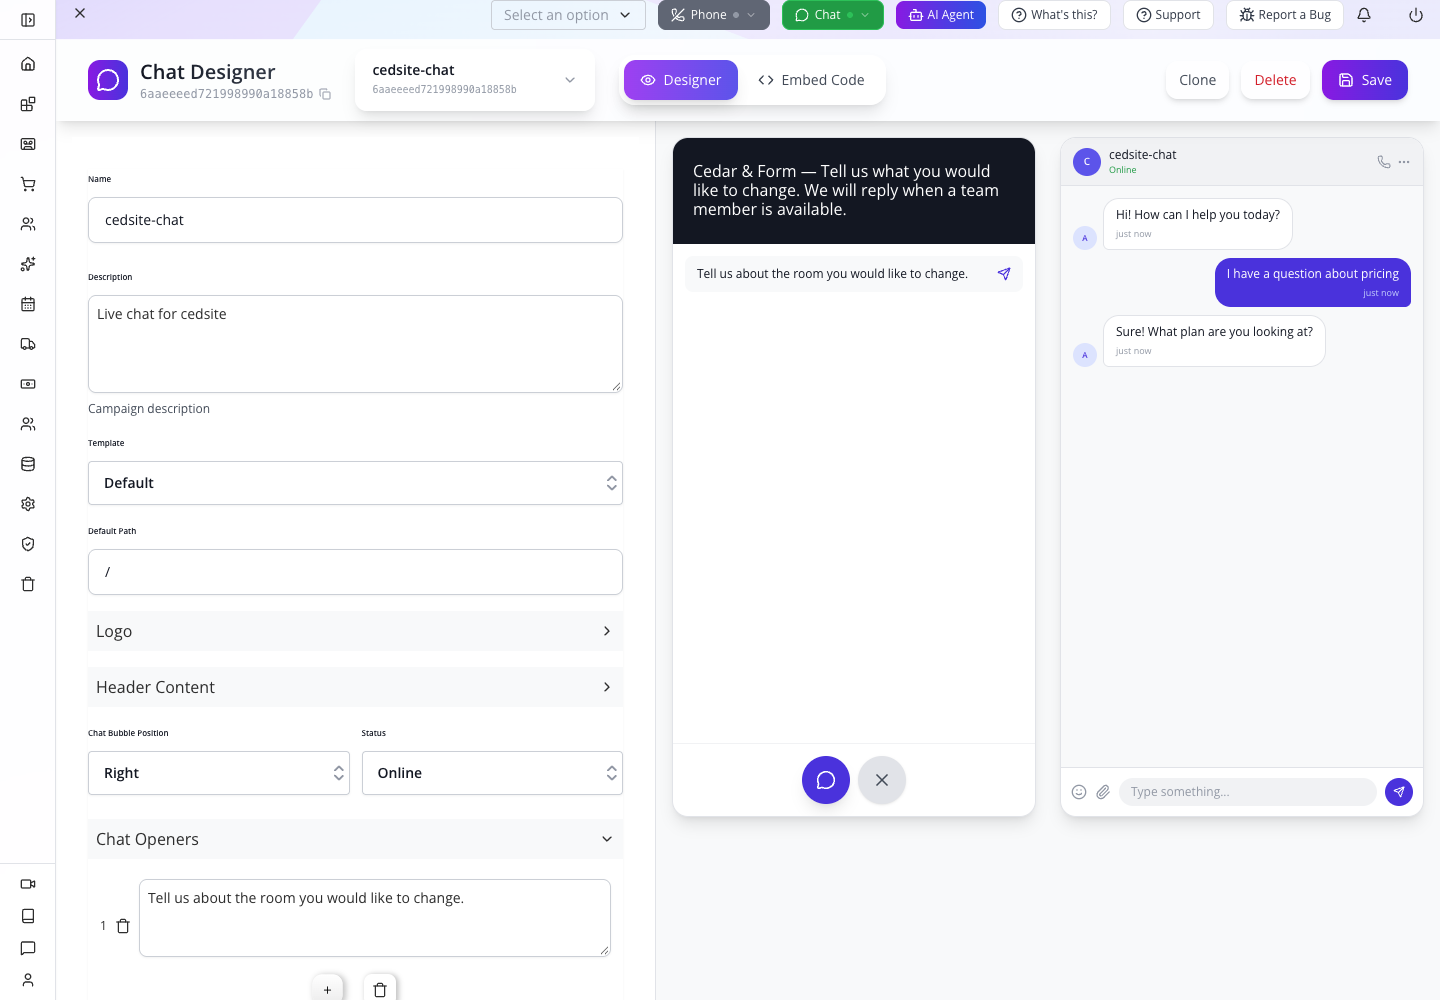
The left side contains the settings. The right side is a preview with sample pricing dialogue; it is not Priya’s conversation. The sections include Name, Header Content, Status, Chat Openers, Offline and Availability. Select a section’s heading or chevron to expand its fields.
Keep the recognisable technical Name for finding this widget. Put customer-facing business wording in Header Content; do not use an internal identifier as your welcome message.
2. Write the header and the first question
Expand Header Content and wait for its rich-text editor to load. Click inside the editor and enter:
Cedar & Form — Tell us what you would like to change. We will reply when a team member is available.
Expand Chat Openers. Replace the existing opener in Type your message here with:
Tell us about the room you would like to change.
Select the top Save and wait for the save confirmation. Reload the designer, select the same widget again, and check the opener and header. The example kept its widget/app-user name cedsite-chat.
Open the public website in a fresh private visitor session and open the launcher. Read the actual welcome panel. Both pieces of text should appear there.
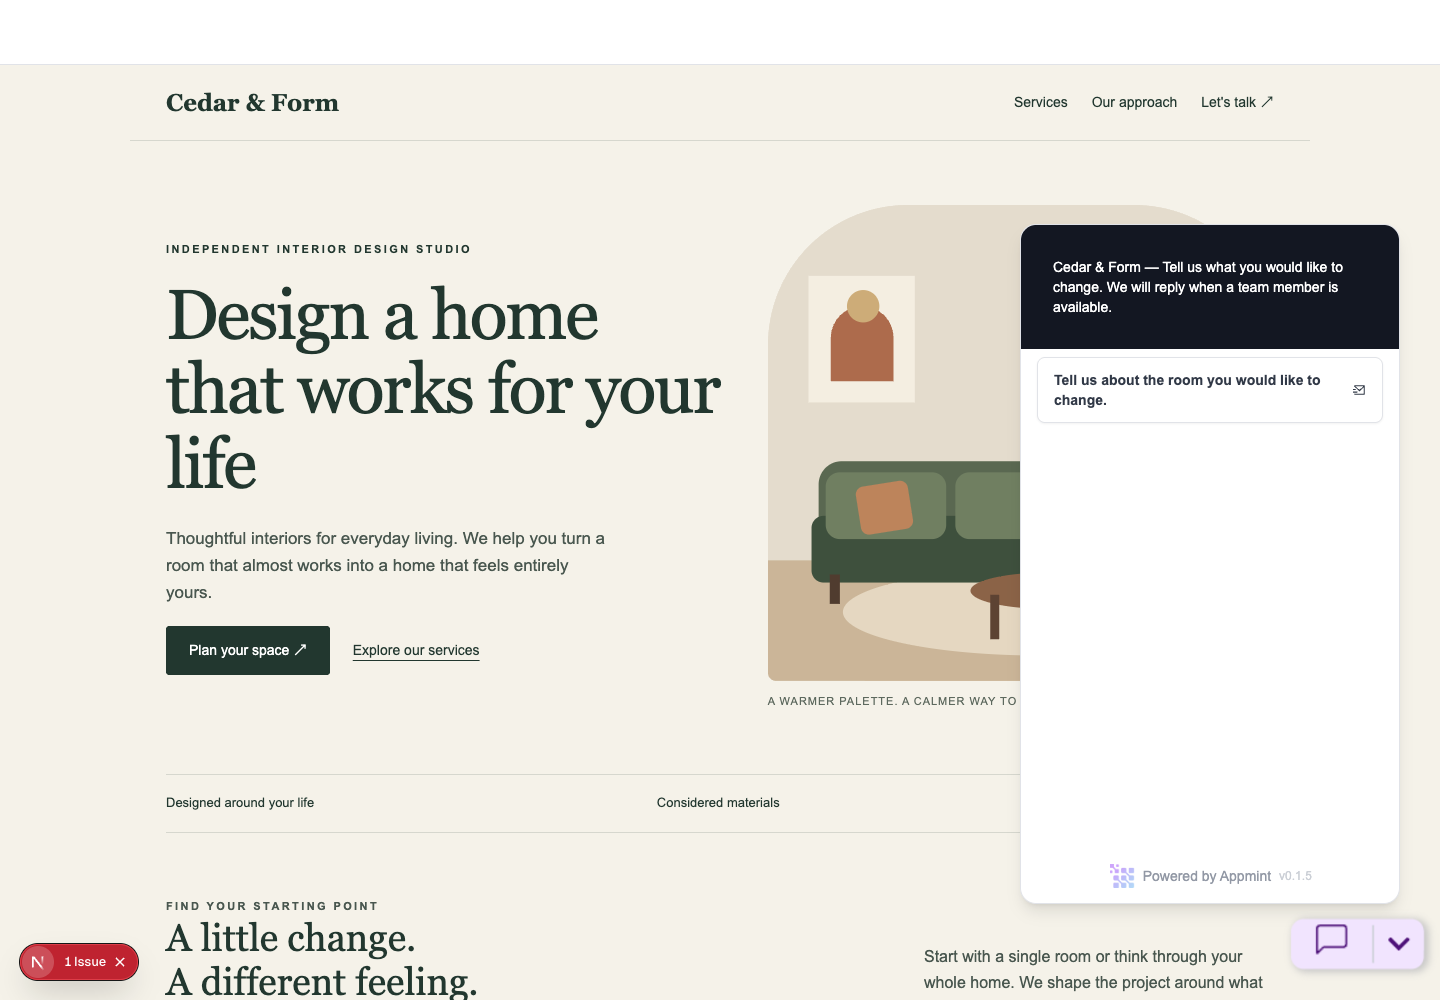
The header sets expectations; the opener gives the visitor an easy first action. Avoid promising 24/7 human staffing unless that is what you provide. Saving a greeting does not change staffing or a schedule.
3. Separate the agent connection from the widget’s mode
In Studio’s toolbar, select Chat → Go offline. If you use several staff tabs or devices, check those too before treating the company as unstaffed.
Open a fresh visitor session while the widget is still Online. Select the new opener. In this rehearsal the visitor could still reach Start chatting even though Jordan had disconnected. Going offline in the staff toolbar is not the same action as switching the website widget to an away form.
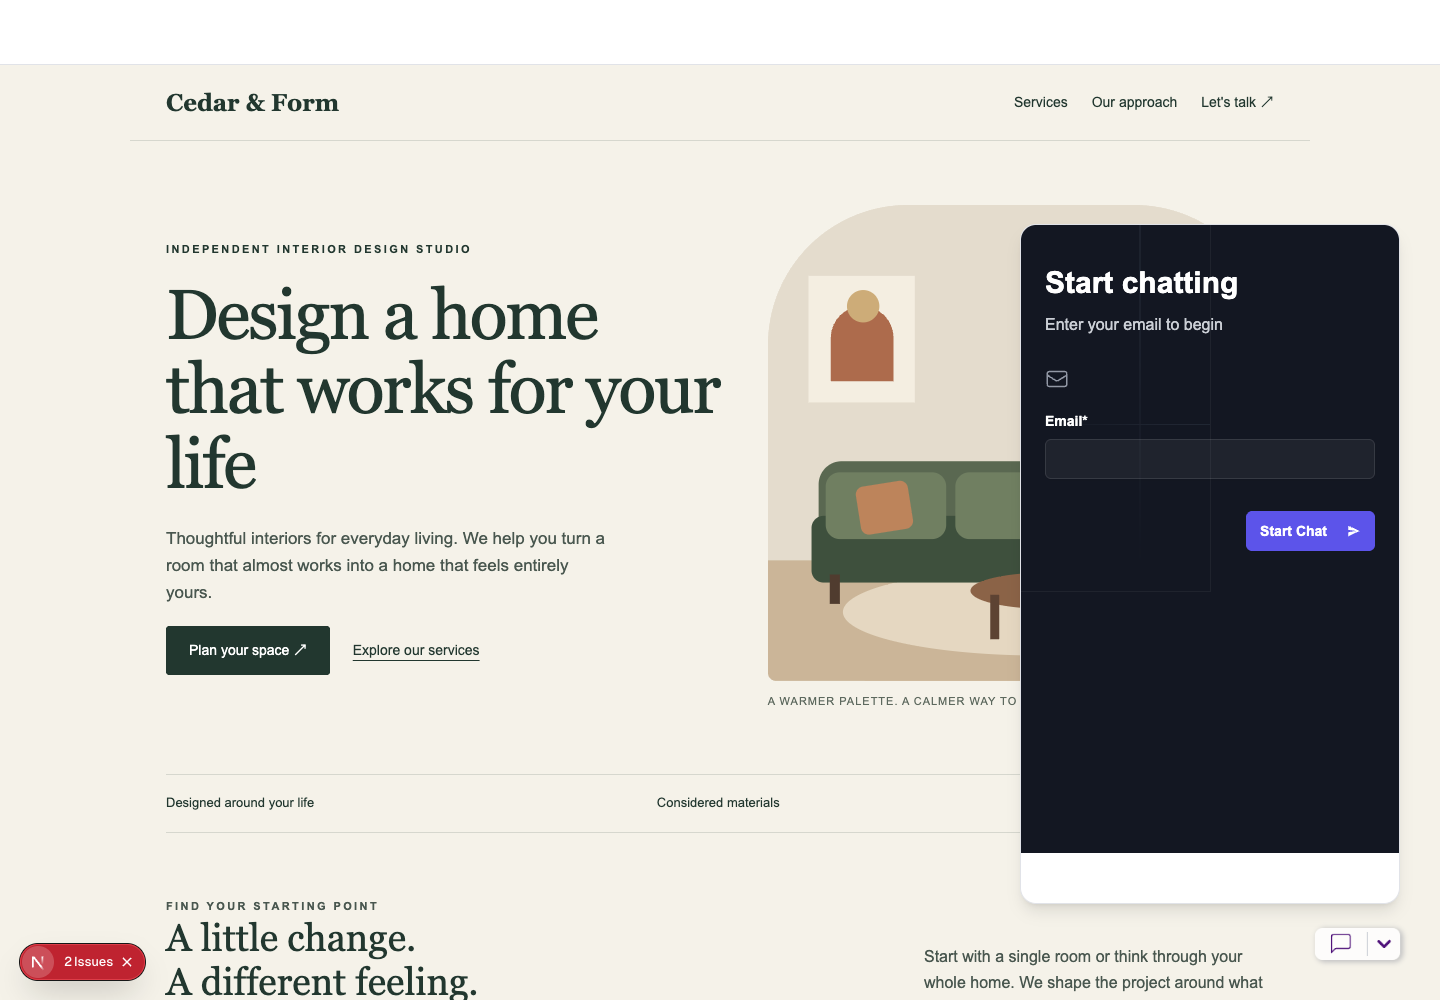
Return to the saved widget in Chat Designer. Open the Status selector and choose Offline. Expand the separate Offline section below it. Keep Show Form on and enter this Message:
We are away from the desk. Tell us about your room and the best way to reach you; we will reply when the team returns.
Select Save. Reload the designer, choose the same saved widget, expand Offline, and confirm that Show Form and your message remain saved.
4. Send an away request and find it at the staff desk
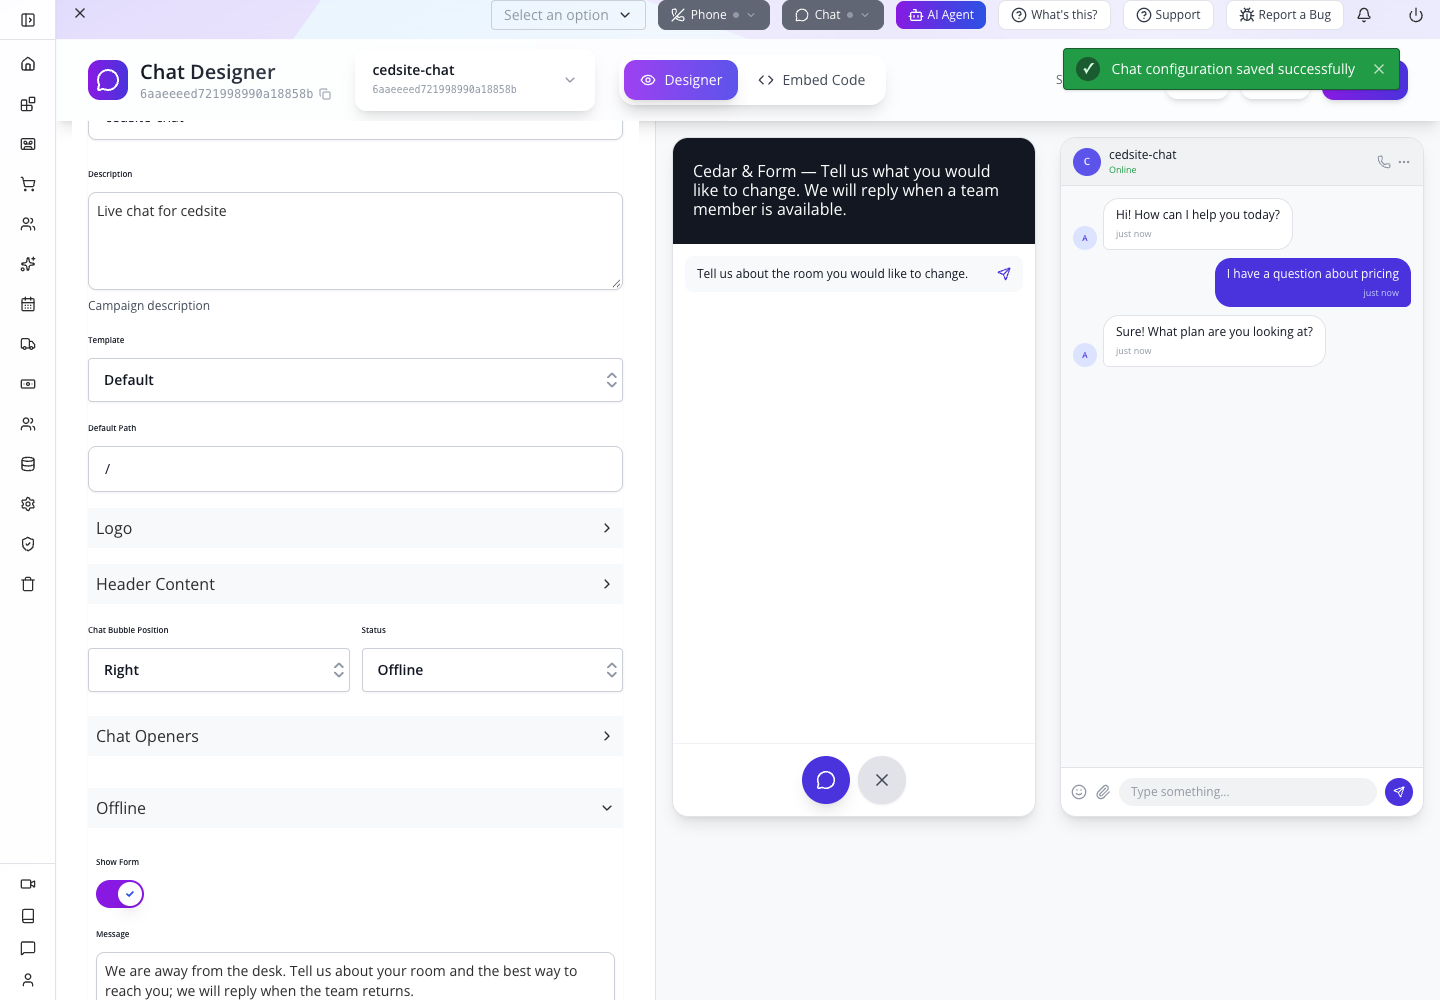
Open the website in a fresh private visitor session. Open the launcher and choose the opener. You should see We are offline, your message and the contact form.
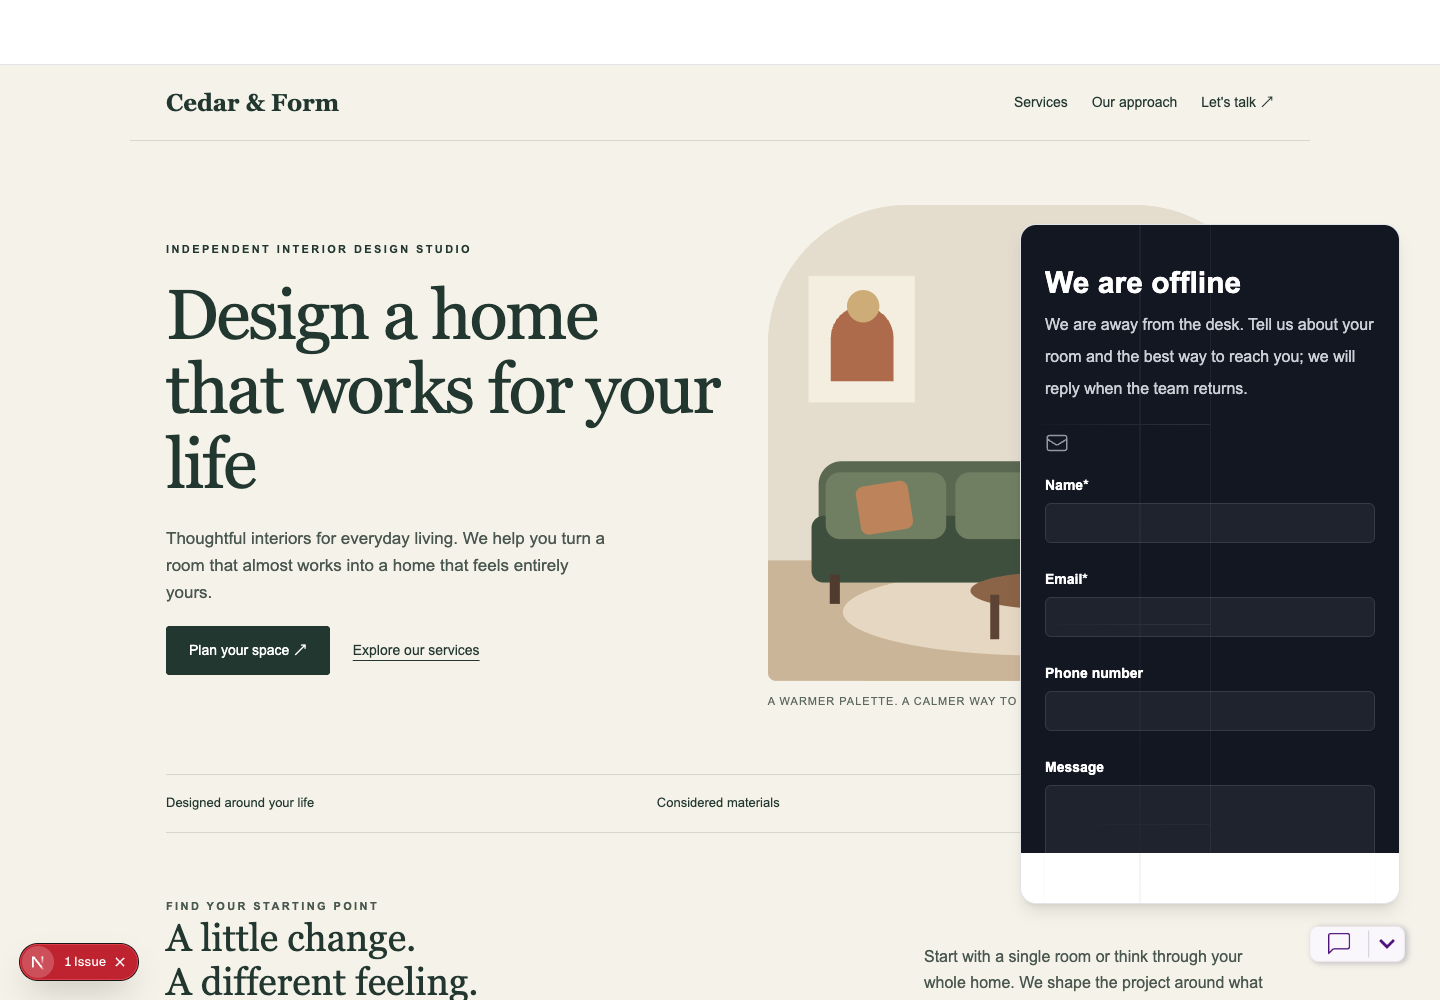
Enter these practice values:
| Field | Enter | Purpose |
|---|---|---|
| Name | Priya Nair | Who the team will help |
[email protected] | Contact identity for this fictional request | |
| Phone number | Leave blank for this exercise | Optional additional contact route |
| Message | Please help plan storage for my small living room. I would like a consultation next week. Fictional tutorial request. | Room, objective and requested next step |
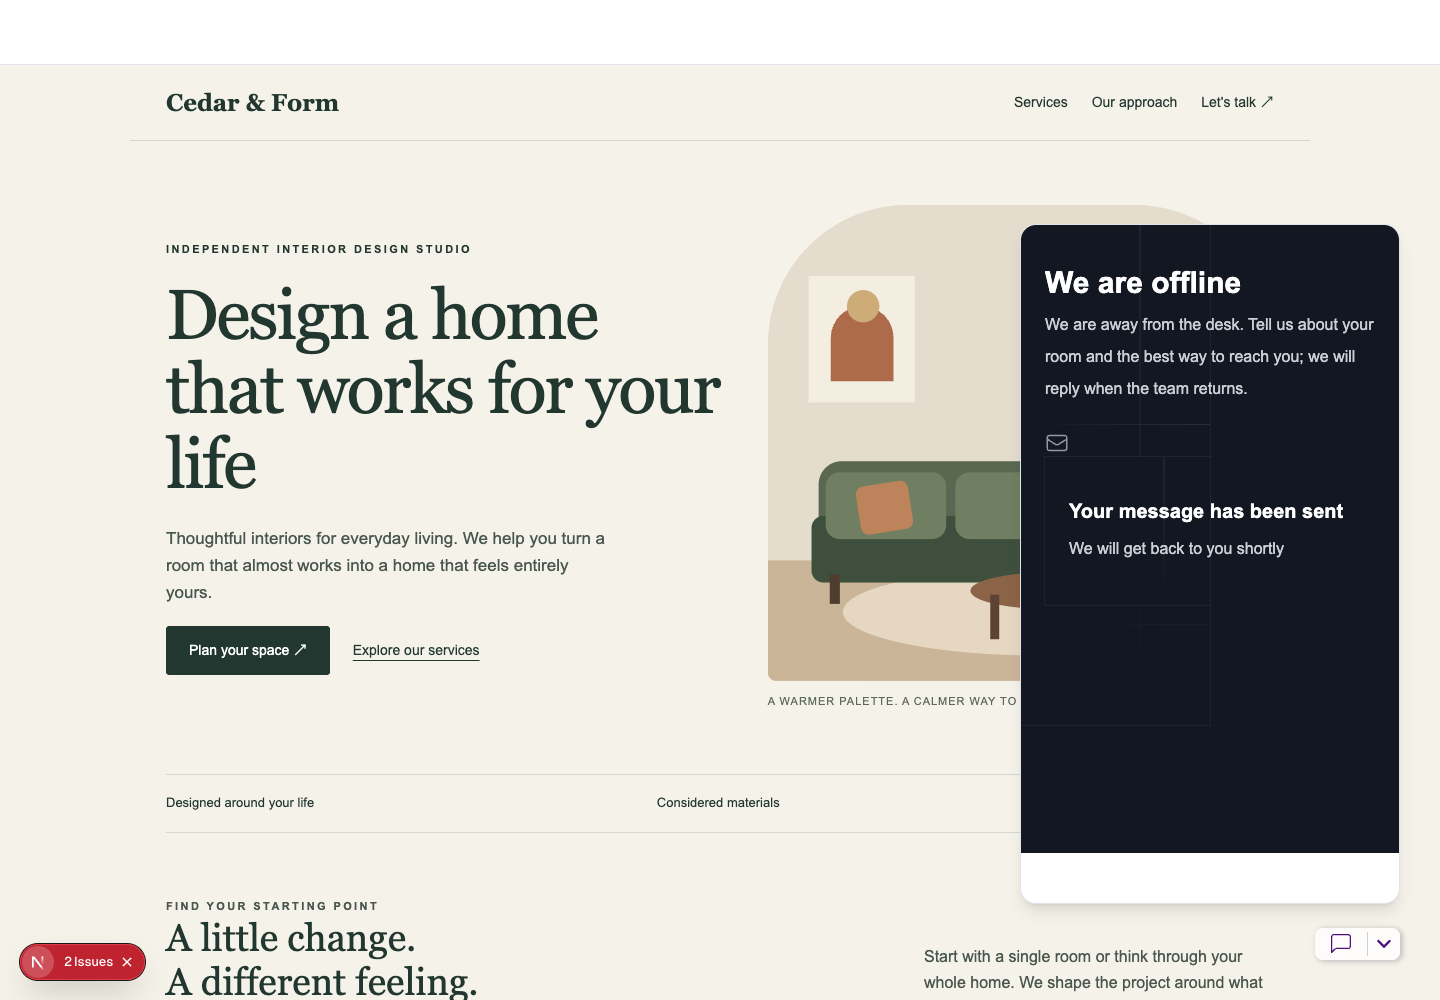
Select Submit once. Wait for Your message has been sent. In this test the input form disappeared after success, reducing the chance of submitting the same request again.
Now switch to Studio and open CRM → Tickets. If you land on New Ticket, use the back arrow beside that heading to reach the list. Reload the list and find Chat request from Priya Nair. Open it and read the email and description.
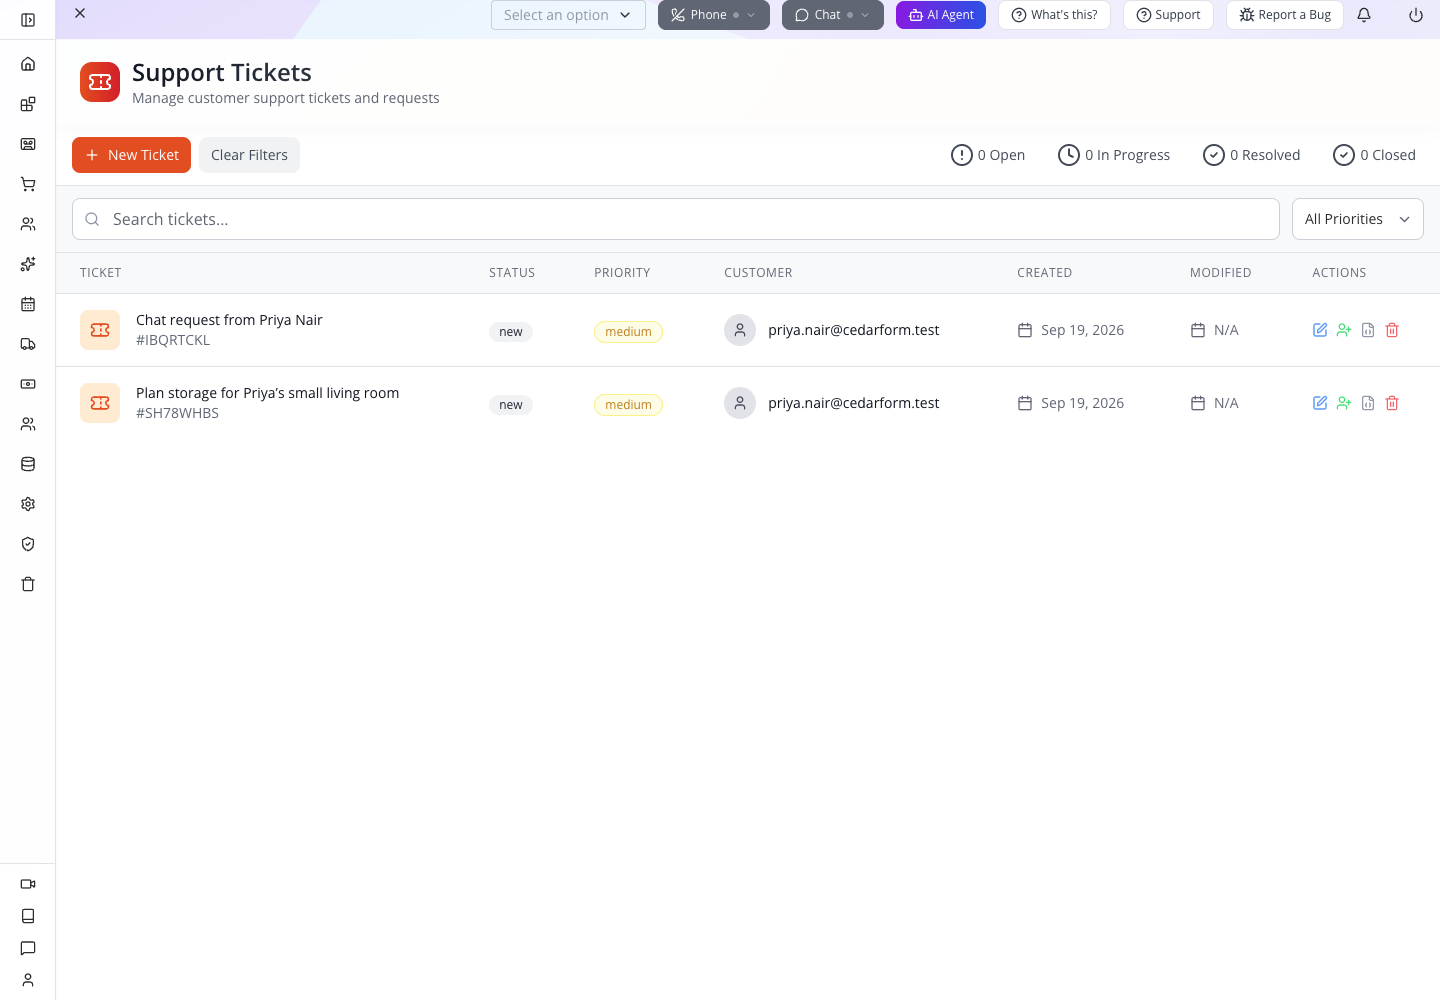
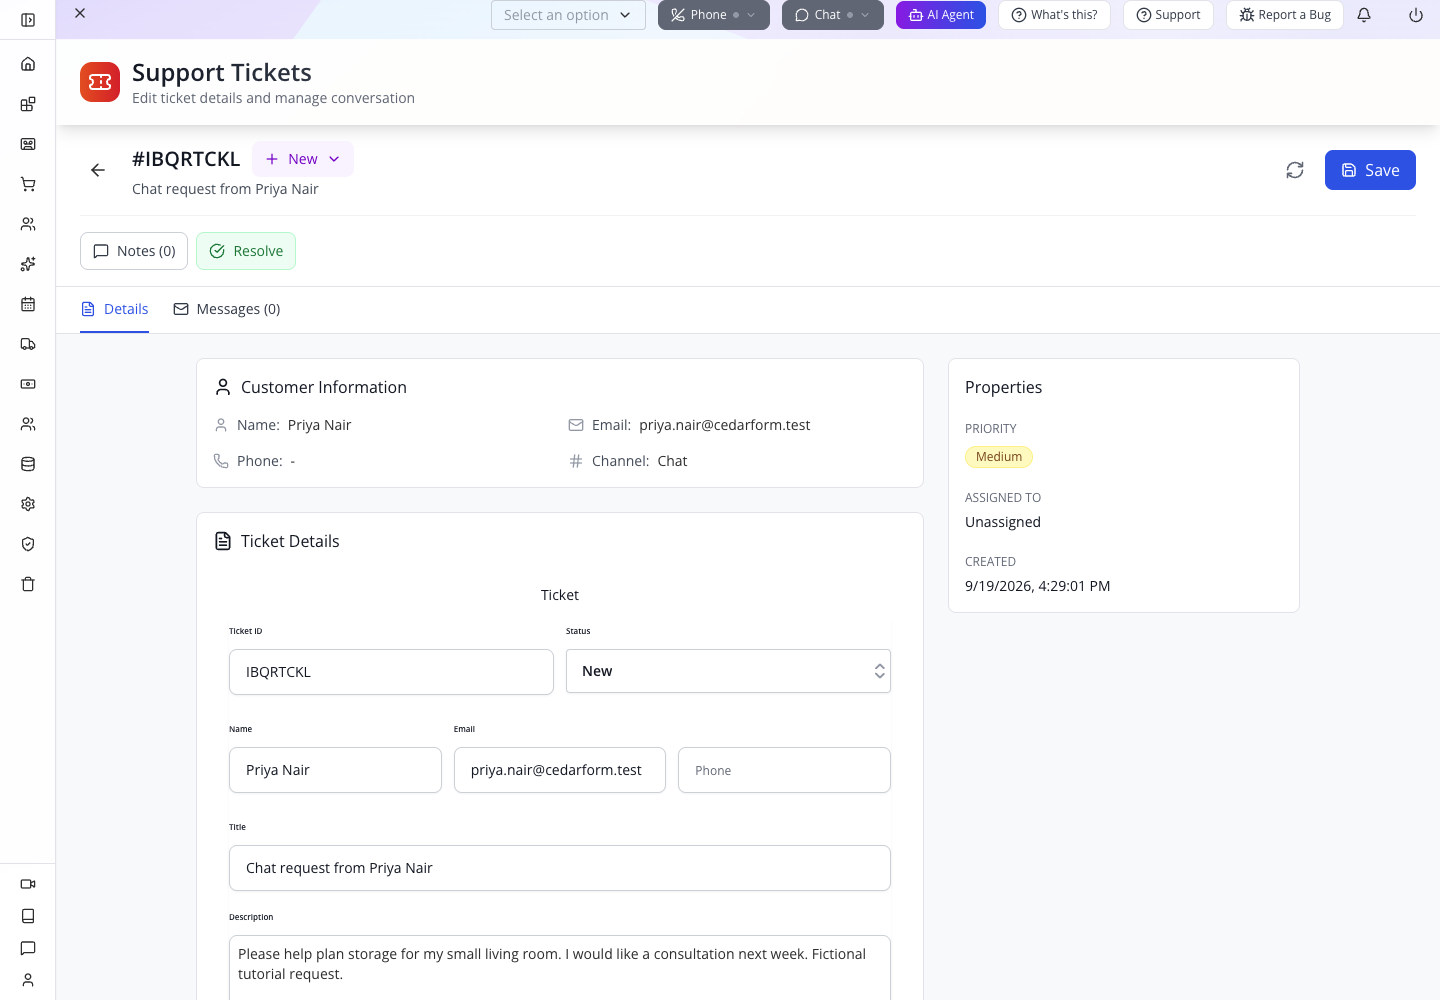
The recorded reference was IBQRTCKL, with New, Medium and Chat. Yours will have a different reference. This ticket was created by the visitor’s form submission. Finding its matching message in the staff view is the handoff check; a success banner by itself is not the entire test. No received email or transcript is claimed by this check.
If Submit shows an error, keep the message and investigate before promising receipt. Do not repeatedly press Submit: first search the staff list in case the save succeeded but the response was interrupted.
5. Rehearse an away message without a form
Some businesses prefer to direct visitors to another contact route. In the saved widget, keep Status → Offline, switch Show Form off and replace Message with:
Our chat desk is away. Use Start a conversation on this website to email us about your project.
Select Save. Use a new private visitor session, open the launcher and select the opener. Check that your message is visible and the input fields are absent.
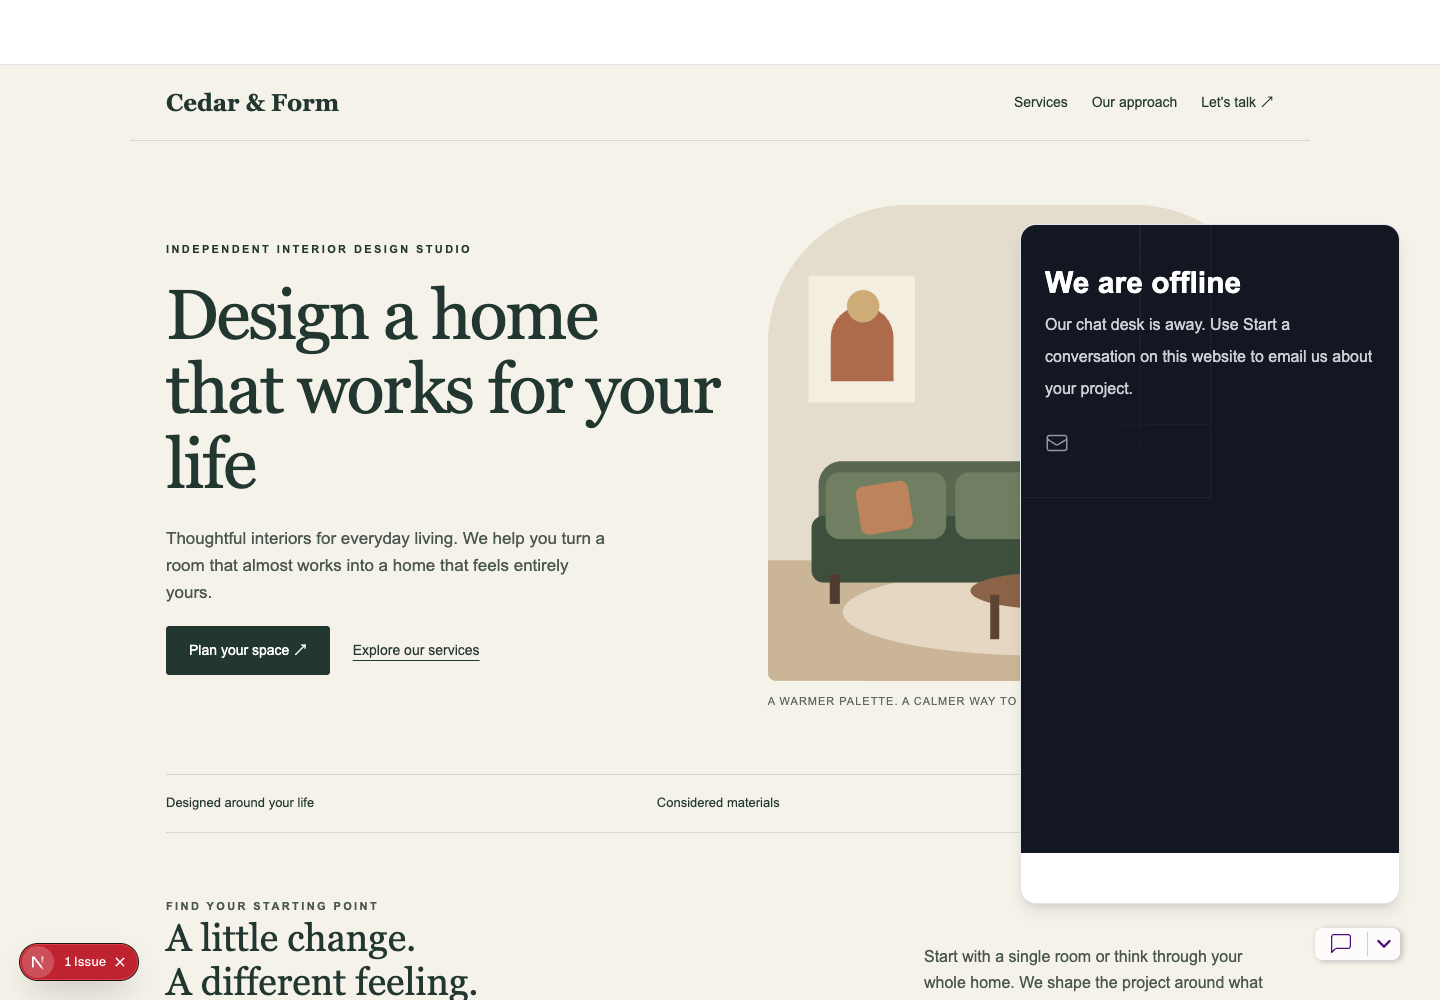
On the Cedar & Form page, Let’s talk ↗ takes you to the contact section. Inspect Start a conversation ↗ and confirm its email destination is your own monitored enquiry address. A mailto: action may open your email application; check the recipient and subject without sending a test message unnecessarily.
The private fictional site uses [email protected]. That is an illustrative destination, not a receiving inbox. Replace it with your business address before offering this fallback to real visitors. The walkthrough checked the contact anchor and destination; it did not establish email delivery.
For the final practice configuration, return to the widget, switch Show Form back on and restore the tested “We are away from the desk…” message. Set Status → Online, select Save, then reconnect the responsible agent using Chat → Connect chat. The away form is now prepared for the next deliberate switch to Offline.
Check yourself: what changes when the agent goes offline, when the widget switches Offline, and when a ticket is saved? They are three separate states. Test each one from the visitor and staff views.
Part 4 — Turn unfinished work into a ticket
1. Create the follow-up with enough context
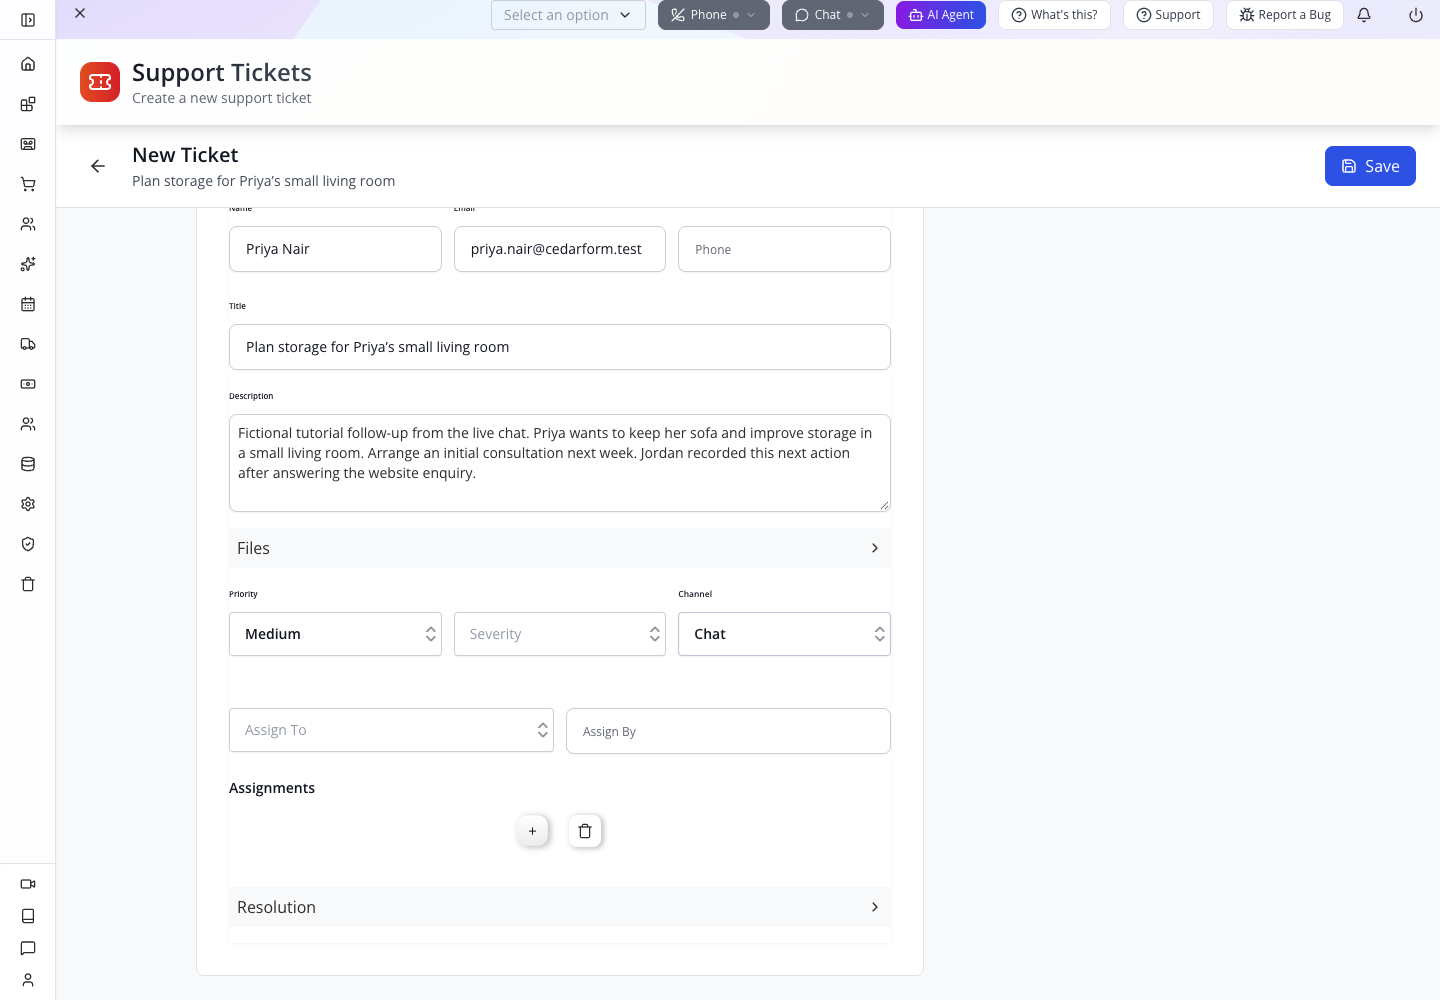
Open CRM → Tickets. In this build the entry opened a New Ticket form under Support Tickets. If you arrive at the ticket list instead, select New Ticket. This is a manual staff action after the live conversation. It is separate from the automatic away-request ticket you just tested. For a real enquiry already recorded as a ticket, update that existing record rather than making a duplicate.
Enter:
| Field | Example | Why it matters |
|---|---|---|
| Name | Priya Nair | Recognisable customer |
[email protected] | Identity to compare with the conversation | |
| Title | Plan storage for Priya’s small living room | Work to do, visible at a glance |
| Description | Fictional tutorial follow-up from the live chat. Priya wants to keep her sofa and improve storage in a small living room. Arrange an initial consultation next week. Jordan recorded this next action after answering the website enquiry. | Outcome, constraints, next step and origin |
| Status | New | Work has been recorded, not completed |
| Priority | Medium | Example priority; use your team’s triage rules |
| Channel | Chat | Where the enquiry started |
Leave the automatically generated Ticket ID alone. Do not assign the ticket to a made-up colleague; select a real responsible person when one is available in your company.
2. Save once, then find the record
Select Save. After Ticket saved, the form resets. Use the back arrow beside New Ticket to open the list rather than pressing Save again on the cleared form.
The rehearsal created ticket SH78WHBS. Your ticket will have its own reference. Find it by its title or customer, reload and open it again.

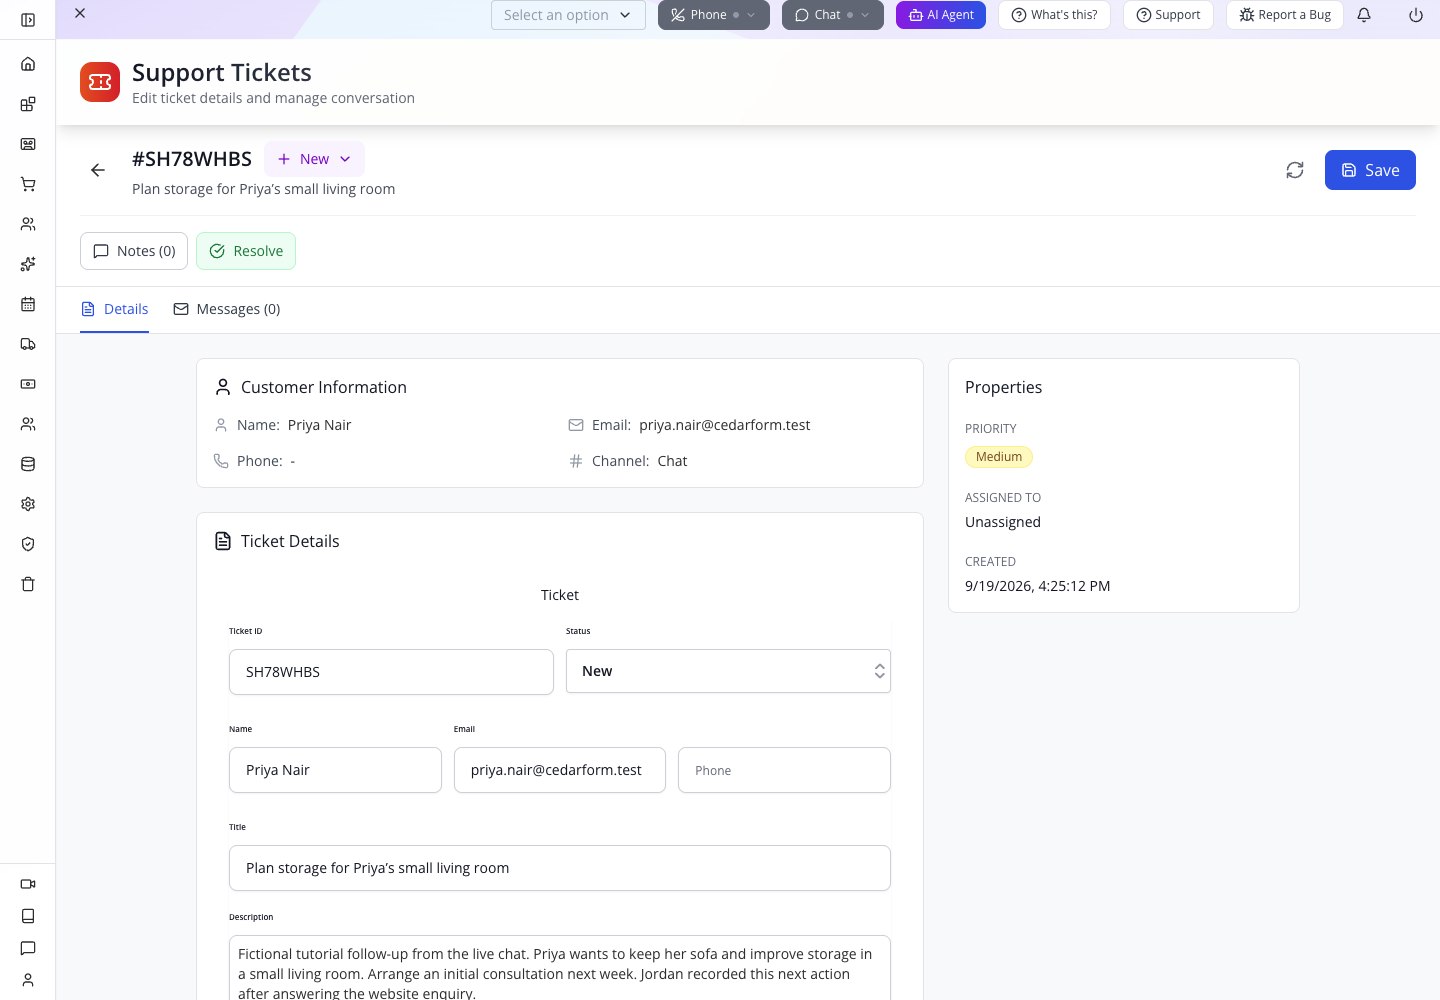
The detail screen includes Details, Messages, Notes and Resolve. Recording a ticket does not mean you have sent the customer an email or resolved the request. Keep it New until somebody starts the work; use the actual next action to decide when it is complete.
Try it: ask another person to read only the title and description. They should be able to say which room, what stays, what needs improving and what happens next.
Check yourself: was this ticket created automatically by the widget? No. A staff member saved it, then checked the persisted record. That distinction matters when reviewing missed enquiries.
Part 5 — Extend the channel deliberately
External websites. In Chat Designer, the Embed Code area offers HTML/JavaScript, React Component, Select App Credential and Copy Code. Select the widget’s app credential, not an employee’s login. The generated code uses an organisation ID, configuration ID and app user name; the app secret stays private.
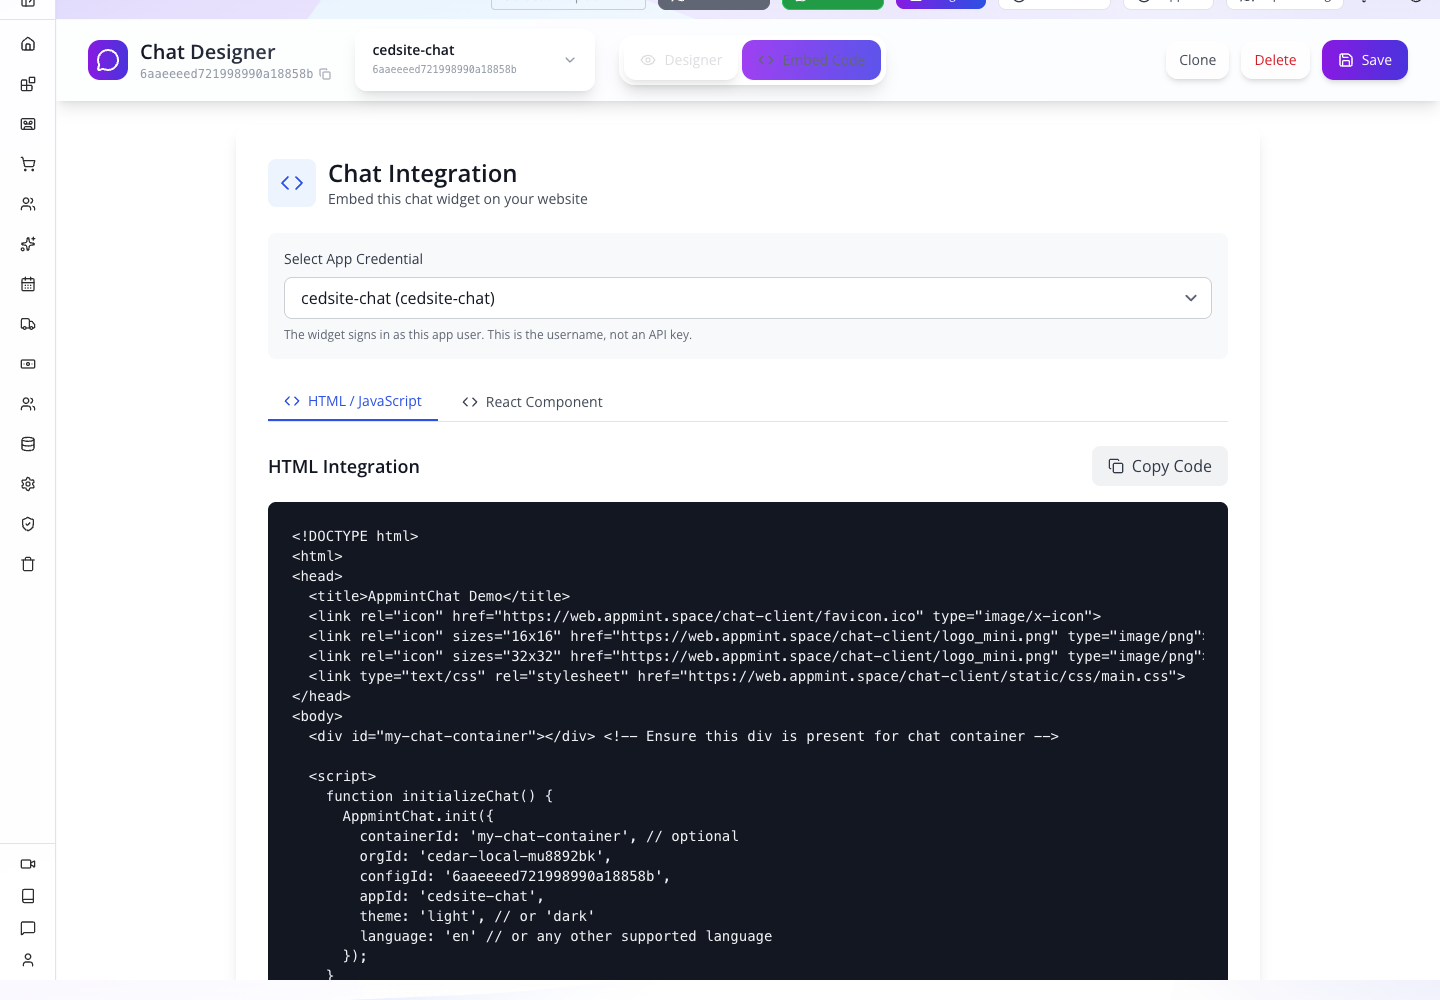
The HTML / JavaScript output is a complete example page. Select Copy Code, save the complete example as an .html file, and serve it on your test website. If you are adding it to an existing page, put its stylesheet links in that page’s <head>, then its chat container and scripts before the closing </body>. Do not paste a second complete HTML document inside your existing page.
Open that test page in a separate private visitor session. Confirm the launcher and the saved greeting, enter the visitor’s email, and send a question. Keep the agent connected in CRM → Chat, pick the queue entry and reply. Read the answer on the external page, then end the chat and check the ended state there.
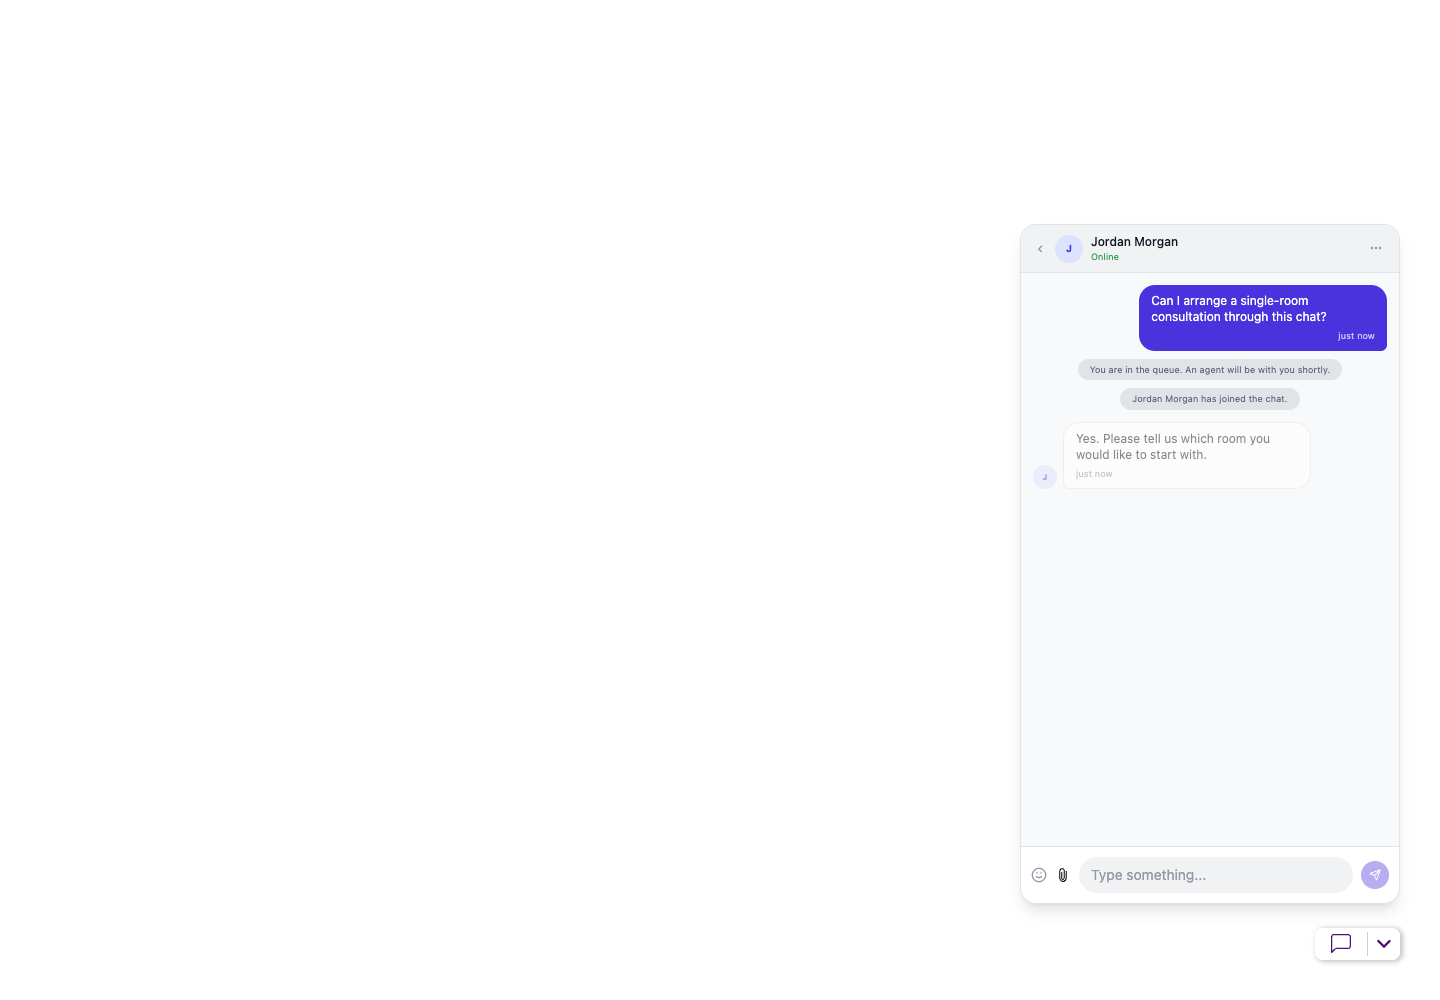
This additional rehearsal used Alex Rivers ([email protected]), who asked: “Can I arrange a single-room consultation through this chat?” Jordan replied: “Yes. Please tell us which room you would like to start with.” The generated example was tested as a separate local website using the same local API and widget build, then closed deliberately. An Appmint-hosted site already configured in Part 1 does not need this second installation.
Email and phone. Website support chat, business email, telephone calls and customer tickets are separate parts of the service workflow. Configure and test each channel with an address or number you control. The employee phone and mobile CRM course covers staff calling; the custom API course covers external-service credentials and integrations. Do not interpret a working chat reply as confirmation that email, SMS or calls are configured.
AI assistance. The setup wizard also offers AI replies. Establish the human desk first, then follow Build an AI business assistant to test knowledge, answers and human escalation. Enabling an assistant is not a substitute for checking what happens when it cannot answer.
If something goes wrong
| Symptom | Check and next action |
|---|---|
| Live Chat still shows Set up | Confirm the correct active site. Complete Finish once; closing the wizard before Finish does not create the setup. |
| No launcher | Check the saved site feature and the public page you opened. For an external embed, check its script/stylesheet requests and organisation, configuration and app-user values. Avoid installing a second widget on the same hosted page. |
| Queue is empty | The visitor must send a message after entering their email. Confirm agent and visitor are using the same organisation/widget, then inspect Queue. |
| Visitor appears as an email | This configuration collected email at entry. Use it to choose the correct thread. |
| Reload opens an older conversation | Select the current assigned customer tab in Agent Desk. Historical Chats entries are a separate viewer. Read the last question before replying. |
| No other agents are online | Cancel Transfer and keep helping the visitor until a colleague is connected and available. |
| Agent is offline but the visitor can start | Agent connection and widget Status are separate. Check other staff tabs/devices, then deliberately configure the intended widget mode. |
| Away form is missing | Check the selected widget, Status, Offline → Show Form and the saved values. A successful submission also hides that session’s form. |
| Submit shows an error | Keep the visitor’s message; check the staff list before retrying. Do not claim receipt without a saved request. |
| Blank New Ticket after Save | The form resets after success. Use the back arrow to the list and find the saved title before creating another record. |
| Name changes unexpectedly | Keep a simple technical widget identifier. Use Header Content for business wording and read the saved configuration back. |
| External page shows the wrong greeting | Confirm its configuration ID and app credential. Test in a fresh visitor session after saving the intended widget. |
What happened behind the scenes
For developers: configuration, assignments and guest ticket intake
The setup wizard creates a chat configuration and app credential, then links them to the site’s live-chat feature. The human-only setup leaves the AI assistant unset. The public widget uses its app-user name; its one-time secret does not belong in the embed.
Queue acceptance assigns a customer conversation to the agent. Reconnection restores server-recorded assignments for that signed organisation/agent and loads their saved messages. Ended conversations are removed from active assignments while their message history remains available. Presence and transfer candidates are scoped to the organisation.
The away form uses a signed, organisation-bound guest token and the narrow POST /crm/tickets/chat-request intake. That route validates the same-organisation widget and Show Form setting and constructs a New/Medium/Chat ticket from bounded contact/message fields. It does not give an unverified visitor a registered customer’s identity or accept arbitrary ownership, assignment or status fields. A saved ticket ID is required before the widget confirms success.
The local walkthrough found and repaired tenant presence leakage, missing guest organisation binding, lost active controls on reload, duplicate lifecycle notices, misleading full-page embed instructions and the guest/general-ticket authentication mismatch. Each repaired path was exercised again. Earlier failure captures remain in the review records; they are not the result taught in this course.
Relevant software source paths under the projects directory:
websitemint/packages/ui/src/components/welcome-screens/buttons/live-chat-setup-wizard.tsxwebsitemint/packages/ui/src/ui/header/live-chat-control.tsxwebsitemint/packages/ui/src/components/crm/chat/agent-desk/agent-desk-store.tswebsitemint/packages/ui/src/components/crm/chat/modern-chat-designer.tsxchat-client/src/components/chat-socket.tsx,chat-store.tsandutils/request.tsappengine/src/chat/chat.gateway.ts,chat-presence.service.tsappengine/src/users/users.service.tsappengine/src/crm/tickets.controller.ts,tickets.service.ts
Closing a chat can request a transcript, but this exercise did not establish transcript or notification-email delivery. Phone, AI and actual colleague transfer require their own acceptance checks.
Where next
Use the enquiry and booking course to turn the customer’s interest into a consultation. Continue to a client dashboard for ongoing client work, and roles and permissions before expanding the support team.
Evidence: own local Cedar organisation, site cedsite, widget/app user cedsite-chat; independent visitor sessions. Passed: setup/reload, two-way chat, active-assignment recovery, historical readback, transfer availability with no eligible colleague, deliberate end, branded greeting, agent/widget availability distinction, automatic away ticket IBQRTCKL and staff readback, manual ticket SH78WHBS and independent reading exercise, no-form fallback, and standalone embed exchange. The companion packet includes real stills and two raw screen recordings. No actual colleague transfer, attachment exchange, AI takeover, phone setup, receiving inbox or transcript delivery is claimed. Capture and acceptance ledger · Companion-video guide.