
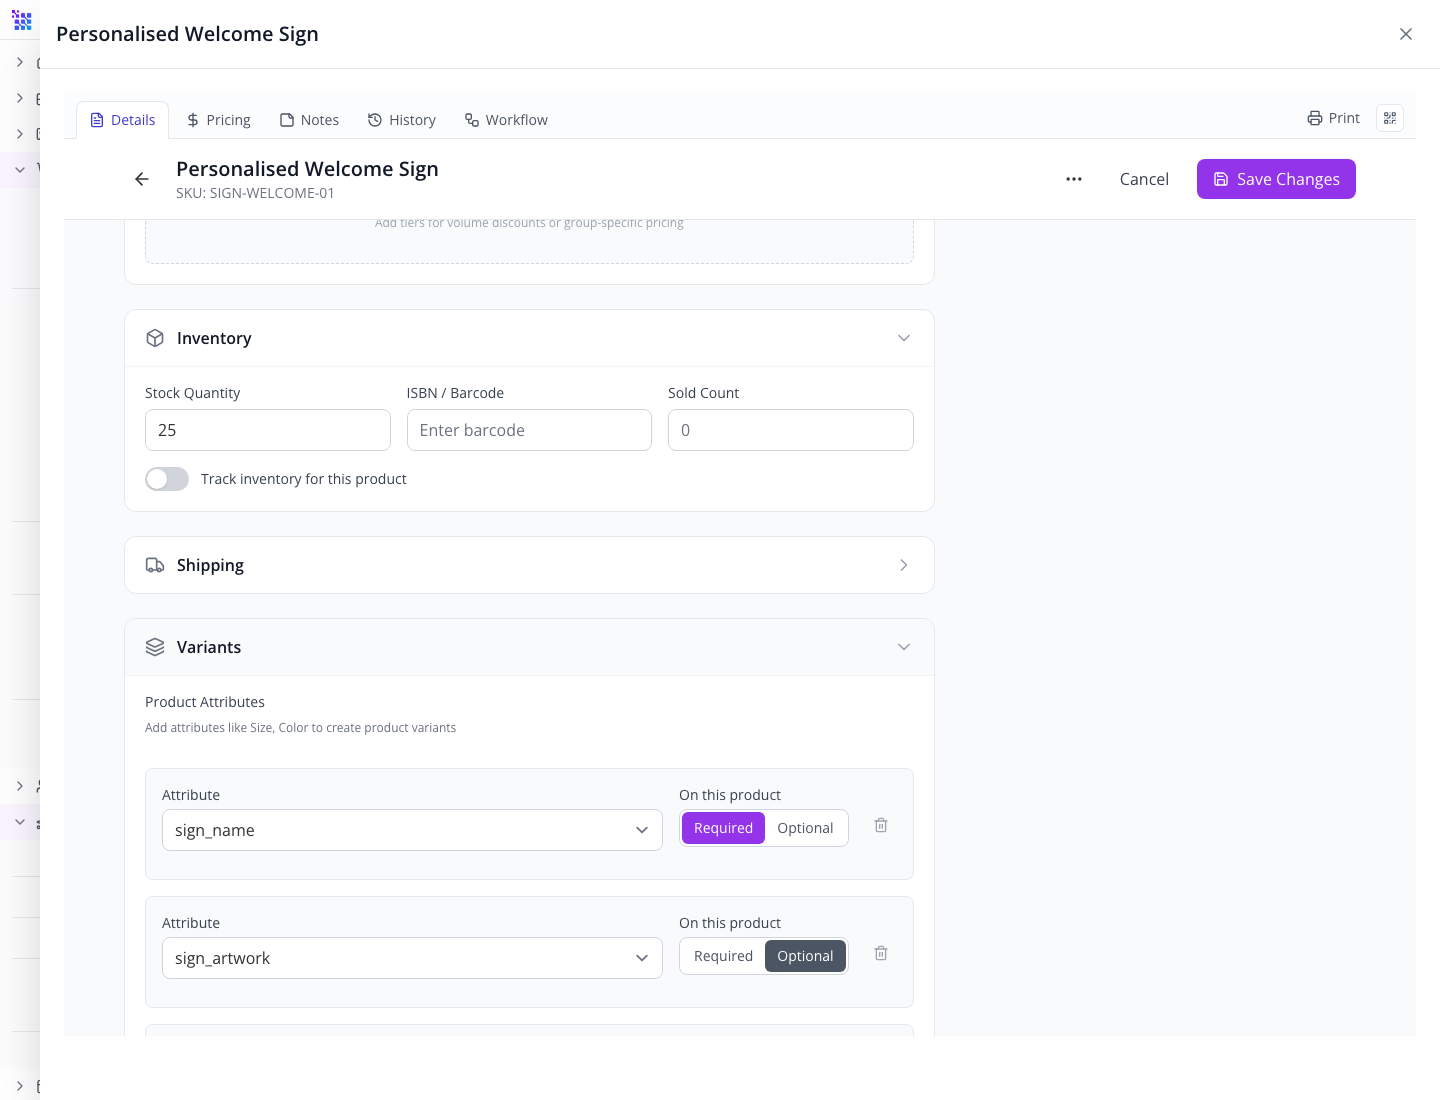
One catalogue product; a different name and artwork for each customer. The size price belongs to this product, while the reusable field definitions live in Attribute.
For: owners and operators selling made-to-order goods. Allow: 45–60 minutes for catalogue and shipping setup, followed by a separate customer-order rehearsal. Level: beginner setup with advanced fulfilment checks. Product: Appmint Studio Manager and the website storefront. Catalogue setup rechecked: 21 September 2026, local Studio 0.6.2. Customer-order verification is in progress. Example: Tutorial Sign Studio’s Personalised Welcome Sign, SKU SIGN-WELCOME-01.
What you will have at the end
The first practical result is a saved $45 product with a useful description, three personalisation fields and a default shipping configuration. A 30 cm sign keeps the base price. A 45 cm sign adds $12. Customers supply the name for their sign and may attach artwork.
The second result is an order-readiness checklist: how to distinguish catalogue images from customer artwork, check different personalisations in a cart, and reconcile the order, payment, shipment and any return. Those records answer different questions. Saving one of them does not finish all the others.
Verified walkthrough: catalogue and shipping setup, customer registration/sign-in, personalised cart lines, saved-cart restoration, correct pricing, and operator access to uploaded artwork have passed locally. Checkout still needs a configured payment sandbox; a completed order, shipment and refund have not been demonstrated. Those remaining steps are explicitly marked below.
What you need
- An organisation and a saved website. Complete Appmint signup and first setup, then Build a business website.
- Access to Storefront → Product, Attribute and Shipping in Studio Manager.
- These two original practice files: The Okafors crest and Maya’s floral welcome. Download the SVG files themselves. They are sample customer artwork, not screenshots of the product.
- For the later buying rehearsal: a customer account and mailbox you control, plus an authorised test configuration for your payment provider. Artwork uploads require a signed-in customer. A Studio administrator’s session is not a substitute for checking the customer experience.


You can finish catalogue and flat-rate shipping setup without a carrier account or payment-provider credentials. Use a training organisation while learning. Replace the example product copy, prices and delivery promises with details your business can actually fulfil before selling.
The story
Priya runs Tutorial Sign Studio. The shop sells a welcome sign, but the workbench needs more than a product name: which family, which design and which size? A message buried in an inbox is easy to separate from the purchase. Personalisation fields keep those instructions with the customer’s line item.
We will prepare two designs: The Okafors, 30 cm, and Welcome Home Maya, 45 cm. They share one SKU but must retain different names, files and prices. That is the central test of this course.
The route
flowchart LR
    A[Product: name, SKU, price] --> B[Attach reusable attributes]
    B --> C[Configure shipping]
    C --> D[Check the website and two cart lines]
    D --> E[Rehearse checkout and fulfilment]
    E --> F[Reconcile payment and any return]
Part 1 — Give the customer a clear product to buy
1. Open the catalogue
Expand Storefront in the left sidebar and choose Product. This opens Product Center. Its top tabs are Dashboard, Products and Partner Sync on the checked build.
Choose Products to see individual records. On the dashboard, New Product takes you to that list; choose Add Product on the list to open the actual creation form.
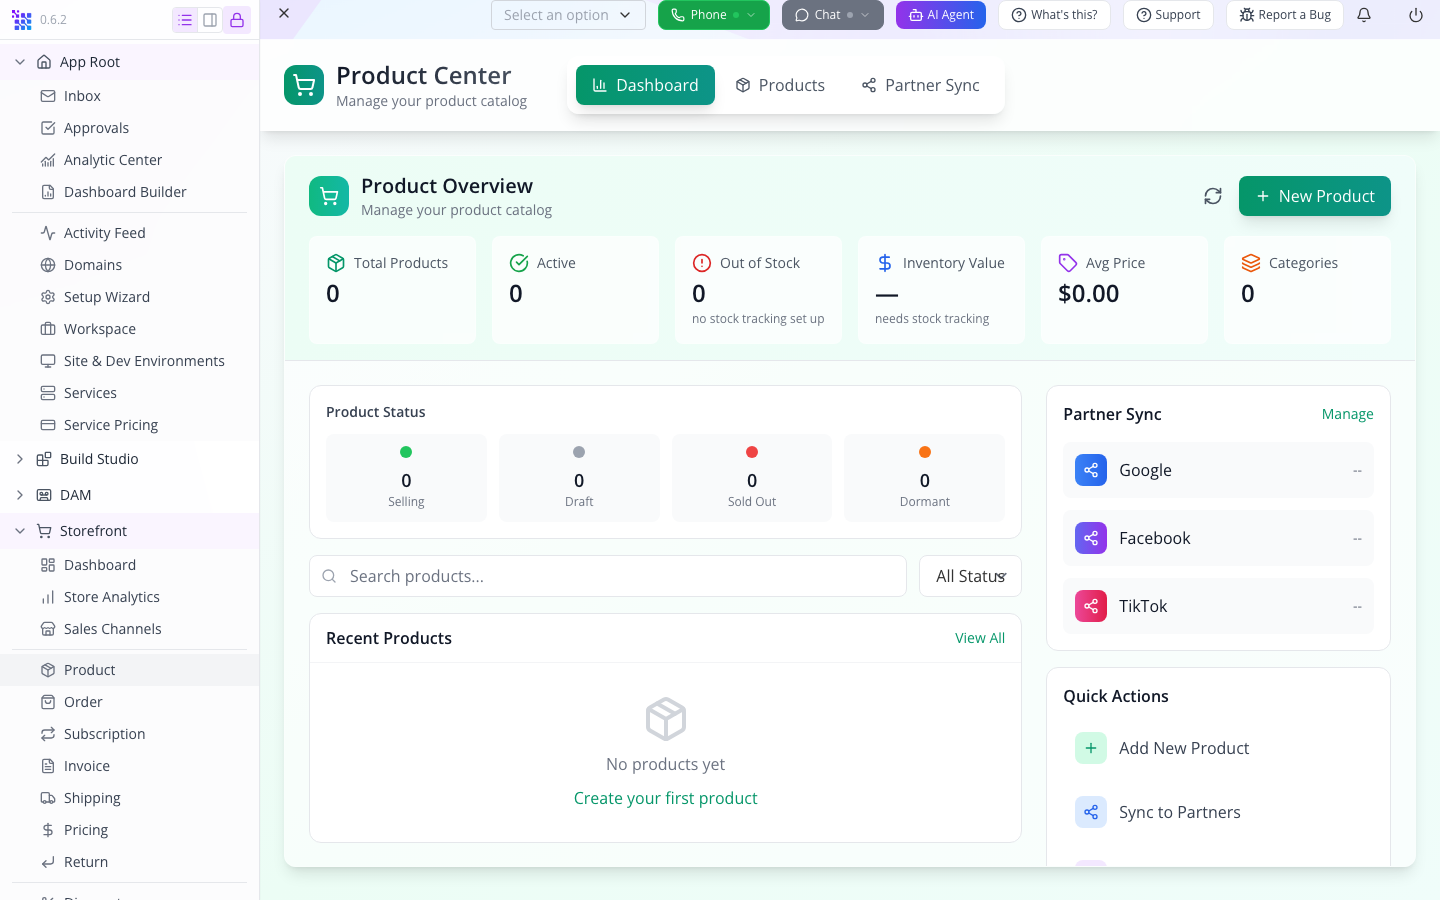
The distinction matters when the catalogue is empty: reaching the Products tab has not created anything. The creation form has Product Name, SKU and Create Product.
2. Name the product and give it a stable SKU
In Product Name, enter Personalised Welcome Sign. In SKU, enter SIGN-WELCOME-01.
The name helps the customer recognise the item. The SKU helps your team match it across orders, stock and external sales channels. Keep it stable when you improve the public wording later.
URL Slug is the readable identifier used in product links. The form says Auto-generated from name, but it remained blank in the initial saved record during this walkthrough. Enter personalised-welcome-sign explicitly and check it again after saving. Do not build a customer link from the name until you have opened the actual product page.
Watch for: an unsaved field on screen is not a finished product record. After each group of changes, wait for Product saved successfully, then reopen the product. This is especially useful if the rich-text editor or an upload is still updating.
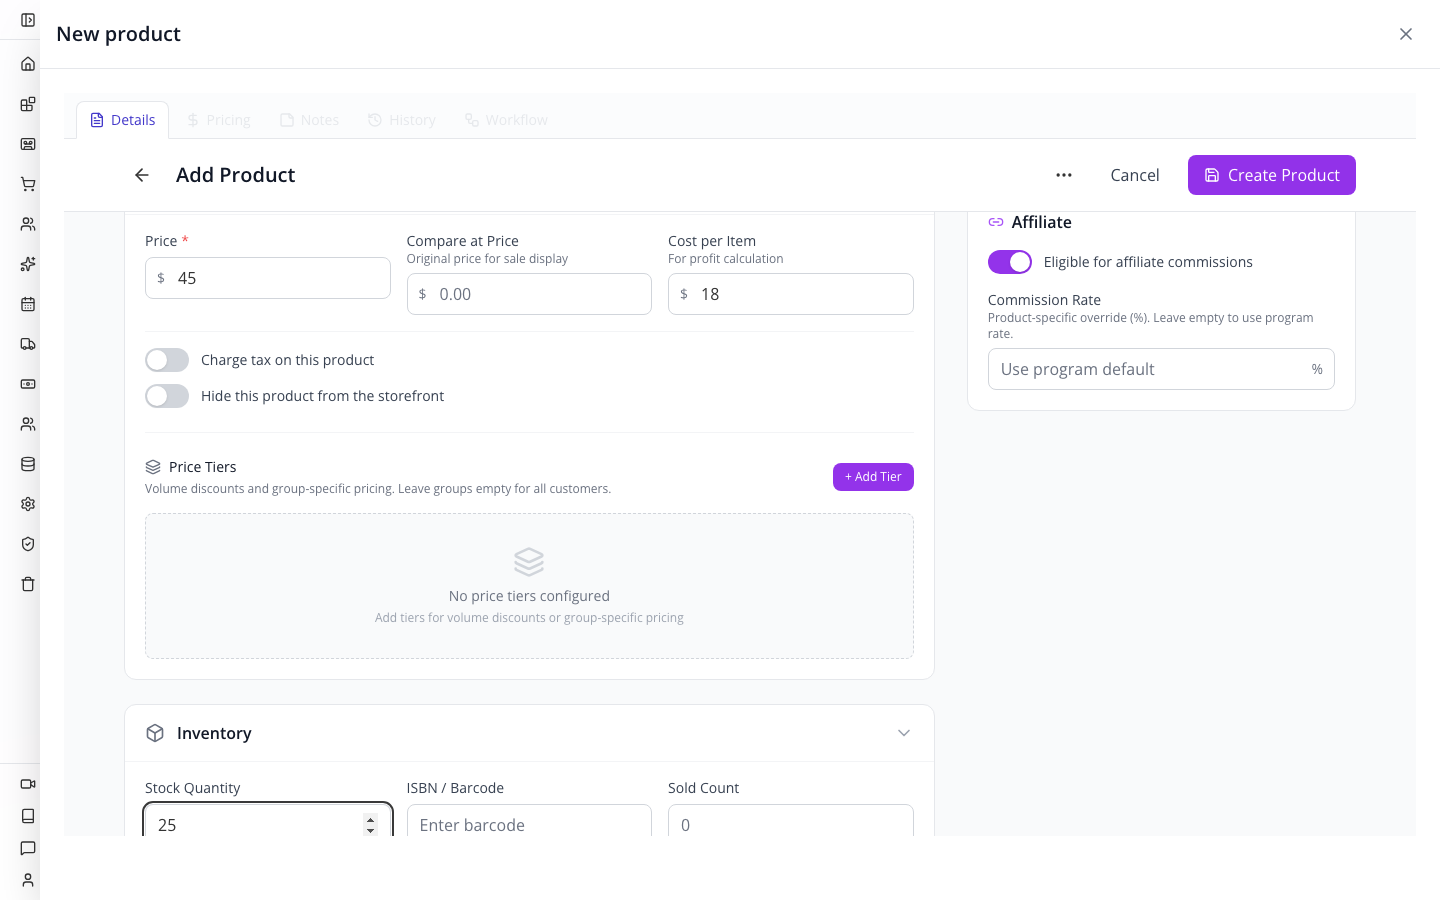
3. Set the base price and internal cost
Scroll to Pricing and enter:
| Field | Value | Why it is here |
|---|---|---|
| Price | 45.00 | The base selling price before the larger-size addition |
| Compare at Price | Leave blank | This exercise is not advertising a markdown |
| Cost per Item | 18.00 | An internal cost for margin reporting, not another customer charge |
| Stock Quantity | 25 | The quantity field on this catalogue record |
| Status | Available | The product’s descriptive status |
Leave Hide this product from the storefront off for the training product. Review Charge tax on this product according to your business’s actual tax setup; the checkbox alone does not establish the correct jurisdiction or rate.
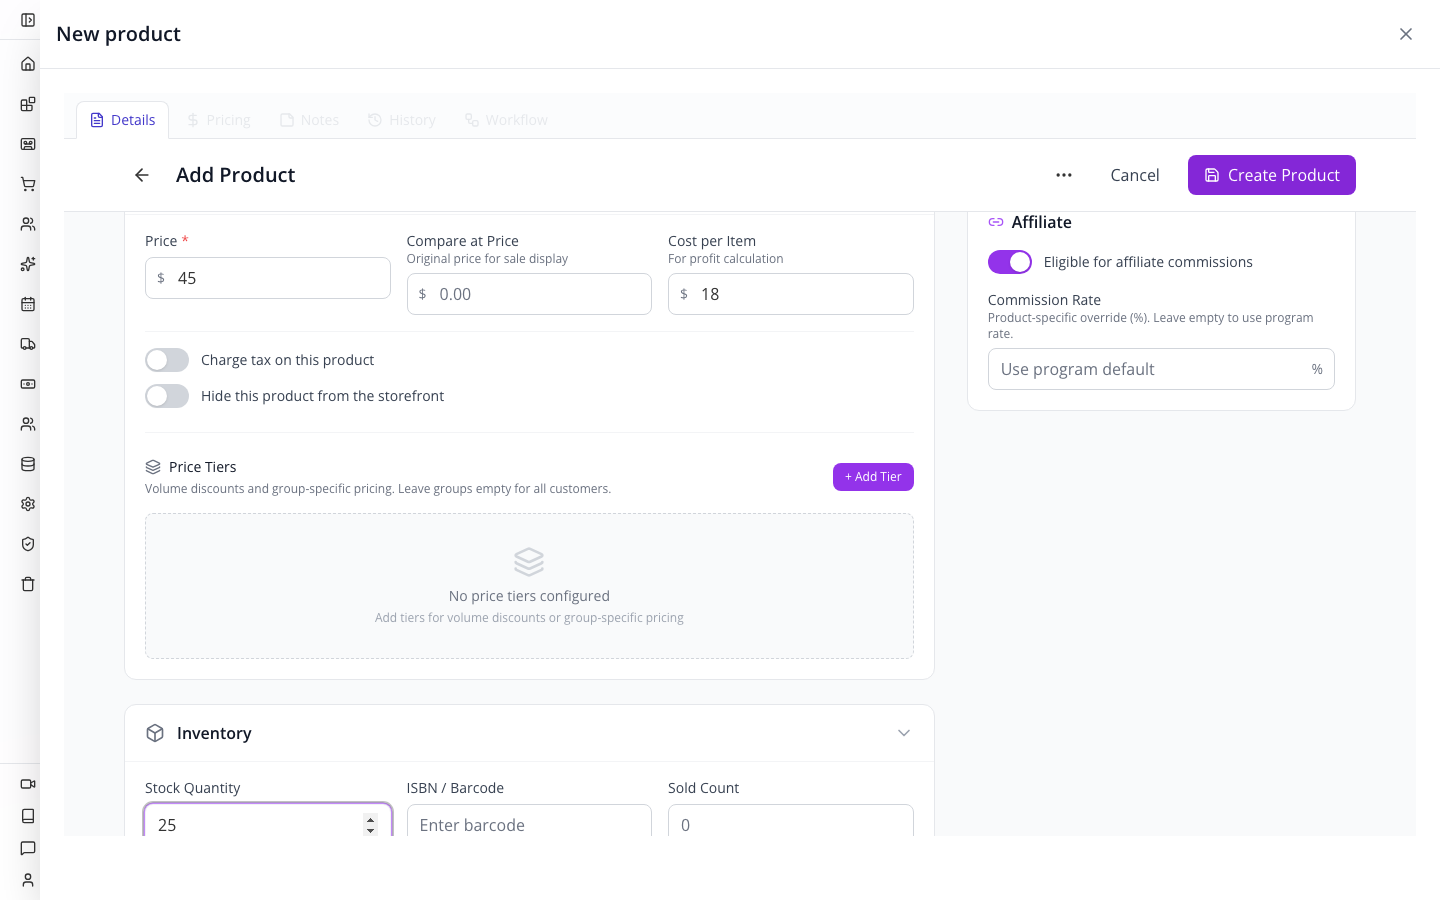
Visibility: use the explicit hide control when withholding a product from the catalogue. Do not rely on a status label such as Draft or Sold Out to make the public listing unavailable. Check the website after making a visibility change.
Stock: after the local repair, both the product editor and Products list show
25. Location-based inventory is still a separate operating setup; a catalogue quantity alone does not establish stock at each business location.
4. Create the record, then reopen it
Choose Create Product. After creation the editor offers Save Changes. Return to the product list and find SIGN-WELCOME-01; reload the page and open the same row again.
Check name, SKU, price, cost and quantity. In the practiced record, the editor retained 45, 18 and 25 after reload.
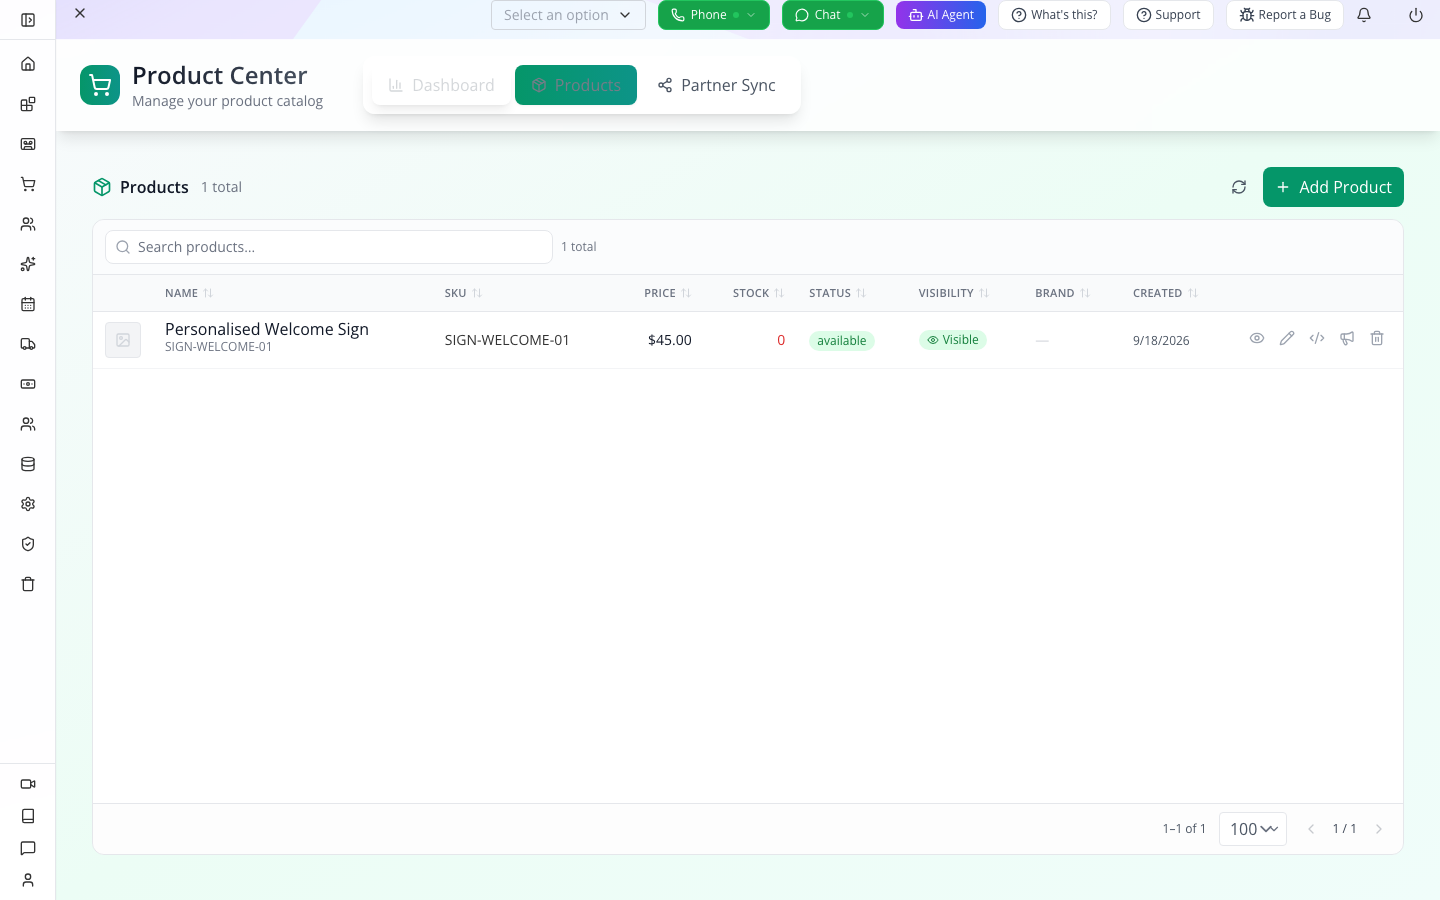
You now have the record that attributes, cart lines and sales-channel settings can refer to. Do not create another product just because the first is missing a description or image; edit this one.
5. Explain what the buyer is ordering
In Basic Information → Description, use the rich-text area to enter:
A welcome made personal. Add a family name or a short greeting, choose a 30 cm or 45 cm sign, and upload your own crest or artwork. We use the details on your order to prepare your sign. The 45 cm option adds $12 to the $45 base price.
Choose Save Changes, wait for success and reopen the product. This description persisted in the walkthrough. The explicitly entered slug also persisted after the later restart and readback.
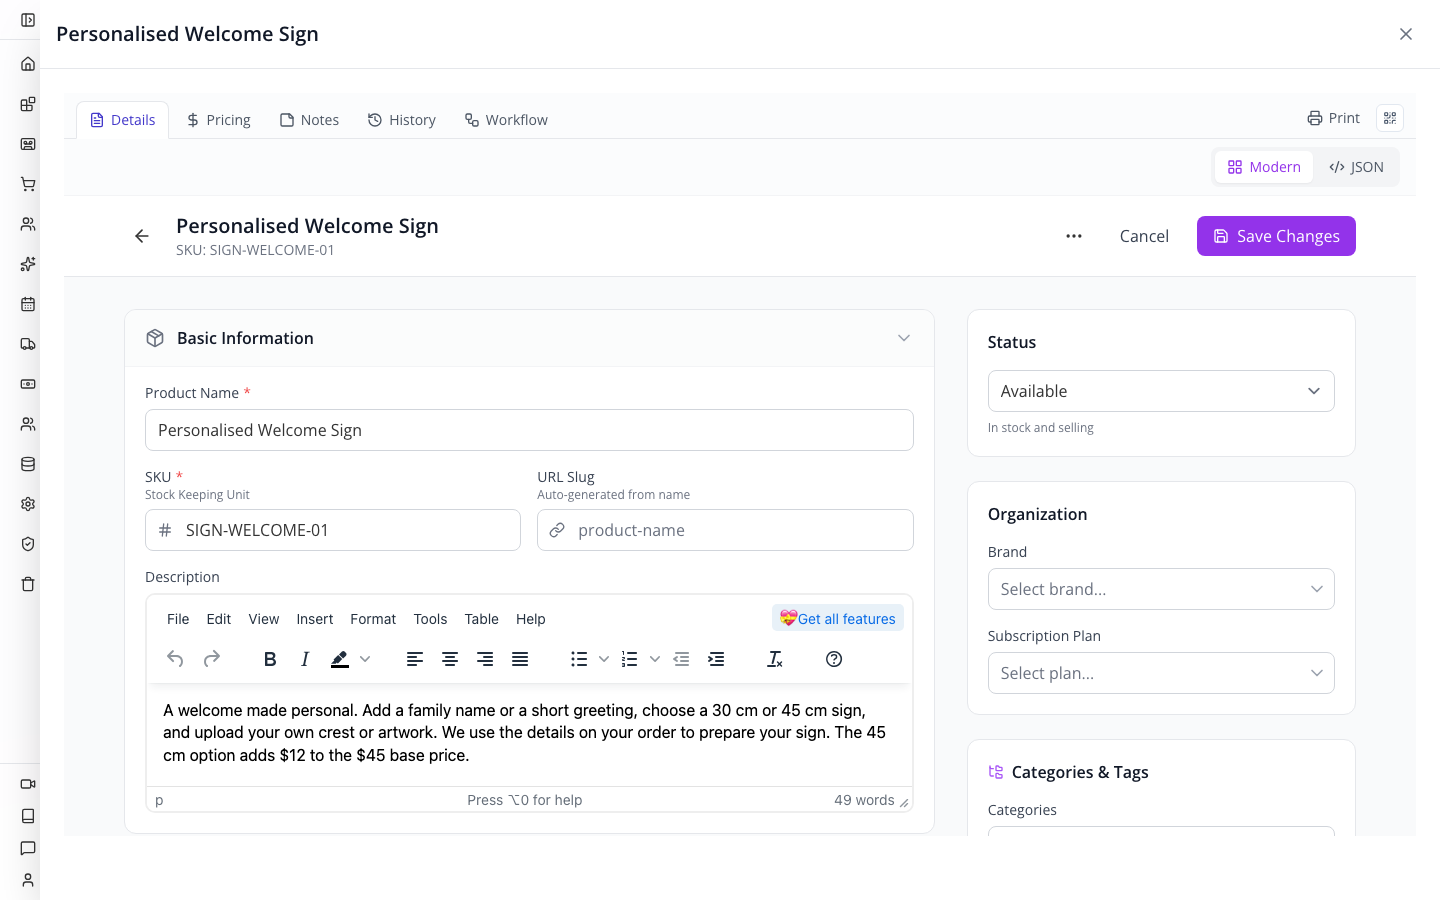
For your own product, add material, dimensions, what the buyer receives and how artwork approval works. Make turnaround and shipping promises only when your team can meet them. A good description answers the questions that would otherwise become support messages.
6. Prepare the catalogue image separately from customer artwork
Download welcome-sign-gallery.png, the original tutorial product illustration supplied with this course. Open it to confirm it is the round welcome sign image. This fixture lets you rehearse the gallery upload without needing a real product photograph; replace it with accurate imagery of your own item before selling. The editable SVG is also supplied. Keep the two customer-artwork SVGs for the later personalisation exercise.
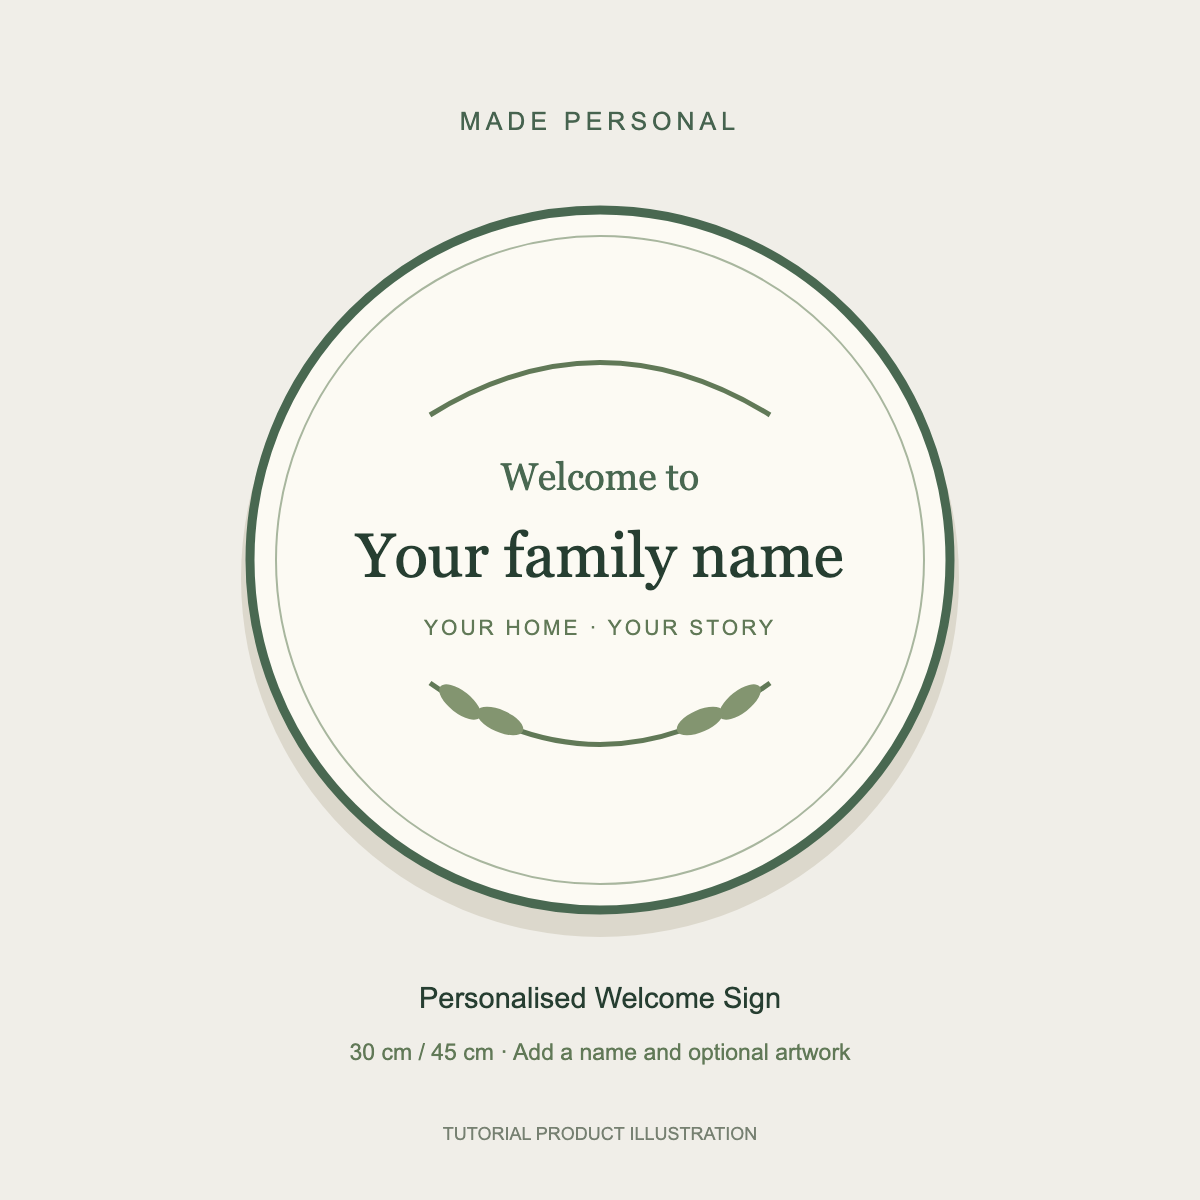

The Media section is for the product’s public gallery. Select from computer uploads an image; Choose from File Manager selects an existing asset. After a usable thumbnail appears, the star on that image is Set as default image. Uploading and choosing the default are separate actions; finish with Save Changes.
The public catalogue image should show the product a customer is buying. A customer’s own crest belongs in their personalisation upload later, not as a replacement for the shop’s gallery image.
In the local recheck, uploading the supplied illustration, selecting its default star and saving produced a working gallery thumbnail and product-list image after reload. Confirm both views before continuing. A file selected on your computer is not proof that the upload finished.
Try it. Rewrite the first sentence of the description for your own product, save it, then reload. Have a colleague explain what is included without asking you.
Check yourself. Does putting the family name in Product Name create the right personalisation model? No. Keep the catalogue name reusable; the family name belongs to that customer’s line item.
Part 2 — Add the three questions that make each sign different
An attribute definition describes a reusable question and its input type. Attaching it to a product decides whether that question is required and which choice prices apply. The customer’s answer then belongs to their cart or order line.
1. Create the name field
Open Storefront → Attribute and choose Add Attribute. Enter:
| Control | Value |
|---|---|
| Name | sign_name |
| Title | Name on the sign |
| Type | Text (free input) |
Choose Create Attribute and find the new record in the list.
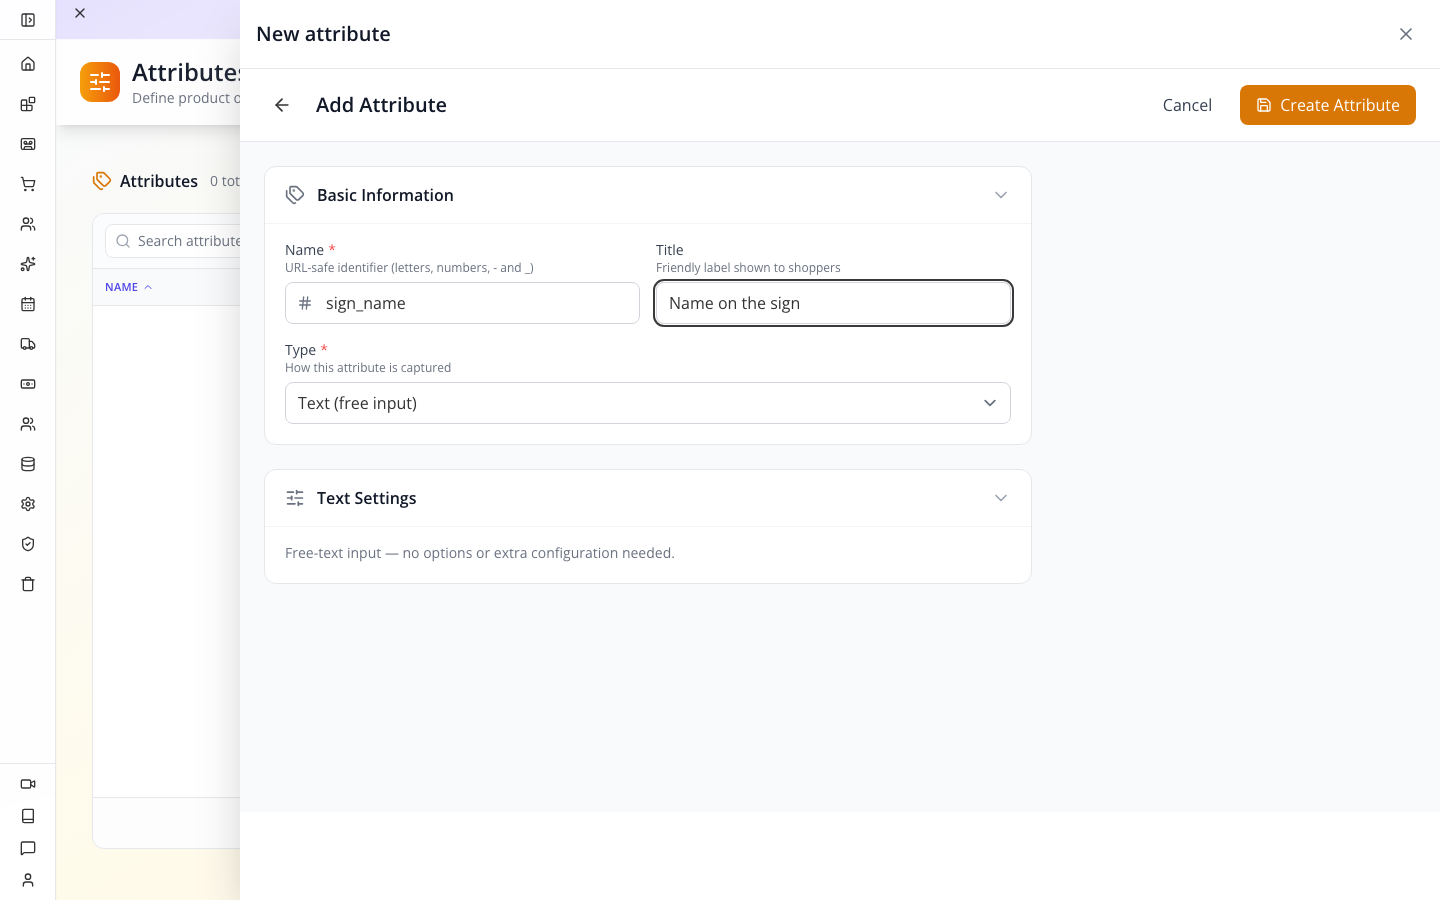
sign_name is the stable internal name; Name on the sign is the shopper-friendly title. The checked text settings have no maximum-length control. If your production process has a character limit, state it clearly in the product copy and review orders against it; do not assume the app enforces an unseen 24-character limit.
2. Create the artwork field
Choose Add Attribute again. Set Name to sign_artwork, Title to Your artwork, and Type to File upload.
Set Accepted file types to .png,.svg. Leave Allow multiple files off: this product asks for one artwork file. Leave the upload-note option off for this first exercise. Choose Create Attribute.
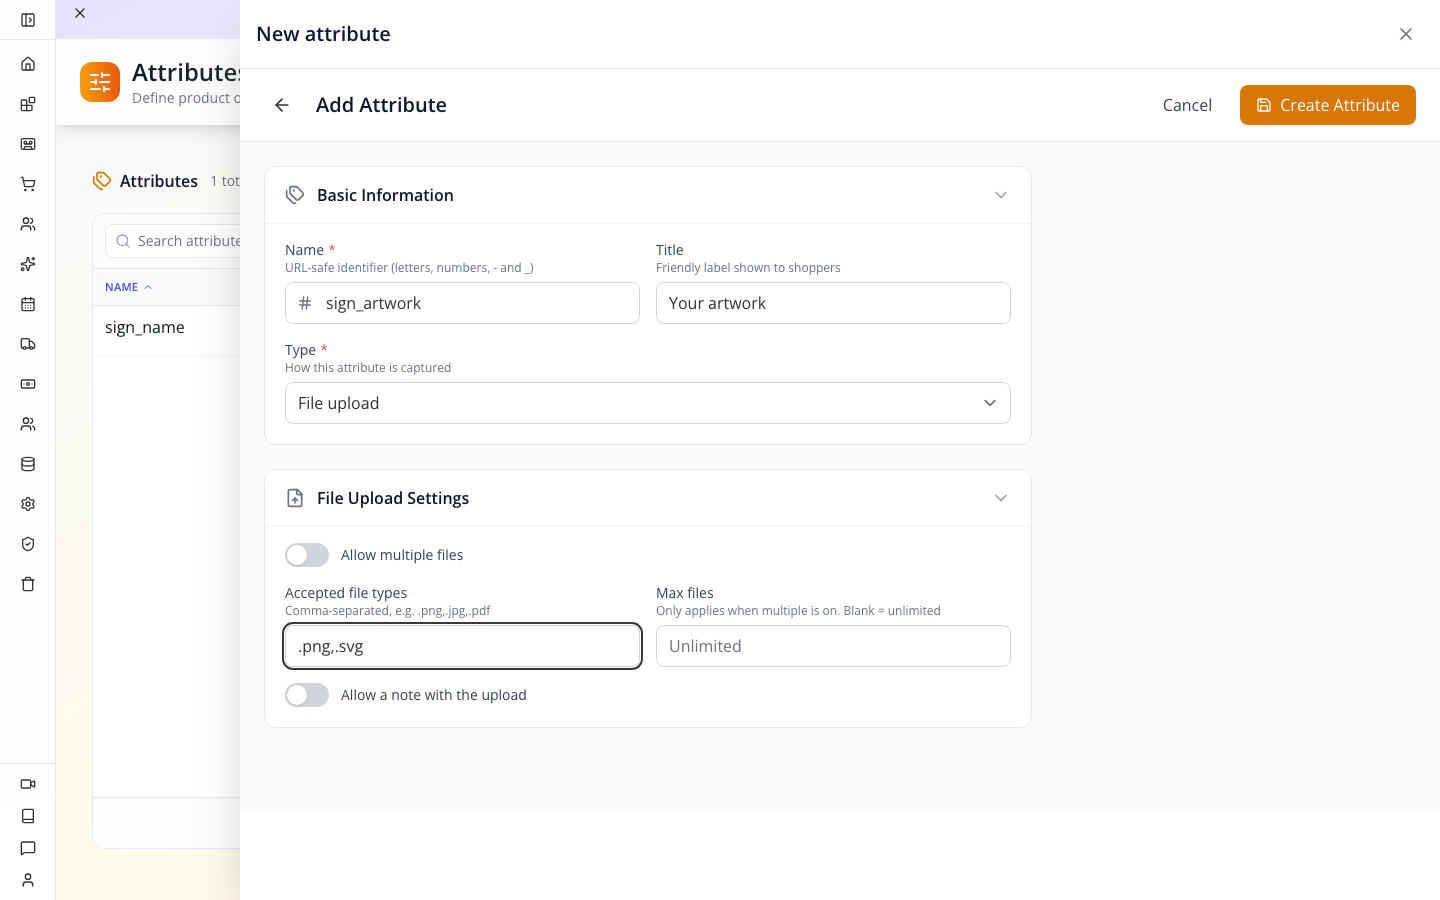
Those accepted extensions describe what the picker allows. They do not tell your workshop whether the image is sharp enough to print. Add a separate artwork-quality requirement to the product description when you know your production needs.
3. Create the size choices
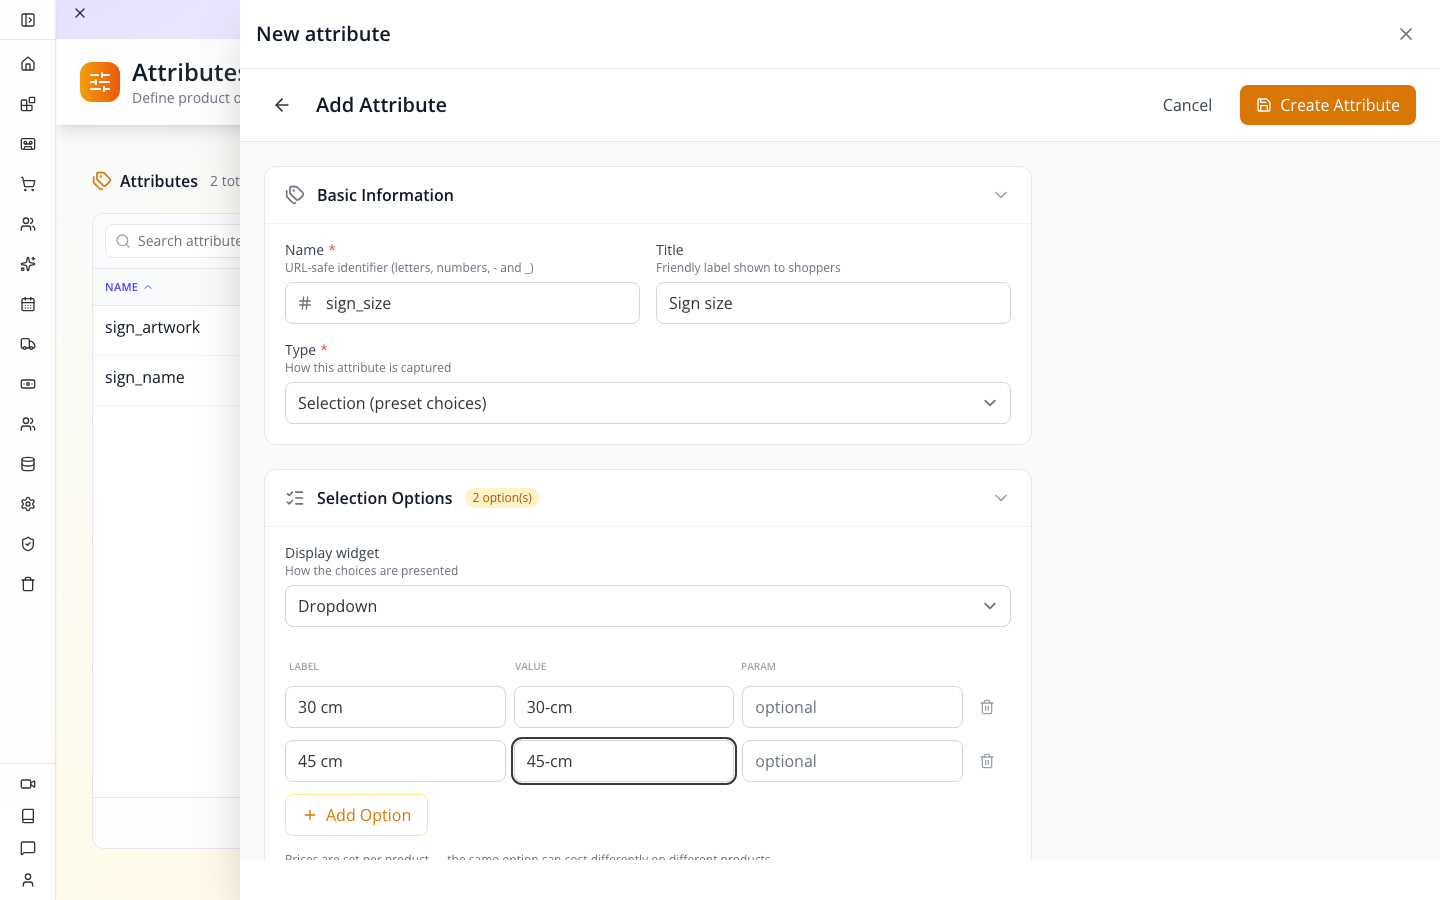
Add a third attribute with Name sign_size, Title Sign size, Type Selection (preset choices) and Display widget Dropdown.
Use Add Option to create:
| Label | Value | Param |
|---|---|---|
30 cm | 30-cm | Leave blank |
45 cm | 45-cm | Leave blank |
Choose Create Attribute. This defines the choices; you will set the surcharge on the product in the next step.
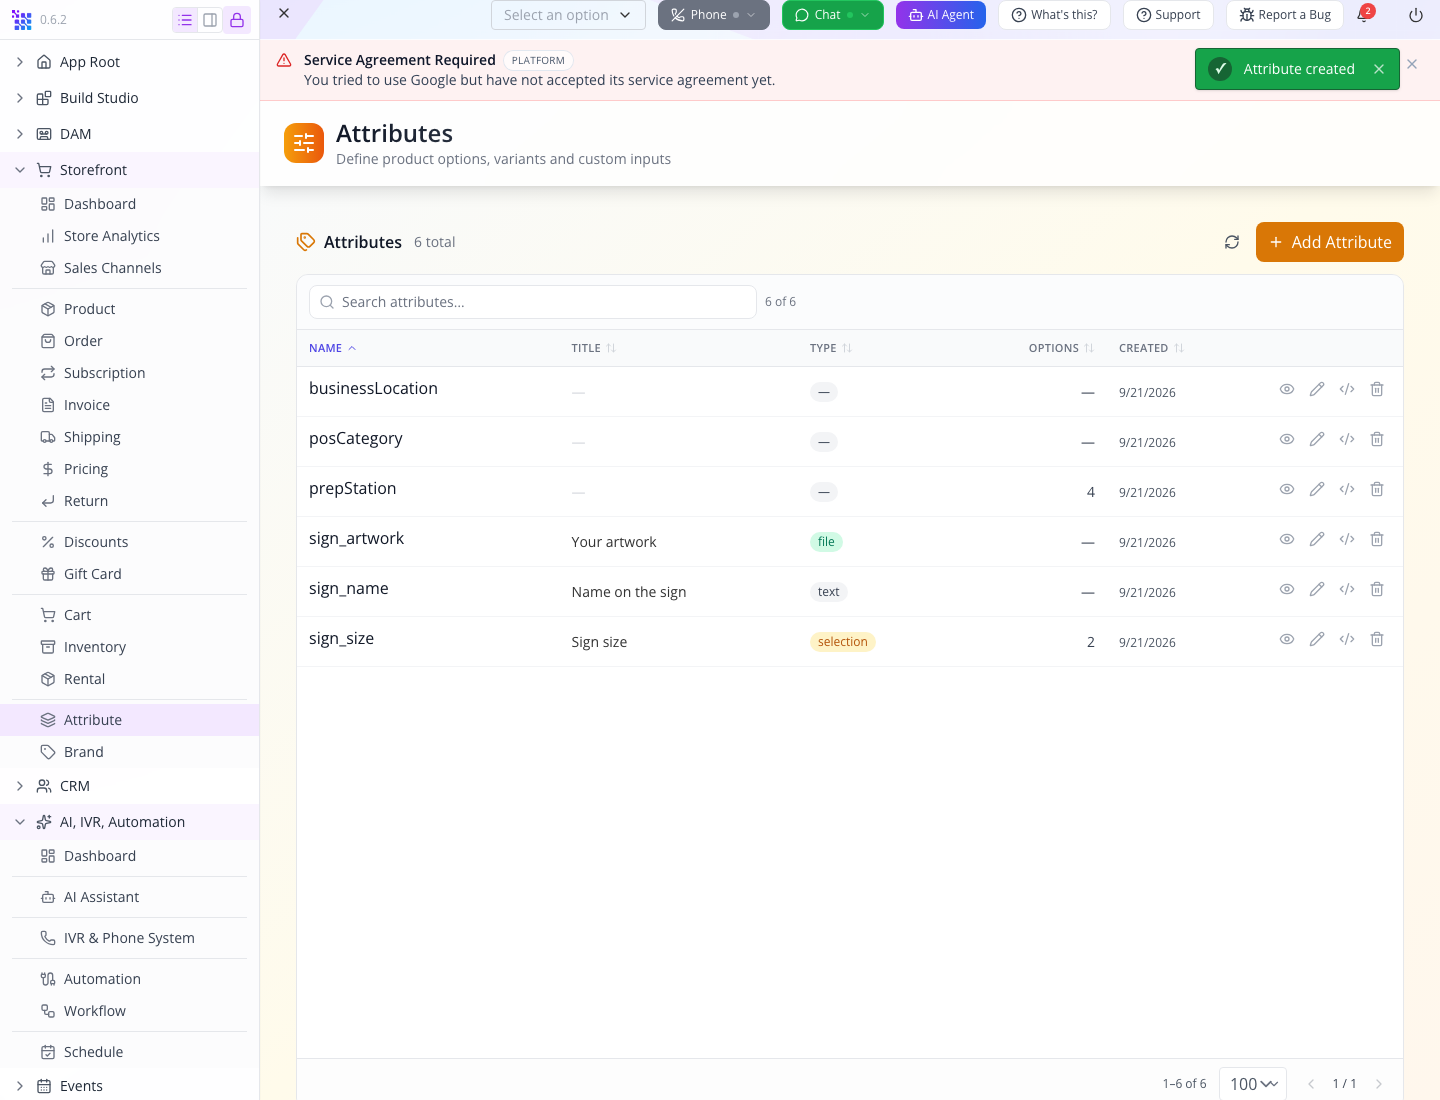
Reload the Attribute list. Confirm all three definitions exist and have the intended types.
4. Attach the questions to the product
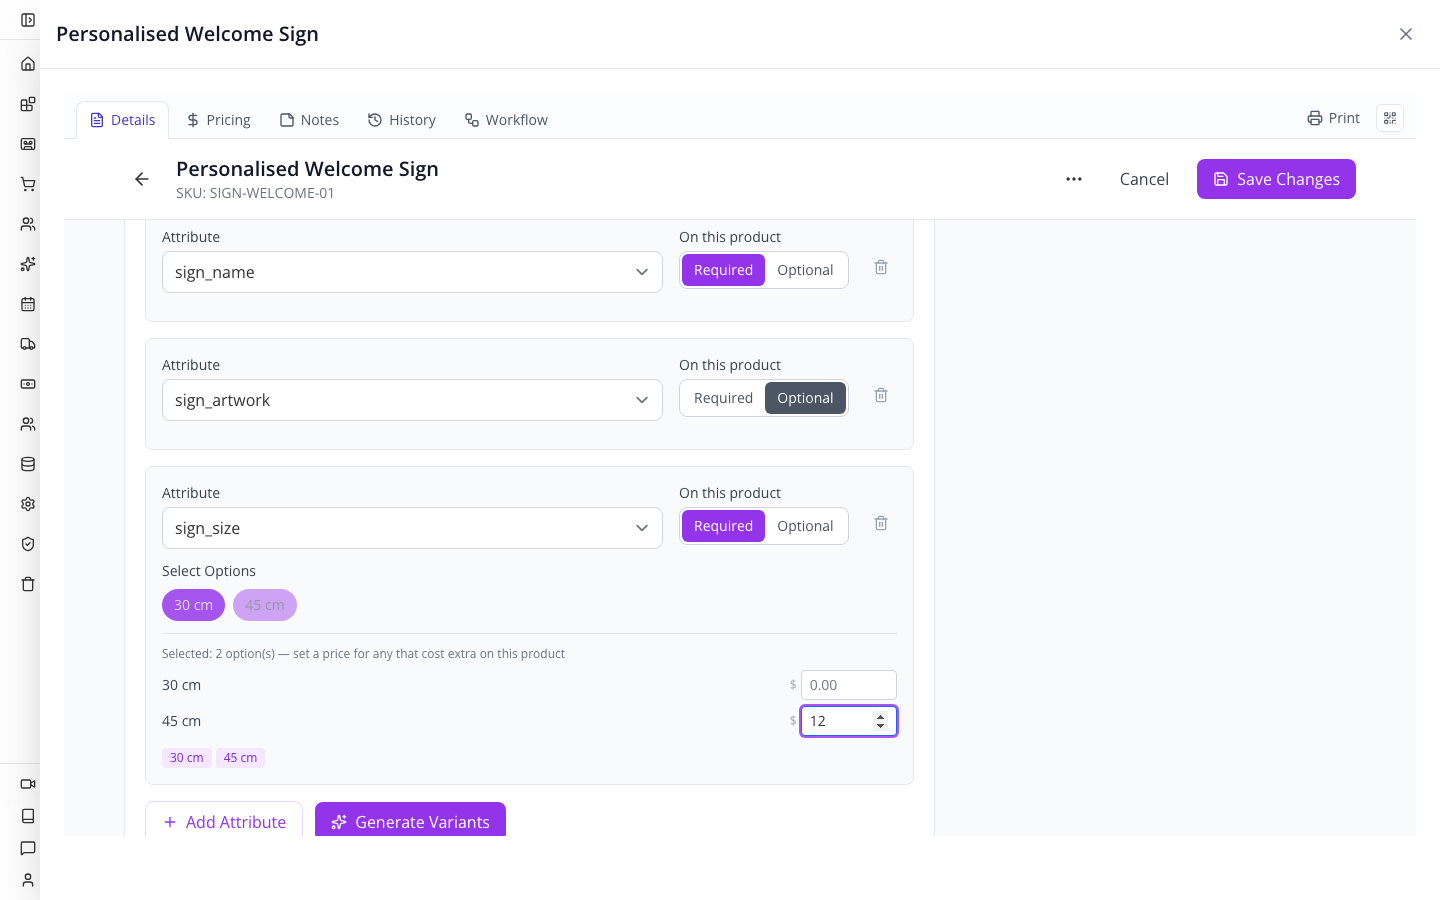
Return to Storefront → Product → Products, open Personalised Welcome Sign, and expand Variants. Use Add Attribute once for each row. Select sign_name, sign_artwork and sign_size in the respective selectors.
Set the name to Required, artwork to Optional, and size to Required. For sign_size, select both 30 cm and 45 cm as available options.
Why optional artwork? Some customers only want lettering. If every order in your real business requires artwork, make that product’s artwork field required instead. Do not make it mandatory merely because this exercise includes a sample file.
5. Put the size surcharge in the right place
In the product’s sign_size row, leave the additional price for 30 cm at zero and enter 12 for 45 cm. Choose Save Changes. Reload, reopen the product and expand Variants again.
You should find the same three attributes, required settings, two sizes and the 12 addition. These settings survived the full reload in the walkthrough.
The intended unit prices are now:
| Selection | Calculation | Unit price before tax and shipping |
|---|---|---|
| 30 cm | $45 + $0 | $45 |
| 45 cm | $45 + $12 | $57 |
Do not enter 57 as the surcharge: that would add $57 to the base price. Do not put 12 into the attribute’s Param field; that is not the product’s price addition.
Generate Variants is a separate operation for variant records. It was not needed to save these attribute attachments. Before using it for size-specific SKUs or stock, decide how you will identify and manage each generated variant; do not treat customer names or files as a finite catalogue of variants.
Try it. Reopen sign_size in Attribute and then reopen it on the product. Point to the reusable label in the first screen and this product’s price addition in the second.
Check yourself. Would a different product automatically charge $12 for 45 cm because it uses sign_size? No. Its own product attachment needs the appropriate pricing.
Part 3 — Offer a simple delivery choice
1. Open shipping configuration
Choose Storefront → Shipping. In Shipping Center, select the top Settings tab. This opens Shipping Settings, whose sub-tabs are Overview, Shipping Methods, Providers and Product Shipping.
On Overview, choose + Add Method under Active Shipping Methods. The drawer title is New shipping configuration.
2. Name the configuration and make it the default
Enter Name tutorial-flat-rate, Title Tutorial flat rate, and Currency USD. Keep Active selected and select Use as the site default.
The internal name identifies the configuration. Its title helps operators recognise it. The option you add next provides the customer-facing delivery name.
3. Add the $8 offer
Choose Add a shipping option. In the new option:
| Control | Value |
|---|---|
| Name | Standard delivery |
| How it is priced | Flat fee |
| Amount | 8 |
| Charge per item | Off |
| Free above | Leave disabled/blank |
| Countries, States, Postcodes | Leave blank for the training calculation |
| Handling per order / per item | Leave blank |
| Markup | None |
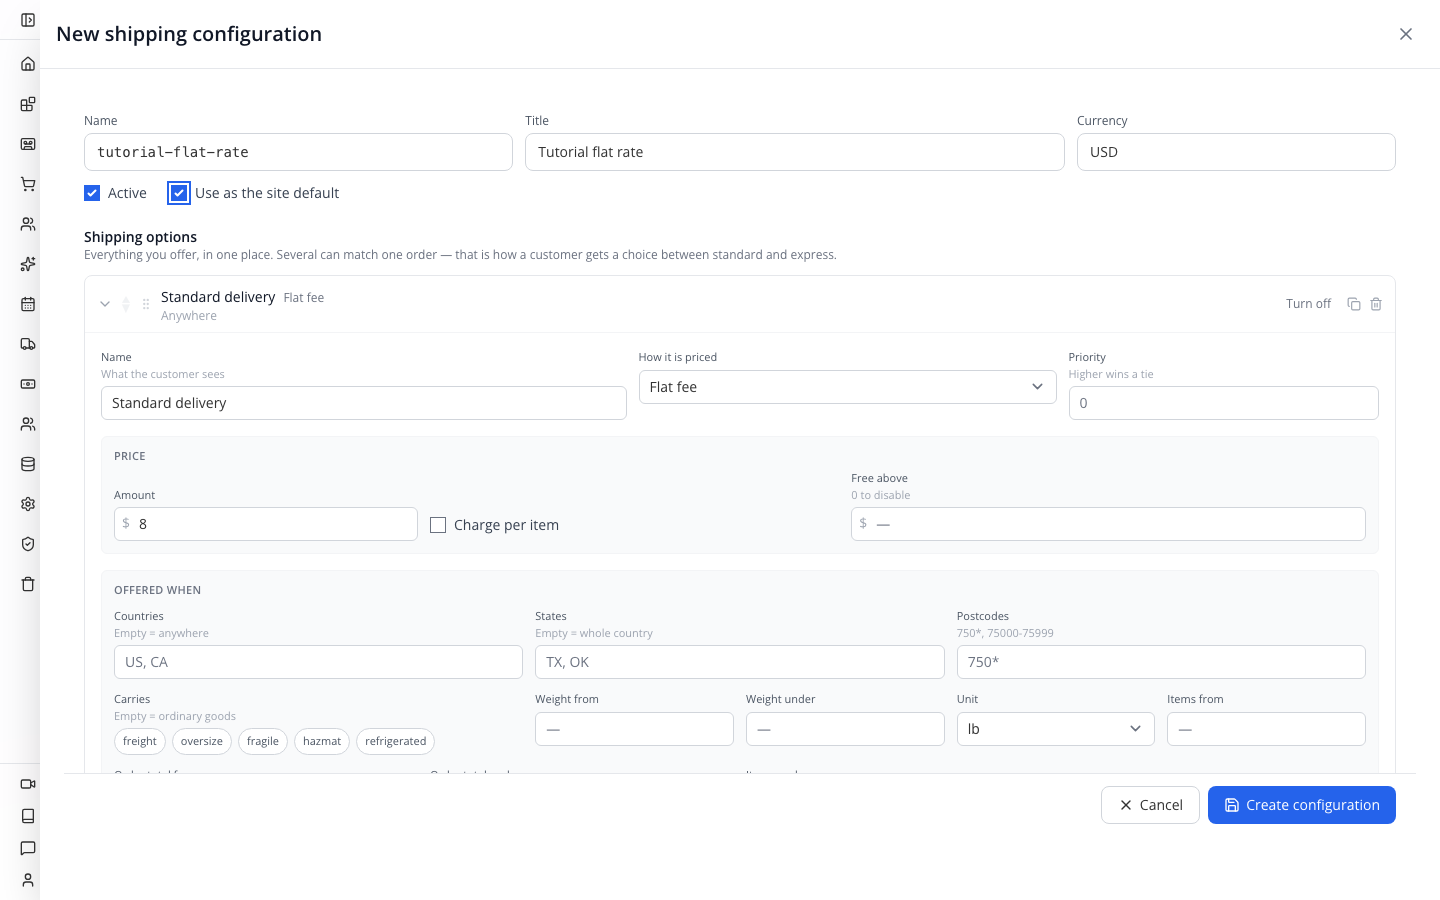
Charge per item is off because the example is one $8 shipping charge for the order, not $8 for each sign. Empty destination conditions mean the offer is not geographically restricted. For a real shop, enter the destinations you actually serve before advertising the rate.
Flat fees do not need carrier-rate credentials. Live carrier rates is a different method and requires the corresponding provider setup and shipping information. Do not switch to it simply to obtain a carrier label later.
4. Save and verify the default
Choose Create configuration. After the success notice, reload Shipping Center, open Settings again and check Default: Tutorial flat rate.
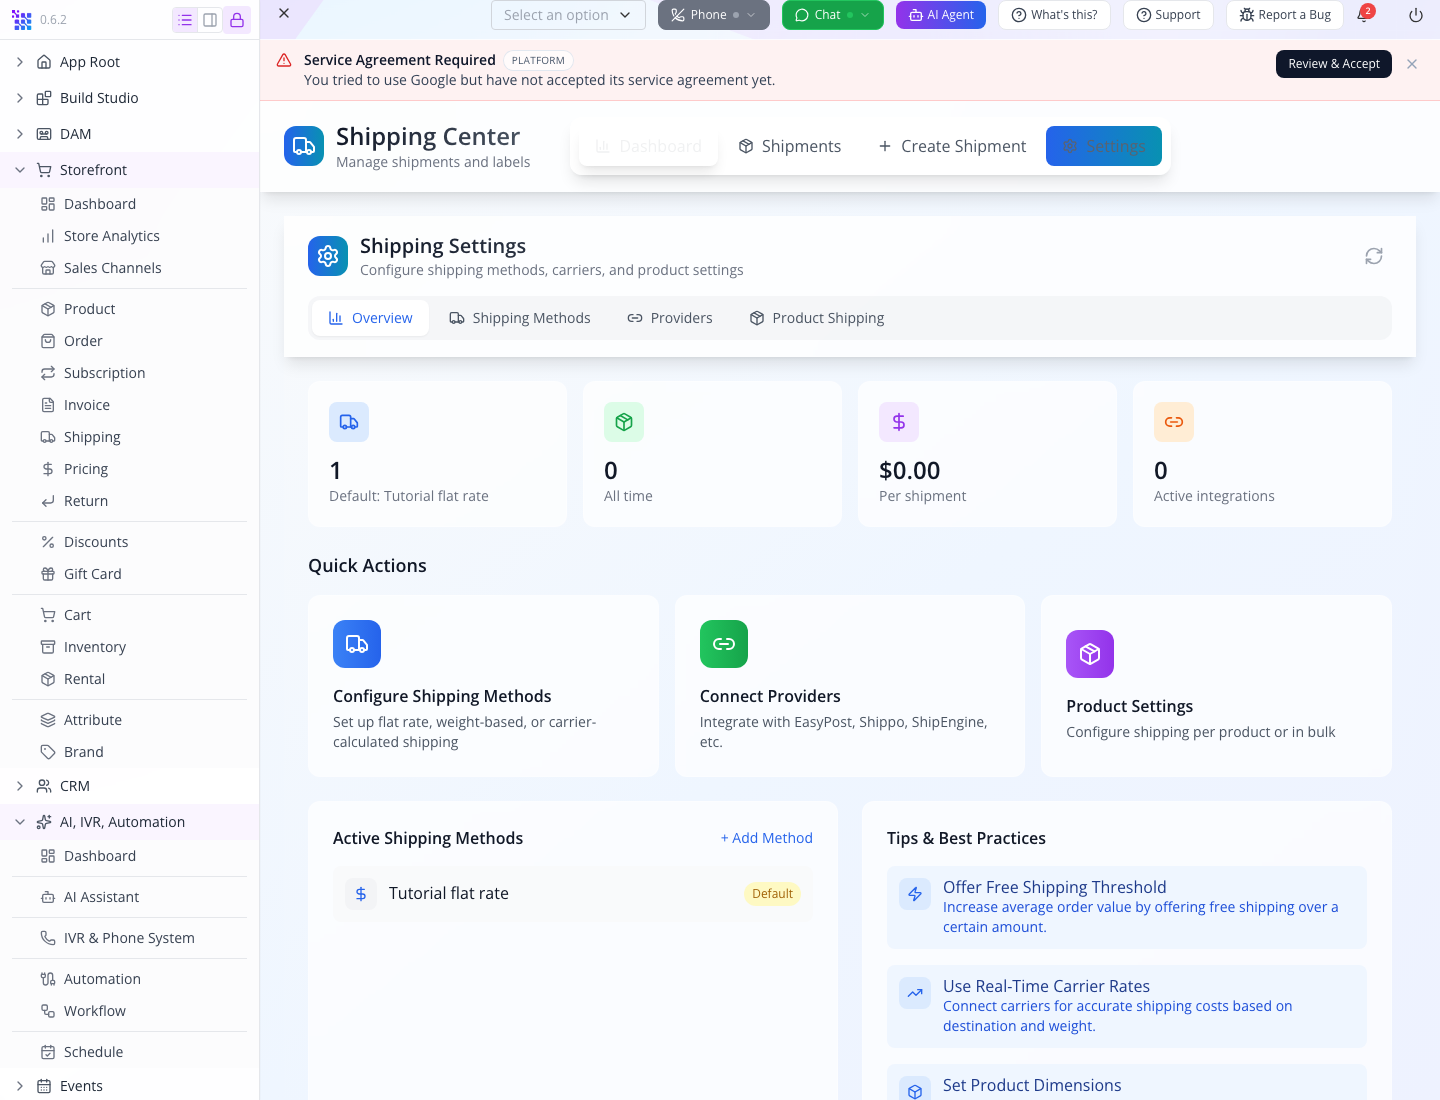
This verifies the configuration. The website checkout must still show an actual matching shipping option for the destination and cart. A saved default does not prove that a carrier label has been purchased or that a parcel has shipped.
Try it. Explain the difference between one 45 cm sign and two 45 cm signs under this flat offer. Before tax or discounts, the expected totals are $57 + $8 = $65 and $114 + $8 = $122.
Check yourself. If you accidentally enabled Charge per item, which check would expose it? A two-sign cart: compare its shipping line with the one-sign cart before placing an order.
Part 4 — Rehearse the customer journey before taking orders
This section is the acceptance rehearsal for the configured product. Complete it on your actual website before making a sales promise. The saved setup screenshots above are not a substitute for the following customer results.
Put the storefront on the intended site page
On App Root, find Active Site. If it says nothing is loaded, select Choose a site and choose your existing site. Check the name before changing its features.
First create the page that will host the shop. Open Build Studio → New Web Page, confirm the site selector, and use the top toolbar's Save disk icon. In Page → Information, enter Name store, Slug store and Title Tutorial Sign Studio — Shop, then select Save. This can be an empty page: Storefront supplies its body. The website course explains the builder and page-save controls.
Return to App Root → Active Site → Site Features. Turn on Storefront. Select Choose page on the Storefront row and choose Tutorial Sign Studio — Shop, identified by store and /store. Do not select No page: that leaves the feature unattached.
Reload Home. The Storefront row should remain enabled and show on /store, with Change, Edit and View controls. The earlier default-page selector is no longer the interface on the locally checked build.
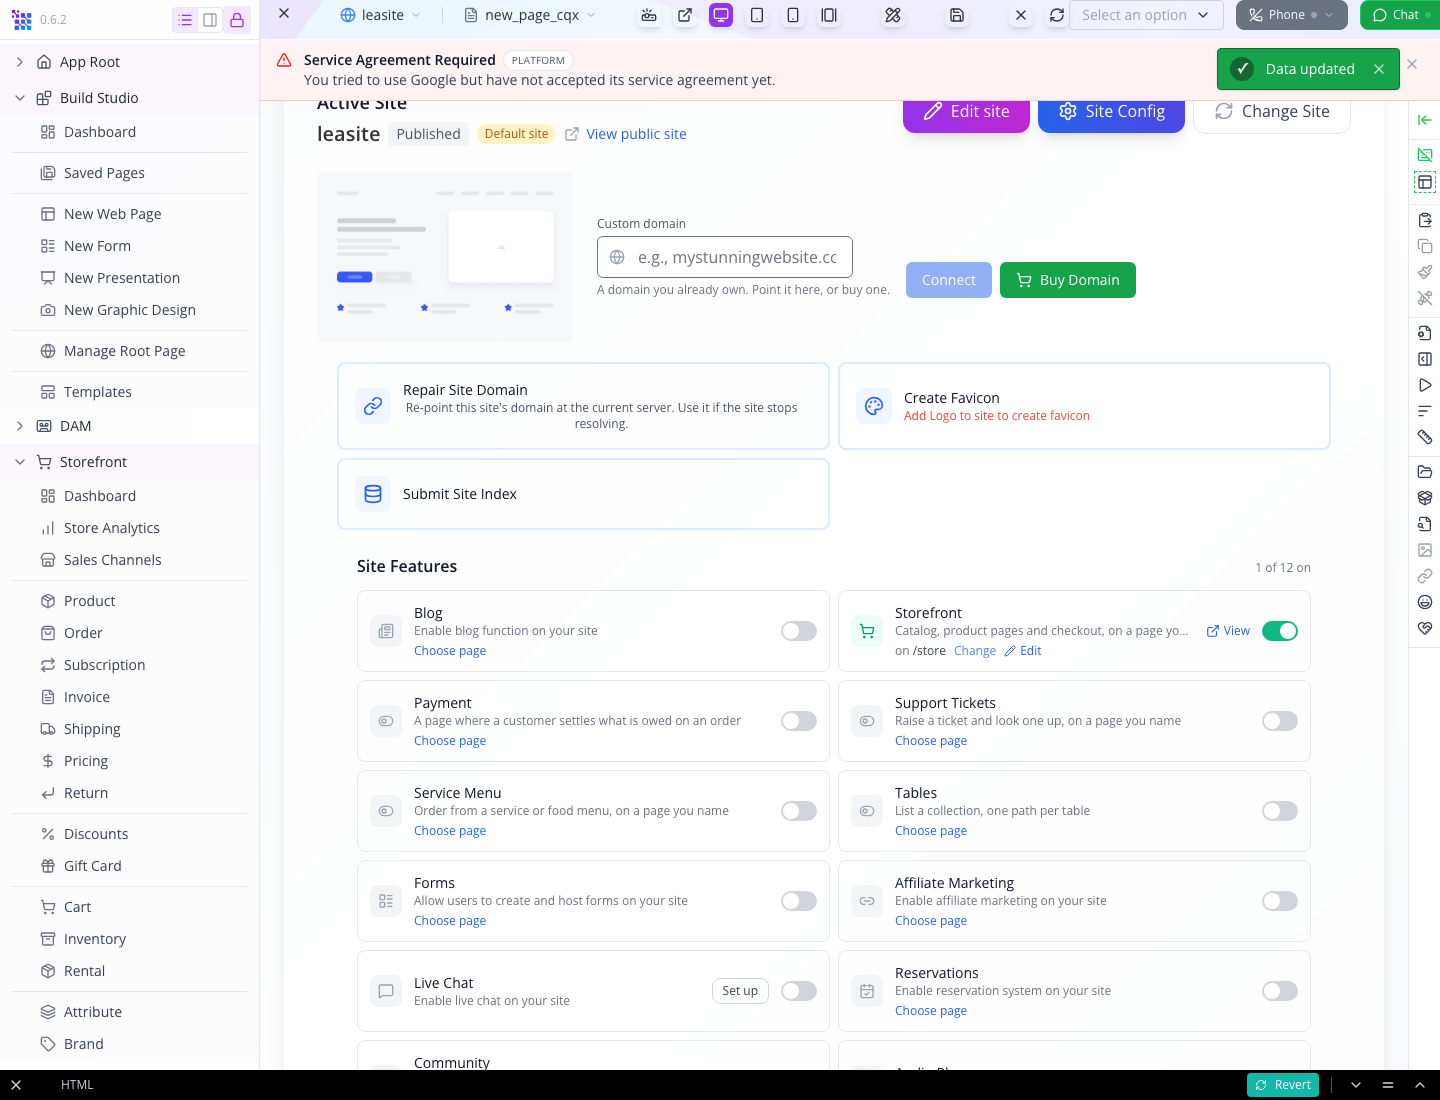
Enabling Storefront and attaching its page are separate actions. A page with the right name in a different site does not complete this setup.
Use View public site on your own site card, then open its store page and follow the product from the catalogue. Copy the address you actually reach. Do not paste the training server’s address into customer documentation or assume every shop uses /product/….
The catalogue opens the product under the shop's route—for this saved page, /store/personalised-welcome-sign. Confirm that the gallery illustration loads, the name and artwork controls appear, and Sign size offers30 cm and45 cm. Select45 cm: the displayed unit price must change from$45 to$57. Return to30 cm before preparing the first line.
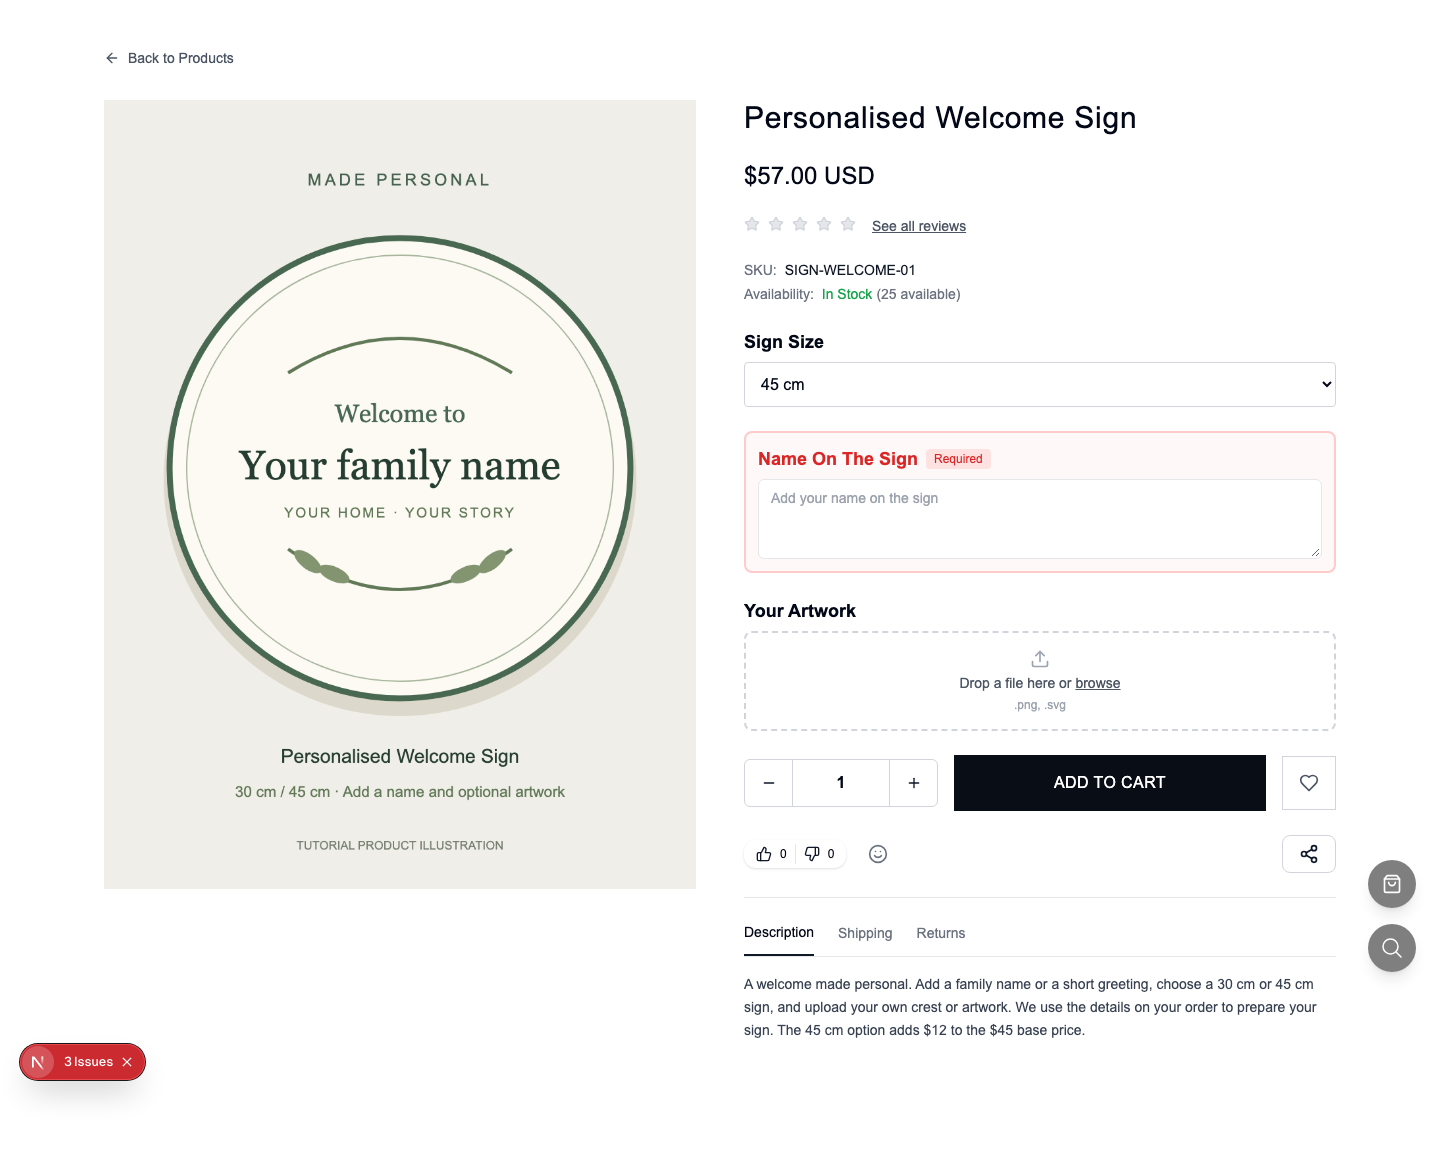
The Required result above was produced by choosing a size and selecting Add to Cart without a name. The cart stayed empty. This check catches an incomplete personalisation before an order exists.
Check the small sign first
Open the product as an ordinary visitor. Check that the page answers: what is this, how much is it, what can I customise, and how do I add it?
For the first line use Name on the sign The Okafors, size 30 cm, quantity 1. The price should start from $45 before tax, shipping or discounts. Do not add this line yet: finish the signed-in artwork upload below first. If you already added a no-artwork practice line, remove that line before creating the complete personalised one; a later upload is not proof that an earlier cart line changed.
Sign in before uploading the artwork. If you choose a file while signed out, the uploader displays Please sign in to upload files for this product. Select its sign in link; it carries the product address so you return here after authentication.
- On Sign in, existing customers enter their email and password, or enter their email and select Send magic link.
- For a new customer, select Create one. Enter Full name and Email address, then select Send magic link. In this rehearsal the customer is Ada Okafor; use a mailbox you control for your own practice.
- Open the email titled Your secure login link and follow its sign-in link promptly. The browser completes sign-in and returns to this product. Do not register the same person again while waiting for mail; use the existing-customer sign-in form to request another link if necessary.
- Select30 cm and enter
The Okaforsagain if navigation cleared the unsaved fields. Select browse under Your artwork, choose the downloadedokafor-crest.svg, and wait until the uploaded filename appears with its remove control. A progress row or selected local filename alone does not prove upload finished. - Select Add to Cart once. Open the shopping-bag button and confirm the line contains The Okafors,
30-cm, quantity1 andokafor-crest.svg, with a$45 line amount.
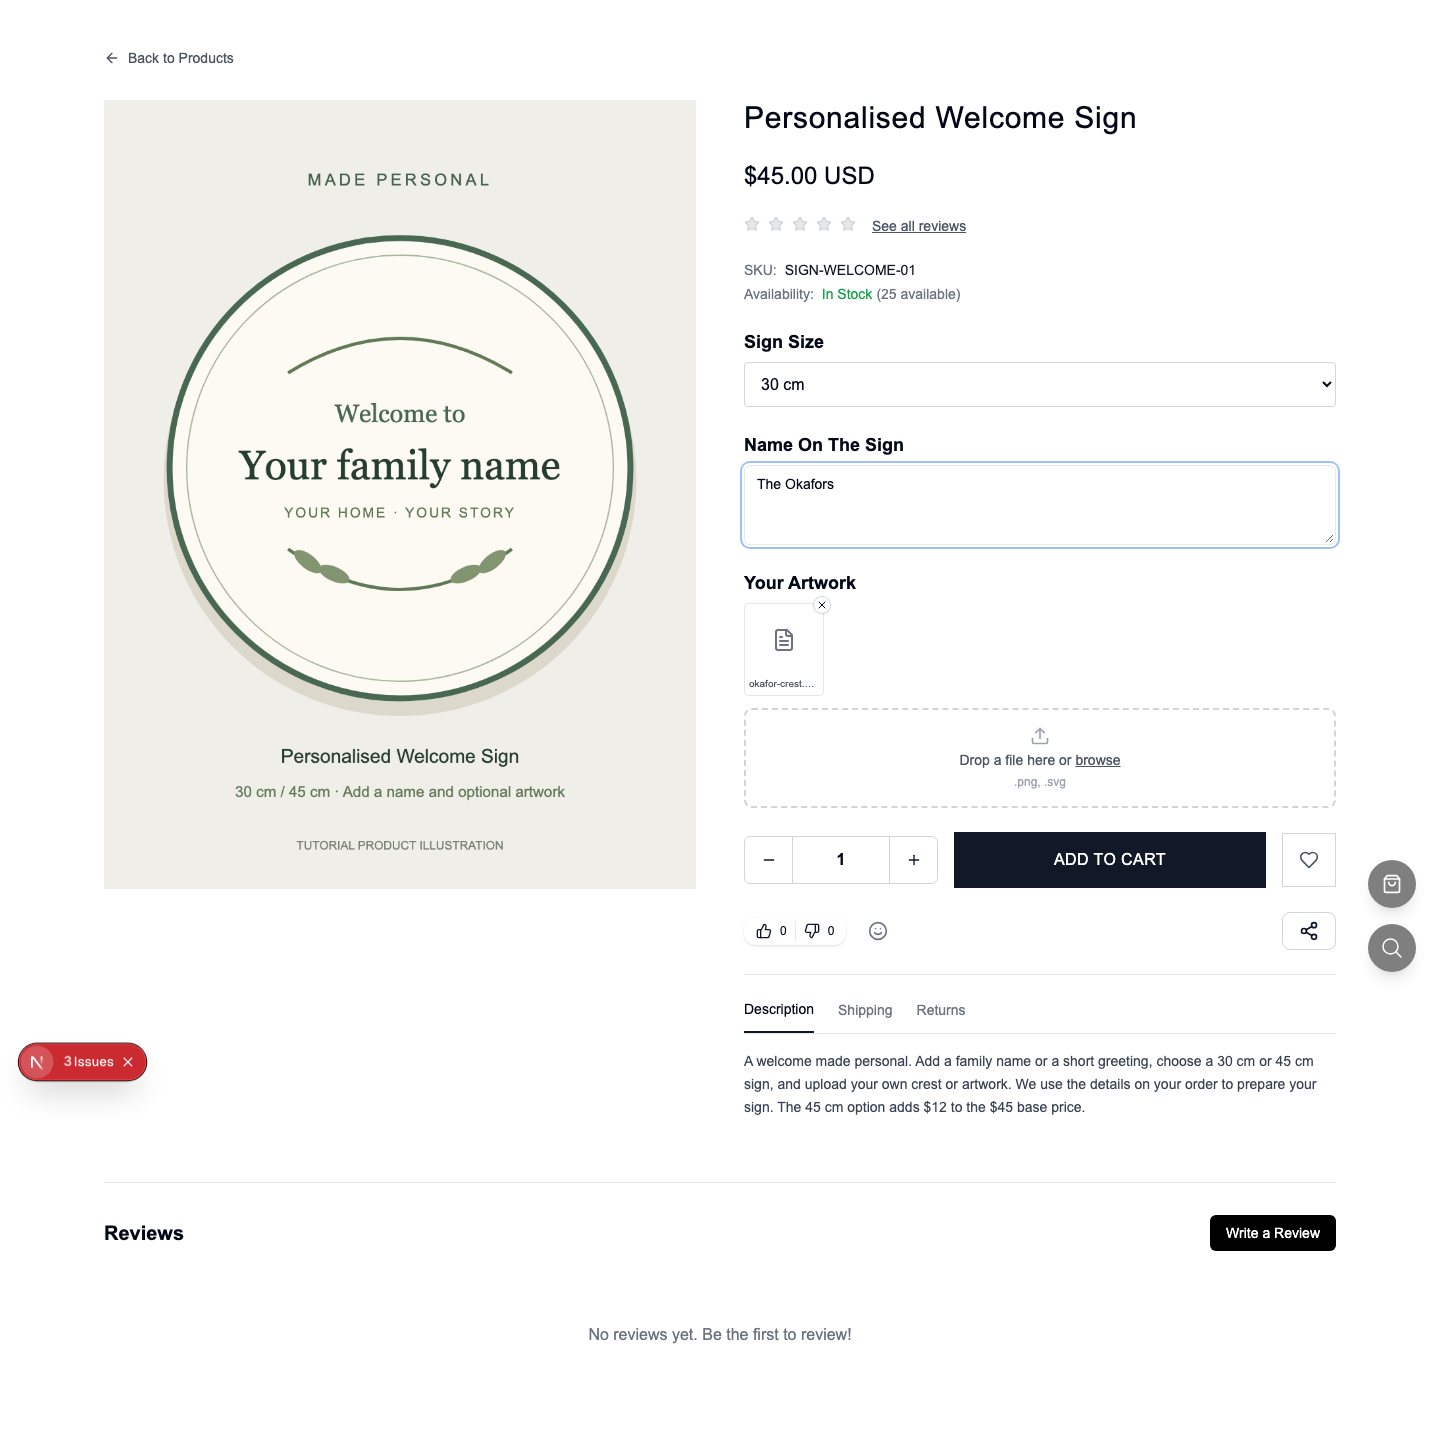
The gallery remains the same illustration for everyone. The uploaded crest belongs to this customer's cart line; it does not replace the product gallery.
Add a visibly different second line
Close the cart. If the previous artwork remains in the product form, use its remove button before choosing the next file; this changes the form, not the already-added cart line. Use Name on the sign Welcome Home Maya, size 45 cm, quantity 2, and maya-flowers.svg after customer sign-in.
Inspect the cart for two distinct personalisations. The second line should be $57 × 2 = $114 before order-level additions. The first line must still say The Okafors and retain its own artwork. Reload the page and repeat the comparison. Open the cart if it is closed. Both designs, both filenames and their quantities must remain. With the saved flat delivery offer, the cart shows Products$159, Shipping$8, Total$167.
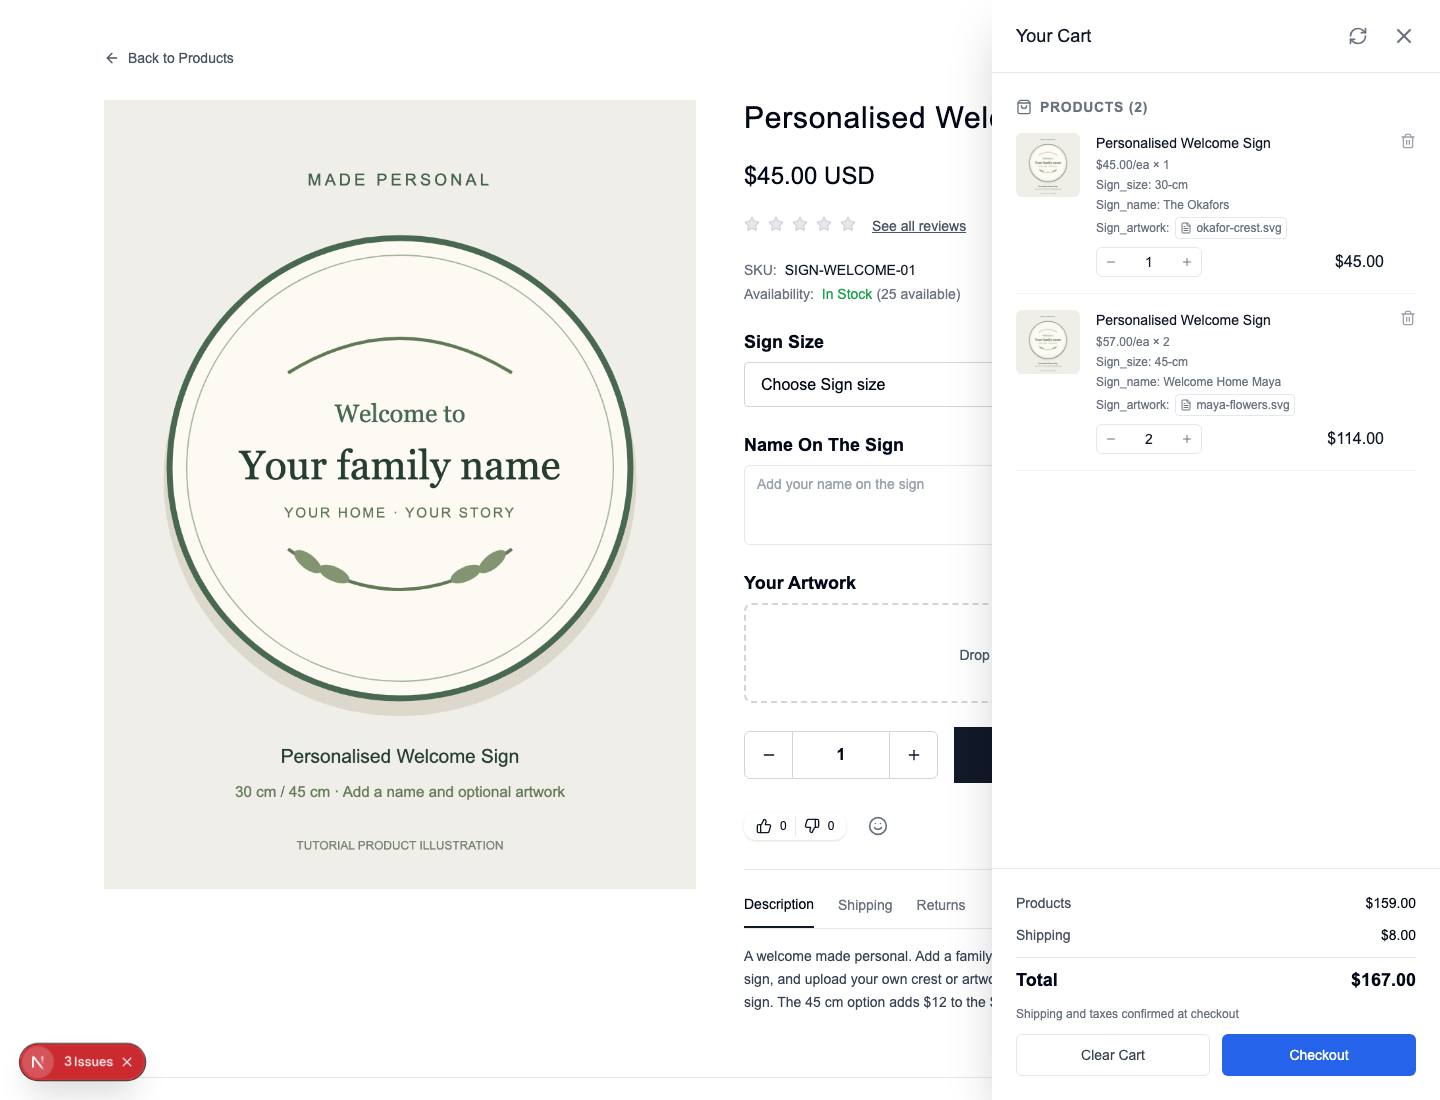
If the two designs merge, a name disappears, an upload fails or the size addition is missing, stop this order rehearsal at that result. Keep the exact cart state and correct the problem before accepting customer work. Do not compensate by changing the shared product name for each buyer.
Check checkout and payment as separate results
Use a customer mailbox you control for the rehearsal: order submission can send a confirmation. Configure your gateway’s test environment deliberately, keeping credentials out of recordings. A no-gateway checkout is not a demonstration of a paid order.
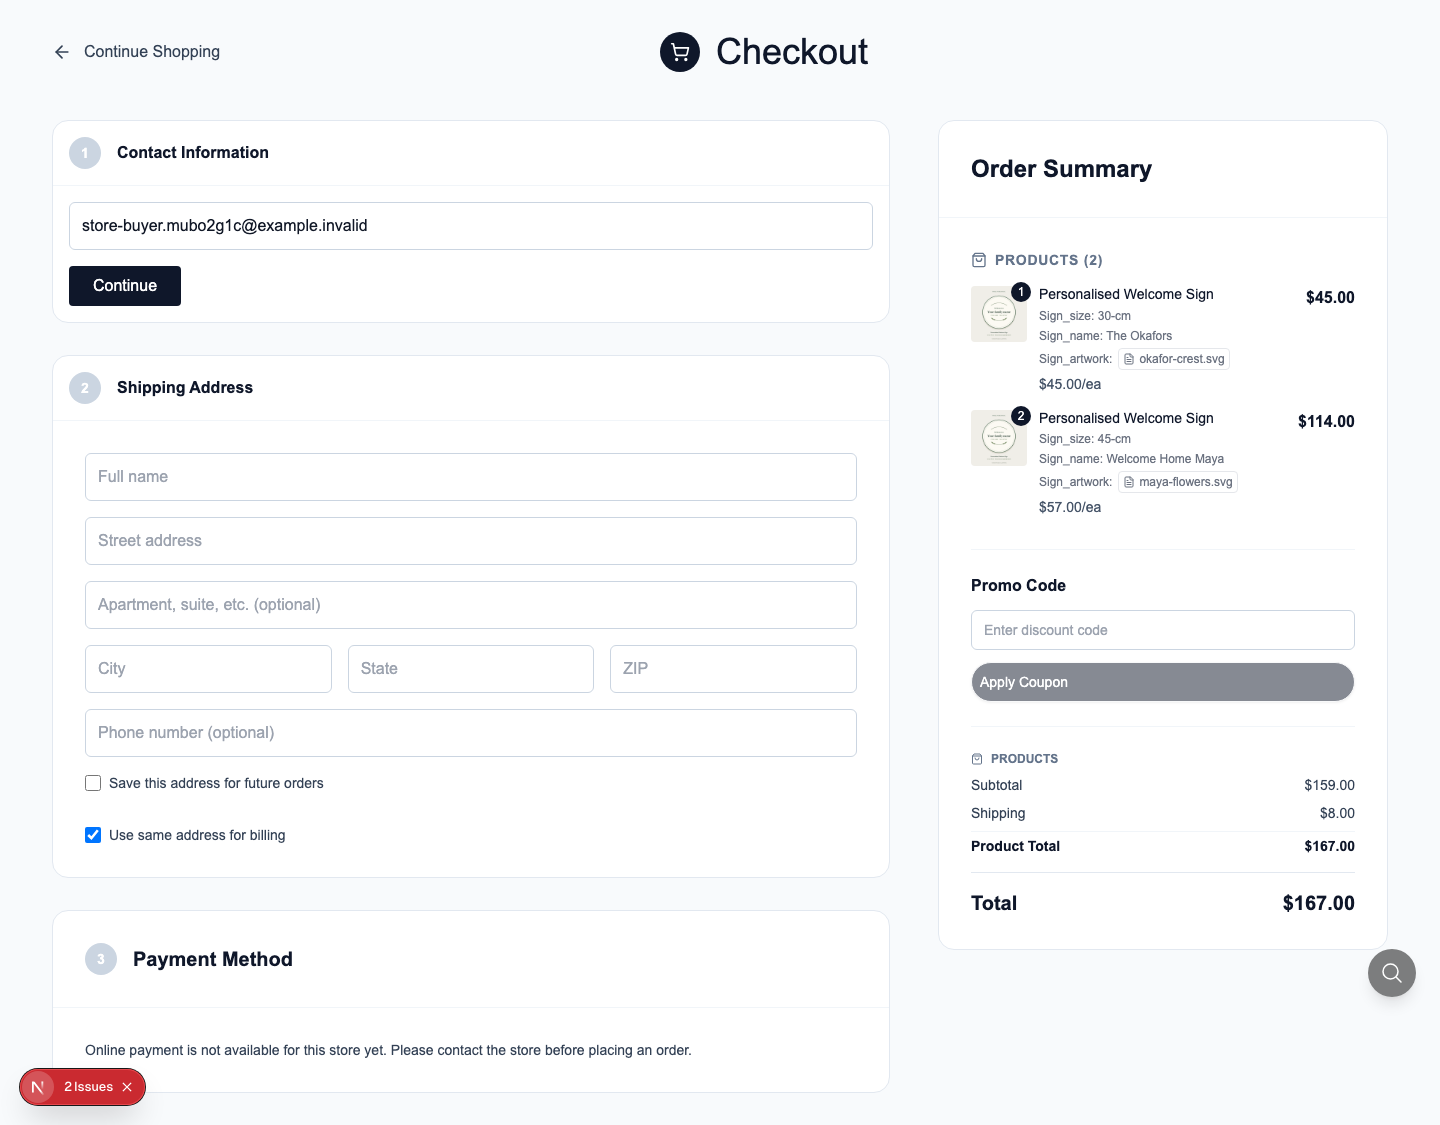
Before submitting, compare the checkout lines, destination, selected delivery method, tax, discounts and final amount. For the two example lines together, the merchandise subtotal should be $45 + $114 = $159; with the example $8 offer and no tax or discounts, the total would be $167. Use the actual tax and shipping results on your site rather than forcing the example total.
Developer setup: connect the training Stripe configuration
The checkout below used an organisation-owned Stripe test integration created through the normal API. This is the demonstrated setup path; a separate provider-setup UI was not exercised. Use a training organisation with no conflicting Stripe configuration, an owner session, and matching publishable/server keys from your own Stripe sandbox. Keep the server key out of the browser, screenshots and shared files.
Send POST /repository/create to your AppEngine API with orgid: <your training organisation ID>, the owner's Authorization: Bearer <token> and Content-Type: application/json:
{
  "pk": "", "sk": "", "isNew": true, "version": 0,
  "name": "tutorial-stripe-sandbox", "datatype": "config",
  "data": {
    "name": "tutorial-stripe-sandbox",
    "title": "Tutorial Stripe sandbox",
    "provider": "StripeProvider", "type": "Payment",
    "useCases": ["Payment"], "status": "active", "priority": 100,
    "secretKey": "<YOUR_STRIPE_TEST_SECRET_KEY>",
    "publishableKey": "<YOUR_STRIPE_TEST_PUBLISHABLE_KEY>"
  }
}
Save the returned configuration ID. Reuse an existing matching training configuration instead of creating another active provider each time you revisit the lesson. Confirm the selected provider is in test mode before entering the test card: the review independently checked Stripe's livemode: false result and the resulting test PaymentIntent. A title containing “sandbox” alone does not select test mode. See Stripe's test setup for its sandbox keys and card details.
Complete a Stripe sandbox card payment
Use this branch only after your operator has configured and verified Stripe in test mode for the training organisation. The normal gateway service selects its active organisation integration; there is no configuration-ID dropdown for the customer. The author’s fresh payment rehearsal used one 30-cm sign for Mira Sandbox: $45 merchandise plus $8 shipping, total $53. It is separate from the earlier two-design $167 artwork exercise.
- Review Contact Information and Shipping Address. Use Edit beside either section to correct it before paying.
- In Payment Method, select Card. Check the Order Summary again: the chosen size, personalization, quantity, shipping and total must match your cart.
- In the test form, enter card
4242 4242 4242 4242, a future expiration such as12/34, and CVC123. Set the billing country and ZIP for your fictional address. These are Stripe’s test values, not a real payment card. Stripe’s interactive testing instructions. - Select Pay now once. Wait for the response; do not click again while the first payment is being checked.
- On Order confirmed, read the order number, Paid badge, Paid with Stripe amount and total. Retain the order number for the operator check below.
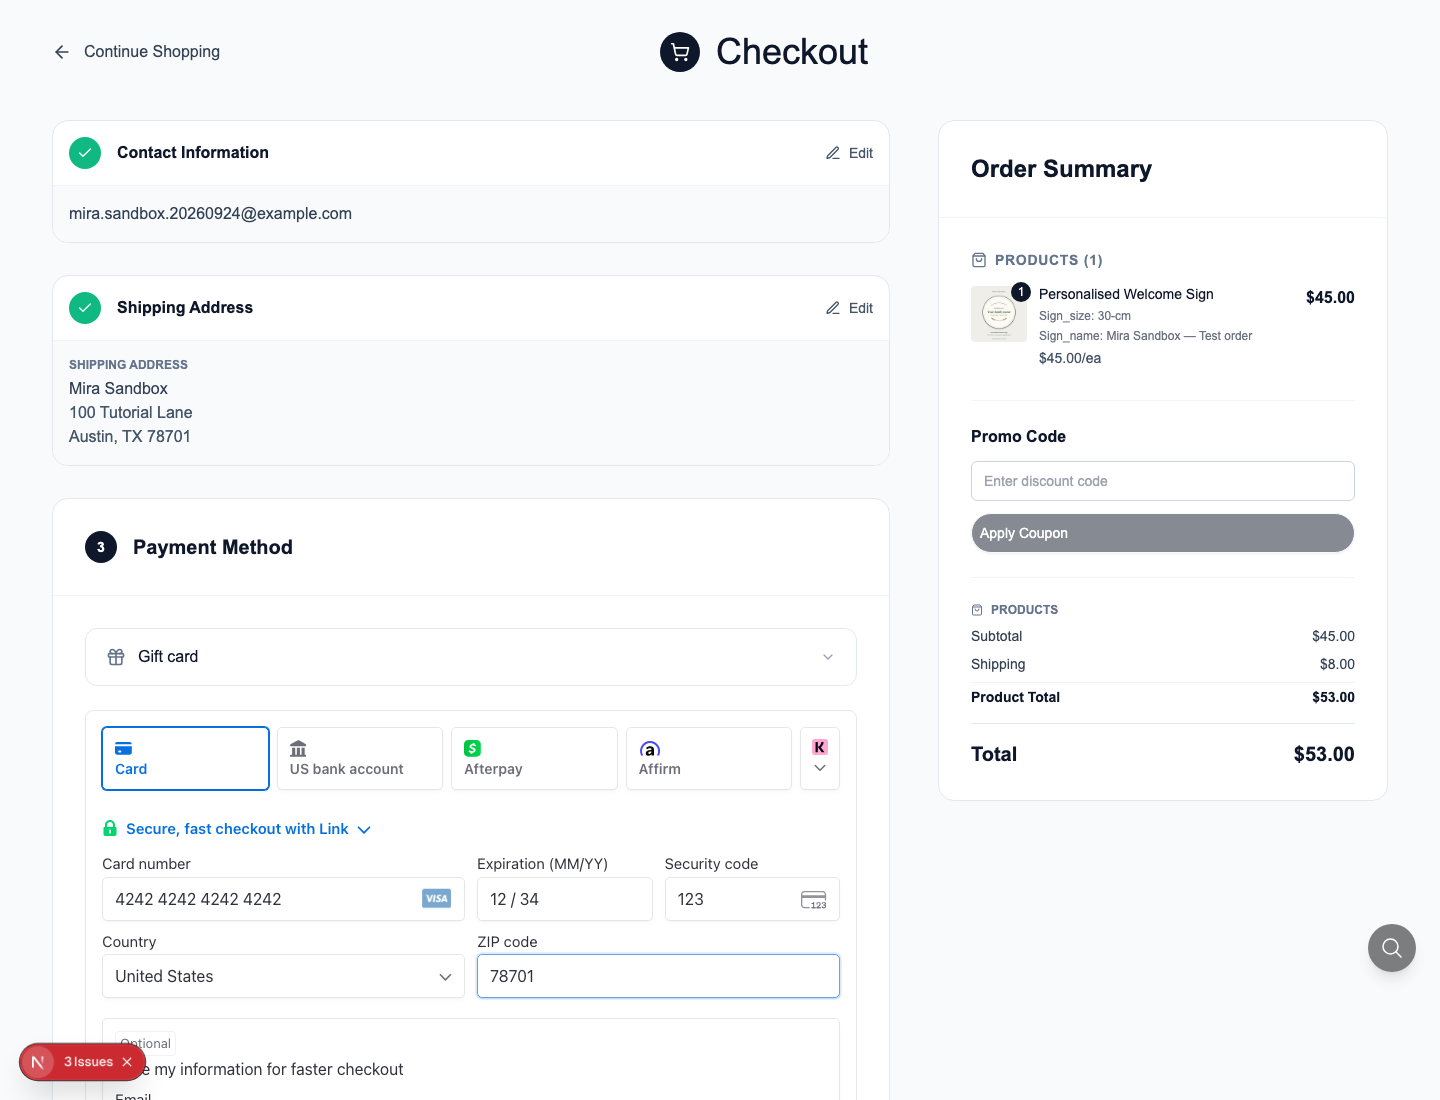

For this run, Stripe independently reported the matching payment as succeeded with livemode: false. The customer confirmation is therefore supported by a provider test result. It does not mean a physical parcel has shipped, and it does not turn the earlier unpaid order into a paid one.
If the page fails after you press Pay: check for the order and provider result before retrying. A missing confirmation page alone does not prove the payment failed. If the cart reports a pricing error before submission, resolve that error before paying; do not force a zero-total checkout.
After a completed test checkout, retain the order number. In Storefront → Order, open that order and compare its lines and payment information with the confirmation. Verify the transaction in the provider’s test environment as well. A confirmation page, an order status and a settled transaction are related results, not interchangeable evidence.
Try it. Before the paid rehearsal, deliberately omit the required name and see whether the customer interface prevents adding an incomplete line. Restore the name and repeat with the other size.
Check yourself. A customer sees their file in the cart. Is the workshop ready to print? Only after the operator can retrieve the right file for the right placed order and verify any required design approval.
Return to your saved cart in another browser session
An empty cart in a fresh browser does not necessarily mean your selections were lost. The website saves a server copy when it updates the open cart, so sign in with the same customer account before trying to recover it.
- Open the cart. If you are signed out, select Sign in to restore your saved cart. Enter the email used for this rehearsal, select Send magic link, and follow the new link from that mailbox. You return to the store.
- Open the cart again. When it is empty, select Restore saved cart. Let restoration and pricing finish. This action reads your saved customer cart; it does not place an order.
- Compare both lines: The Okafors / 30-cm / 1 / okafor-crest.svg and Welcome Home Maya / 45-cm / 2 / maya-flowers.svg. The amounts should return to $45 and $114, with the configured $8 delivery charge and $167 total.
- Change Maya's quantity to 1. After pricing finishes, the total should be $110. Change it back to 2, wait for $167, then reload and reopen the cart. Both designs and their original quantities should remain.
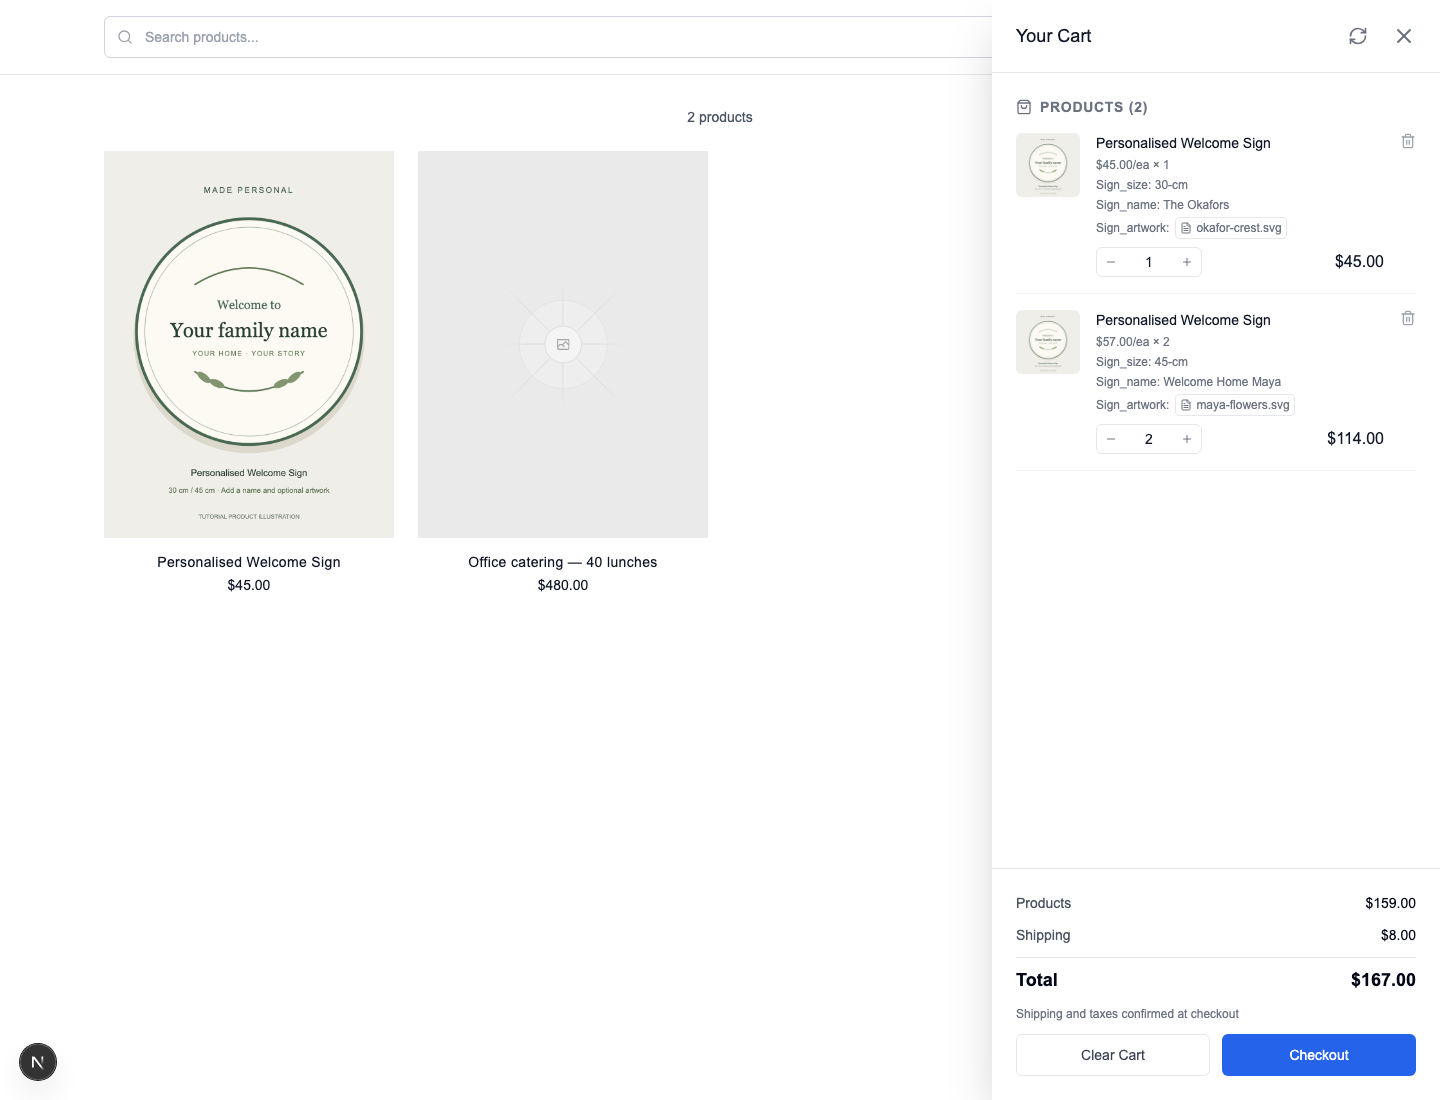
If recovery cannot finish: There are no items in your saved cart means this signed-in customer's saved cart has no selections to restore. Check that you used the same customer account. Could not restore your saved cart means the request failed; sign in again if the session expired, then retry. Restoration is offered for an empty cart and will not replace items added while its request is running.
Part 5 — Advanced: deliver the right sign and handle a return
Check the artwork handoff before taking orders
You have two designs for the same product. The fulfilment task is to keep each design attached to its own name, size and quantity—not simply to find two files.
- In Studio Manager, expand Storefront and select Cart. Find the row with the rehearsal customer's email and the $167 total. Open that row.
- Under Product Items, check the first line:
SIGN-WELCOME-01, The Okafors, 30-cm, quantity 1, amount $45. In its uploaded files section, select Open okafor-crest.svg. The artwork opens in another browser tab. - Return to the cart detail. Check the second line: Welcome Home Maya, 45-cm, quantity 2, amount $114. Select Open maya-flowers.svg under that line. Compare the design itself, not just the filename.
- Return to Studio and compare Subtotal $159, Shipping $8 and Total $167 with the customer's cart. If you change a quantity on the customer site, let the cart finish updating, then refresh Studio before using the figures for fulfilment.
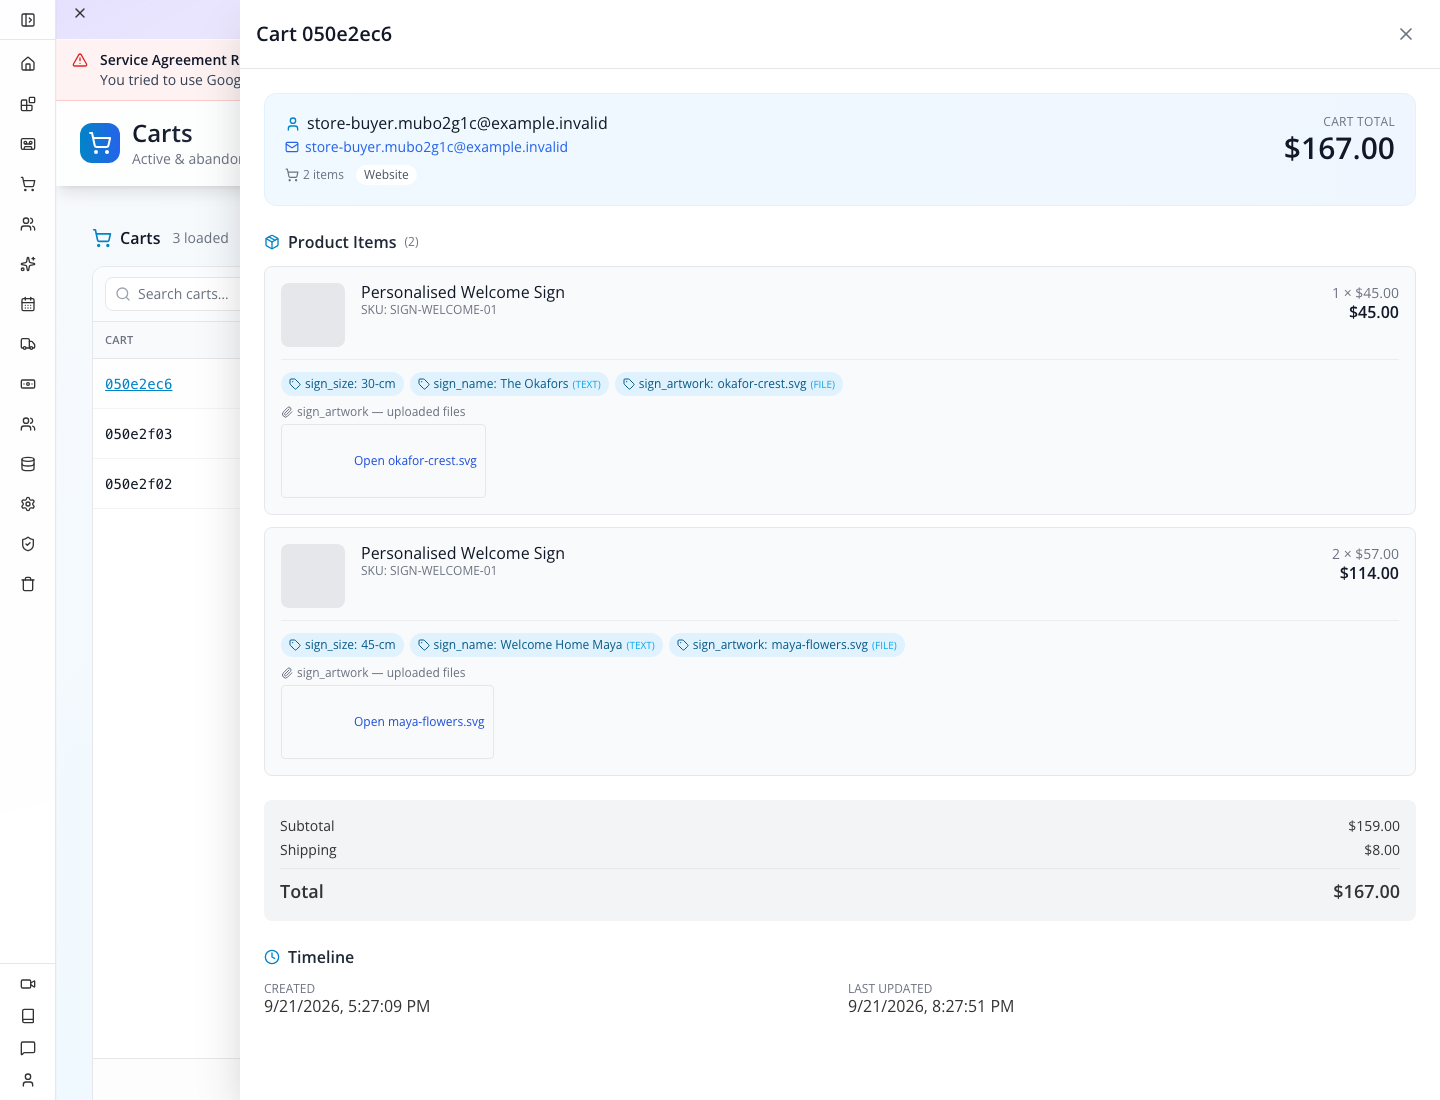
Watch out: a filename appearing in the customer cart does not prove the operator can retrieve the file. Open both attachments during your rehearsal. If Studio shows could not load artwork, use Retry. If the file tab displays NoSuchKey, report the affected cart and filename through Support; that is a storage-path failure, not a design approval. Keep the signed file URL out of support screenshots—it grants temporary access to private artwork.
Retrieve the artwork from the placed order
- In Studio Manager, open Storefront → Order, then Order Management. Find the order number from the customer confirmation. Select its order-number row to open the detail drawer.
- Select Items (2). Match The Okafors / 30-cm / quantity1 / $45 and Welcome Home Maya / 45-cm / quantity2 / $114 before downloading anything.
- On the first line, select Open okafor-crest.svg. Inspect the opened design: it reads The Okafors. Return to the order and select Open maya-flowers.svg on the second line; that design reads Welcome Home Maya. Keep each file associated with its own name, size and quantity during production.
- Select Payments. Check Gross collected, Uncollected balance and the payment records before releasing production. The earlier screenshot below labels these amounts Paid and Balance. Our local order RPSDCGHC4 explicitly shows Paid$0, Balance$167, Unpaid. It proves the order retains artwork after checkout clears the selected server cart; it does not prove a paid sale.
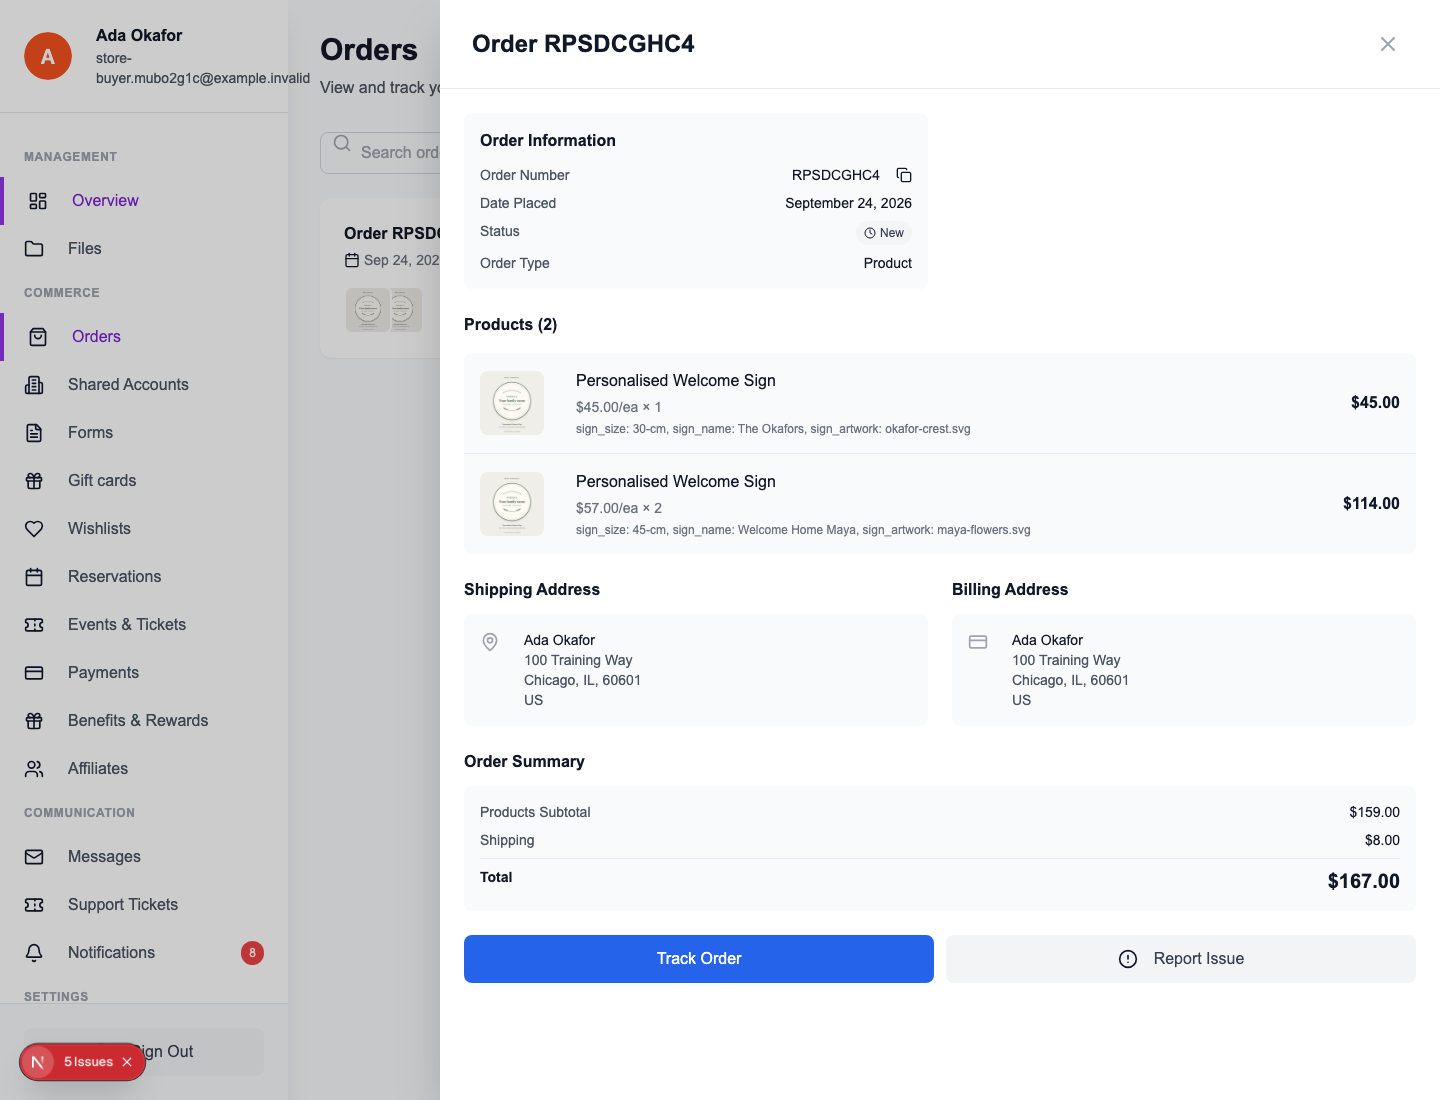
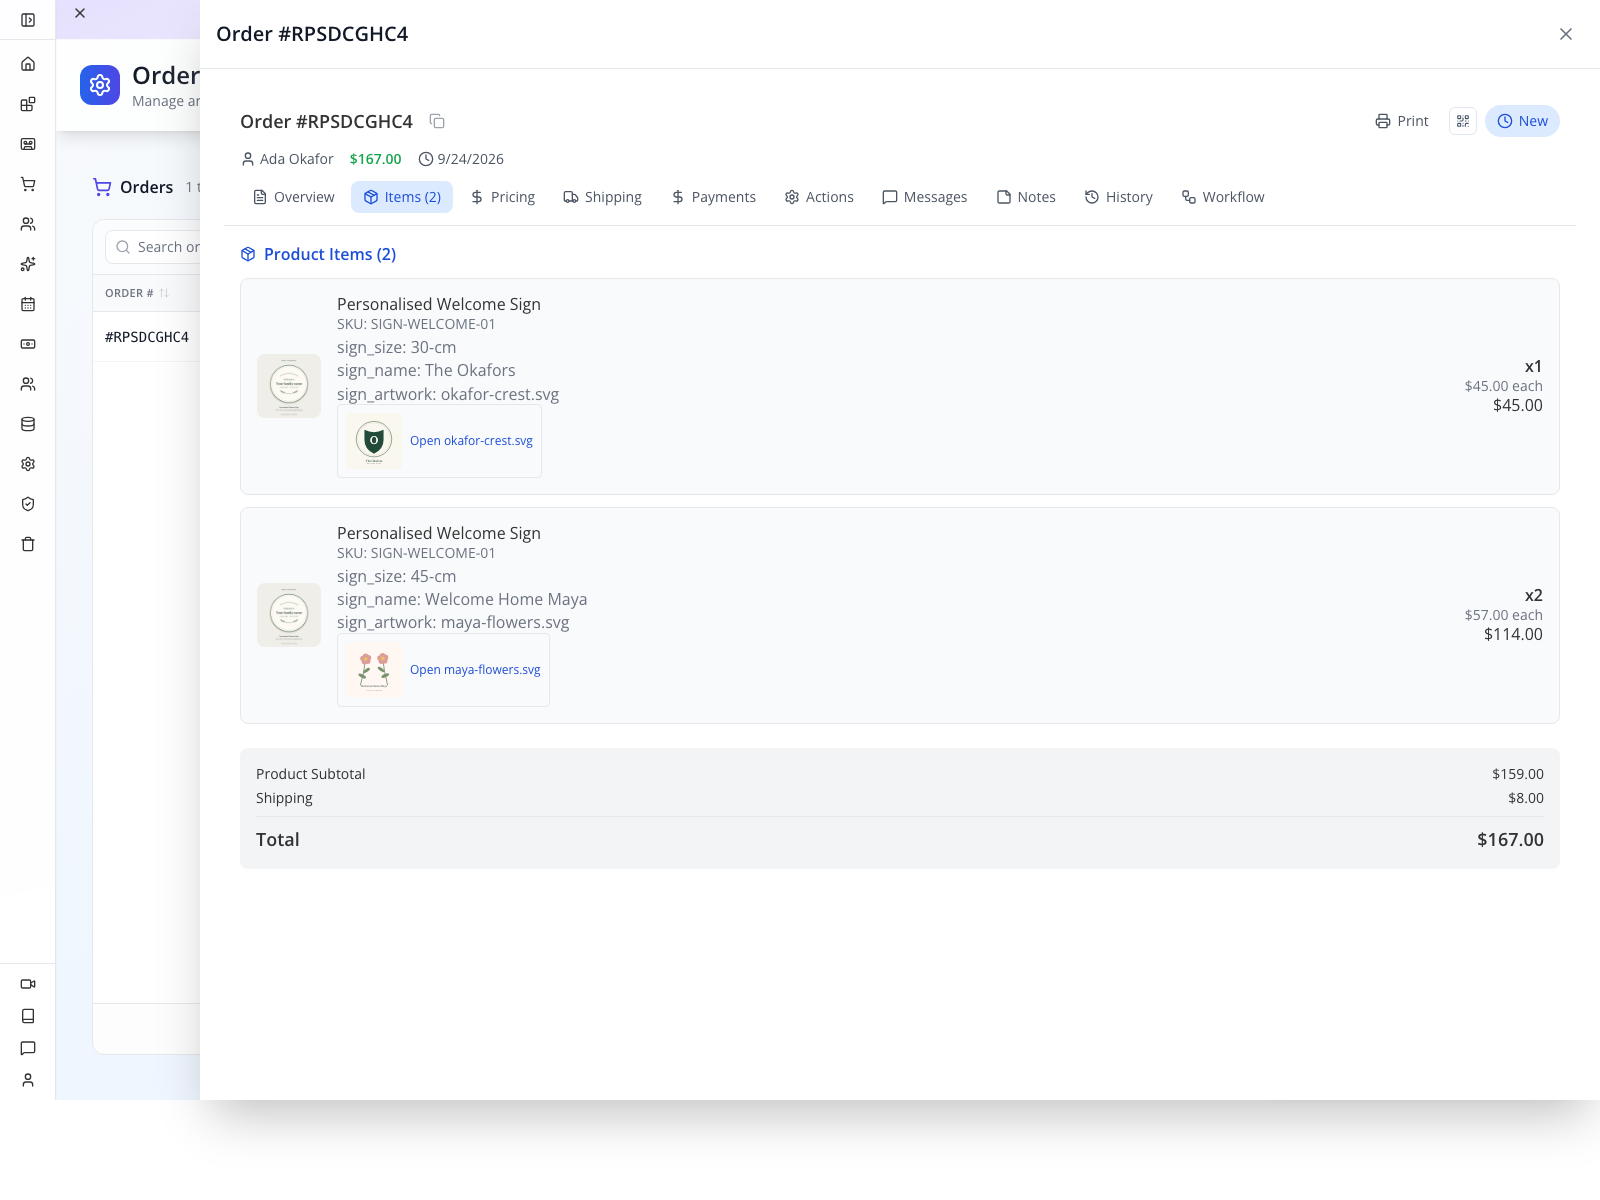
Original artwork rehearsal: RPSDCGHC4 was created once through the real customer-authenticated checkout API without a payment gateway or reference. Its customer/operator screens and both actual files were checked. The separate fresh sandbox order AZ1QTIMKN subsequently passed the ordinary online payment screen. Do not create fake payment references, mark an unpaid order paid, or use the customer's active cart as the permanent order archive.
Match the paid order to its provider payment
For your paid sandbox order, open Storefront → Order, select its order, then Payments. Check four things together:
- Order total, Gross collected and Uncollected balance: at payment, AZ1QTIMKN had $53, $53 and $0 respectively. The earlier capture labels the latter two Paid and Balance; the current screen also separates refunded and net-retained amounts.
- The number of payment rows: this run has one paid row, not two charges.
- Gateway and Reference: the row says Stripe and carries the same payment-intent reference returned by the provider.
- The provider's test result: the corresponding intent is
succeeded, for 5,300 USD minor units, withlivemode: false.
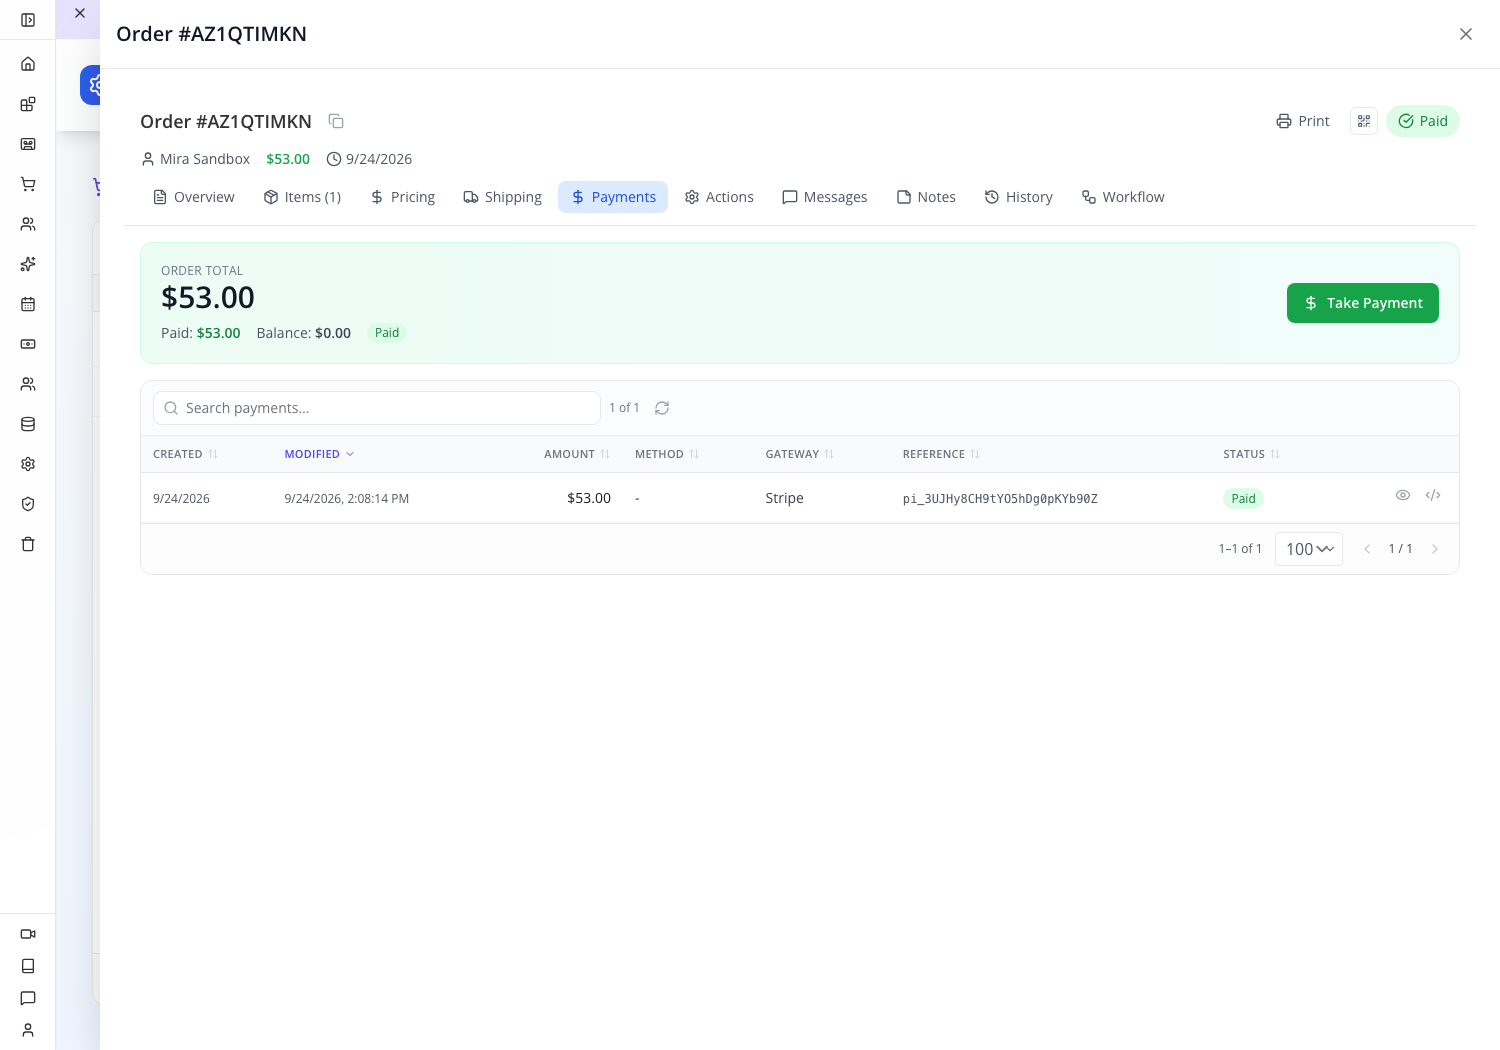
Do not select Take Payment again merely because the button remains available on a fully paid order. Inspect the saved payment first. Matching these records establishes this sandbox payment; it does not establish shipment or refund.
Record a shipment you arranged outside Appmint
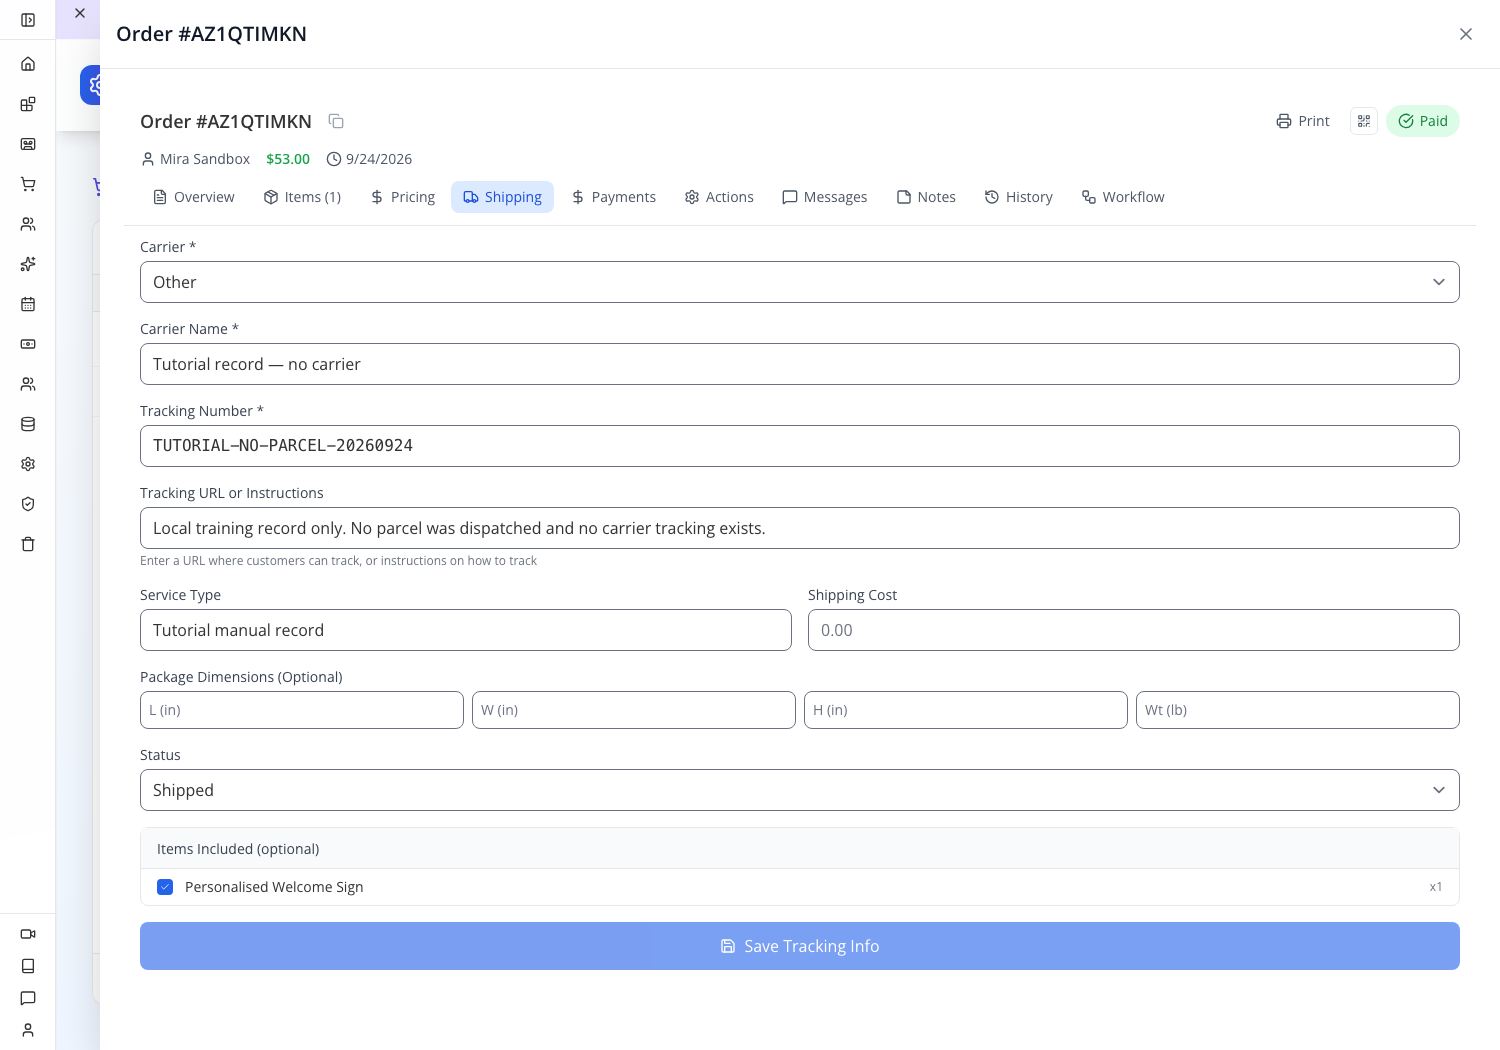
Use manual tracking when the carrier arrangements already exist and you need to record them against the right order. It does not purchase a shipping label. The screenshots below use an explicitly fictional tracking entry on the sandbox order; no parcel was dispatched.
- Open the paid order's Shipping tab and select Add Manual Tracking. Check Items Included so the entry belongs to the intended product and quantity.
- Choose the actual Carrier. Selecting Other reveals Carrier Name. Enter the shipment's Tracking Number and Tracking URL or Instructions. For the local exercise the labels explicitly say Tutorial record — no carrier and TUTORIAL-NO-PARCEL-20260924; use real carrier details only for a real shipment.
- Fill Service Type and Shipping Cost from the shipment you arranged. Optional package dimensions are L (in), W (in), H (in) and Wt (lb). These are shipment details, separate from the flat delivery amount charged at checkout.
- Set Status to the actual shipment stage. The training record used Shipped with a note that no parcel was dispatched. Verify the selected item, then select Save Tracking Info once.
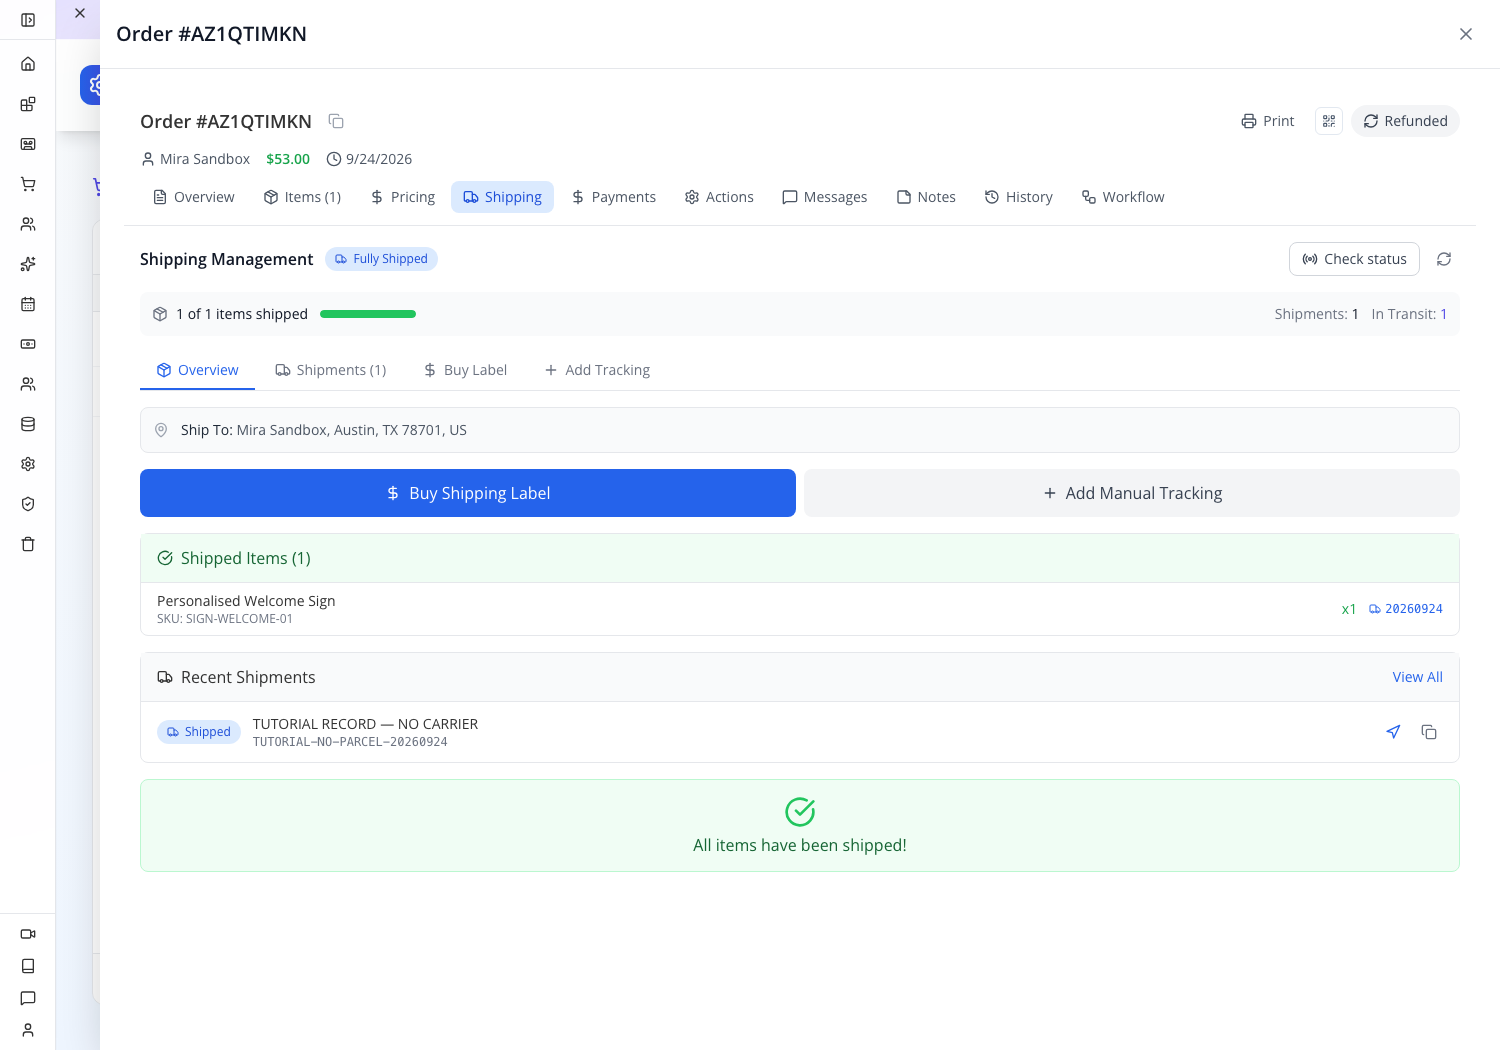
- Read the saved shipment and item counts, then reopen the order. In the corrected local readback, this one-sign order has one manual shipment, a fully shipped status and no pending item quantity. That records the operator's entry; obtain delivery evidence from your carrier before telling a real customer the parcel arrived.
Refund the payment and reconcile the result
The order refund is the money operation. The return record below tracks the item and inspection. Use the order that actually received the payment—here AZ1QTIMKN, not the earlier unpaid artwork exercise.
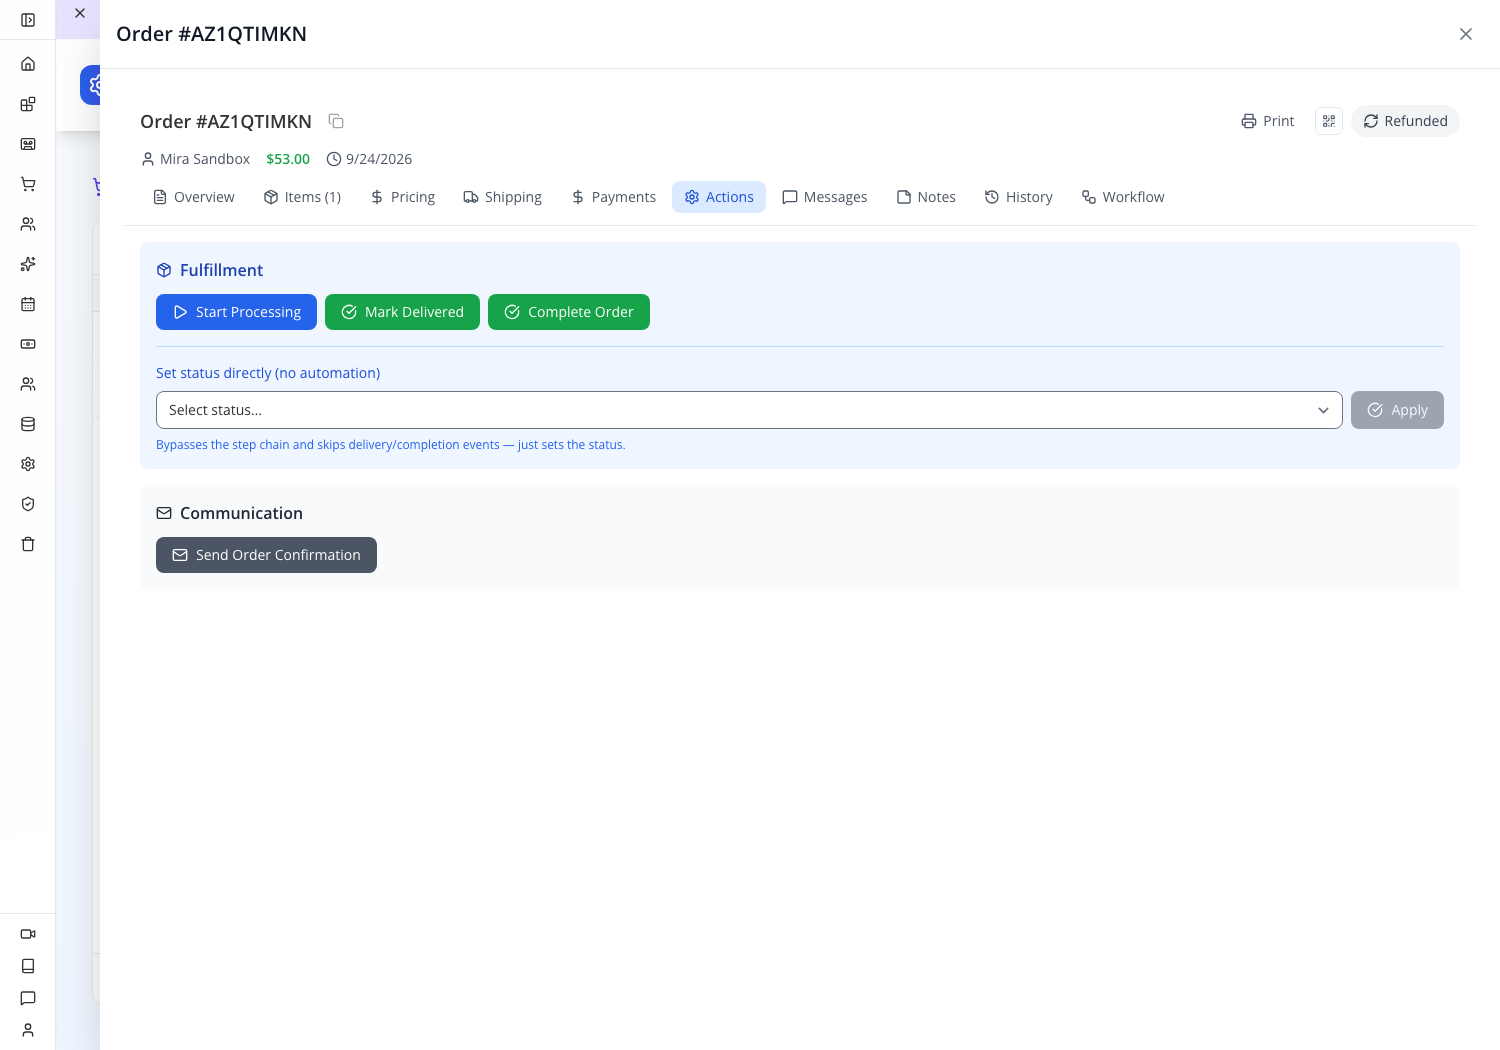
- Open the order's Actions tab and scroll to Refund. Enter the approved refund in Amount (max $53.00) and explain it in Reason; the maximum reflects this order’s refundable amount. This sandbox rehearsal refunded the complete 53, covering the $45 sign and $8 delivery amount, with an explicit test-payment reason. Choose your actual refund amount from the agreed resolution.
- Select Process Refund once. Wait for the result, then reopen the order. This run changed the header to Refunded and saved one refund-history entry for $53. If the response is interrupted, inspect the existing refund history and provider result before submitting anything again.
- Match the saved refund reference with the provider's record. The actual Stripe sandbox refund was
succeededfor 5,300 USD minor units, against the same payment intent as the original $53 payment; the charge reportedrefunded: trueandlivemode: false.
- Open Payments and compare the summary: Gross collected $53.00, Uncollected balance $0.00, Refunded $53.00, Net retained $0.00, Refunded. The balance is zero because the original amount was collected; the refund does not create another bill for the customer.
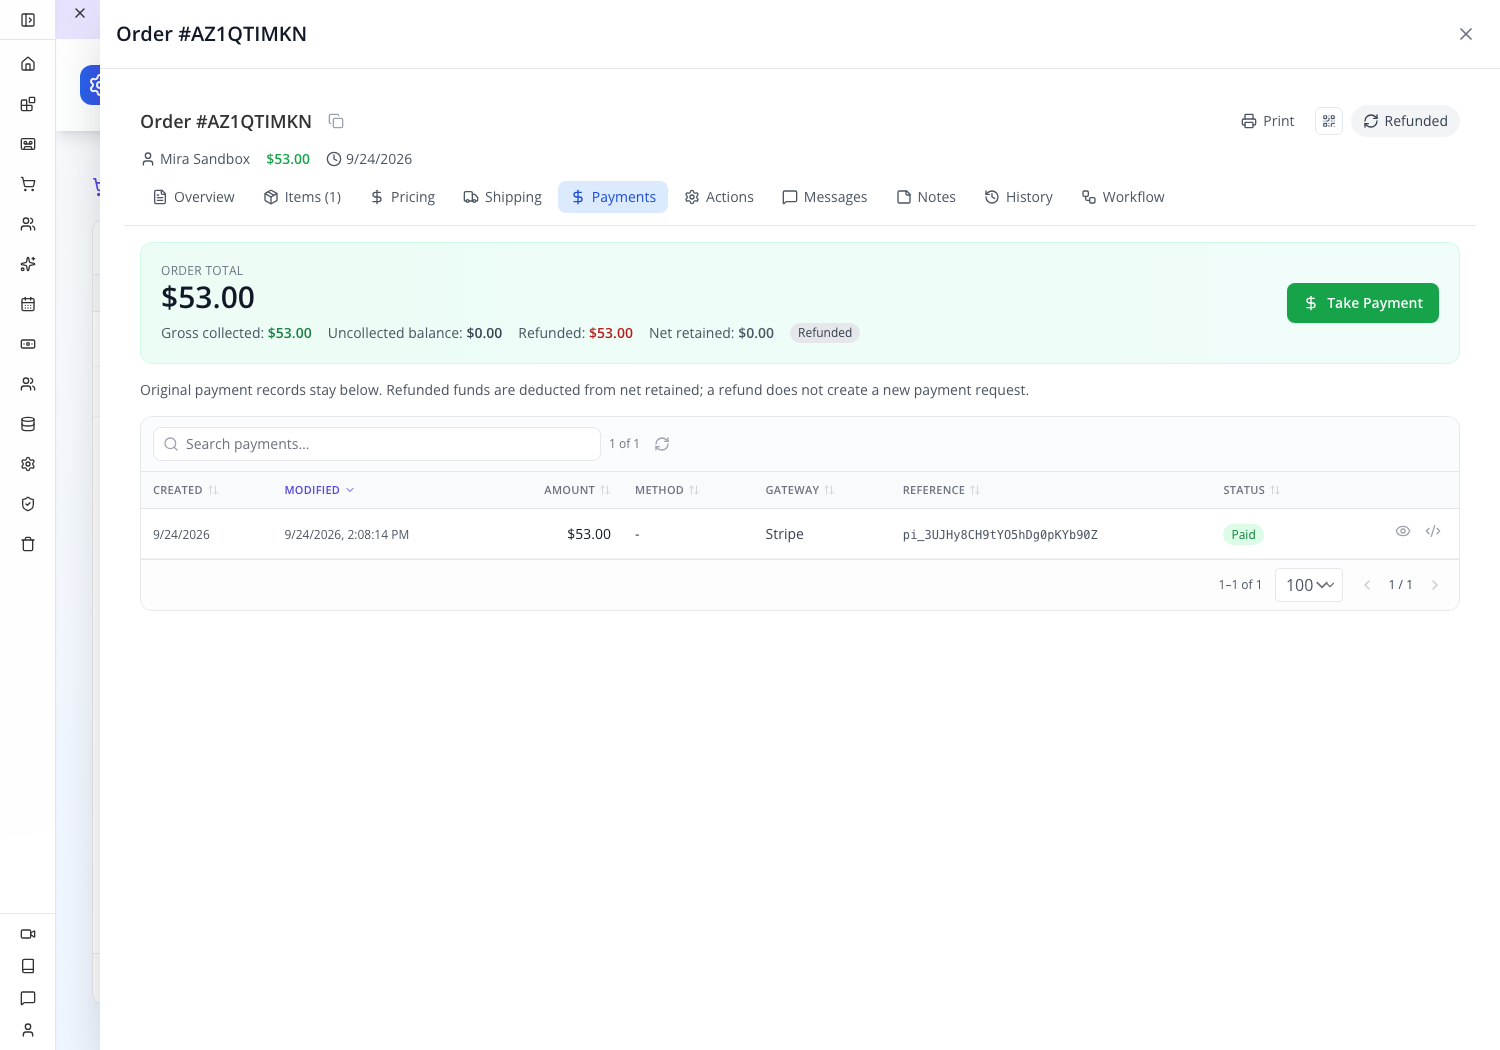
The original paid transaction remains part of the order's history. Read collected, refunded and remaining amounts together rather than expecting that original transaction to disappear. A refund request accepted by a provider is not automatically its final outcome; check the provider status before confirming the result to the customer.
Separate gallery, artwork and design proof
| Item | Purpose |
|---|---|
| Product gallery image | Shows everyone what is for sale |
| Customer-uploaded artwork | Supplies the particular design for one line |
| Design proof | Shows a composition or placement to check before production |
Design Preview in the product editor supports a base image and zones tied to an artwork attribute. Treat this as an additional setup exercise: test alignment, a differently proportioned image, the rendered proof and operator retrieval. Uploading any SVG does not automatically mean an approved print proof exists.
Reconcile a damaged return without losing the money trail
Use Storefront → Return for the goods coming back and the order’s actual refund controls for the money. The reviewed return lifecycle is requested → approved → shipped → received → completed, with rejection and inspection branches. Follow the current state rather than skipping directly to a completion label.
When returned items reach Received, inspect each personalised line independently:
- Open Storefront → Return → Returns. Find the RMA number, open its three-dot Actions menu, and select Start Inspection.
- Read the line number, name, SKU, returned quantity and price. The same SKU can appear more than once because the designs differ.
- Choose Accept or Reject for every line. Accept means that line is accepted for this return; it is not a declaration that the goods are fit to sell again. Record the inspection explanation in Notes.
- Select Inspect. The return advances to Inspecting. Confirm the saved decisions and accepted value before completing any refund.
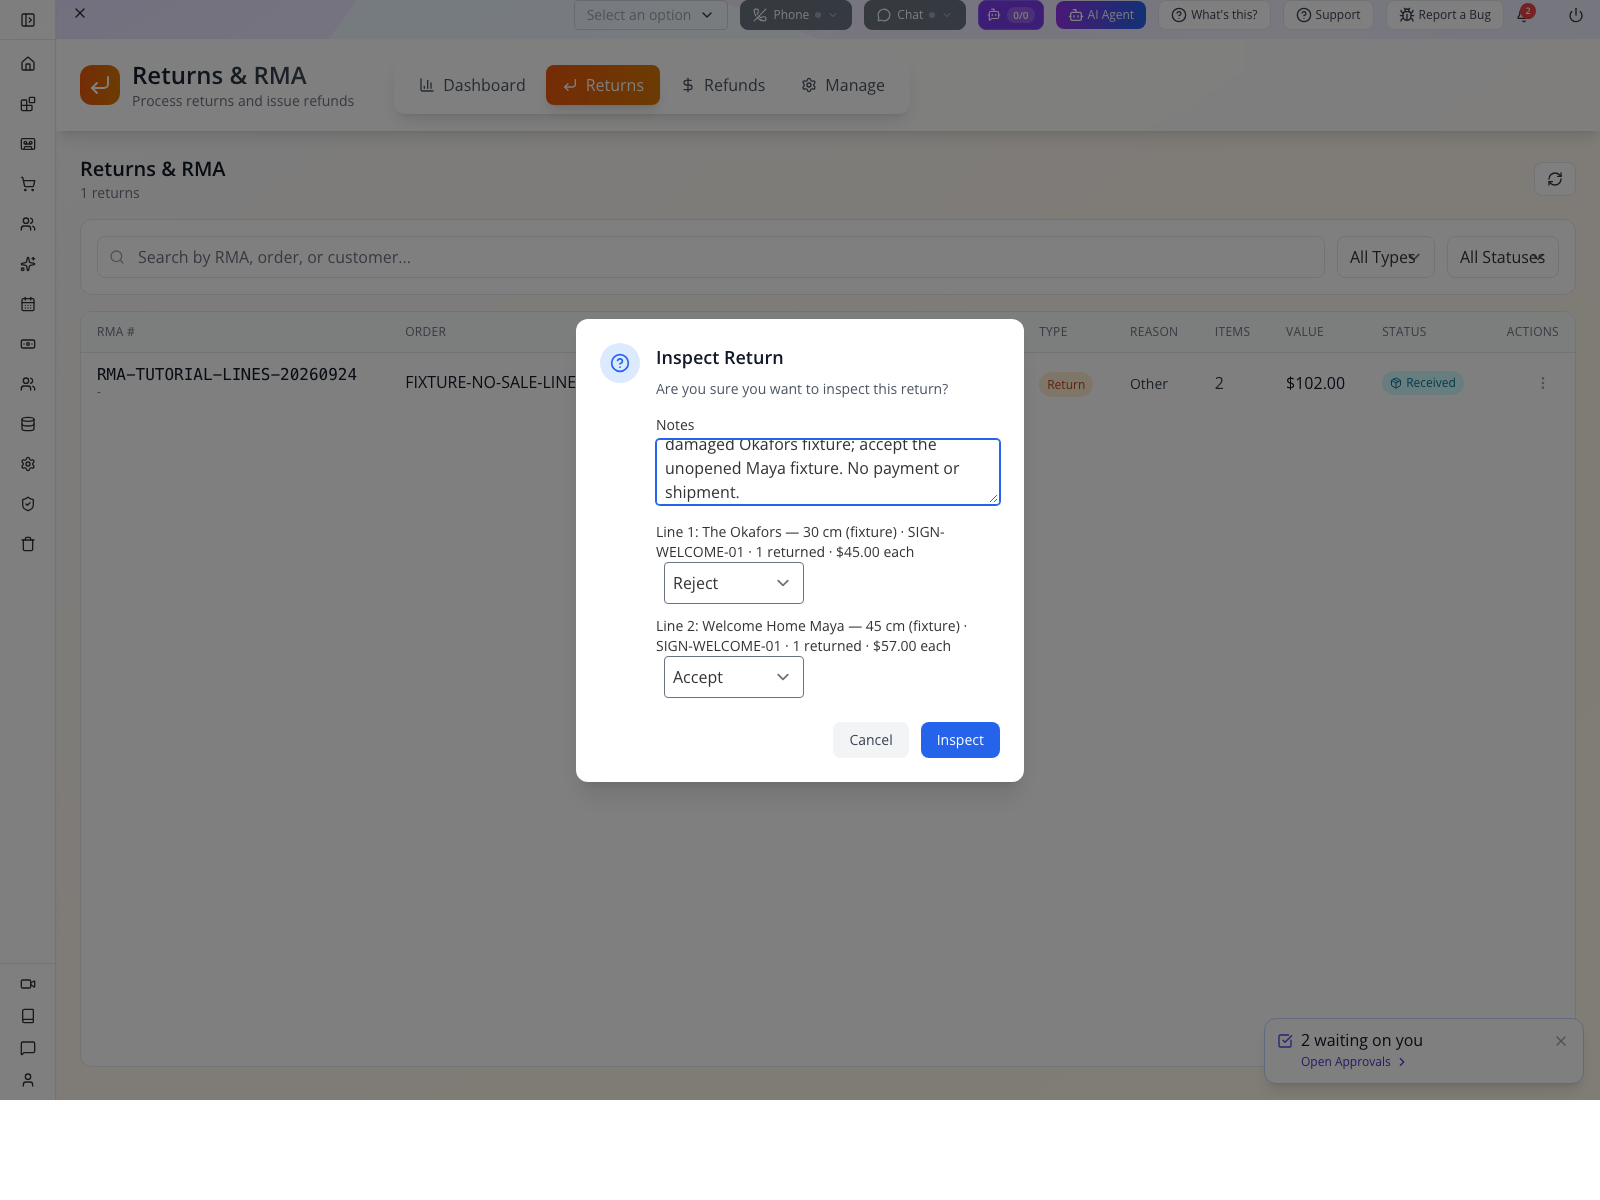
What this rehearsal proves: rejecting the$45 Okafors line and accepting one$57 Maya item saved separate decisions and a$57 accepted value. The screenshot is an isolated received-return fixture, not a shipped or paid customer order. The accepted-value list was checked at$57. The same synthetic fixture was then completed with a deliberate zero refund and no payment reference; its saved timeline says no money moved. For a real return, choose the amount from the actual approved resolution—zero is not a workaround for an unpaid provider refund. The real unpaid order RPSDCGHC4 remains unchanged.
A returned 45 cm sign in this example has a $57 merchandise price before allocated discounts and tax, not the $45 base price. Determine the refund from the original paid order and your return policy; do not blindly refund $45 or the whole two-sign order.
The Complete return action does not itself call an external payment gateway or restock goods. An external refund reference is a recorded reference, not provider verification. Cash refunds must match the saved POS refund records. Store credit and Gift card are different: those options can add real stored value to a gift card. Choose the method deliberately; do not use them as a harmless placeholder while waiting for a provider refund. A personalised sign may not be resaleable; inspect it before recording a separate stock-return decision.
Connect the paid order’s return to its existing refund
The paid sandbox order now has a real application return request, RMA-QXR1Q7WMPZ, created through the customer's API and completed in Studio. It is a fictional goods-handling exercise: no parcel was returned. The $53 provider refund had already succeeded before recording this RMA, so completing it must not send another refund.
Create the request through the supported API. No customer return-request form was available in the reviewed storefront. A developer can submit POST /storefront/returns/request using the signed-in customer's bearer, their organisation's orgid header and JSON content type. Use the customer's own order number and ordered line values. For the one-sign training order, the request shape was:
{
  "orderNumber": "<your paid training order number>",
  "reason": "Local training return for the already refunded sandbox order; no physical goods are being returned.",
  "reasonCategory": "other",
  "type": "return",
  "items": [{
    "sku": "SIGN-WELCOME-01",
    "name": "Personalised Welcome Sign",
    "quantity": 1,
    "returnQuantity": 1,
    "price": 45,
    "reason": "Fictional inspection exercise",
    "condition": "opened"
  }],
  "refundMethod": "original_payment"
}
Retain the returned RMA number. Check for an existing request before repeating a submission; the completed review record should be reopened, not recreated.
In Studio, open Storefront → Return → Returns. Find the RMA and use its row's three-dot menu to select Approve.
Fill Return name, Street, City, State, Postal code, Country and Approval notes, then select Approve. These fields describe where a real return should go. Our notes explicitly identify a fictional local return and the already-refunded test payment.
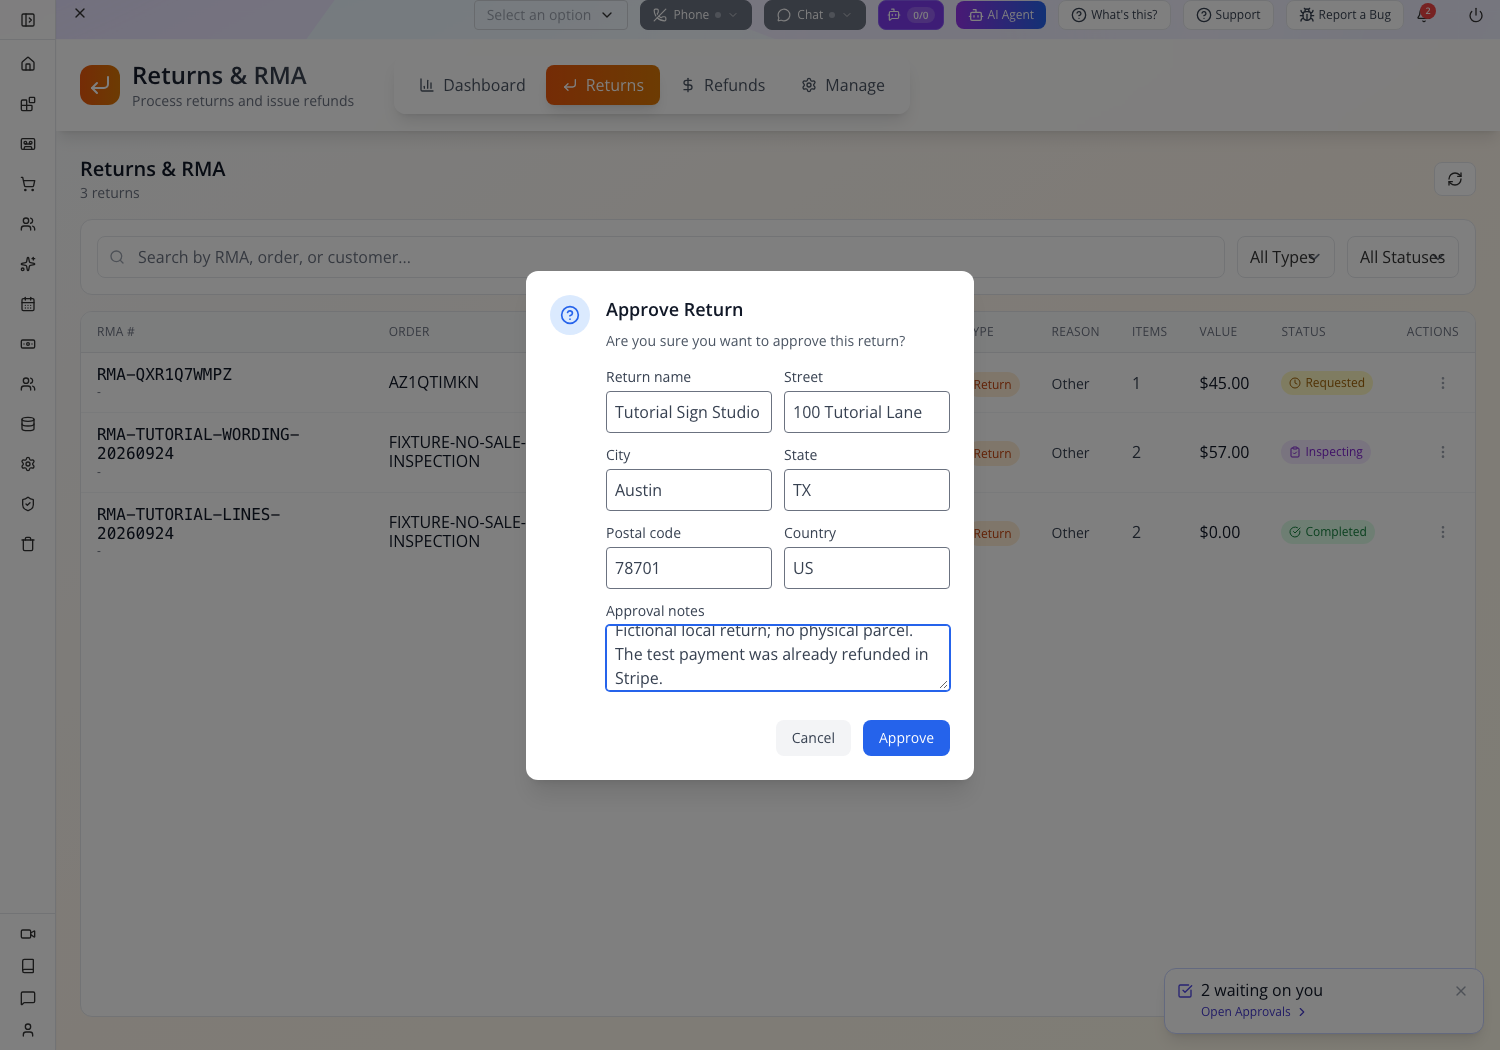
Use the same row menu and select Receive in store, add the receipt notes, then select Receive. For a real return, do this only when the goods arrive. The training record describes no physical receipt.
Select Start Inspection, inspect the single sign line and choose Accept, record the explanation, then select Inspect. Confirm the return value is $45, the merchandise portion.
Select Complete return. Enter Refund amount 45, choose Original payment, and paste the already succeeded provider refund reference into Refund record IDs or external reference (required above zero). In Notes, explain that this $45 is part of the earlier $53 refund; the other $8 was order shipping. Select Complete once.
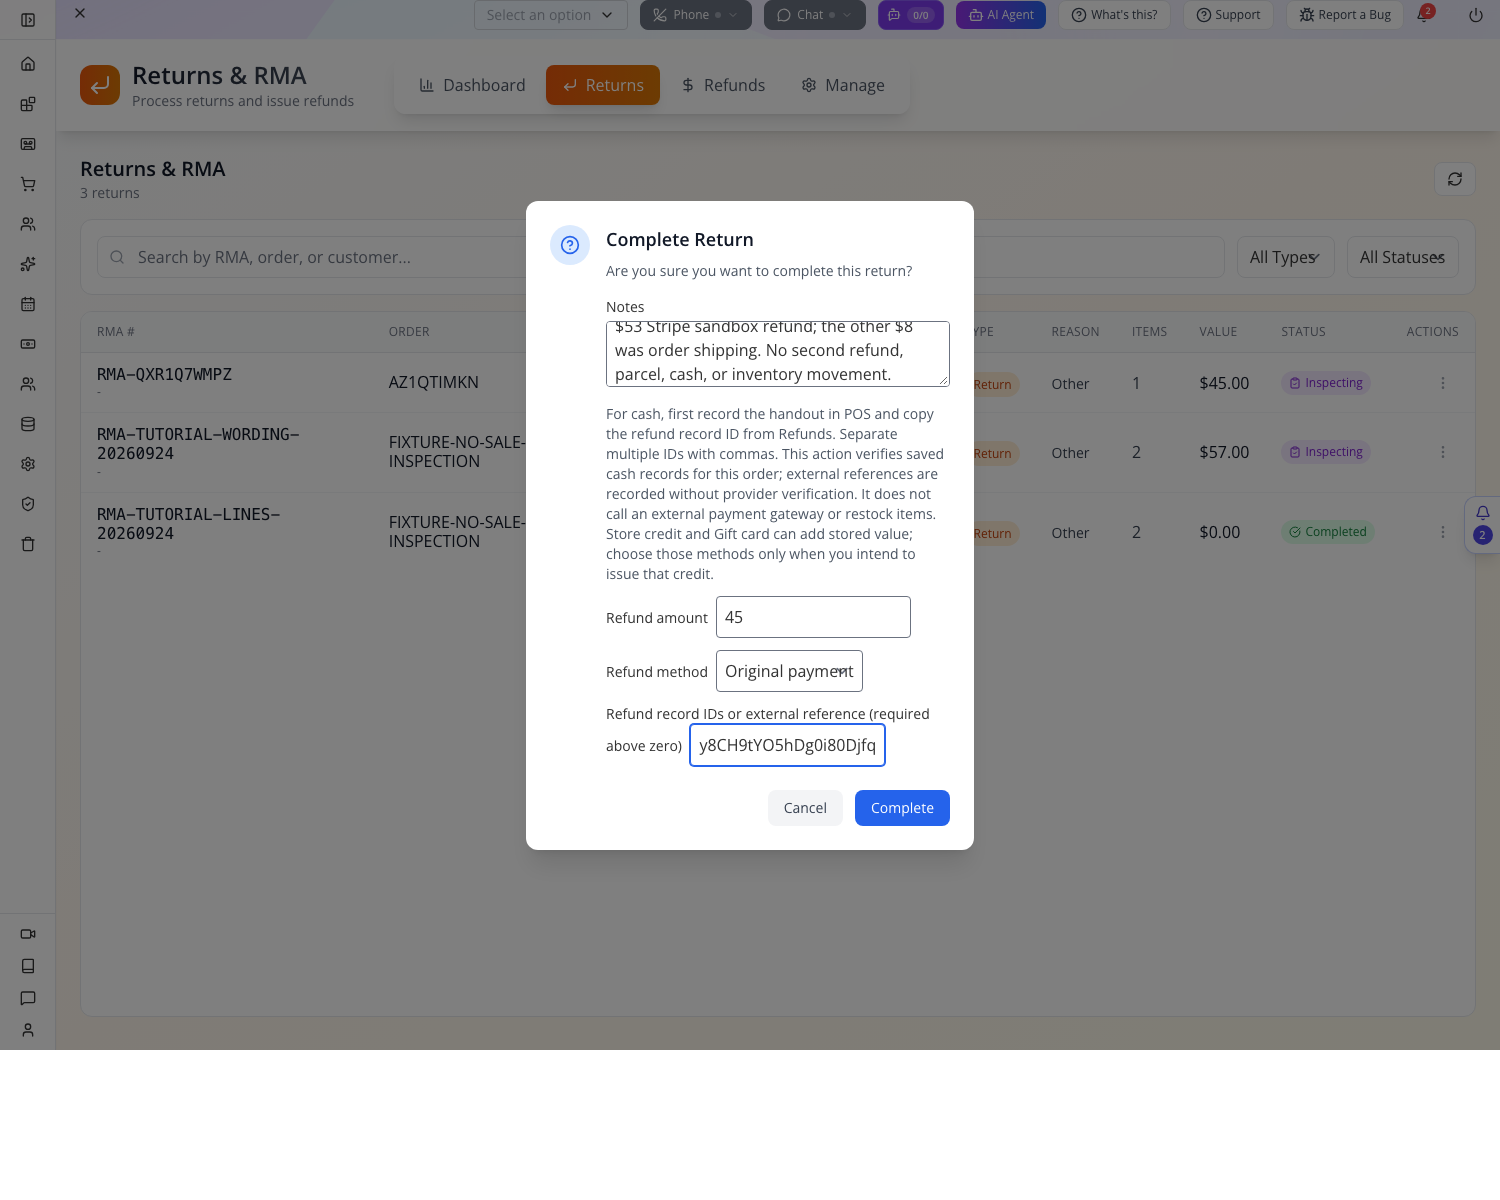
Confirm the row shows Completed, the correct order number, one item and $45.00. A fresh read of
GET /storefront/returns/rma/<your RMA number>returnedstatus: completed,refundAmount: 45,refundStatus: recordedand the same external refund reference. Rechecking Stripe still showed the original single $53 succeeded refund.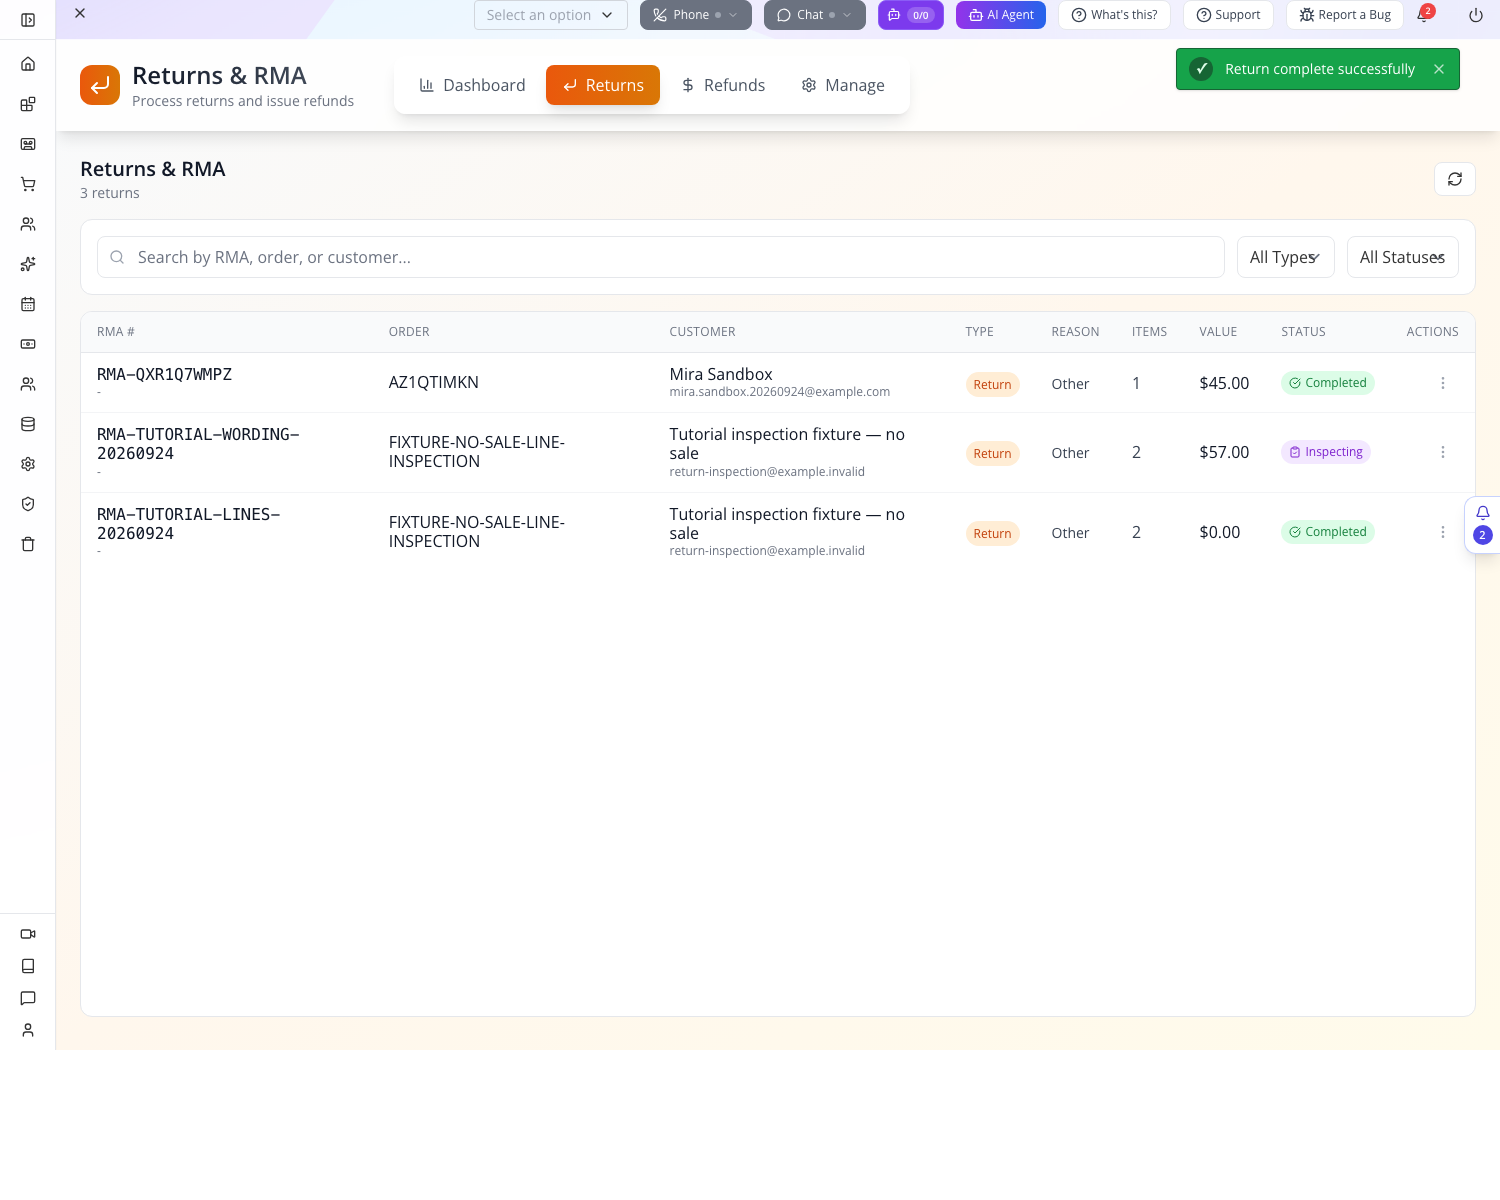
Recorded describes the RMA’s external-reference bookkeeping. Use the independently checked provider record to establish the money outcome. This exercise neither restocked the sign nor added store credit or a gift card.
Try it. Explain which record answers each question: “What did Maya order?”, “Where is her artwork?”, “Has the payment been refunded?” and “Can we sell the returned sign again?”
Check yourself. A return says completed but there is no provider refund. Has the customer received their money? The return status alone cannot establish that. Trace the refund separately.
If something goes wrong
| Symptom | First check | Next action |
|---|---|---|
| New Product opens a list | You are still on Product Center navigation | Use Add Product on Products |
| Slug is blank after save | Reopen URL Slug, despite its auto-generation hint | Enter it, wait for save success, reopen and use the actual website product link |
| Description or another field reverts | An editor/upload may still be updating | Save a small change, wait for success and verify it after reopening |
| Gallery upload has no usable thumbnail | Upload completion and saved gallery entry | Reopen and verify the image; do not use a broken gallery as launch-ready media |
| Stock differs between screens | Confirm the same product and whether the screen shows catalogue or location stock | Refresh; investigate an unexplained difference before promising stock |
| No 24-character setting on the name attribute | Text type has no extra settings on this build | Explain a real production limit in copy; do not describe a nonexistent control |
| Large sign has the wrong price | Base price versus additional choice price | Set 45 on the product and 12 as the 45 cm addition |
| Product page shows Application error | The link reached from the correct catalogue | Record the path and exception for support; do not treat the shop as ready for checkout |
| Storefront is enabled but /store says page not found | The page record in the active site | Create and save the store page, then retry |
| Public store shows unrelated products | Site/domain and environment routing | Verify the intended company/site before sharing the link or ordering |
| Artwork requests sign-in | Customer upload authentication | Use the normal customer sign-in and retry with a controlled account |
| Two personalisations lose their distinction | Cart-line names, sizes and filenames | Preserve the failing example and resolve it before taking orders |
| Shipping is $16 for two signs | Charge per item | Turn it off for a single $8 order-level offer and check checkout again |
| Order exists but is unpaid | Gateway and actual payment transaction | Complete a properly configured test payment; do not merely edit a status label |
| Artwork is absent from order detail | Operator retrieval path for the placed order | Verify the stored attachment and supported retrieval route; do not assume the cleared cart is an archive |
| Return is completed but no money moved | Actual provider refund | Reconcile the refund and reference separately from the return record |
What happened behind the scenes
Implementation notes for developers and course maintainers
The product and attributes are separate records (sf_product, sf_attribute). The UI saves the product’s data and post fields through the repository; AttributeEditor supplies product-specific required flags and option prices.
Relevant source files under /Users/imzee/projects:
websitemint/packages/ui/src/components/storefront/product/product-form.tsx: creation, description, slug, gallery/default image and product sections.websitemint/packages/ui/src/components/storefront/attribute/attribute-form.tsx: actual text, file and selection settings.websitemint/packages/ui/src/components/storefront/shipping/shipping-config-form.tsxandshipping-options-editor.tsx: configuration versus individual shipping offer, conditions and fees.websitemint/packages/ui/src/components/welcome-screens/buttons/site-features-section.tsx: current feature row and page selection.base-app/src/lib/site-feature-pages.tsandcomponents/storefront/StorefrontRoute.tsx: selected store route and child product route.base-app/src/components/storefront/utils/custom-attributes.ts: text/file definitions, required checks andoptions[]with file information.base-app/src/lib/storefront-upload.ts: authenticatedclient-data/files/upload; multipart transfer and the sign-in-required result.appengine/src/storefront/storefront.order.service.ts: server cart calculation, copied options/design, cart clearing and order-confirmation notification.appengine/src/storefront/services/returns.service.ts: return transitions and completion record. Do not infer a gateway refund from its completion note.
Current source checks do not replace payment-provider or customer-account acceptance tests. Earlier specifications described paid orders, an assumed /product/… path, an unavailable text maximum length and a $45 refund for the larger sign. This manuscript replaces those assumptions with the observed setup and explicit completion checks.
Where next
- Prepare the catalogue for other sales channels.
- Follow payments and payouts.
- Manage local deliveries.
- BusinessMade stock, sales and returns for the separate BusinessMade operating workflow.
Evidence and companion-video handoff
**Practiced:**21 September2026 local recovery organization: product/gallery/attributes/shipping/site attachment saved and reloaded; working product page; customer registration, locally captured magic-link sign-in and return to product; two artwork uploads; distinct45/114 cart lines and159+8=167 server total; reload persistence; quantity change/repricing110→167 and close/reopen; Studio server-cart readback and opening both actual SVG attachments from their matching lines; restoring a saved cart after fresh sign-in; stable cart ID through repricing and reload; a fresh upload opened by the operator, followed by removal of its temporary test line. Screenshots above are actual local captures. Repair and evidence report.
Verified24 September: one customer-authenticated unpaid checkout; the selected server cart cleared; both artwork files opened from the placed order; customer and operator line/total readback; Payments shows Paid$0 and Balance$167.
Current acceptance: actual payment-screen checkout, matching Stripe sandbox payment and operator payment readback passed on AZ1QTIMKN. The manual training shipment, actual provider refund, corrected shipping/payment readbacks and customer-requested RMA through completion also pass. Physical carrier dispatch and bank settlement are not represented by these training records. A finished companion video has not been recorded. Earlier product-rendering failure is repaired locally and is retained in the repair report as history.
Producer: use the companion-video guide. It identifies existing screenshots, missing footage, scene purpose and the results required before filming an end-to-end sale.